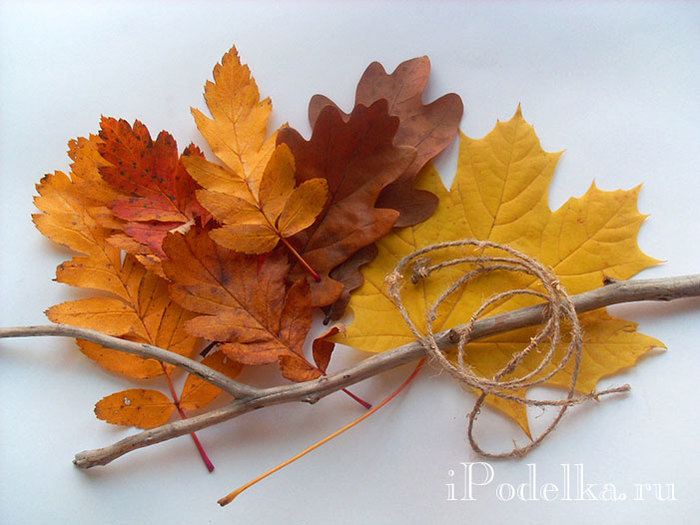
Behind the window has already come autumn and everyone around began to hide with beautiful multi-colored fallen leaves. And while the rain did not turn this beauty in the wet porridge - it's time to do creativity! Especially if your baby came from a garden or school with a task to make a cradle on the autumn theme.
Make autumn crafts with children from natural materials You can from anything - leaves, cones, acorns, chestnuts. It may be appliques or any interesting figures. Introducing unique step-by-step master classes - how to make autumn crafts with your own hands with a photo.
Autumn crafts do-it-yourself master classes
Autumn wreath from the acorn of the "respiration of autumn" with their own hands
Bright autumn colors fall into the soul for a long time. Create an autumn wreath from the acorns with your own hands to extend the autumn mood. Made on the basis of natural materials, it will look even more interesting.
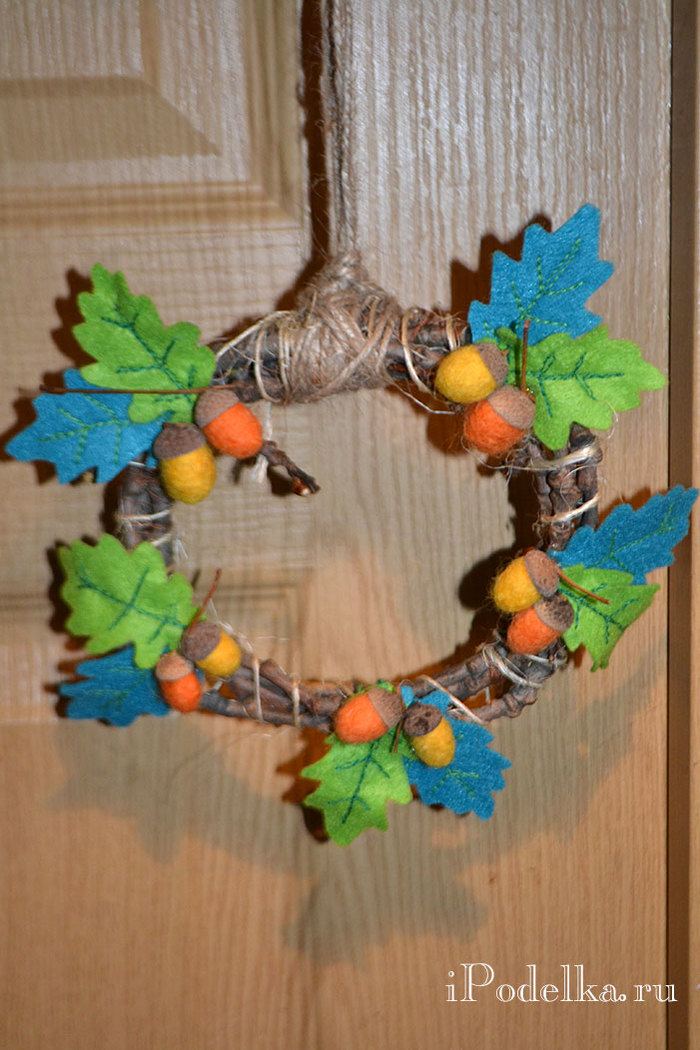
Autumn wreath from the acorns made by their own hands


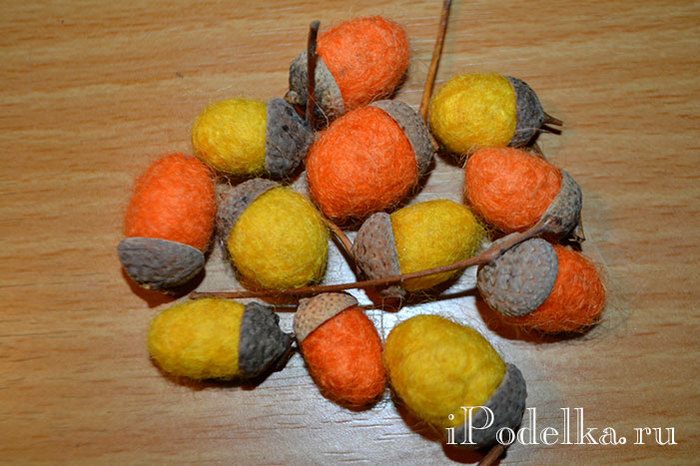
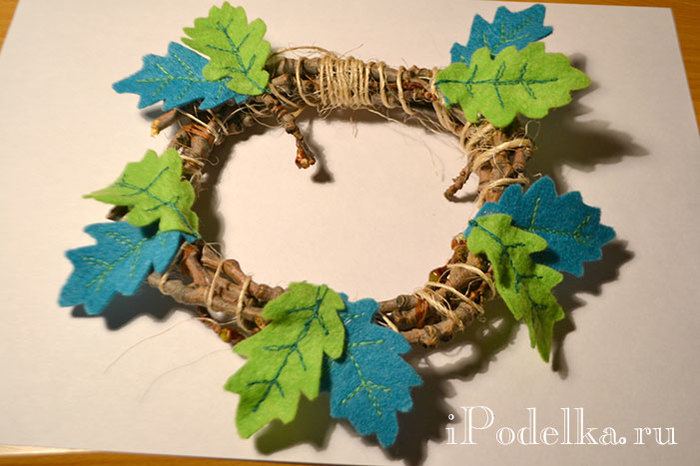
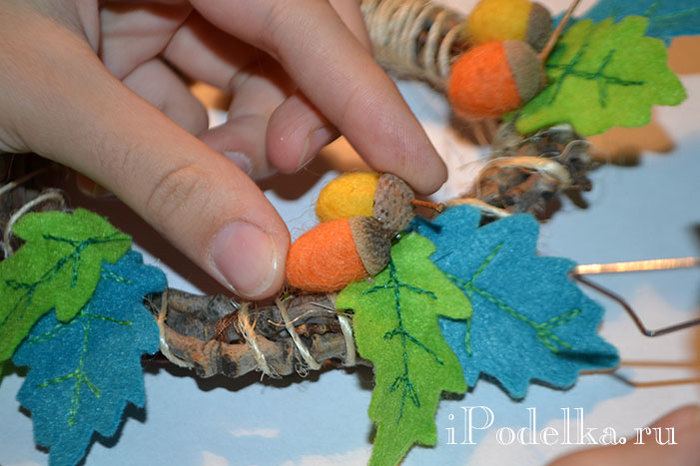

The autumn wreath of the acorns made by their own hands will become the original and stylish decoration of any interior.
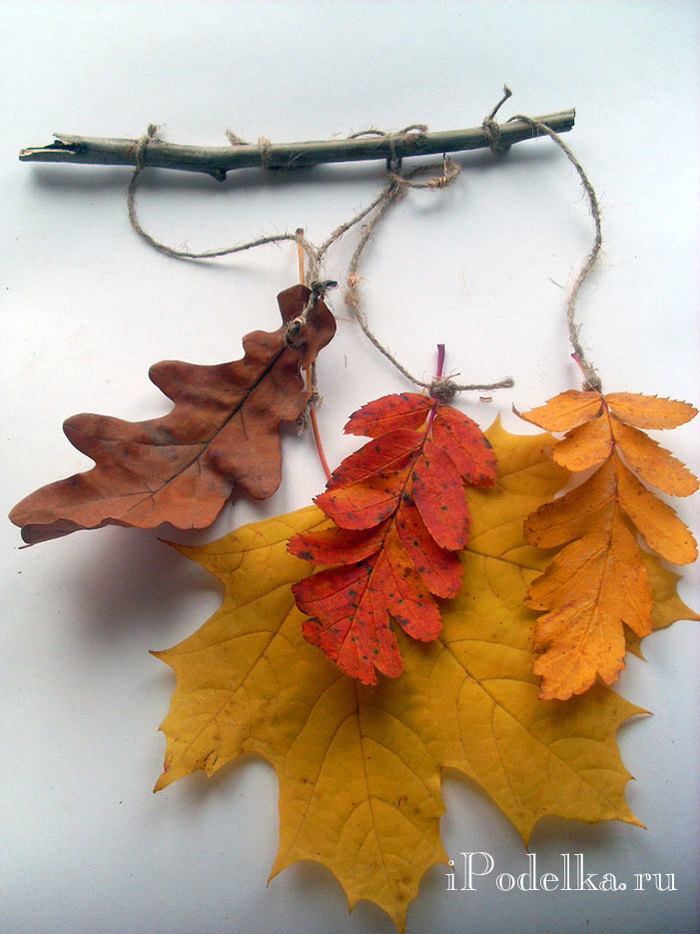
Autumnal handicraft with leaves "Pear on a plate"
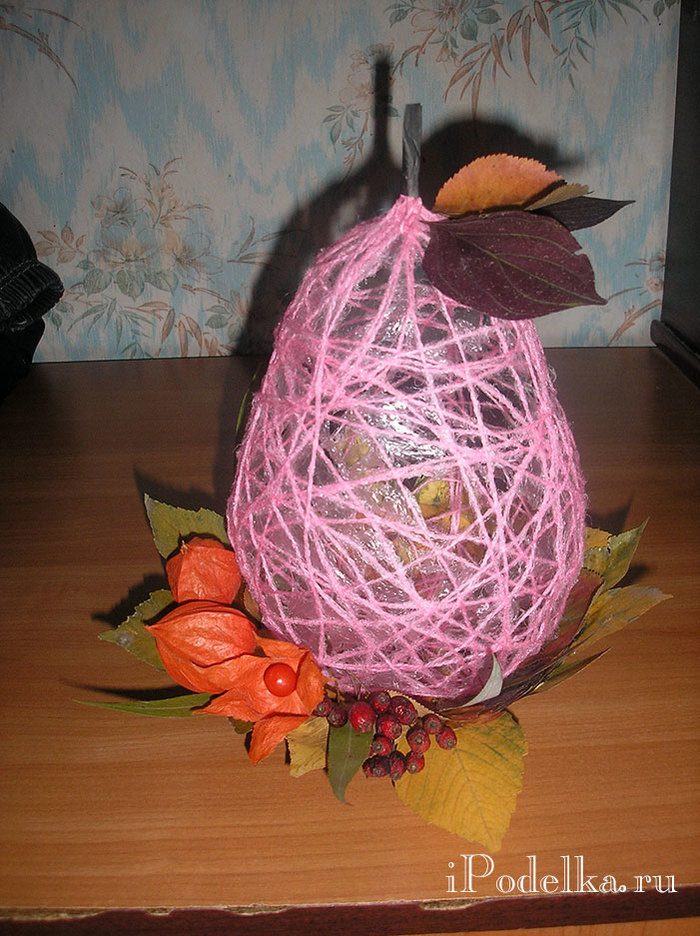


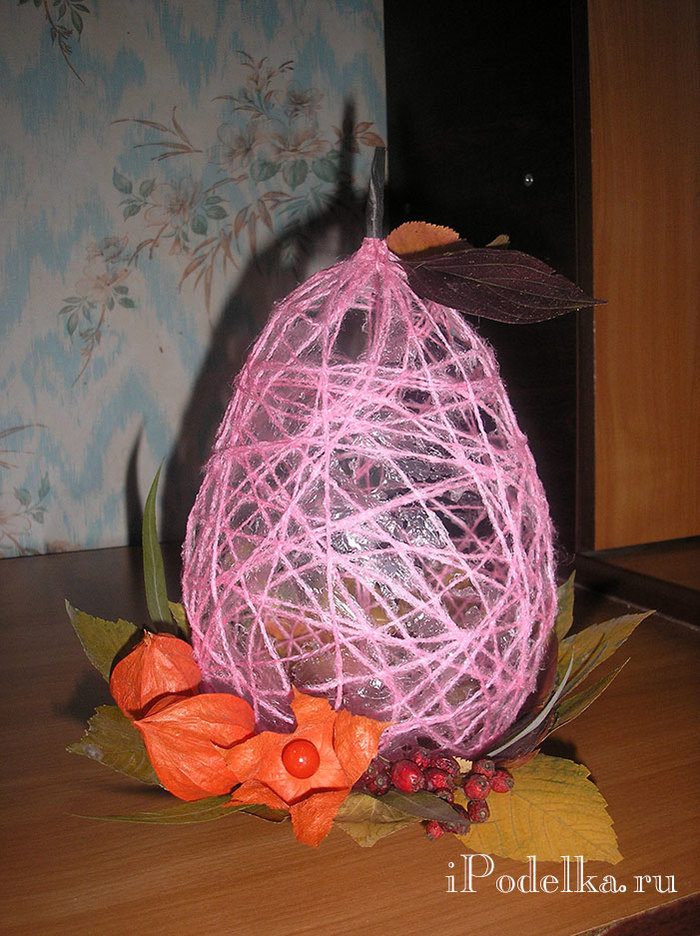


Herbarium from the leaves collected in the fall is a whole wealth and raw materials for children's crafts. Options for using it natural material You can come up with a lot. Since practicing creative classes To create unusual figures with children, you must necessarily, we offer you an interesting idea For creativity.
Only work with a dried and fragile material should be very careful.
Practicing similar classes, children over time will independently learn to creatively think and notice the amazing features of natural objects.
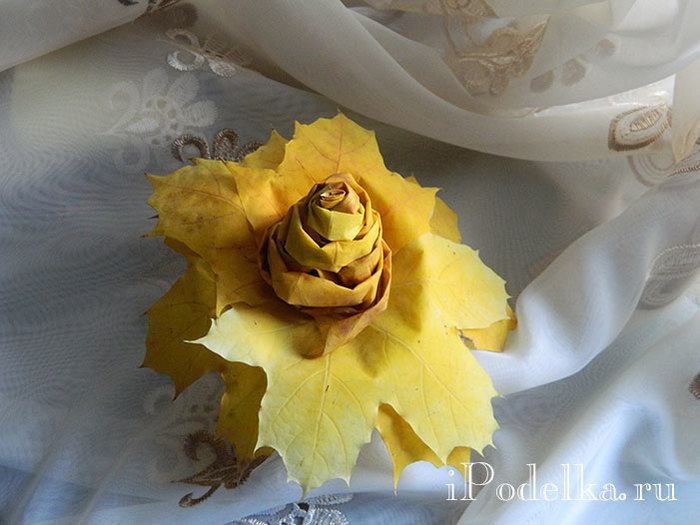
If the soul wants something original - we propose to create the autumn flower composition. Namely, a bouquet "Autumn mood."
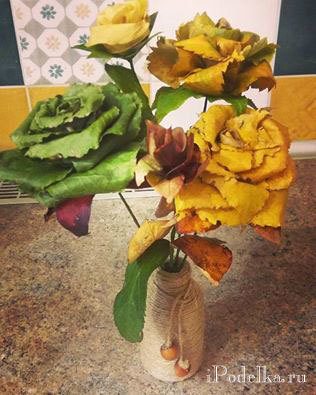
The product consists of two elements - vase and flowers.
For colors we need:
- leaves of different size and color;
- glue pistol;
- wire or thin twigs (for stem);
- scissors, pliers (for wire).
Be careful with the adhesive gun, if you perform crafts from leaves with a child. Better to trust the baby to select leaves, lay out in colors, cut them and serve you.
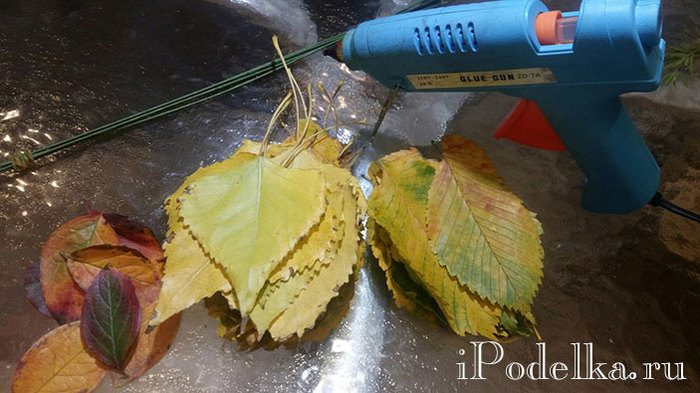
As it turned out, more realistic roses come out of the leaflets with a slightly curved edges ( green flower). Try to wrap the leaf edges to avoid sticking petals. Large leaves can be cut in half. For roses at 8-10 cm in diameter, it will take 15-20 fragments of a leaf size of 5-6 cm.
Progress:
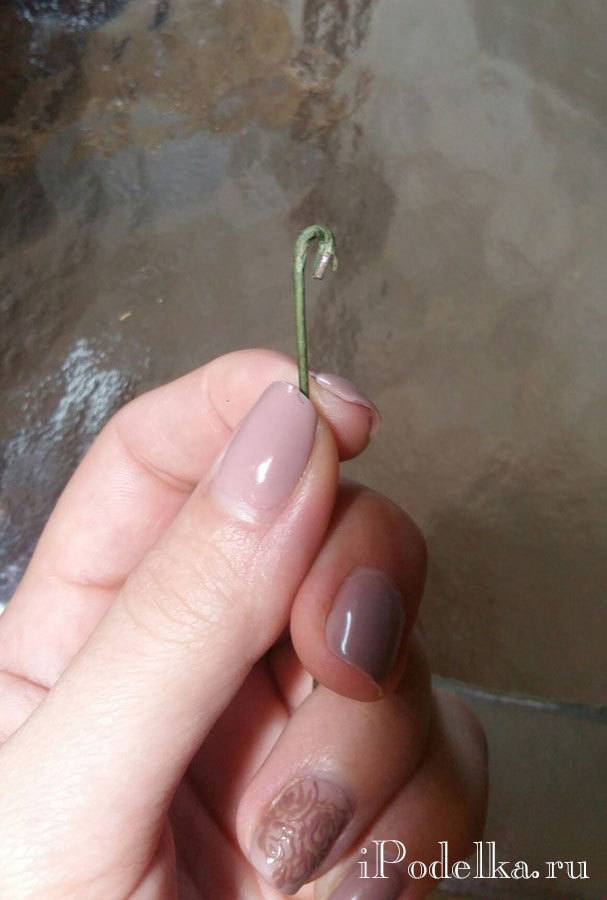
1. Take the wire, bend the edge.
2. We begin to form a rose from the leaves and their fragments. The first sheet is wrapped around the corner of the wire and fasten with glue. We continue to lug the leaves in a circle, filling free spaces.

3. The lowest row is a chashelistic. Take 5 leaves of small size and contrast color. Slice in a circle, thereby closing all the "insides" of the flower. The photo shows the red little leaflets under green petals - this is a chashelistic.
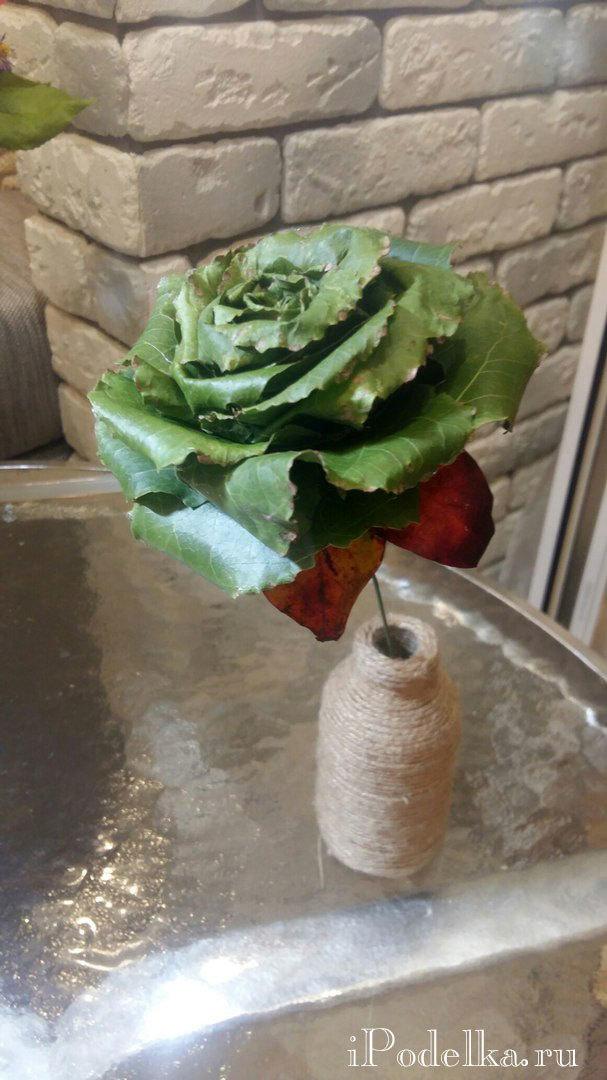
4. The stalk of the finished flower can be wrapped with a floristic ribbon and climb a few leaves to the stalk. If you use twigs, then just glue a couple of leaves along the flower leg. Autumn rose is ready.
To form a beautiful bouquet you will require several colors - 3,5,7. Try to make them different and in color, and in size. So it will look more colorful. You can enter several buds into the composition. They will help fill empty places in the flower arrangement.
VAZochka for autumn bouquet
For the thematic vase, any small bottle (glass or plastic), a beef, a couple of acorns or forest nuts. And, of course, a glue gun or any other glue. Watch the bottle with a thread, periodically fixing the result with glue. Nuts or acorns cling to a small cut of the twine with glue. Tie the result on the vase.
If your bottle has a large size, you can decorate it with appliqué from halves of nut shell or any cereals. Tell your baby to come up with how to decorate the vase. Direct it fantasy in the right direction.
Now you can form a beautiful bouquet from the colors and put it in a vase. It will be more convenient if the height of the legs of each flower will be different. You can fill the space into several tiers.
Such crafts are autumn leaves They can become not only the original decoration of any interior, but also help you win on any school exhibition.
Nature itself suggests thousands of ideas. You do not need to be an experienced master to create a unique, filled with warm and care decoration for your home. And the kids are happy to participate in the creative process and mask amazing crafts along with adults. Master class - how to do this - read here.


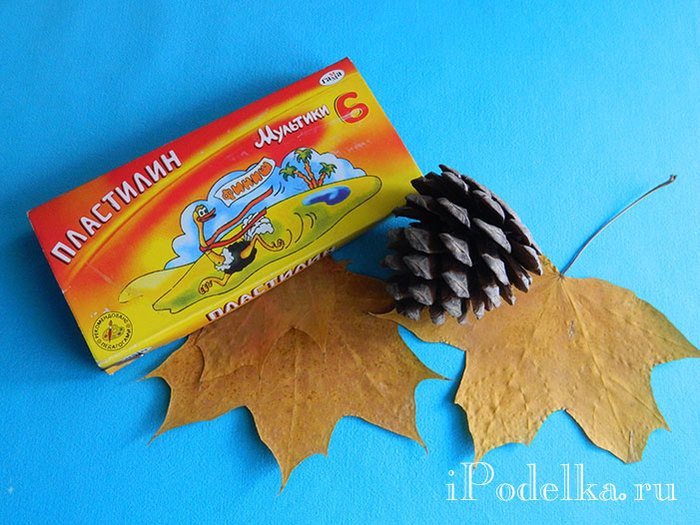
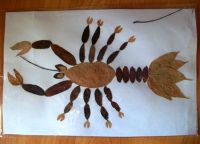
Why not make a hedgehog from a bump and plasticine? Autumn multicolored leaves will give the work of special paints.
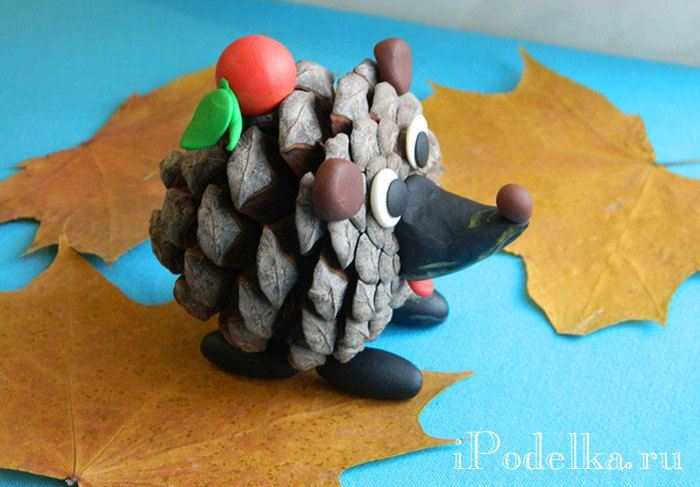
In encyclopedias it is written that the hedgehogs live in forests and parks, but sometimes they can be found in the village courts. Spiny animals arrange nests in firewood lunits. At night, individual coupling or a full-fledged family go into search of food.
Quietly fucked with a snack greenery on the beds. Twilight clearly seen the direction of hunters. Hedgehogs do not worry that the owners of the courtyard see their movement. As a rule, quiet and harmless neighbors do not drive, sometimes even feed the milk.
What does the Yozh eat? Insects, slugs, mice. So, such an animal is advantageous to keep those who are engaged in gloomy.
Such a pretty turned out to be a hedgehog from the bump. As a decor, you can decorate the spines with a plasticine or a real small apple, and put the hero itself on the carpet from the autumn maple leaves. Detailed master class - how to make this - read here.
![]()

By the way, the hedgehogs are considered rapid animals. They are able to develop speed up to 3 m / s. At the same time, spying animals are perfectly jumping and swimming.
The resulting hedgehog, unlike the present, can be safely taken into hand. It will not hiss, and turn into a tangle, warning about danger. This hero will not save anywhere from the small owner, and safely hesitate all the autumn and even winter. Hedgehog from the bump does not flow into the hibernation. He is ready to celebrate the Winter and New Year holidays with children.
How to do this - read here.
Such fun are made very simple and quickly. Detailed master class See here.


Autumn motifs in the home interior
Seasonal flowers and herbs, autumn multicolored leaves will be the best decoration of the house.
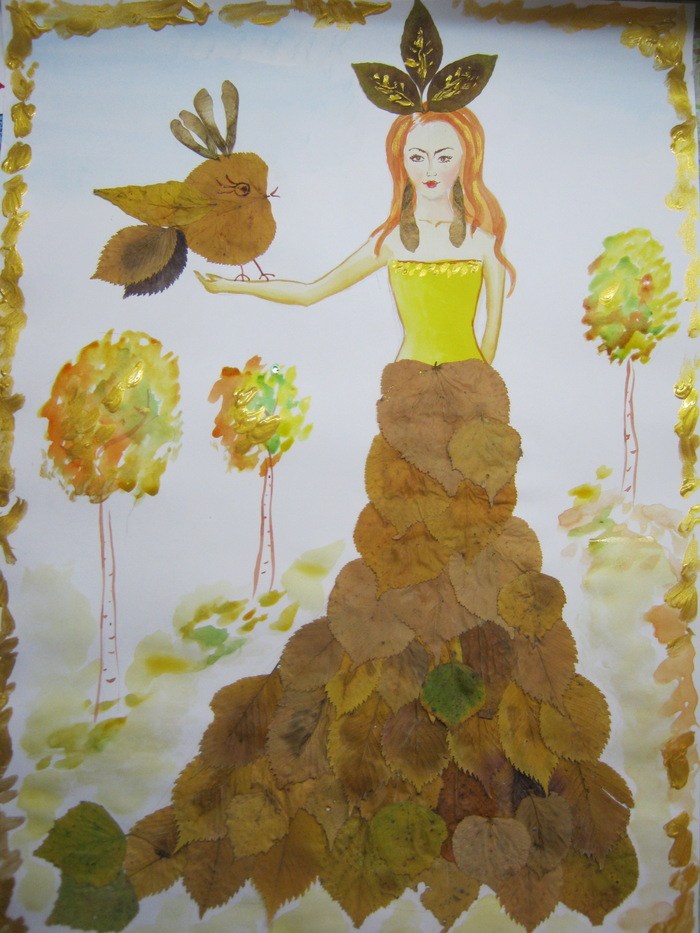
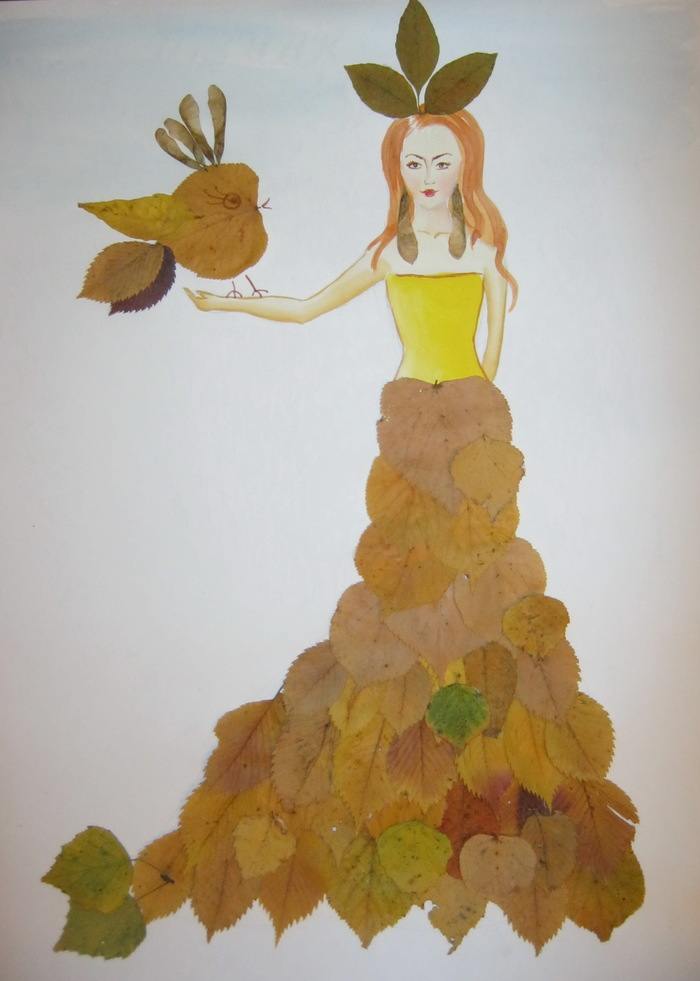
How to make a toy goddess autumn of fabric
Do with your own hands - it is so entertaining and interesting. Well, and if it turns out and beautifully - then there are no prices for such toys. You will come to the exhibition of products made by your hands, and just eyes scatter. Let's try to reveal some secrets of the masters and consider the way to manufacture the goddess of autumn, which can be given to children or hang on the wall in their home.

So, we will need: acrylic paints On fabric (with gold and silver jars), a set of tassels, cotton fabric, filler, thread with a needle.
Step one. Making layout
In the layout we must come up with how our toy will look like. At this stage, we make the original sketch, then the pattern, sew the details together.
Our autumn is sewn from a single piece of material. It is only necessary to make her legs and one hand separately (the hand cuts out of another piece of fabric and is surface on top of the product). When all this is ready, you need to fill the toy with cotton or other material and sew all holes.
Step second. Time for creativity
Now we have to draw our autumn goddess. You can completely repeat the drawing of the finished product, which will be shown below. In any case, orange, golden, yellow and red paints should be used, because autumn is rich in these flowers.

In our hands, our autumn is a big tambourine, it seems to convenes the whole world so that people, animals and animals pleased with the last warm days. Next, you need to paint the toy (in order for the paint to keep better, can be applied to the fabric PVA glue).
Step Three. Decorating our toy
You can decorate our beauty endlessly. After all, autumn is unique. You can glue a bead to it, add sparkles - all that your heart. Look, what a beautiful autumn we succeed. Long-way to watch.
Goddess autumn do it yourself
Physalis in Pumpkin
Autumn bouquets can be made not only from the living colors, but also from branches of oak with acorns, sea buckthorn, barberries, rosehip, viburnum, elderberry, rowan, wild grapes, bright Fizalis lanterns, erasev, etc ..
Such compositions look perfectly in a pumpkin vase, a wicker basket, a tin bucket, a clay jug. The vessel can be reeling with spikes, decorate the ribbon.
Wandering lights
A decorated candles in the autumn style will help acorns, birch bark, Physalis, hawthorn berries, small decorative pumpkins. Simple thick candles can be wrapped with birch bark or insert into small pumpkins, where the top is cut and a part of the pulp is removed. Glass candlesticks will look original and festively, if they paint their paints for stained glass.
If in a thick branch, drill holes in the size of the candles, decorate with small pumpkins, bumps and berries, then the original candlestick for the house is ready.
September wreath
For mood, you can weigh the wreath on the wall or the entrance door. Flexible branches are suitable for its foundation. Make a bet on the vine, a straw or wire hanger for clothes, deposited in the form of a circle. Hook received. Decor elements are better present to leaves, hop cones, herbal panicles, wood branches, grape vines, acorns, rowan. In any case, it is convenient to secure a thermopystole based on a thermopystole (alternative fixation by thin wire).
Decorate wreath in autumn, the benefit of natural material is plenty - bright leaves, thin branches, balls from a grape vine and more. And you can hang leaves to a frame. An old lampshade or a wooden staircase is suitable for him.
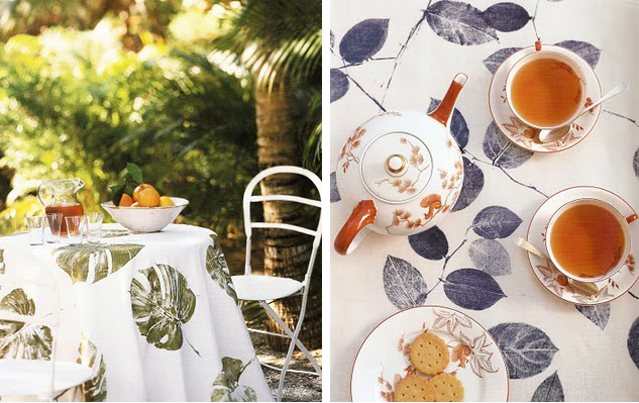
Leaf Fall on the sofa
What can be more pleasant than a cup of fragrant tea, drunk on a sofa with soft pillows and a warm fleece plaid? In textiles it is better to use soft velvety fabrics of autumn gamut (brown-red, bright orange, bordeaux, Marsala color, terracotta, muted green), prints in the form of leaves, vegetables, autumn colors.
The decor in the form of autumn leaves is convenient to carve out of tight fabric and set up a zigzag background. If the leaves are made of felt and edges do not need additional processing, you can faster them on the pillowcase by the usual seam - it will give the volume and will help create a planned composition.
Frame from acorns
Candle the clips of a tight cardboard with a felt of a tight cardboard, decorate it with a bouquet of small decorative elements in the autumn style: apples, an acorn cap, felt leaflets, berries, etc. Book can be removed, attach a pin to it and use as a brook.
Children offer to poke a cardboard frame with an acorns, inside insert a dense piece of monotonous cardboard or burlap background, stick a beautiful leaf or any other gift of nature.
What about the festive table?
Use autumn motifs in serving. Clips for napkins Make in the form of an oak bouquet: felt leaves, an acorns with a soft color "nut". Sleepy twigs can be collected in the ring and decorate half walnut. Do not forget to make small bouquets from oak leaves and berries.
Yellow and red leaves can be used as napkins under a plate or for decorating dishes. Let autumn bring bright colors and comfort to your home!
Interesting ideas - how to make autumn crafts

With the onset of autumn, there is a huge amount of natural material from which you can make interesting and original crafts with your own hands along with children. This task is your baby can get at school on the eve of the exhibition dedicated to the autumn holiday.
In this article we will tell you what the autumnal craft can be made to a school for the exhibition or as homework In terms of work, and what materials are best used.
What materials can be used?In most cases, the following natural materials are used to create beautiful and original crafts for the autumn holiday to school or the exhibition, which replete this year of year is used:
- dry leaves of all sorts of colors and diverse shape;
- pine I. spruce shishk;
- small and large pebbles, as well as sand;
- needles needles;
- acorns;
- berries of rosehip and rowan;
- maple seeds, ash, as well as watermelon and melon;
- moss and bark of trees;
- feathers of birds of different sizes;
- reed.
Simple crafts for the autumn holiday to school for grade 1
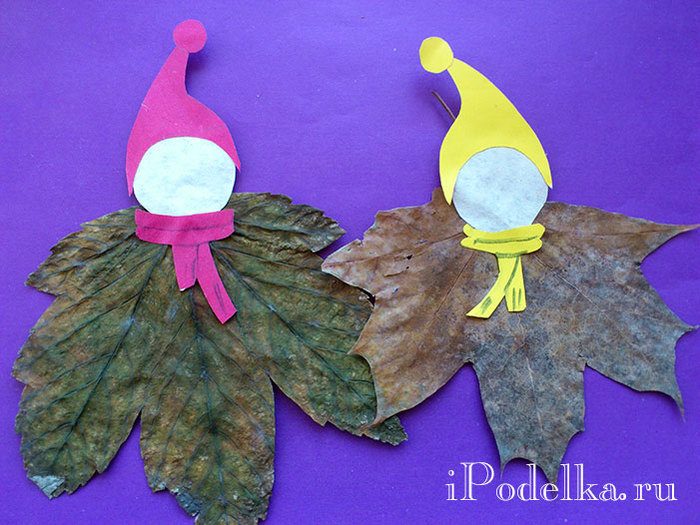
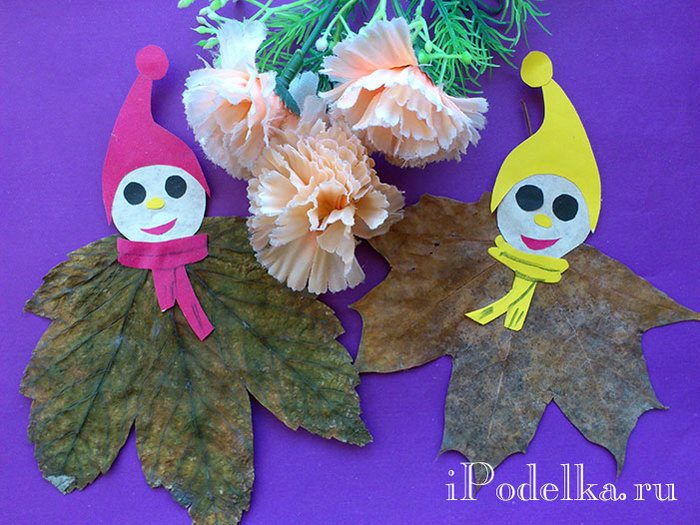
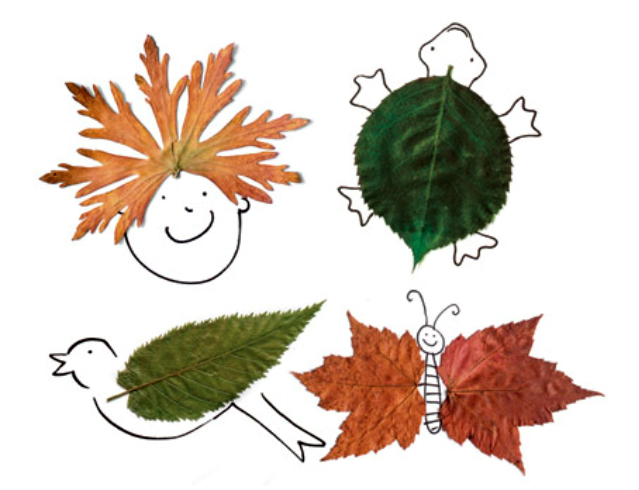
As a rule, younger schoolchildren use dry leaves in their works of all possible forms, colors and sizes. The lightest autumn crafts that may attribute a student to school junior classes, - this is simple applications Of the leaves in the form of pretty little animals, fish or birds.
If you have a few days in stock, you can collect fresh leaves of trees together with your son or daughter and cut any figures on your own, for example, cars, airplanes, letters or numbers. After that, the crawler should be dried in a thick book or between newspapers.
In addition, kids together with loving parents can cut out of plasticine any composition on the topic of autumn.
The ideas of autumn crafts to school for the guys older
It all depends on the imagination and imagination of your child, as well as whether someone from adults will help him in creating a masterpiece. At any exhibition of the best autumn crafts at school, you can find a lot of beautiful and original collages from the leaves and cones, various applications and panels, dry bouquets, herbarium and composition and much more.
To make an unusually beautiful and original tree from natural materials, you can use the following instructions:
- Take the ordinary paper package and carefully tear the handles. Spin it with two hands in different directions. The bottom of the package is tightened with plasticine, and the upper part of it dissolve on the harnesses.
- Tearing handles tie up the package. With the help of glue or plasticine, fasten the branches on the barrel and leaves of different trees.
- Between the leaves and on the trunk, glue several winters. Make your face face - 2 caps from the acorns of the same size are gluing to the trunk by the convex side. Outside, place it on a small piece of plasticine in them and attach rowan berries. As a nose, use the stomach hat glued by the convex side outside. Mouth from several small berries.
 |
 |
 |
Autumn is a great time for needlework, because it gives us so many beautiful materials: leaves, vegetables, fruits, flowers, acorns, bumps and twigs. And how cozy the house becomes, if you decorate it with a decor in the yellow-bagg harm. In this material you will find 6 ideas of autumn crafts with your own hands for adults and children with step-by-step master classes and a selection of photos for inspiration.
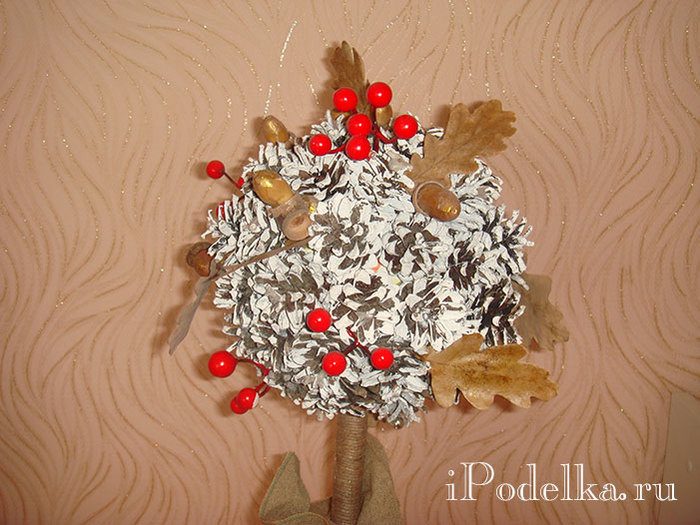
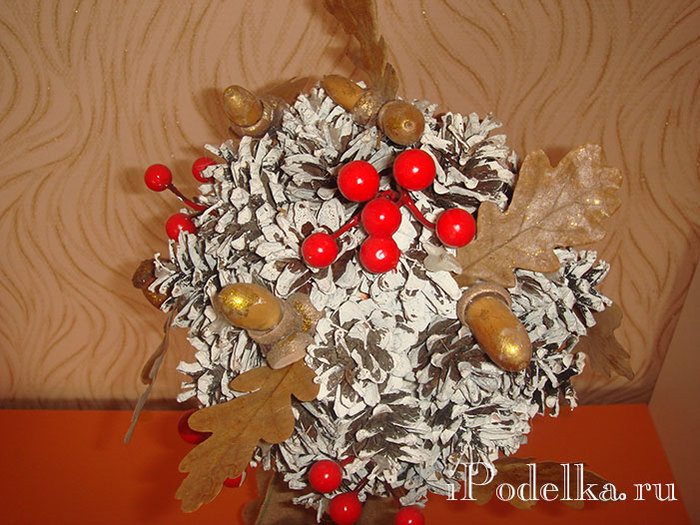
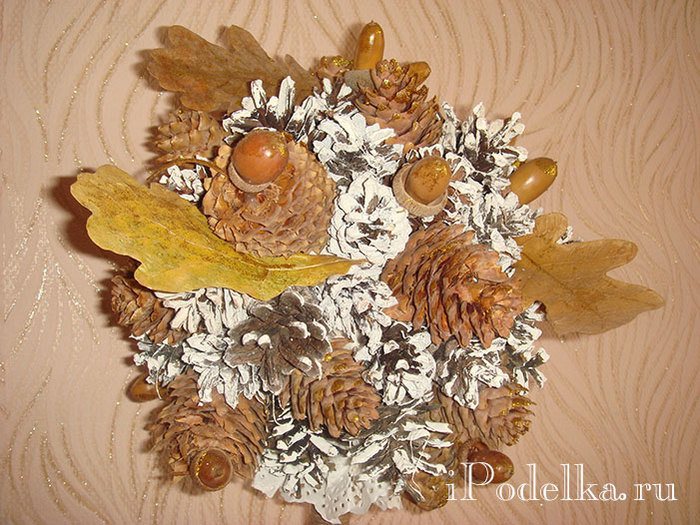
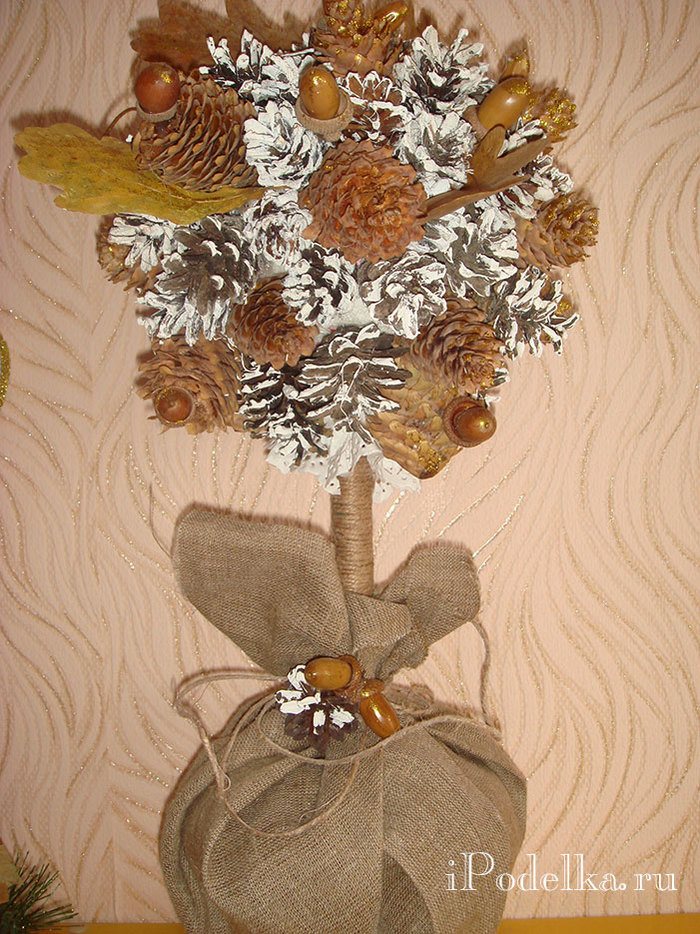
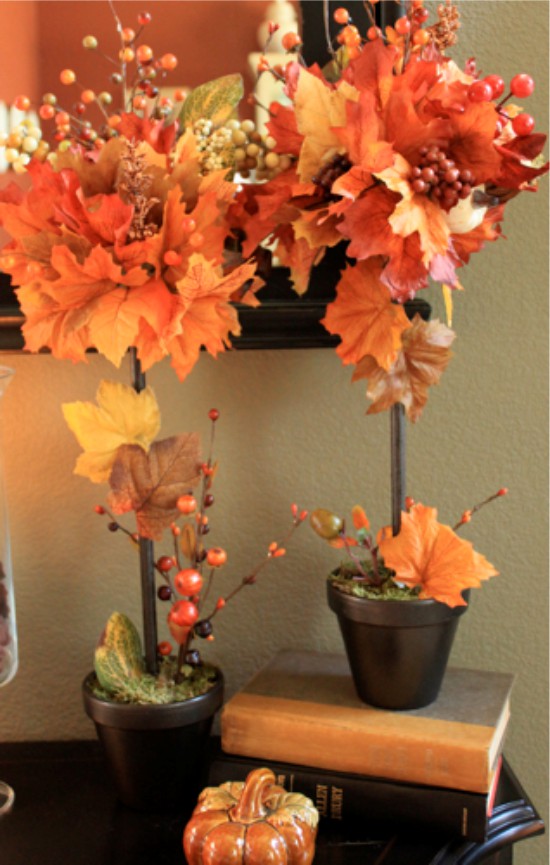
Idea 1. Autumn Topiary
Topiary is decorative treewhich can be decorate the dining table, a fireplace regiment or space at the entrance door. For its manufacture, you can use natural or artificial materials, for example: leaves, berries on branches, acorns, bumps, chestnuts, flowers dried slices of citruses, as well as felt, sisal, flax and everything you will tell you your fantasy. In the next slider, you can see a few examples of such autumn crafts.
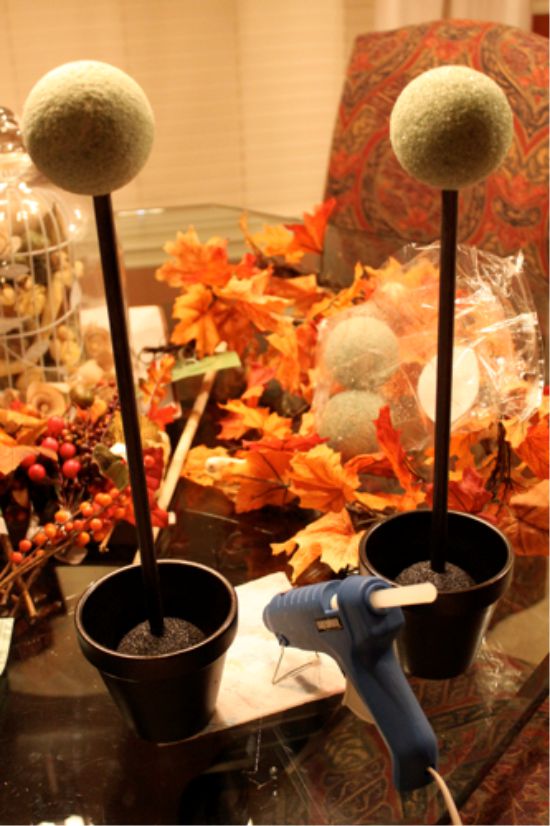
Materials:
- Clay pot;
- Wooden wand or branch;
- Two balls of foam or floral foam;
- Materials for the decoration of the crown;
- Dry moss (can be replaced by a sisal);
- Adhesive glue and a few glue sticks;
- Scissors;
- Sideboards or secateurs;
- Acrylic paints for painting trunk, ball and pot (optional).
Instruction:
Step 1. Cut the sharp object in the ball-based hole under the trunk of a depth of about a third of its diameter. Drove hot glue into the hole and insert the trunk into it.
Step 2. Insert the second ball in the pot. If the ball is not tightly tightly sitting in a pot, laid around it the newspaper. Cut in the ball a hole under the barrel of a depth of 2-3 cm. Insert the barrel with the crown into the hole and adjust its length. Next, drop the glue into the ball hole, install the barrel in it and start filling the hole with glue, lattaya around the barrel and small pieces of paper. It is necessary so that hot glue is not too deepened a hole.
Step 3. Paint the pot in desired colorIf you do not like his initial look. In this project, the pot painted spray-paint in the shade of dark bronze from Rustoleum (sold in construction markets, for example, in Lerua Merlen).
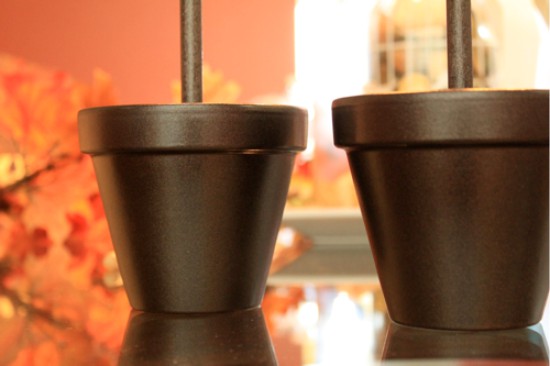
Remember that the design of the pot must be simple and simple, so as not to distract attention from the crown. If necessary, at this stage, the trunk and / or balls are painted. Balls are preferably painting so that the spaces between decorative details are invisible.
Step 4. While the paint on our billet dries, sort the decorative parts from the size. If you use artificial leaves, flowers and berries with a wire base, then, slicing them, leave the "stems" with a length of about 2 cm. It is necessary in order not to not only stick the items, but also to stick them into the ball - then they will hold more . If the "stems" do not have wire, then it is better to cut the details "under the root".
Step 5. Now it's time for the most interesting - creating crown. First, evenly distribute and glue the largest details on the ball, then the average. Finally, fill the gaps with small decorations.

Step 6. Well, that's all, it remains only to decorate a ball in a pot dry moss or sisal, having previously finished it with glue.
Idea 2. Pumpkins from toilet paper bushings
And here is another idea of \u200b\u200bautumn crafts on the topic of vegetables, which can be made with children - pumpkins from the bushings from toilet paper. Opportunities for decorating such crafts are endless. For example, children can use colored paper, gouache or sequins, and adults - tin gold, fabric or lace.

Materials:
- Bushings from toilet paper or paper towels;
- Scissors;
- Twine;
- For decor: Brushes, gouache or acrylic paints, PVA and glue and gloves or book pages, etc.;
- Cinnamon or branches (to create a vegetable core);
- Burlap, felt or cardboard (for creating leaves).
Step 1. Unlock the roll from toilet paper and cut the rings.

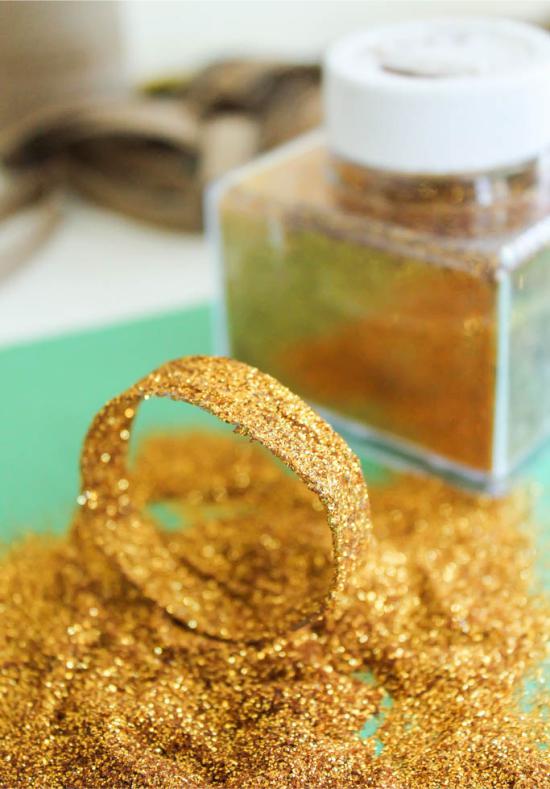
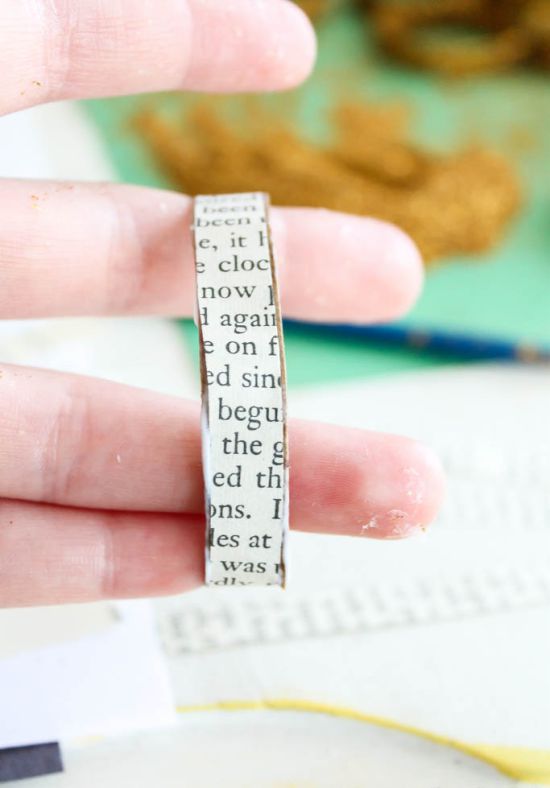
Step 2. Decorate the rings with the material that you like, for example, kraft paper, paper for scrap-buking, cloth, ribbons, or just paint their acrylic paint. You can also arrange pumpkins exactly as in this master class - glitter and strips of book pages.
Method 1. With the help of a brush, smear the pva glue outer sides All rings, and then abundantly sprinkle glitter on them. Wait until the workpiece gets dry, and then cover the sequins by the second layer of PVA glue to protect them from sickness.
Method 2. Cut out the thin strips of paper from the book pages and stick them to the rings on PVA aluminum or adhesive pencil.
Step 3. To form your pumpkins, skip the twine thread through the rings, then tighten its two ends and tie the node as shown in the photo.

Step 4. Now in the center of the pumpkin, insert cinnamon sticks or cropped twigs.
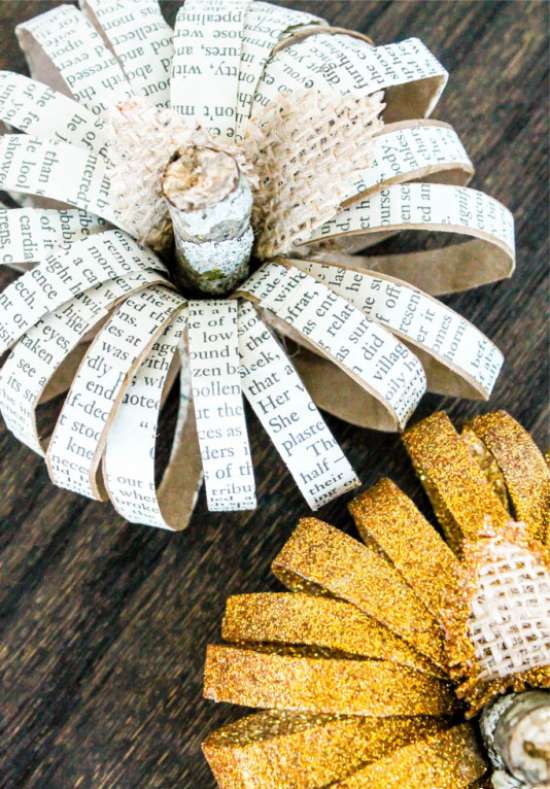
Step 5. Hooray, your pumpkins are almost ready, it remains only to add leaves to them, carved from burlap, felt, cardboard, or any other material on hand.
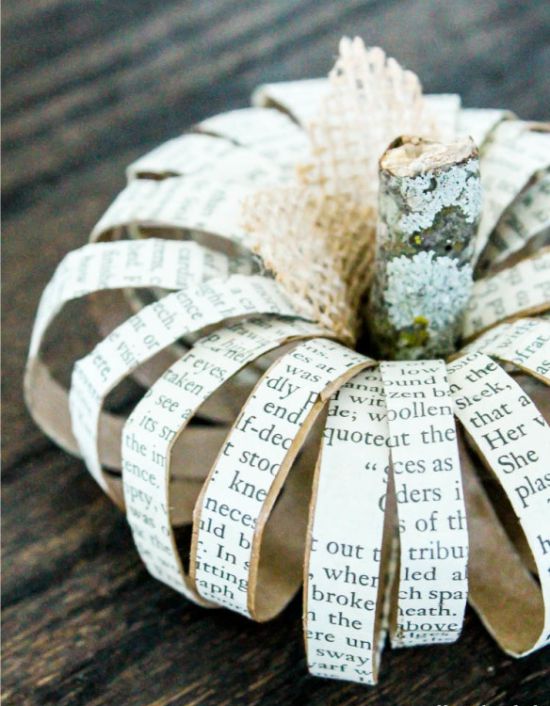
By the same principle, you can make a pumpkin from the rings of any material.
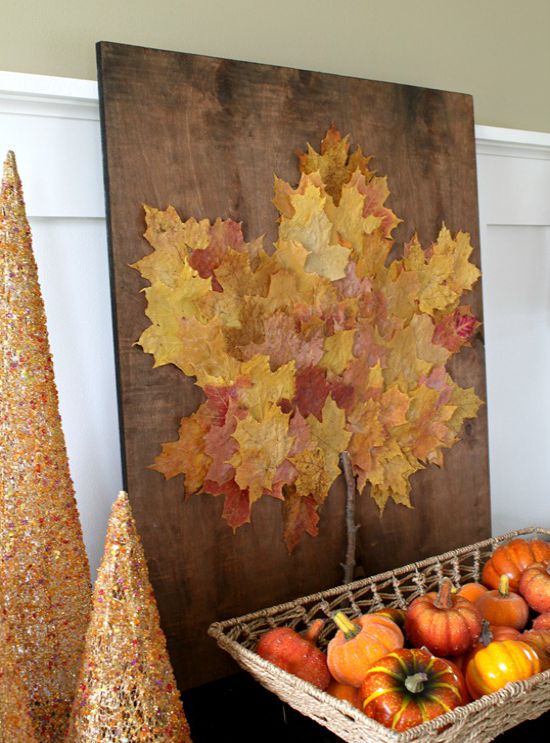
Idea 3. Panel from leaves
Next, we present you the idea of \u200b\u200bcrafts from autumn leaves. Since hot glue and sharp objects are not used in this master class, then you can safely connect to the work of children, and especially to the material collection.
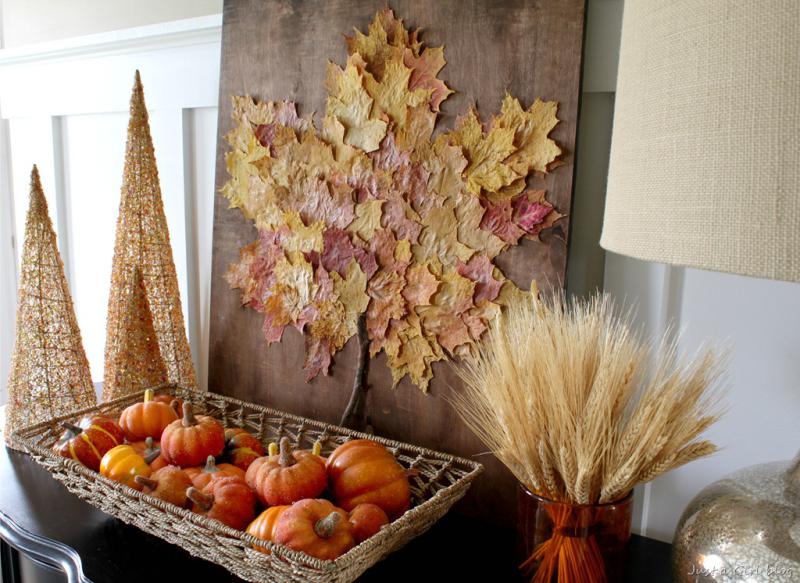
The idea of \u200b\u200bautumn crafts from natural material, which can be done with children and use for seasonal home decoration
Materials:
Instruction:
Step 1. Cut the pubescoml tree and pass the ends with sandpaper.
Step 2. Paint the blackboard by the Morilka and leave to dry.
Step 3. Draw a maple leaf from hand on the chalkboard with a template or stencil.

Step 4. Start gluing the pre-dried leaves (see to dry them at the end of the article) on the principle of fans, trying to place them so that their edges coincided with the contour of the picture. At the same time, it is not necessary to glue the leaves completely, let their tops be a bit loose, so that the panel gains some volume. For each glued leaf, put any suitable press for a minute.
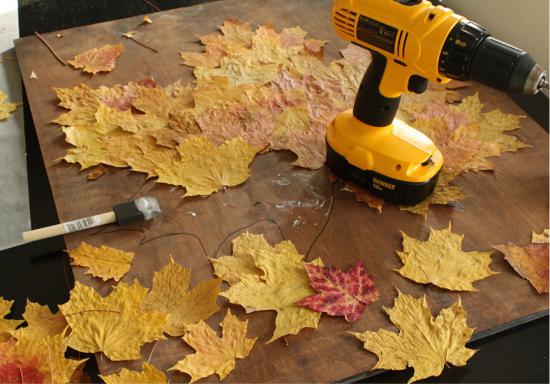
Keep in mind that the leaves will not be glued immediately, but after drying the glue will be kept well.
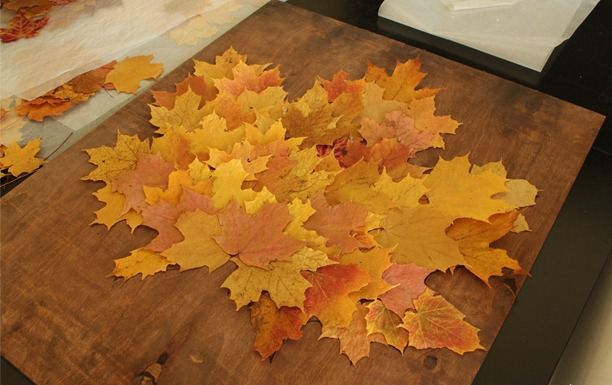
Step 5. To make the outline of the pattern clearer, cut the leaves in some places. However, try to resort to such a correction as little as possible in order not to lose the beauty of natural lines.
Step 6. Now attach a twig to your panel on the site of the stem, bother the surplus and glue.
In the next selection of photos presents examples of no less original autumn panels.

And finally, we suggest watch a video lesson about how to make the autumn crawler in the form of a panel of leaves with a frame from the acorns.
Also, see our other materials:
Idea 4. Wind Music from Natural Materials and Not Only
The following project is an example of an interesting, but very simple in the manufacture of crafts from natural materials and ready-made details that the child can do almost independently.
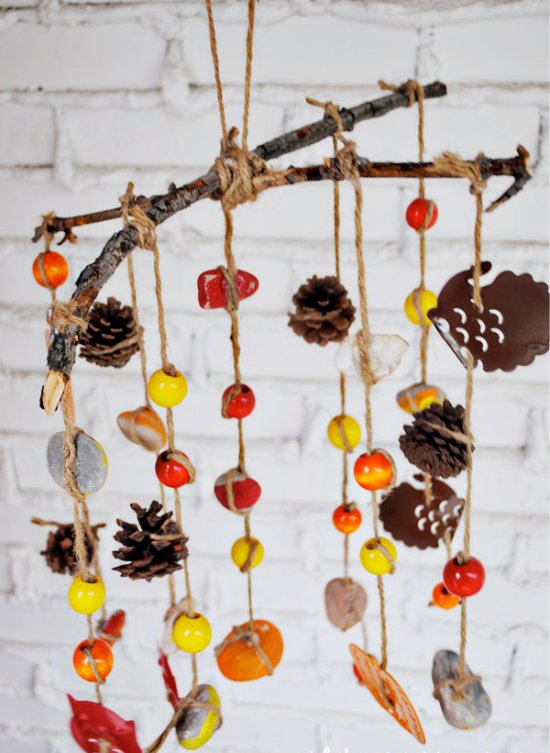
Materials:
- Two or one sticks;
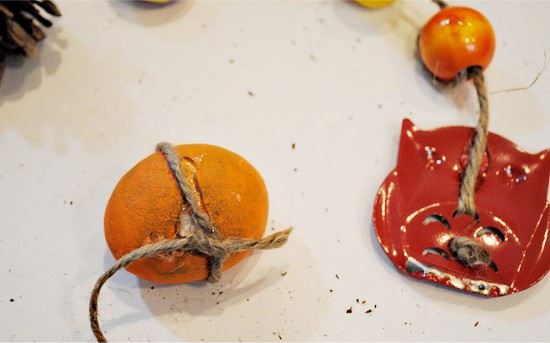
- Natural and factory materials for the jewelry of the threads: pine cones, flat pebbles, acorns, wooden beads, metal small stands for candles (used in this project) and everything that comes to hand and corresponds to the topic of autumn;
- Twine;
- Hot glue glue and glue sticks.

Step 1. Paint some elements of the future wind music, if there is such a need. In this master class, the author painted pebbles into bright yellow and red colors.

Step 2. Until the decorations dry, tie two sticks cross on the cross and tie the center of the cross with twine as shown in the photo below. You can also use just one long stick or, say, the hoop.

Step 3. Cut 9 ropes of twine of the desired length with a small margin on the nodules so that in the future you have turned two rows on every branch and one in the middle.
Step 4. To create one row of wind music, take a piece of twine and start to ride beads or other details on it, skipping ropes into the holes twice or well tightening into the nodes. Stones should additionally fix hot glue. In order not to make a mistake with the sequence, the details should be previously decomposed in the desired order. By the way, especially ringing elements are better to post each other, so that their chime to the wind is better audible.
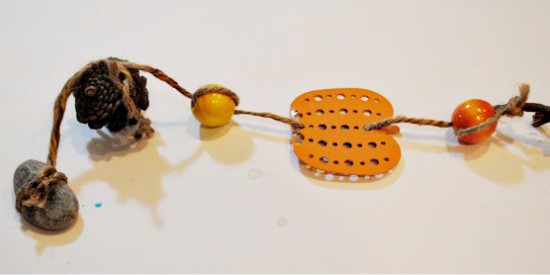
Step 5. At the end of each rope, tie the nodes.

Step 6. After each thread is finished, tie them to branches on double knots with a drop of glue.
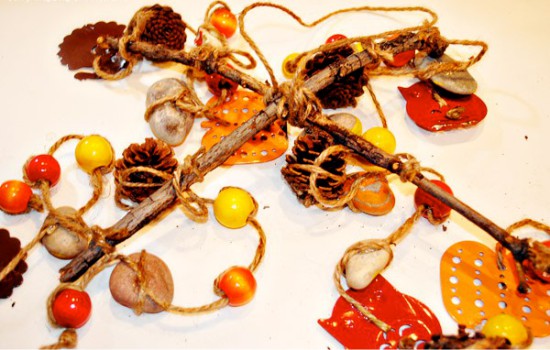
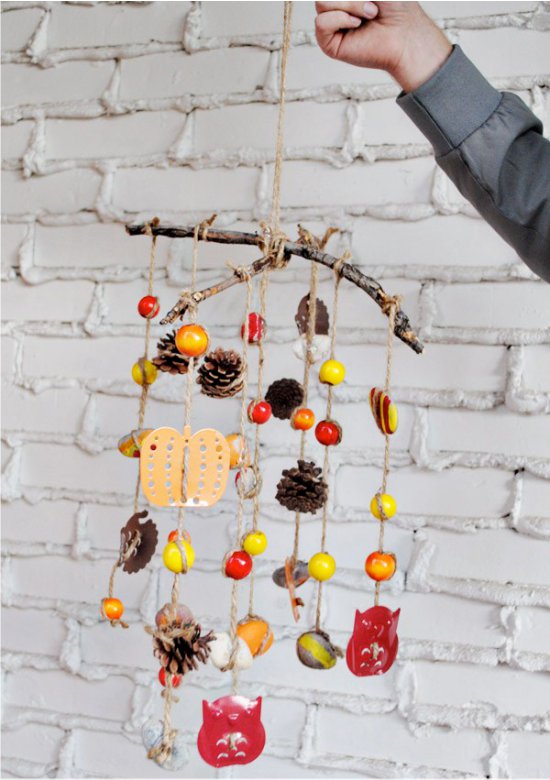
Below are other examples of this. unusual decorationMade from cones, acorns and leaves.

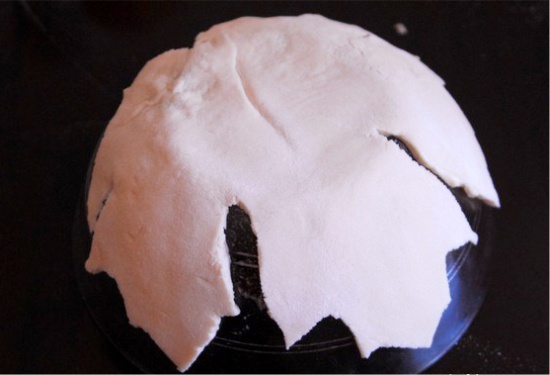
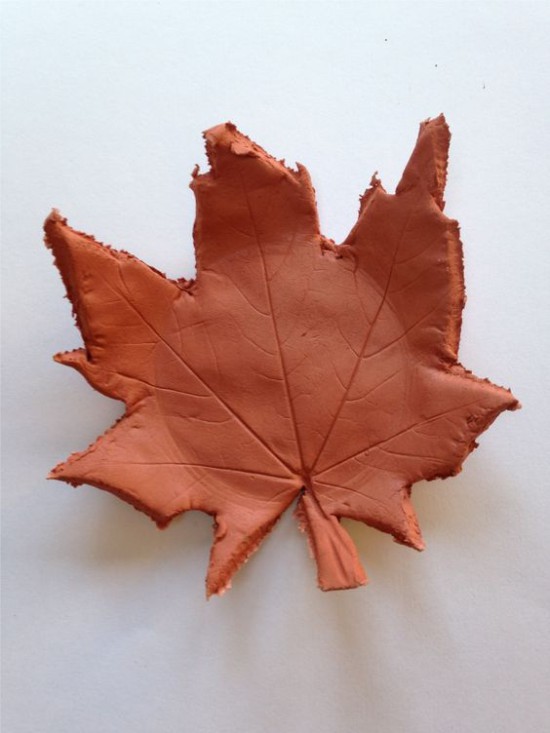
Idea 5. Candlesticks in the form of autumnal leaves from salt dough
Leaves can be used not only as decorative or finishing material, but also at the same time as a pattern and stamp to create crafts from any mass for modeling. Take note on the idea of \u200b\u200bautumn crafts with children in the form of such pretty leaves from salt dough. By the way, they are not only beautiful by themselves, but also can perform a practical function, for example, you can store various decorations or put candles.

![]()
Materials:
- Ingredients for kneading salted dough: ½ Salt glass, ½ cup of water, 1 cup flour;
- Tank kneading capacity;
- Glass bowl;
- Rolling
- Big leaves;
- Vegetable oil;
- Acrylic paints of yellow, red, orange and brown colors.
Instruction:
Step 1. The first thing to do is go for a walk with the whole family and find at least two beautiful large leaves.
Step 2. Then notice the salt dough. To do this, simply mix all the ingredients and roll the dough to about 6 mm thick (no less) so that it is not too thick it, but not too fragile.
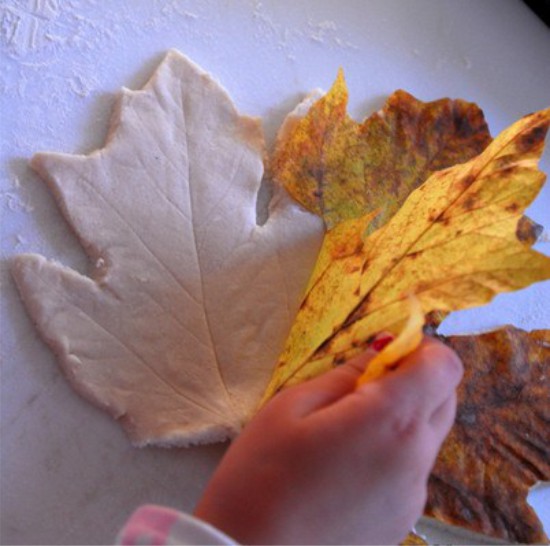
Step 3. Explore your leaflets on the dough and walk on it with a rolling pin with a slight pressure.

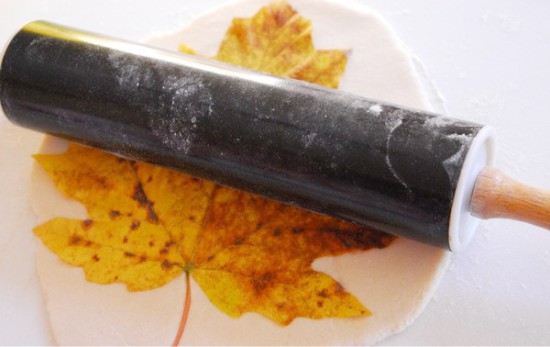
Step 4. The next step is to cut the shape around the sheet. Use a sharp knife and, of course, take this part of the work on yourself.

Step 5. Remove the leaves. Turn the glass bowl and lubricate it with a thin layer of vegetable oil.
Step 6. Carefully lift the sheets and put them on the bowls.
Step 7. Place bowls with a dough in the oven, warmed up to 250 degrees and leave them to be baked within 2-3 hours.
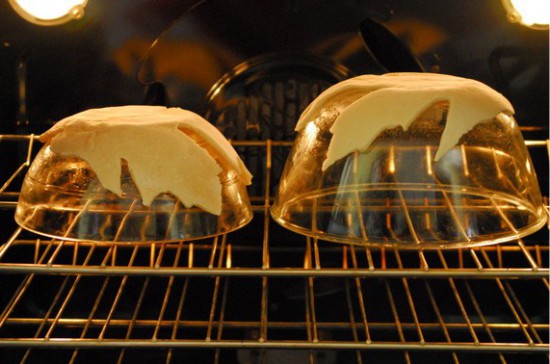
Step 8. Get your billets out of the oven and let them cool without being removed from the bowls for about 15 minutes. Then carefully lift the leaves and leave to the complete cooling.
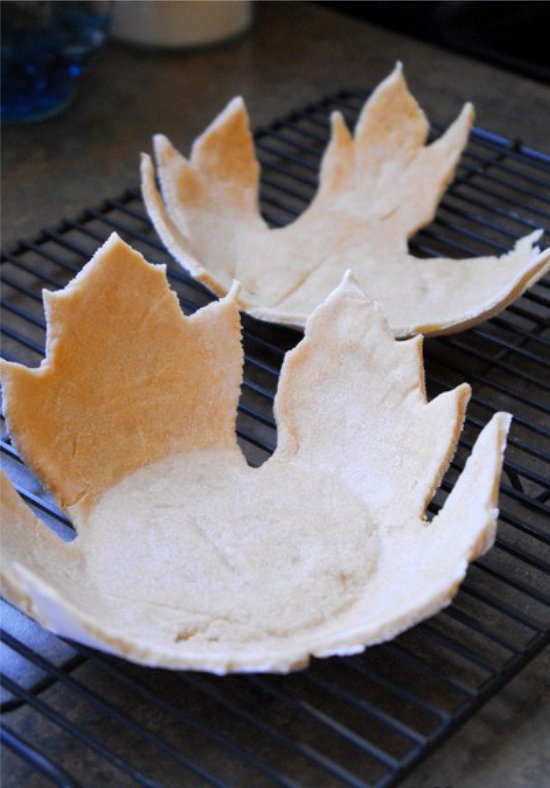
Billets
Step 9. As soon as the bowls are cooled, proceed to painting. To do this, run away the paints of each color across the cups and allow children to mix them independently and paint the inside of the leaves first, and then external. Crafts from salt dough are rather fragile, so you need to paint carefully, without push. Wait until the paint is driving and, if desired, cover the bowl of the layer of PVA glue. He will give the craft to the car and make a little stronger.
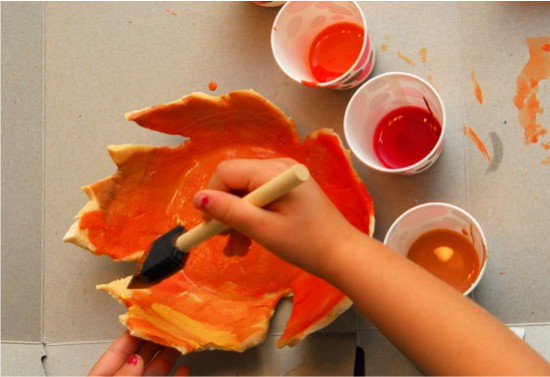
Painting Bowl
Forms of leaves can be different.
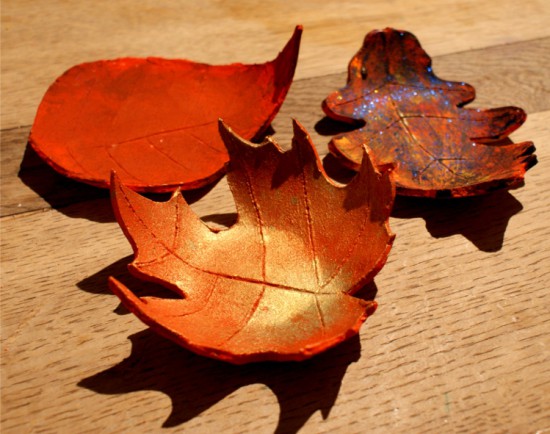
By the way, if you do not want to mess with a salted dough, then you can replace it with soft plasticine. Below in the photo shows an example of such a craft.
Idea 6. Garland from felt
Felt although it is not natural, crafts from it are obtained by the most autumn. Today we suggest you make the simplest garland from felt leaves.

Materials:
- Several sheets of felt of autumn colors;
- Twine;
- Scissors;
- Glue;
- Thick threads with a needle;
- Pencil.
Instruction:
Step 1. Download and print leaf templates (see template for downloading below), then cut them out and outline contours.
Step 2. Cut the blanks.
Step 3. In the manual large stitches, be accommodated.
Step 4. Now, withsting an equal interval, we swell on the twine. To do this, the tail of each leaf is wrapped around the twine and secure glue. If you wish, you can sew details. Wu-ala, autumn garland from felt is ready!
How to make garlands with your own hands.
How to dry leaves and flowers
Method 1. This method is suitable in case you want to appliques or other unsecured crafts. Spreads the sheets or flowers between the pages of the book at a distance of about 3 mm from each other and move them to other pages every day (also observing 3 mm interval). During the week, paper will absorb all moisture from plants, and you can use them for creativity.
Method 2. If your handicraft does not imply the use of flat leaves, then you can dry them, simply gathering in a bundle and hanging up tops in a dry but ventilated room. At the same time, keep in mind that from sunlight leaves will lose completely completely, and in the shadow - will save.
Method 3. This is a method suitable for drying and preserving the color of leaves and cornflowers. Fresh, just torn leaflers / cornflowers blocked the napkin if they are wet. Each sheet put between two layers of waxed paper, on top of the received "sandwich" put a paper towel. Heat the iron and make sure that the evaporation mode is turned off. With pressure, turn the paper towel with an iron for 2-5 minutes. Turn the "sandwich" and re-enjoy it through a paper towel, then carefully remove the wax paper.
Soon New Year! Magic elves of Petra Rule.
Elves Petra Rerle: Sculptures, who choose their author
Petra Werle's French artist creates funny fantasy men using a wide variety of materials: pieces of bread, feathers, dried leaves and flowers, parts of insects and marine seashells.
In the early works of Petra, bread crumbs were the main material from which she created humorous sculptures depicting couples in intricate erotic poses. Later, the artist switched to another sphere, creating work resembling a mixture of the theater of Kabuki, fashion podium and baroque drama. Modest maidens and silent dandy told the audience the history of love and loss, wonders and fun, freedom and customs, innocence and evil ...
Now Peter uses bread only to create individuals and limbs of their heroes. Her smiling fairy and flirty ballerina are dressed in motley outfits from moss, seashells, birds feathers dried butterflies, beetles, cocoons ... Elements of luxury robes For their creatures, the artist finds on flea markets, meadows and fields, flower shops and even ... Among dinner residues from Seafood.

For his works, Peter Nerle transfers us for a long forgotten, but familiar world of fantasies and dreams, often hidden from our eyes and memory and lost in the bustle of daily worries. "They are not my own invention," the artist speaks of his works. "They chose me to put their universal message with my help to give people to humans." What do you want to inform small creatures to each of us? And you look at them more closely, smile in response to their smile and wink also slyly as they do. And then who knows, maybe it is you that they will open their secrets and tell why they came to this world.
Peter Verle was born in Alsace. Her father was a sailor, and the childhood of the girl passed on a barge, ruling between Basel and Rotterdam. Now the works of the artist are demonstrated at exhibitions in France and abroad
Want to get for your autumn crafts for school the main prize? Take the usual idea and look at it at a different angle.
Autumn crafts for school: appliqués, compositions, herbaria
Appliques with a raisyn
"Appliques! That's bored! " - You will say. And you will be wrong. Absolutely not necessarily to portray the next autumn tree. So that the applique is successful, enough of several leaves.Dorisinate them to the picture - it will turn out unusual and fresh.
Even a classic applique can be done cheerful. For example, this ladybird has unusual wings. Leaves-wings are glued to pieces of cardboard - slide them, and ladybug take off.
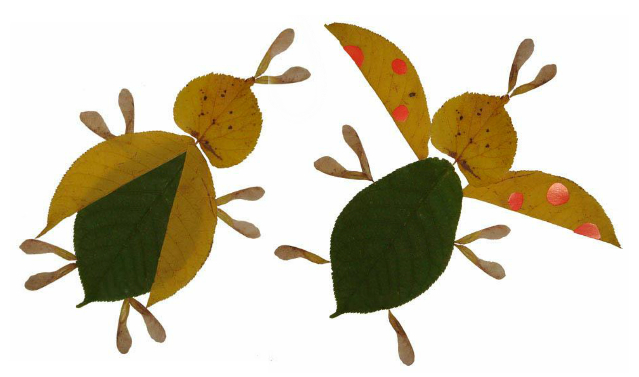
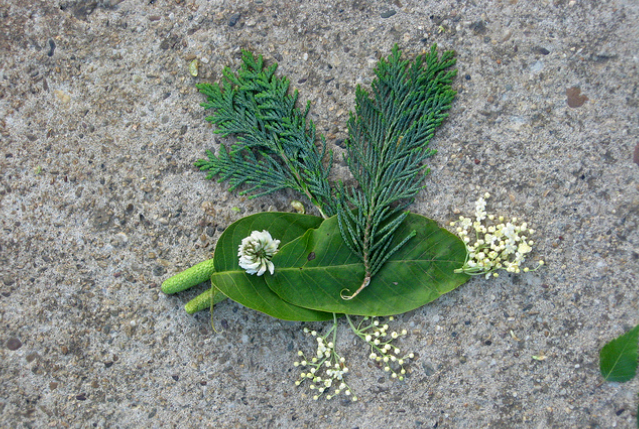
Fantastic animals and birds from leaves and petals
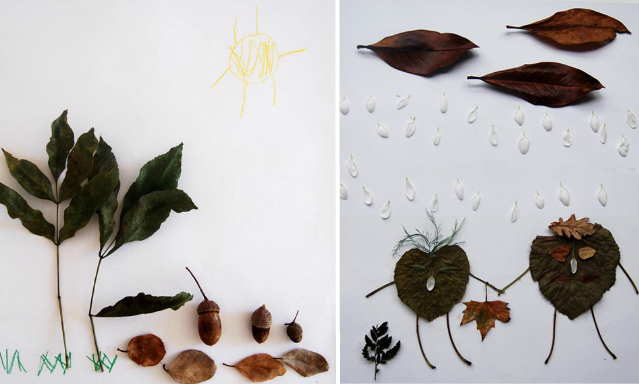
My favorite autumn crafts for school are these dragon and a bird from green leaves. Nothing needs to be glued and dry - to keep the craft, take a picture of it or put it under the glass.
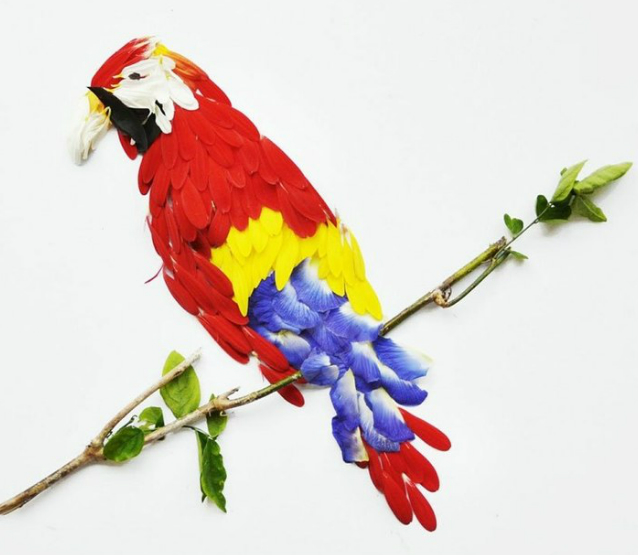
If you have not only herbs, but also flowers, try putting bright parrot petals. To work it was easier you can spread the petals directly to the picture or photo with a bird.
By the same principle, without drop of glue, you can collect plot compositions.
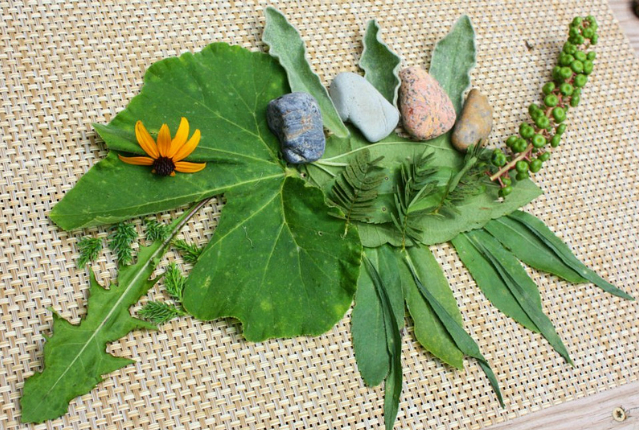
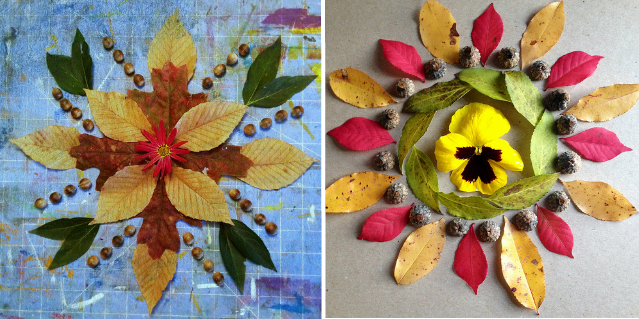
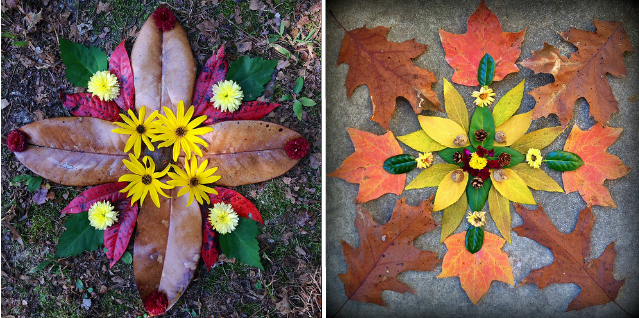
Floral Kaleidoscope
Remember what pictures look like in a kaleidoscope? Try to lay out the same colors and leaves. Plus that from the same colors you can lay out how many different "kaleidoscopes" (If, of course, you have a camera at hand).
If you need to consolidate these autumn crafts for school, stick the leaves or, again, press it with glass.

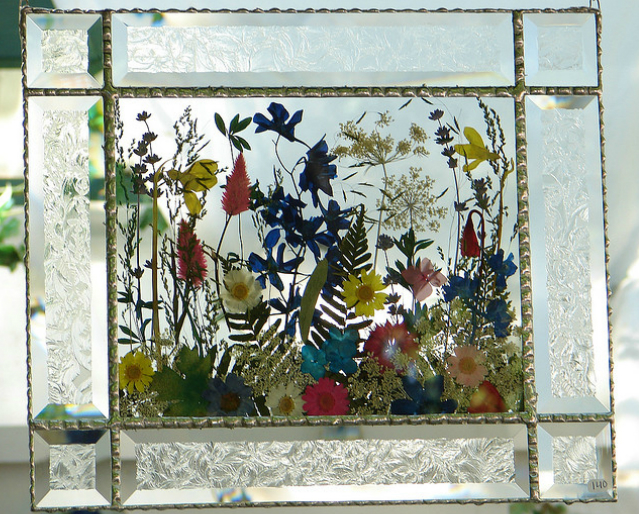
Herbarium in a transparent frame
Herbarium is very beautiful. But who will see them in old books? It is much better to arrange the dried flowers between the pair of glasses. On the lumen composition will be similar to the stained glass window. And you always have not just at hand autumnal Crafts For school, but also a reminder of the bright colors of the summer.
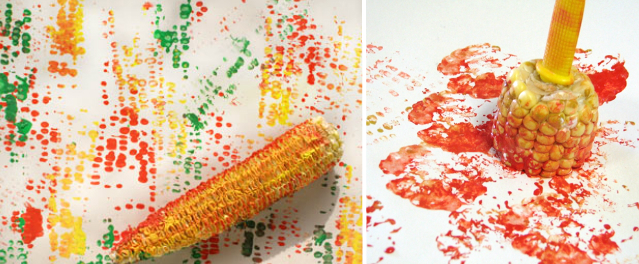
Autumn typography
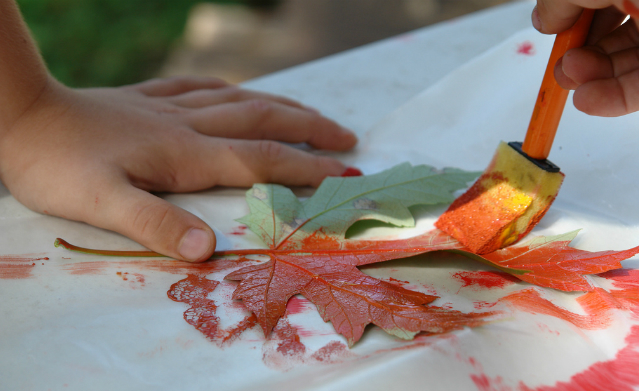
Rollers and seals
Have you ever printed with leaves? Collect them from the inside and press paper or fabric to the sheet. If you do not take watercolor and gouache, but acrylic paints, with the help of such seals, you can paint on the autumn tablecloth.
To decorate the tablecloth, you can build this corn roller or corn stamp.Use several colors, and your autumn handicraft for school will like it.