When deciding to paint walls, ceilings, furniture or any other surface, the first step is to choose the right type of paint and varnish material, and then choose the appropriate paint colors. V modern world manufacturers of paints and varnishes are ready to offer such a wide range of shades that everyone will certainly be able to choose the required tone. However, in stores, the choice of goods is not so large and all that a buyer can do is order a tinting of paint in a specialized company. Of course, such a solution can be quite expensive. Therefore, let's try to figure out how to mix paints correctly at home.
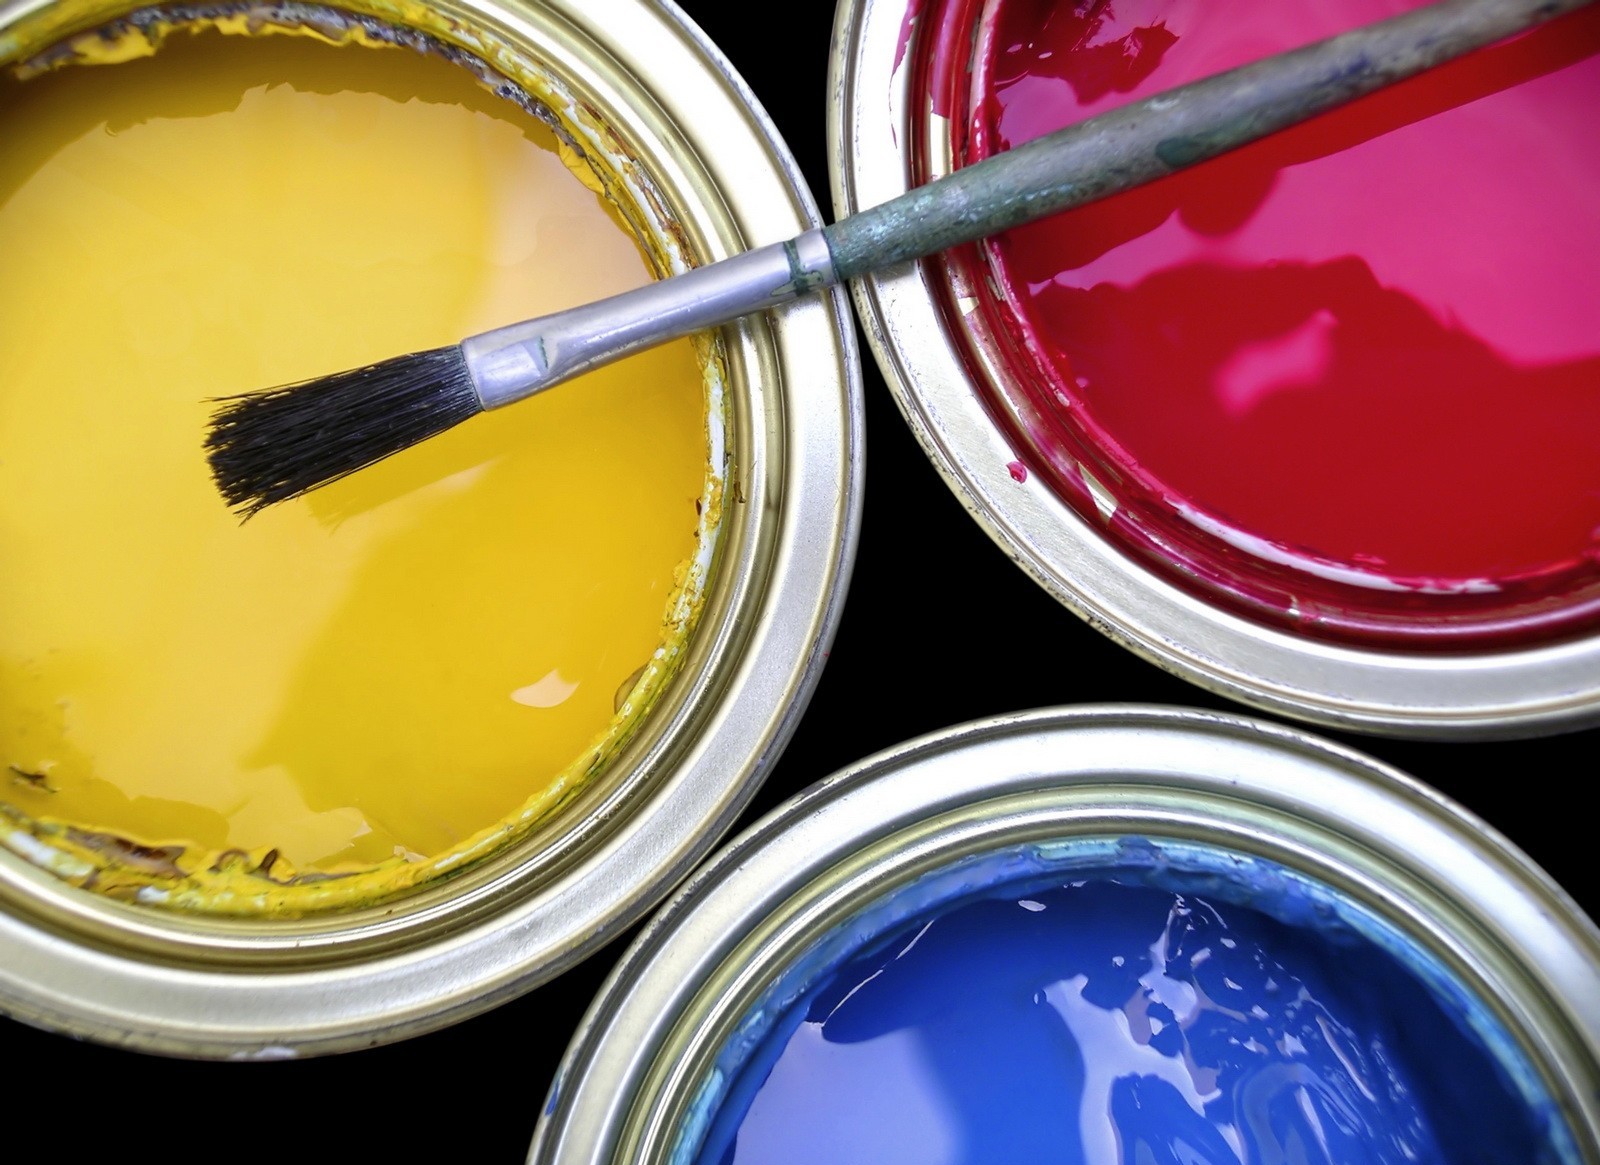
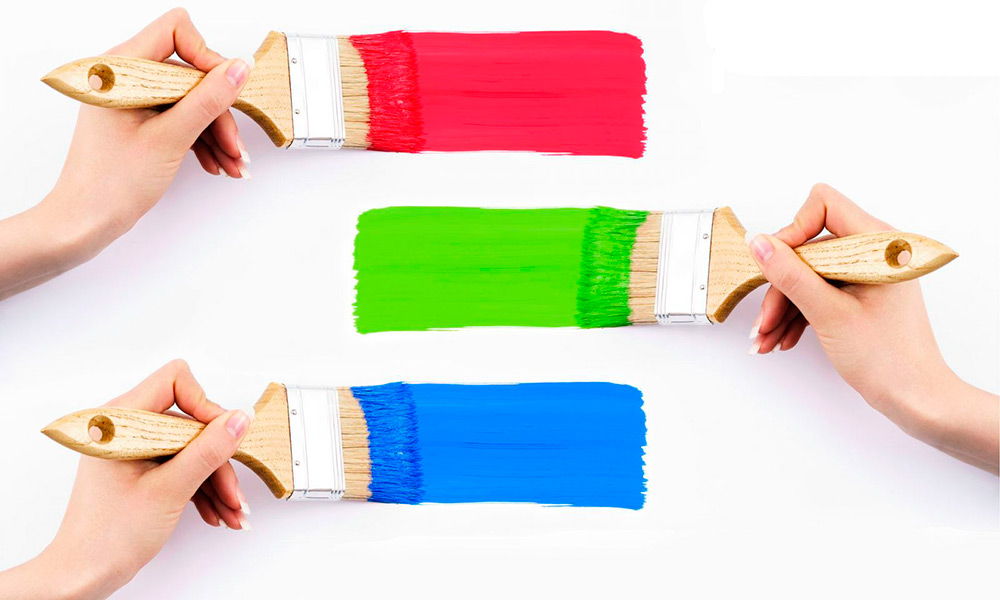
There are only 3 basic shades - these are red, blue and yellow. Also, the main colors include white and black. The rest of the vast range of colors can be obtained by mixing the listed tones in various proportions. The easiest way to paint is water-based paint, that is, compositions made on the basis of an aqueous dispersion of polymers, for example, acrylic or vinyl acetate. It is also quite easy to tint acrylic paints in the required color, that is, products based on polyacrylates. Most often, such products are supplied to stores in white, and for tinting, manufacturers produce a wide range of pigment concentrates (powder or liquid), specially designed for water-soluble paints.
You can immediately buy hues such as apricot, amethyst, purple, cappuccino, spring green, ivory and many more. Then add them to the main composition and place them carefully. The proportions are usually indicated on the instructions for the pigment. But what to do if you need to use oil paints, because powder colors are not provided for such products? This option involves mixing paints of ready-made shades.
Important! It is allowed to mix colors only of the same type of paintwork, that is, in oil paints that can be diluted with linseed oil or white spirit, only the same type of products should be added, the same applies to nitro paints diluted with a special solvent.
For the base, you can use the staining options presented in the table:
| Base color The resulting shade |
White | Black | Red | Blue | Yellow |
| Green | + | + | |||
| Olive green | + | + | |||
| Gray green | + | + | + | ||
| Mint | + | + | + | ||
| Orange | + | + | |||
| Peach | + | + | + | ||
| Pink | + | + | |||
| Blue | + | + | |||
| Light plum | + | + | + | ||
| Purple | + | + | |||
| Brown | + | + | + |
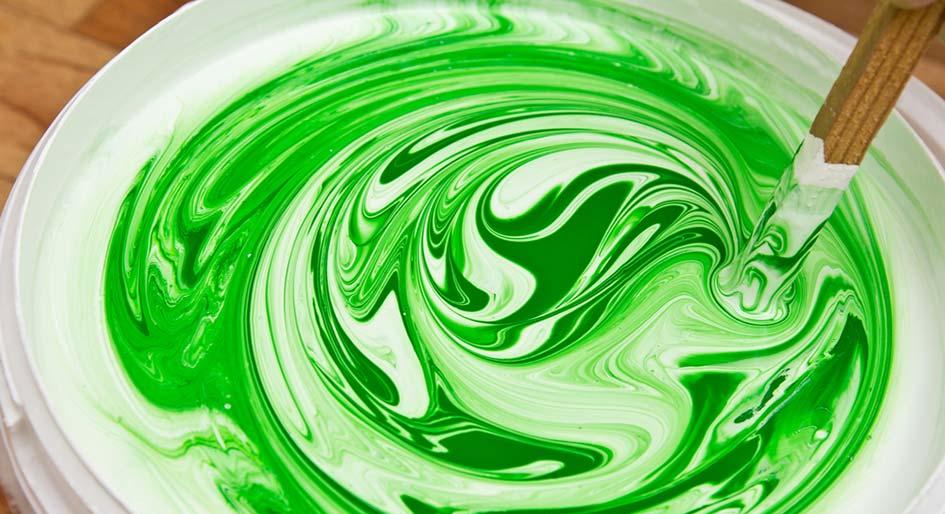
However, it is important to understand that it is not so easy to get the desired shade. That is, it is not enough just to know which colors should be mixed, you also need to have an idea of the proportions. For example, to create a coffee with milk tone, you need to use white, red, blue and yellow colors. However, first you have to mix green color, by combining yellow and blue, then add red to the resulting paint, so the tone turns brown and only then add white until the desired result is obtained. That is why there is an important rule: before mixing the whole mass, it is recommended to make a test batch in a small container. This will help you avoid failure and save money in the event of a failed experiment.
Self-production of colored paint has certain disadvantages. In particular, it can be noted that it is quite problematic to repeat the exact color version, and mixing "in reserve" is not profitable from a financial point of view. Therefore, you should accurately calculate the material consumption and mix the colors of paintwork materials with a margin of 5-10%.
Mixing procedure
So, let's take a closer look at the question of how to properly mix paint at home. For this purpose, a wide variety of paintwork materials are suitable, be it acrylic paints, oil paints or any other options. Almost any product can be given the desired color. The main tool that is needed for work is a construction mixer, that is, a special attachment that can be put on a drill. It is also worth stocking up on various containers in which the kneading will be made and a small panel that allows you to check the resulting shade. For these purposes, it is optimal to take the same material that is planned to be painted.
Attention! With natural and artificial lighting, the resulting color will look different. Therefore, before proceeding with the painting of the entire surface, it is worth considering the sample in various conditions.
Tinting steps
- Receiving a probe. This step involves mixing small amounts of different shades. To do this, select the primary colors, for example, you want to get a plum color. The main colors will be red, blue, white and black. Pour 50 ml of red paint into a small jar and dilute it with 10 ml of white paint. Then mix in equal parts blue and black tone and combine the resulting mixture. You can also mix red, blue and black to get a coffee color and so on, there are quite a few options. However, it is not at all necessary that by combining shades, the first time it will be possible to find the desired color. You will have to experiment a lot, adding one dye, then another.
- Experimental staining. The next step is staining the sample. It is worth saying that the first and second steps can constantly alternate, since the color that you do not always like in the jar will also look beautiful when it dries. For example, a milky shade may look off-white or even yellowish, and what looked like olive in a jar will turn gray-green on the wall. As a result, the selection will have to be carried out anew. Therefore, it is so important not to rush to the main surface color.
- Guiding the main solution. After the color on the pilot board has been approved, large quantities of paint can be applied. How to get a large volume of color? You should take the overall container and increase the selected proportions by 5 or 10 times. Then mix the formulations thoroughly with a mixer. Important! It is not necessary to paint the entire surface at once, for a start it is recommended to make sure that the water-soluble paint or oil has acquired the required tone.
To make the interior design truly luxurious and unique, it is worth using tinted paint colors. It's so nice to come home, where the color of the kitchen has a delicious shade of coffee with milk, and the ceiling in the bathroom is painted in a relaxing mint color. And in order to create such coziness and comfort in the house, it is enough just to know how to mix paints correctly in order to get the desired option.
Being engaged in painting, painting or applied arts, you can often face the problem of a lack of one color or another. That's when an entertaining and very useful science comes to our aid - a colorist. For example, let's talk about making paints.
What do you need for this?
- Paints (see what is from red, blue, black and white may be needed).
- Brushes (the more the better).
- Palette.
- Water or thinner for oil paints.
Whatever paints you paint - acrylic, oil or watercolors, you need to use a palette, and only then apply to the drawing. In this case, you can adjust the intensity of the shade you need and correct it if necessary.
How to get paints, many were told in drawing lessons in elementary school. But when an urgent need to "figure out" such a color, we frantically begin to mix all the shades in a row, getting a kind of dirty mass. ![]()
How to get purple color from paints in a few steps?
Myself purple is secondary, in order to get it, we need to mix two primary, primary colors - red and blue.
Take some red in the palette and add about the same amount of blue there. Mix the paints thoroughly. This will create a base purple color. Most likely, it will not suit you, and you will have to "modify" it.
- In order to get a lighter one, you need to add white.
- If you mix purple with white paint, you can get a purple color too. Depending on the amount of white, purple shades of varying intensity will be obtained.
- A delicate purple shade of color can be obtained by mixing pink with blue.
There is another way how to get purple color from paints. To get a muted purple color, you need to mix black paint with any cold paint.For example, it can be alizarin red. You will get exactly purple, it will not be very bright and chromatic.
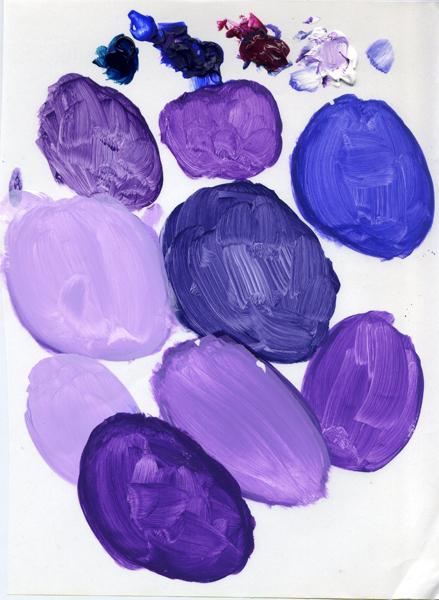 There is one more important point how to get purple from paints. A large role in this will be played by the saturation of the shades of the outgoing colors. For example, it will look like this: scarlet + light blue paint will give you a purple color with a beautiful burgundy shade... Or if you mix red with dark blue, you get a rich purple color, very close to eggplant.
In the event that you work with watercolors and do not use whitewash, adjust the saturation or pallor of the color using the amount of water.
And if you prefer to work with gouache, do not forget that when it dries it becomes lighter by several shades, and you need to achieve a darker purple color.
Be sure to change, wipe or wash your brushes with every paint set, then your experiments will delight you.
Well, now you know how to make purple. And the situation will not take you by surprise.
Artist Lee Hammond, in her book "Acrylic Painting with Lee Hammond", has provided a wonderful lesson on the correct mixing of acrylic paints. This is useful material for beginners, but experienced artists can also find useful information for themselves. The lesson will be of interest to those who are not going to immediately buy the entire ready-made palette. And what is it for? Paints mix perfectly with each other, and everyone knows the common truths of drawing: blue and yellow give green, and blue and red - purple.
Difficulties often arise when mixing paints. For example, from red and blue pigments it is obtained Brown color rather than purple. Here the fact is that not all pigments mix well and correctly with each other. This article takes a closer look at field-proven pigments and their main combinations. By following these tips, you will learn how to choose the right paints, save money when buying, and your color palette will be extensive and rich.
In this lesson, some of the paint names are translated and others have their original names. The fact is that the main color scheme takes its name from the color pigment from which it is made. Such pigments in paint production have been used for centuries, they are familiar to every artist and have long become international: ocher, soot. We have translated only those names that may be incomprehensible.
Best advice for newbies: When you go to the store, write down the names of the colors you need and only buy them. The paints are only the same in appearance, but they are composed of different pigments. Do not forget that pigments have different properties and qualities (density, transparency), on which the mixing result depends. Without writing down the desired name, you run the risk of getting the wrong result that you expected.
We remind you that everything said in this article applies exclusively to acrylic paints!
Basic palette. What does it include
The palette consists of 7 colors, but on their basis you can create and create many colors and shades. (Naturally, you can buy other colors in the store. They are called additional colors, and we will not indicate them in this article. Over time, you will understand what paints need to be purchased).
Three defining colors 
Two complementary colors 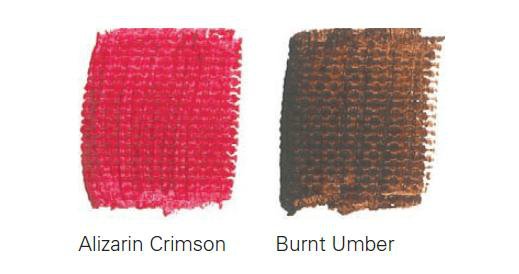
Two neutral colors 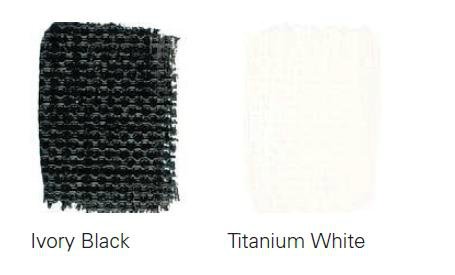
Now let's start the fun part: we will mix paints and create other colors.
The magic of light colors
At the beginning of our journey, let's try to mix each of the main colors with white. This is how all light colors are obtained.
Attention! The color samples obtained are labeled with the names of the paints that were used. 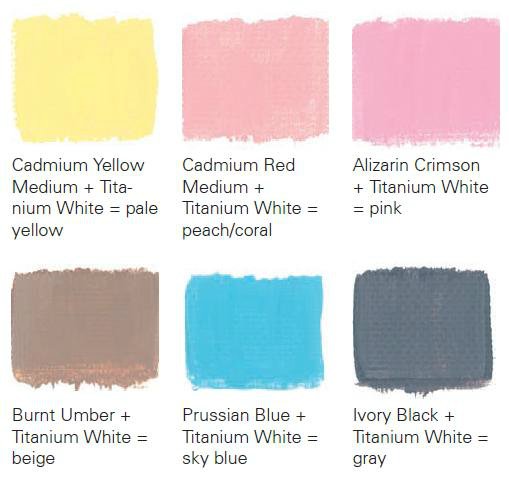
In the figure, the samples are presented from top to bottom and from left to right:
1 - fawn; 2 - peach (coral); 3 - pink;
4 - beige; 5 - sky blue; 6 - gray.
How to get dark tones
And everything is simple here. For darker tones, mix the primary colors with black.

We made it:
1 - dark olive green; 2 - chestnut; 3 - plum;
4 - dark brown; 5 - dark blue.
All shades of green
This is a more difficult level, at which we will get the desired colors by mixing the basic paints with the paints obtained earlier. Lee Hammond did not put green in the main palette, but she describes in detail how to get it in different variations.
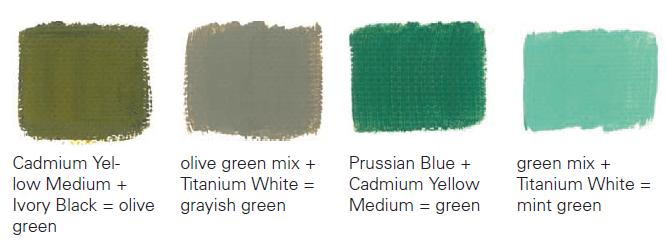
What happened:
1– olive green; 2 - gray-green; 3 - green; 4 - mint green.
The whole process of getting green is extensive and interesting. Such work is quite laborious, but this is due to the many shades obtained. For example, green can be made from yellow by adding a drop of black to it, or from yellow and blue. Combining yellow and brown creates earthy shades of green.
The second and fourth (see photo) shades of green (see photo) are obtained by combining the base paint with the paint mixed separately. That is, to obtain a shade of Grayish Green, it is necessary to add titanium white to the previously obtained Olive green.
Attention! Lee Hammond puts a "mix" label on the color name if a composite color from the tables provided is used.
Shades of magenta and violet
To obtain these shades, Cadmium red medium is added to the colors from the main palette: Cadmium red medium or Alizarin Crimson.
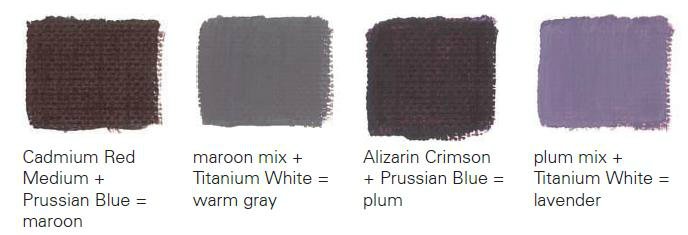
What new tones got:
1 - chestnut; 2 - warm gray; 3 - plum; 4 - lavender.
All of these mixtures can be lightened by adding a white base color to them. This is how delicate shades of lilac, lavender are obtained.
Lightness of orange shades
Everything is simple here: each of the shades of orange is obtained by mixing one of the presented red colors (Alizarin Crimson or Cadmium Red Medium) with the main yellow (Cadmium Yellow Medium).
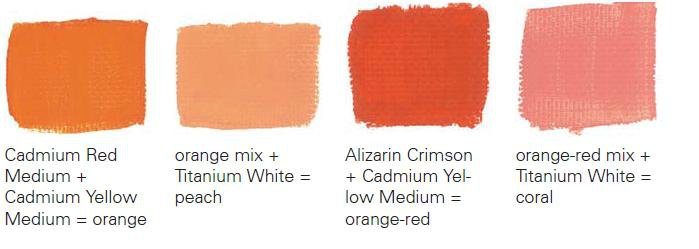
What colors should be obtained
1 - orange; 2 - peach; 3 - orange-red; 4 - coral.
If you need peach, melon, coral colors, then the resulting orange shades must be mixed with titanium white (Titanium White).
The simplicity of earthy tones
Burnt Umber is irreplaceable here. We will add it to other colors to get the shade we need. All the colors obtained in this way can be easily transformed into pastel colors if you add titanium white to them. In the picture below, the top row shows monosyllabic earth tones, the bottom row shows pastel shades(the same earthen, but with the addition of white paint).
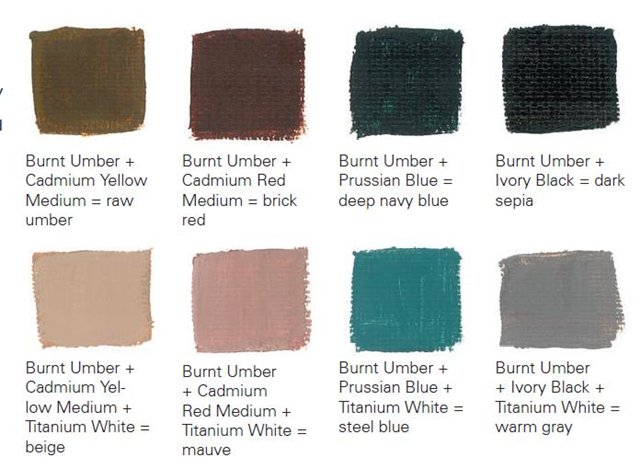
All shades:
1 - umber; 2 - brick red; 3 - deep dark blue; 4 - dark sepia;
5 - beige; 6 - lilac; 7 - blue steel; 8 - warm gray.