Butterflies are considered symbols of the soul, as well as the ability to transform, because this winged beauty is born from a nondescript caterpillar. And also butterflies remind us of summer, warmth and sunshine. In addition, all butterflies are different, and especially the butterflies in your child's fantasies. So let's make a butterfly today in different styles applications, including the application "butterfly" made of leaves, which will undoubtedly develop in the baby not only useful fine motor skills, but also imaginative thinking.
Craft from leaves
It is very cool to make such an applique in autumn, when the summer memories are still so vivid and bright, and under your feet every now and then you find beautiful multicolored leaves - just the material we need to make a butterfly applique from the leaves.
It will also be great to make such an applique if you have a herbarium - dry leaves are also a great material to work with.
For the butterfly applique we need:
- The paper or cardboard that we will use to base our work;
- Glue;
- Leaves. It is advisable to find one oblong for the butterfly's body, as well as four relatively large ones for the wings.
So let's get to work.
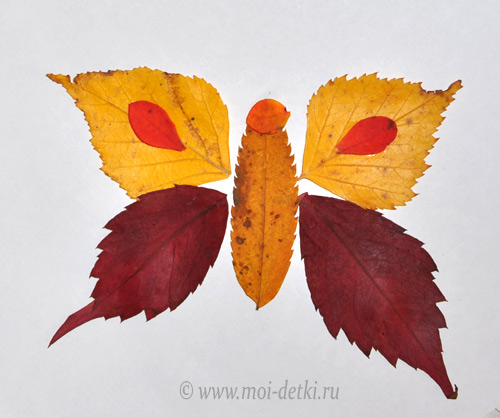
First of all, we lay out our leaves so that in outline it resembles the silhouette of a butterfly. It is better not to glue anything right away, since you first need to see if everything is in place. When the "draft" suits us, we can start gluing. We begin to glue the body. A small head can be cut from any leaf that matches the color.


You can also use acorns or thick tree branches instead of the body. Once the body and head are in place, the wings can be glued on. Glue large leaves with sharp tips in different directions. From above, you can additionally decorate with clippings from leaves of a different color, dried berries, plasticine, sparkles, beads, and so on.

From colored paper

Making a butterfly out of colored paper is very easy. It is enough just to cut out the body, wings, head and antennae from paper, as well as wing decorations and glue it all on a sheet of paper or cardboard.
You can also make a butterfly out of colored paper using children's hands. First, we outline the palm on colored paper and cut it out. To create a butterfly, we need six palms: four of one color and two of the other.


Cut out two identical parts from paper for the body of the butterfly and glue its lower part to the cardboard base. The background can be of any color.
Next, from the first three palms (two of the same color and one of the other), we need to assemble a wing. This is done as follows: you need to fold two identical palms one on top of the other, as shown in the figure.

Then, on top of these two palms, impose a third, the one that is of a different color. Fasten them all together with double-sided tape or glue.

Do the same to create the second wing. Next, you need to glue the wings to the already glued part of the body, so that the wings do not overlap. Glue the second part of the body evenly from above.

The colored paper butterfly is ready! You can draw or glue eyes, and additionally decorate the background and wings with the help of various sparkles, beads, and so on.
Fabric work
The application "Butterfly" made of fabric can be easily mastered by children in middle group as they are old enough to cut and sew the first stitches in the fabric. Of course, all this is under the supervision of adults.
You can take felt as a fabric, as it is great for crafts: it does not crumble, it can be easily cut and glued, and felt is a soft and durable material.
To make this craft, we need:
- Felt;
- Glue gun;
- Jewelry (rhinestones, beads, beads, and so on).
First of all, we need to draw a butterfly pattern on paper or cardboard.
Cutting stencils:


Transfer the cut stencil to felt. Details can be made different colors(for this, each detail needs to be painted in the color you want to make it), or you can use felt of the same color. Next, we cut out our butterfly.
Now the matter remains small: decorate it with rhinestones and beads. For shine, you can sprinkle hairspray on the finished butterfly, then sprinkle with dry sequins and secure with varnish again.

Such a butterfly can be attached, for example, to a piece of wire or a stick to form a decoration for a flower pot. To do this, you need to cut out not one part for the butterfly, but two identical parts, front and back. Then you need to carefully glue them together, putting a stick between them so that it reaches the middle of the butterfly figure. You can glue the stick to the back of the figurine with a glue gun to prevent it from falling out. On the front, if desired, you can glue cut out parts of other colors or just decorate.

You can also make a felt butterfly as follows.
First, cut out a larger butterfly from felt of the same color, and then cut out another butterfly of the same color, but smaller and from felt of a different color. When the parts are cut out, they need to be glued together along the center line: glue the smaller one on the large butterfly. You also need to make several connecting stitches in the same place in the center, thus stitching both butterflies together.


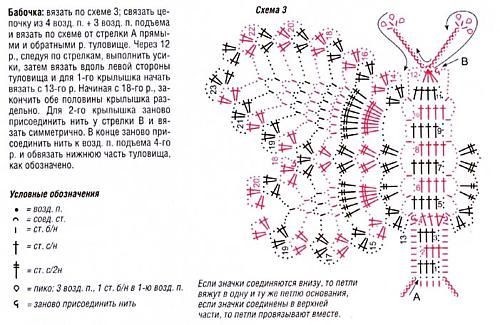
You can crochet butterflies. The photo presentation below shows patterns for knitting.


Related videos
Also, be sure to watch specially selected videos on this topic.
Master Class. Application of autumn leaves "Butterfly"
Head: Zabrodina Nadezhda Vasilievna educator preschool group MBOU "Nikolskaya OOSH them. N. M. Rubtsova "Nikolskoye village, Totemsky district, Vologda region
Age: This master class is intended for children 4 - 5 years old
Purpose of this work: group decoration, gift.
Target: teach children to make crafts from natural materials, develop creativity, imagination.
Tasks:
1) teach to see the beauty of autumn nature,
2) develop accuracy when working with such fragile material as dried leaves;
3) cultivate a love of nature.
Materials and tools: Dried autumn leaves, PVA glue, glue jar, brush, napkin, plasticine, cardboard base for application.
Flutters over the grass ... a bow?
No, it's probably a candy wrapper
multicolored from sweets?
Does any of you know the answer?
Oh, a miracle has wings!
Where are you from?
Quietly the butterfly sat down
rested and took off.
So from flower to flower
I flutter all day. (M. Blinnikova)
Step-by-step workflow
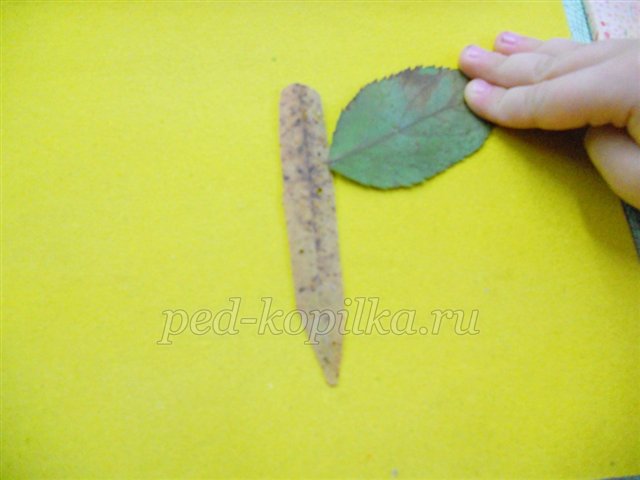
1. Prepare the appropriate material to get started.
2. Choose an oblong leaf and stick the butterfly's "body".

3. Select leaves of the same color and shape and glue the upper wings.

4. Then choose other leaves for the lower wings in color and shape and glue them too.


5. Find two leaves and long petioles, gently break them off. These are the antennae for the butterfly. Stick them on.

6. To make the butterfly look smart, decorate its wings. Remember that the pattern on both upper wings must be the same. Both lower wings should be decorated the same way too. For each pair of wings, come up with a different pattern.
![]()

7. And at the end of the work, make the eyes and mouth of the butterfly.


8. But what kind of work came out with other children.


Application from leaves "Autumn butterflies"... Master class with step by step production.
The work is intended for children aged 7 and older, teachers and parents.
Purpose of work: to make an applique of leaves "Autumn butterflies".
Tasks: to master the technique of making a butterfly; develop practical skills in working with natural material; develop the imagination and imagination of the child.
Materials and tools:
- Autumn leaves,
- scissors,
- double sided tape,
- glue stick,
- colored paper,
- hole puncher.
Purpose: Application "Autumn butterflies" can become a souvenir and a gift for family and friends, an interior decoration.
Step-by-step process of making the "Autumn butterflies" applique.
I suggest making butterflies from autumn leaves.
For red and yellow maple leaves, cut off the middle part of the leaf and the legs, as shown in the photo.

On a strip of double-sided tape, glue a leaf - a head.

Then glue the upper wings from the maple leaf.

Glue the lower wings from a maple leaf of a different color.

Glue the abdomen - an oblong leaf and antennae from the legs of maple leaves.

From the back side, the butterfly looks like this.
![]()
Make eyes with a hole punch from red or other colored leaves. Decorate the abdomen with red triangles carved from maple leaves. Decorate the wings with multi-colored circles made with a hole punch.

The second version of the butterfly is from a different combination.


If the butterfly is placed on colored paper and decorate with the remnants of leaves, creating the effect of falling leaves, we get such options for volumetric applique.


Thank you for the attention. Good luck with your work! I look forward to your feedback.
If you find an error, please select a piece of text and press the keys Ctrl + Enter... Thank you for helping to make our portal better!
Angels made of thread
Angels made of thread Here is such an angel on our New Year's wreath made of tinsel. Is done about ...
Crafts from natural and waste material- the group "Solnyshko"
Crafts from natural and waste material from the pupils of the "Solnyshko" group, Gryazovets presented ...