Children like to do something creative, they just need to show what can be made from certain materials.
Here you will find many interesting crafts from colored paper or natural materialswhich can be done with the children.
All crafts are not completely complex and there will be one pleasure.
Crafts for kindergartens: paint pebbles
If you have selected stones to the sea, you should not throw them away. Arm yourself with acrylic colors or gouache and start painting them.
Such pebbles can be found in many places, then bring home or in kindergarten and paint them into all the colors of the rainbow. You can also draw various characters - possibilities are limitless.


DIY in kindergarten with their own hands from plastic covers
If you have plastic bottles, you should not throw them out. Of these, you can make a huge amount of crafts.

Moreover, the crafts can be not only from bottles, but from their covers. These are such interesting crafts can be done with children. Arm yourself with non-ferrous paper, color cardboard, glue and various decorations.


Autumn crafts from cones to kindergarten
The cones are a natural material from which you can make a lot of interesting crafts.

You can connect several cones, for example. You can do this in several ways: using threads, wire or gum; Using glue or just putting a bump on a wand.
Many other natural materials, such as different branches, acorns and grains, can be attached to the cones.
If the cone is solid, it can be soaked in water and after a couple of days they will become soft, which will allow you to make them easier to cut and pierce (seed or nail).

Opened cones can be used to make a camel body or turkey, and closed - for limbs (legs, hands).
* For a start, you can make a birdbreaker - it is possible simple drinking From the cones.

* A little more complicated will be "Camel", "deer" or "Swan". You will need to make a neck - use the heads of the acorns that it is worth riding a bent wire. The head consists of an acorns.

* Also try to do with the children's deputy. It is done with the help of green and ripe cones. Use wire for attaching hands and legs.

The head of the slave attach to the body with glue.
Use the chewings to make a mustache, and use scales from the bump to create an eye.
What cradle to do in kindergarten: "Apple"
From colored paper you can make an incredible amount bright crafts Together with children. One of them is the volumetric "Apple".

This simple work Children will do with great interest.
For her you will need: Colored paper, glue, cardboard (color cardboard).
Prepare a template and cut on it a certain number of parts.


Start gluing all the details.
The workpiece is glued to some rod (ice cream wand).


Make a tail, cutting an extra piece of paper.


Crafts of children in kindergarten: "Tuchka and a bright rain"
This craft also uses colored paper and glue.

You will need:
Colored paper
Scissors
1. First cut out the contour of the tuchka from the white or blue paper.
2. Watch out the images to understand how to make a drip of the rain.

3. By connecting everything together, the baby will have a very beautiful picture.


Crafts from paper in kindergarten: "Autumn leaves"
From colored paper can be done very beautiful leaveswho acquire rich autumn paints.

Look at the images to understand how such leaves can be made. In fact, the caretaker is quite simple, and the children will like to work on it.


Crafts Autumn for kindergarten: "Mushrooms - Mushrooms"
From the old packaging from eggs, you can make such beautiful mushrooms. Although madman and poisonous mushrooms, they boast a very beautiful color that you will give in your crafts.


Crafts for a kindergarten section: "bull"
But what beautiful bull can be made from the old plastic bottle or container.

You will need:
2 cardboard cylinders from toilet paper
Plastic bottle (not rounded)
Watch out for the photo instruction to make a beautiful animal.


Crafts for kindergarten (photo): "Sheep"
If you are not sorry for cotton sticks, you can make such a beautiful and fluffy lamb.

You will need:
White cardboard
Cotton swabs
Scissors
Clothespins
Black marker
Pink marker
1. Prepare a sheet of cardboard and cut out two figures in the form of an ellipse - one part will serve the torso, and the other is head. Temporarily postpone part for the body.
2. Prepare cotton wands and cut off from them with a length of about 1.5 cm.
3. Start gluing these tops to the body.


4. Take two cotton tips and get them on both sides of the head of the lamb. For bangs, you can glue 3 macs from cotton sticks on top.
5. Draw a marker. You can also add some color part.


6. Cook the tape and make a bow out of it. This bow must be fixed to the head of the lamb.
7. Now stick the sheep's head to the body.
8. Take the sheep torso and attach clothespins to it - they will play the role of legs. If necessary, you can apply glue to these clothespins.

Crafts on the topic "Autumn": "Spider"
From natural materials you can make this beautiful craft. Using autumn leaves, chestnuts and thread, try making a spider on the web.

In the image you can understand how to do it. The caretaker is quite simple, but very interesting and original.


Autumn crafts do it yourself: "Tree from leaves"

You will need:
Leaves (Red, Yellow, Green)
* you can choose the leaves of different shapes
* Do not choose too dry leaves
Several thin branches and one branch thicker
* Big branch can be an unusual shape, with knots
Rowan (if desired)
Adhesive gun or superchalter
Summary:
Crafts from paper for children do it yourself. How to make a craft from paper with the child. Children's handicraft paper.Paper - very affordable Material For creativity with children, this is why paper crafts are so popular. In this article we will tell you about the most interesting crafts from paper for children. In the manufacture of crafts from paper with your own hands, the child learns to work with scissors, develops fine motility, accuracy, patience. Working with glue also requires certain skills from the kid. Not always everything turns out the first time so beautiful and gently as I would like. We tried to select for you only those crafts from paper with which children will be able to cope with themselves either with little help of adults.
1. Crafts from paper. Crafts from paper do it yourself
Let's start with the easiest crafts from paper, to make even small children. By 4 years most of the children are already able to cut out of paper with scissors simple figures. To make a craft from paper "Run" with your own hands, the baby must cut a few paper strips of the same width. The head of the bunny is made of a paper strip glued by a ring. Ears are glued on top separately. To make legs, it is necessary on the strip that is intended for the body, to make small cuts on both sides. The finished craft of paper should be pasted on a strip of paper green - "grass".
Bird-curls. Also a very simple handicraft paper for children. Torchish and head in birds are made of colored paper strips of the same width, but of different lengths. Each paper strip is cholerated, after which the rings are inserted into each other and glued together in one place. Even a small child can make such a craft from paper for children.
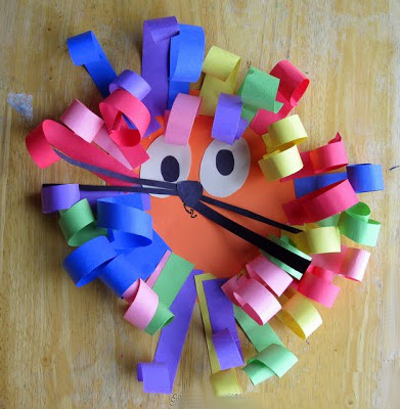
Here is another option for such a craft of colored paper. These birds have twisted tails, winding them on a pencil. Detailed instructions how to make this paper craft, see reference.
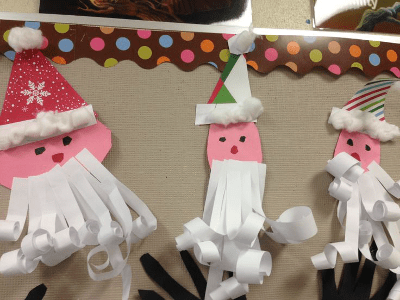
Craft paper "Lion". This pretty, multicolored lion is also made of colored paper strips swirling with a pencil.
Similarly, you can make a paper beard at Santa Claus.
3. How to make a craft from paper. Children's crafts from paper
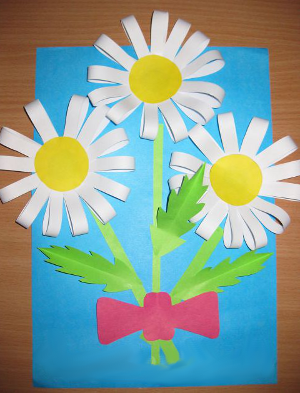
Separately, I would like to tell about the colors made of paper strips. As in the previous crafts, entrust the child to cut paper strips. With this task, the baby will easily cope with 3-4 years. After that, help him cut the seeds of flower and stalk with leaves. First, separately glue each paper strip in the form of "loops" (it will be the petals of the future flower). After that, in the correct sequence, cover all the appliques on the cardboard basis.
4. Crafts from paper. Weaving paper
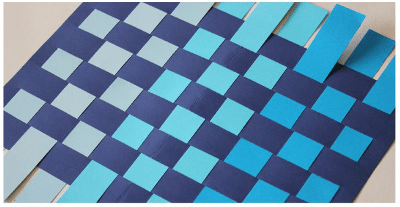
Weaving is one of the most ancient art types. With it, you can make a lot of useful things: bookmarks for books, rugs, baskets, etc. In addition, weaving paper brings up perfection, accuracy, patience, develops attention, eye, coordination of movements. There are several types of weaving from paper. In this article we will tell you about the most simple, and therefore the most popular form of weaving is direct weaving from paper.
To make a craft from paper "Rug" you will need:
Two sheets of colored paper contrasting colors
- line, simple pencil, scissors, glue
On the back of the sheet, it is necessary to make a markup that is applied with a pencil using a ruler. To do this, it is necessary to retreat from the edge from all sides of 1 cm - it will be a kaim. Having draw horizontal lines every 1-1.5 cm. Folded in width (length) The basis of the front side inside and make cuts along the lines of markup to the border, the workpiece to deploy.
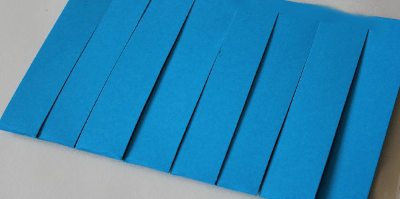
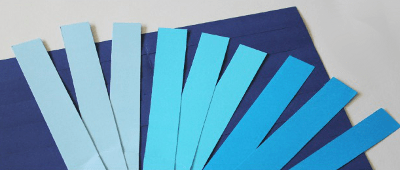
Cut the strips of another color (the width of the strip is equal to the distance between the cuts).
Start weaving from the wrong side to the 1st strip: Strip, like duck, emerged, hid, etc. The tip of the strip is removed from the wrong side.

In this technique you can make a lot of unusual crafts from paper. Here are examples of only some of them.
Material prepared: Anna Ponomarenko
Paper is the most common material for crafts for several reasons: low cost, availability, ease of use. Of course, at all simple material You won't call paper, because it all depends on your skills, the type of paper, as well as the difficulty of handicrafts. It may be simple applique For children, and maybe origami from modules with which little children cannot cope. In this article I want to offer 10 crafts of varying complexity for children and adults. They are made of several types of paper: Simple white A4 format, color, corrugated, strong. Even eats one hand from the leaves for notes. Let's proceed to consider various work options.
3d postcard on March 8
I always want to surprise the gift for the holidays, and such an unusual postcard will not leave anyone indifferent. This cracker will be able to quickly and easily fulfill the child from 9 to 11 years old with your own hands and give a mom or grandmother for the holiday. To find out how to make a 3D postcard you can see photos and video Description with step-by-step instructions.
You will need:
- Colored paper (4 sheets white color and 1 pink leaf)
- Scissors
- PVA glue
- Rule
- Pencil
- Double-sided tape
- Paint (lilac and green)
Progress:
- White sheet Delim in half the line, and then we fold 4 sheets together and cut through the line. We need 7 halves, put aside the 8th to the side.
- We take half a sheet and fold in half 2 times. We have a rectangle, two sides are closed, and two open.
- Canceling the corners to the closed long side outside. So do in both directions.
- Now the cooled corners must be beatened again in the opposite direction, so we do only on the one hand.
- We have a landmark on which we will cut off. Cut at the curved line from one side, and then strip the corner once and cut down the other side. Thus, we will get a form similar to a piece of leaf.
- So we do with the remaining six sheets. So that the form remains at all colors one simply attach the first workpiece and cut it on it.
- Take the resulting flower and cut one petal from him, and then glue the interval of overlapping the lateral petals exactly one to another. There should be 6 petals. So we do with all the flowers.
- Fold the flowers in half. On the side petals of the 1st flower, cover pieces of scotch, on the upper part of the petal.
- We glue the sidelines on the side parts, only the side petals, applying neatly petals on the petal.
- Now the 4th flower is glued with 3 flower, also only 4th all petals should be glued.
- The 5th and 6th flowers glue from above as 2 and 3 (only on the sides).
- The 7th flower is glued on top of all others on 3 petals.
- Sheet pink colour Fold in half, as a postcard, now we will finish our composition.
- We put the flower at half the postcard and on the upper central petal of secure tape and close with another list of postcards. In the same way, stick the second side. Watch the leaf lay a clearly near the fold line.
- The postcard is ready only to paint the middle of the colors. You can sign a postcard.
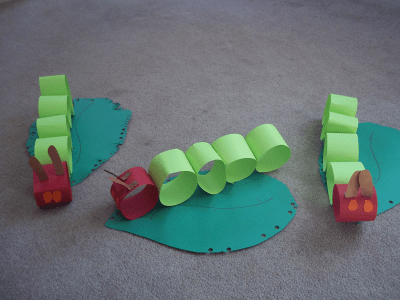
Colored paper caterpillar
Such a caterpillar is easy to perform and will take very little of your time. The cauldron is designed for children from 2 years old and their parents. You can spend time with your chance nice and useful, also develop a motorcycle of children's handles. Let's get to perform the caterpillar with your own hands. 
You will need:
- Colored paper of different colors
- PVA glue
- Scissors
- Rule
- Pencil
- Feltolsters
Progress:
- Make out of paper strips 6 cm long and 1 cm thick (red, green, blue, yellow, purple, brown, blue). Colors should be different so that the caterpillar turns out to be rainbow and bright.
- Each strip glued to get mugs.
- When the circles are ready to glue them with each other alternating color, a strip of circles should turn out. The latter we glue a little higher than the rest, it will be a head.
- Felt-tumbler Draw the mouth and eyes.
- Cut out fine strips from colored paper and tighten with scissors. Stick them to the place of the mustache.
- From sheet green color Cut the shape of a sheet of size focusing on the caterpillar. Our cheerful caterpillar is ready!
Valentine Corrugated Paper
For Valentine's Day, the usual postcards in the form of hearts always give, but if you want to make a more original postcard. Make it from corrugated paper. And now I will tell you how to make Valentine with my own hands in stages with step-by-step instructions. 
You will need:
- Cardboard
- Red Corrugated Paper
- Scissors
- Match
- PVA glue
Progress:
- From cardboard Cut the heart shaped card.
- Corrugated paper cut into squares in size a little more than 1 cm.
- Square to the central part we apply to the tip of the match and circular motion fermenting paper. So do with all the squares.
- We put glue on Valentine and begin to glue our crumpled blanks. When the glue dry flies to the paper so that it is more fluffy. Postcard for the holiday is ready, you can give it to your beloved person.
Bunny in 5 minutes
If you need a crafts for a kindergarten, which will not take a long time, then the volume bunny will become the ideal option. The most important thing is that your baby can be connected to the execution process. Let's see how to make a simple bunny with your own hands. detailed instructions.
You will need:
- Sheet of colored paper
- Scissors
- Rule
- Pencil
Progress:
- From the sheet of paper, cut the length of 2 strips with a width of about 1.5 cm.
- One strip is cut into two different strips. The difference is about 3 cm.
- Both strips glue so that we have 2 mug.
- Glue them with each other.
- The second strip is cut into 3 equal parts. One piece is cut along. Each thin strip we turn in half and the tips glue. This is our ears.
- We glue the ears on our billet from two circles, to a smaller one.
- The remaining strips also cut along. Paws are made like ears. Glued to the bottom circle.
- From one of the strips we make a small circle and make a tail.
- The last band is folded in half and with scissors spin the edge. Scatter and stick to the back of the lower circle and tighten them back scissors. Bunny ready!
Video How to make a bunny of paper in 5 minutes
Beautiful flower
To decorate the interior you can make it yourself unusual flower From paper for notes. To do this, you do not need special skills, a child of 4-7 years old can help with fulfillment. To make the craft we made for you a detailed description with step by step instructions.
You will need:
- Paper for notes
- PVA glue
- Cardboard
- Scissors
Progress:
- Better for notes is better used without sticky edge. Take a sheet of the corner up and fold the side corners and sides to each other. Glue them. It turns out the steers. So do with all the leaves.
- From the cardboard cut around the circle about 7-8 cm. So we have a small flower.
- Now stick to the circle 1st row of petals short side up. Petals must be tightly to each other.
- In the next row we glue the petals in the intervals of the past row.
- So we make the subsequent ranks gradually reducing the number of petals in the row.
- The middle fill in the petals no longer focusing on the ranks, look to be beautiful and voluminous. The flower is ready, you can hang it on the wall, or put on the table.
Video flower do it yourself
Book do it yourself
If you want to do unusual craftThat will be useful to use, you can make a small origami paper book. You do not write down your poems or writings into it, but for minor records it will come in handy, besides in a bag, it will not take much space. Make such a craft is very easy, just follow the instructions with a step-by-step description. 
You will need:
- Sheet of paper A4 - 2 pcs different color
- Scissors
Progress:
- A4 sheet fold in half down long. Open the sheet back.
- Next, bend the sides to the central collar.
- Along the folds, cut the sheet on 4 bands.
- Take one lane to fold it in half 3 times. You get a small rectangle.
- So do with all stripes.
- Open the resulting triangle and now fold it with the harmonica. Also do it with the rest.
- Now glue all the parts, folding the last pages one to another of each harmonica.
- Processing glue to fold the sides that look at each other and glue. In this way, we make page.
- A4 sheet of another color fold in half in width, and then in length. You will have 4 rectangles. Cut one of them.
- At the rectangle, fold the side long sides to the center, but not reaching the center of about 0.5 cm.
- Rectangle fold in half and slightly planning cent. Now focusing on the center Make two bend in the central part of about 0.5 cm wide. The cover is almost ready.
- Now trying the sheets of notebooks on the cover in the size of the sheets inside. Then the last books of the notebook insert into the cover. For better attachment you can use glue. Our unusual notebook Ready.
Video how to make your own hands mini book
Butterflies for decor
Paper butterflies can be used for decoration of walls, windows and gift packaging. They create a romantic and easy mood, because the butterflies are so graceful. Make butterflies with their own hands will be able to take a child since 3 years old, as well as any beginner. There are many options for performing paper butterflies and we want to offer you one of them, quite interesting. And now let's create your own hands a wonderful decoration in the form of a butterfly. 
You will need:
- Sheet of paper A4 - 2 pcs (yellow and pink)
- Needle big
- Beads and beads
- Thin wire
- Scissors
- Double scotch
Progress:
- Take one sheet and fold it in half, but the fold is not necessary too high.
- Corners cut off, from the bottom side more, and with an upper less with a smooth bend in the middle.
- Reveal the sheet and moving along the fold line fold the harmonica. We made the top wing.
- For the bottom, we also do the same cut the corner of the same size. Next fold the harmonica.
- The needle is picked up the wings of butterflies in the center so that in the future it was easier to bore.
- We put the wire in half and ride the wings on it.
- On the wire at the top wings we put on a white bead, on both fibers. Then two gold on every mustache.
- The remaining part of the wire is decorated with golden beads. To finish the mustache, we need a wire tip to push in the last bead twice. Supleny cut off. We also do with the second mustache.
- Upper and lower wings with a scotch combat together.
- On the lower part of the wire we put on white beads of larger size, about 4 pieces, and then 2 more smaller beads.
- It is necessary to finish the tail, like a mustache, but for reliability you can make some twisting movements and cut down too much.
- Now put the butterfly wings and you can decorate the interior.
Chill origami from paper
To decorate the house, office or kindergarten for the new year, you can make an interesting and unusual Christmas tree From paper with your own hands. For those who love origami, this Christmas tree will love. To execute this crawl, see the step-by-step instructions, as well as the photo and video description. 
You will need:
- Colored paper
- Scissors
Progress:
- From the leaf of green paper make a square.
- Connect the two opposite angle so that you have a triangle.
- Intripping the triangle back to the square and fold in the triangle two other opposite corners.
- For bends along the parties we put them in the middle when you fold the triangle.
- Now the sides of the triangle bend to the center, from the beginning on the one hand, and then on the other. And repent again.
- Each resulting triangle we crawl through the collapse, we are placed on the central collar and fold and make a new bend to the left side.
- Divide the resulting design on equal sides.
- Bottom corners. Get up, and then hide inside.
- We get a blank already similar to the Christmas tree. We make three outbreaks on the sides, not at least reaching the center.
- Now we need to have a corner in each outcropped piece inner side. Thus, we will get the corner of the Christmas tree. We do this work with all the pages of the tree.
- The Christmas tree is ready to decorate your home.
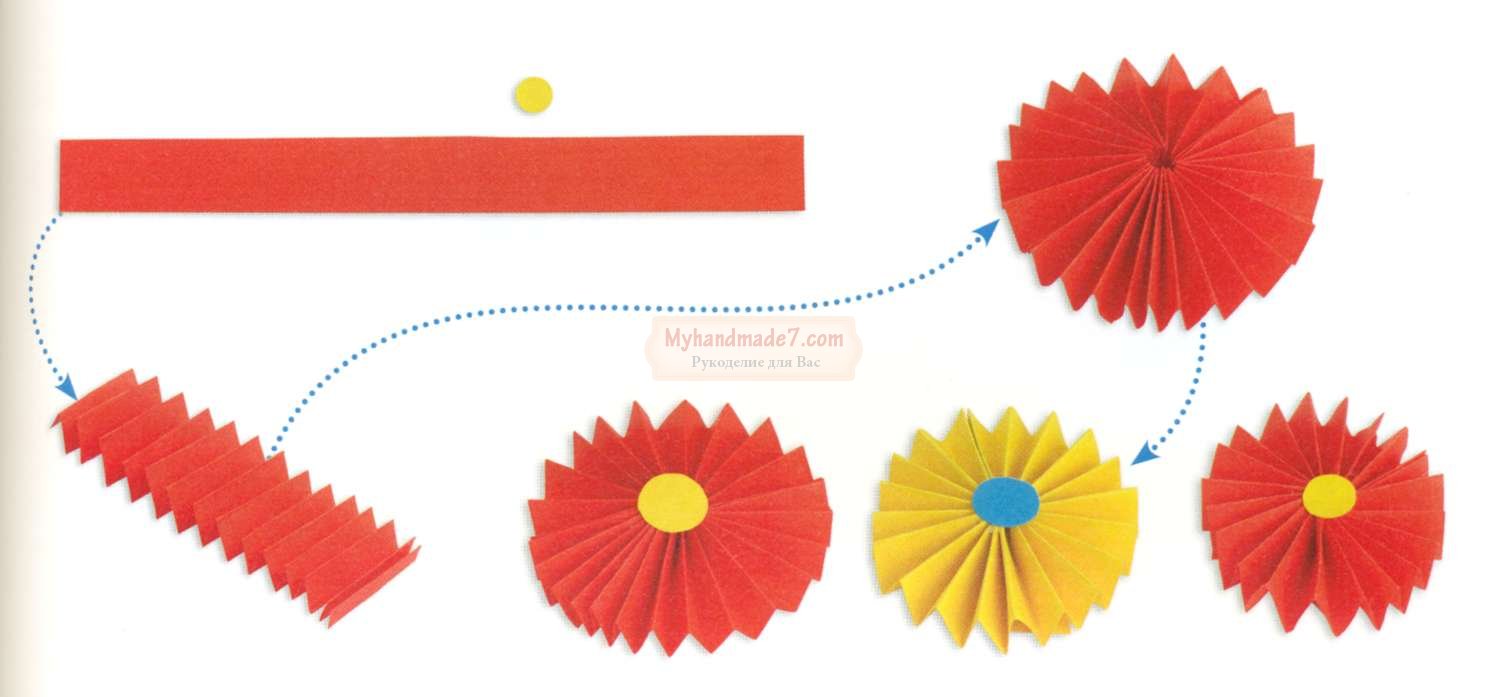
Chamomile paper
If you want to browse in the interior of summer and sunny mood Make a chamomile paper with your own hands. They can be used not only in the interior, but also as a gift to relatives and relatives. Such interesting and beautiful daisies will not leave anyone indifferent. 
You will need:
- Skipping Paper (Yellow and White)
- Green colored paper
- Scissors
- Scotch
- Thicks
- Toothpick
- Rule
Progress:
- Colored paper sheet visually divide along 4 parts and cut 1/4.
- With the help of toothpicks, twist into the tube our strip and the tip glue with scotch. It will be our stalk.
- Cut the piece of white color with a size of 10 × 25 cm and yellow 20 × 4 cm.
- Stripe fold 2 times and cut the closed parts with scissors on the one hand. Now from both sides along the band we do frequent cuts in a depth of about 1 cm.
- White paper fold in half and cut the closed part.
- Put white paper On the table, and the yellow part of the long side, and relative to the width, it should lie in the middle.
- Starting on the other hand, we fold the paper by the accordion.
- In the middle we bind the rope for fixing.
- White ends round with scissors.
- Narrow side of the stalk, drive the middle of the flower and secure it with a scotch.
- Spread the center of the petal to the top so that it is fluffy. Also straighte the daisy petals.
It allows you to develop the skills of handling scissors, improve the work of children's handles and make a kid more accurate. Each child will be able to make appliques from colored paper with their own hands, if you put the task before it.
Thus, the most accessible options for appliqués from colored paper for children of 4-5 years may be such:

Volume Appliques from Colored Paper
Ladybugs. Cut the two red circles and the black seized. Black dots are put on the circles, after which one circle is glued exactly above the black semi-alone, and the second bends in half and sticks to the first circle. We supplement the bug to the toy eyes and the mustache.

Materials for the applique "Ladybug"
We supplement the bug to the toy eyes and the mustache.

Applique "Ladybug"
Look at the video, how to make the applique " ladybug"In another technique:
Applique from pieces of colored paper
Fox. Highly cut from a paper plate of a triangle, and the stapler attaching two triangles of orange cardboard to the circular edge. Then cover the plate with pieces of orange thin colored paper.

Fill the whole paper piece.

Triangles - Ears and Circles - Eyes

It remains only to attach round eyes - and chanterelle is ready!

Ice cream. Draw or cut out from colored paper cups for ice cream and glit a round molds for cupcakes like balls of cream-brulee. With these molds, other appliques of dishes can be made if you use them as a plate.

Applique "Ice Cream"
Applique of colored paper by template
Bunny. Cut in advance the ears pattern, head and triangular rose bunny, as well as a bush of grass, for which he will hide.

We collect a picture on a sheet of white paper, glit all the details and enliven the bunny to the toy eyes.

Applique "Bunny"
Polar bear. From white paper on the template, cut out a round body, head with ears, muzzle and bear paws.

Dorify the necessary details. Covered blue watercolor sheet of white cardboard, creating background.

Against this background, we collect our teddy bear and complement it with toy eyes.

Applique "White Bear"
Multilayer Colored Paper Appliques
As appliqués from colored paper for children of 5-6 years, it is possible to use more complex, multilayer, containing small parts, paintings. Preschoolers may well cope with the creation of such characters as:
Fish. Cut out the one-time plate with a triangular fragment, the remaining part is covered with "scales" - semi-hi-colored pieces of colored paper of different colors that need to be imposed, slightly going on at each other. The stapler attach the tail and fins, glue the eye. Ready!

Here is another fabulous fish with colored scales.

Dragonfly. From a thin paper, cut the trigise torso with head and eight multicolored wings.

We glue it all to the white sheet, we complement the image of the toys and toy eyes.

Applique "Dragonfly"
Application of colored paper and disposable plate
Choppers in the nest. Half a disposable paper plate glued to a sheet of cardboard. From blue paper, cut out three oval figures of chicks.

Cove the figures with lumps with a thin blue paper, and the nest is a decorative chips.

It remains only to glue the eyes of the eye and keyboards - and the applique is ready!

Crafts "Pillars in the nest"
In appliqués " autumn tree»Disposable plate is the background.

Applique "Autumn Tree"
Colored paper appliques for complex template
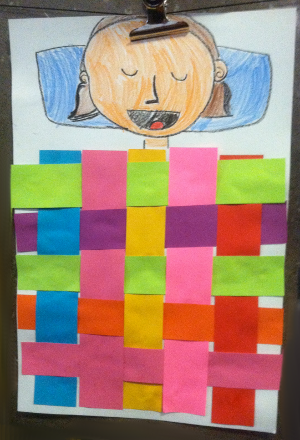
Girl in the rain. This applique is built at work with complex templatesThrough which you need to cut an umbrella, boots, head, dress, hair and girl handles.

What you need to cut for crafts "Girl in the rain"
We collect a picture on a sheet of blue cardboard, alternately gluing the details.

Applique "Girl in the rain"
Combined Colored Paper Applique
Chicken with an umbrella. This applique also implies work with templates, but if the kids are difficult to cope with such a task, templates can pre-prepare caregivers or parents.

Materials for crafts "Chicken"
We decorate the umbrella with a piece of translucent colored paper, which will make the image more interesting.

It will only take to collect a picture.

Applique "Chicken with an umbrella"
Volume Applique of Color Paper Slices
Flower. Cut from a disposable plate or a leaf of a cardboard of a flower circuit.

Cut small pieces from colored paper and roll them into lumps. One after another we glue lumps on glue.

Gently fill the entire flower space.

Application of colored paper "Flower"
Another version of the crafts is "sunflower". On a sheet of paper, draw the contour of sunflower. Cut the pieces of yellow and green paper.

Glit into the center of the black circle. We start to decorate with paper crafts. Before gluing a piece of paper, it is a little ferment - it will give the craft an extra volume.

Application "Sunflower" from colored paper.

Applique "Sunflower" from colored paper
Rainbow. It is made about the same way as the flower: the child is sminetting colored paper and gently lays it with rows, observing the sequence of flowers in the rainbow.

Applique "Rainbow"
Very beautiful in the technique, the volumetric applique of colored paper is autumn tree.

From pieces of red and pink paper, you can make the applique "heart". The basis take the heart from the cardboard.

Slightly ferment pieces and glue them to the base. Crafts will look interesting if you alternate red and pink lumps.

Excellent applications are obtained in the technique of terethery. Small papers are tightly alone to the other with a thin stick.

Here is such an aircraft can be folded from paper in the technique of alert.

Instead of glue, small pieces of paper can be recorded on the basis of plasticine.

Flat appliques from pieces of paper
Application from colored paper "Christmas trees" is done in a very interesting technique. Pieces of fine tissue paper are glued on triangular bases. At the same time, pieces can stick the edges of the eristies and stick together on another. Only after that the triangular base is glued to the pre-painted background.

Application "Christmas trees" from colored paper
Straw scarecrow. Appliqué is made in mosaic technique. We stick to the sheet cut over the hat and the head of the stuffed, teeping the body contours.

Materials for crafts "straw scarecrow"
The task of the child is to fill the torsch with pieces of colored paper, gluing them next to each other. Such pieces yellow color lay out your hair and scarecrow.

Sunset. We lay the sand and purple sunset with pieces of yellow.


Post a landscape small palm tree.

Applique "Sea" from paper
Application with elements of quilling "Heart"
Appliques with queening or paper elements are very impressive. In order to make the applique we need colored paper, pencil, scissors and glue.

We do on paper scores about 1 cm wide and twist it into a roll. Cut the roll of cats. We must have paper curls, whose tips we fix glue.

We glue paper curls on a pre-harvested base - paper heart.

Decorating curls twisted green paper. Curls begin to resemble elegant roses framed by petals. We have an interesting applique in paper techniques.

Appliques from color corrugated paper
Application from color corrugated paper - "Vase with flowers"

Applique "Vase with flowers"
From color corrugated paper and wires, you can make a very effective postcard applique "Summer Polyanka." The technique of its manufacture is not very common. Around the easily attacious rod or wires are wrapped several times corrugated paper. The end of the paper is fixed by glue.

Squeeze paper on the wire. Cut off the excess part of the wire and we bring the ends. We must have colored thick sausages.

"Sausages" from corrugated paper
From such "sausages" lay down the application on paper.

From color corrugated paper, you can make a very beautiful wall panel with yellow flowers.

Paper plate is an excellent base for colorful appliqué. How do you make an idea from a free carrot bed with a paper plate?

Applique on a paper plate "Circling with carrots"
Very beautiful appliques are obtained if they are based on a watercolor painted background.

Application and drawing "Spring"
Using different techniques, and in its own way, uniting ideas, you can create unique pictures that will be the present manifestation of children's talent.
Today we will learn to do interesting and original crafts from paper Together with children or for children.
And for a start, let's see what we need to do this:
To create crafts, we will use different types Paper and Cardboard:
napkins for decoupage on the boxes;
newspaper for creation balloons from papier-mache;
old magazines for crafts with beads;
fastener and wrapping paper;
color bilateral paper;
corrugated and ordinary cardboard;
paper plates, cardboard tubes, various boxes and more.
For creativity, the child will need such basic materials and tools like scissors, glue, paints and markers.
You have so much that many small right items are going, and put them nowhere? Let's make funny pockets, which will fit and which can be hung on a prominent place.
Paper crafts for children: useful pockets
What will take:
colored paper
pencil
lace scissors glue
Sequence of work:
Draw the contour of the face of the animal, such as a bear.
Cut the contour two such figures. Make details for ears and spout, as shown in the photo.

Apply glue around the edge, connect the details so that the pockets turn out inside. Make a hole for two holes.

The covers of the ears and spout. Tightening a ribbon for which you can hang.

Such pockets are perfect for storing small things: hairpins, calculation or stationery.

Paper crafts for children: racing race
Do you know that you can make unusual racing cars with your own hands? Let's create them and arrange a real check in. Interestingly, the car under what number will win?
What will take:
cardboard Paint Tubes, Felt Tops
colored paper cardboard
scissors glue
Sequence of work:
Coloring the tube in bright colors.

Cut out from colored and white paper parts for machines (for wheels it is better to take a black cardboard - then your "car" will be firmly standing). Feltaster Dorisuy what is needed.

Make a hole in the tube, as shown in the picture (you can ask for an adult to help).

Now covered all the details. Wait until it gets up, - and forward, play!

Paper crafts for children: Paper-Masha Balloons
Who does not dream of flying in a balloon? Someday you will definitely do it. Now let's try to make an unusual balloon from an ordinary newspaper.
What will take:
glue Sharik.
needle needles
cream paint.
Sequence of work:
Again the ball, lining it with any cream. Prepare a newspaper for crafts - for this you need to break it into small pieces. Wetting them in the water, skiing the ball so that there is no lumen.

Now apply the glue layer on the ball and crossing the pieces of newspapers in the water - it is necessary to make 2-3 layers. You may need an adult help.

When the ball is completely dry (for this you will need to wait 1-2 days), the needle with a needle - he now does not need a chalk, as shown in the photo.

Now paint the ball with paints.

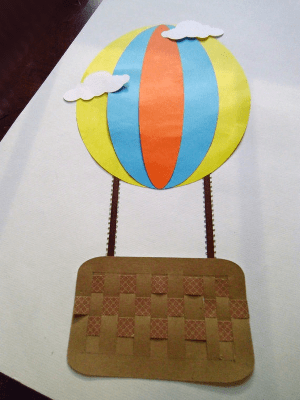
Now make a basket. To do this, the newspaper sheet is divided into 4 parts so that the billets of the rectangular shape are obtained. Then, starting from the bottom angle, the needker to roll the newspaper into the tube, and the tip of the boil.

Take 5 tubes and put them near, and the sixth stretch is across the first, above the second, under the third, etc., alternating. The next tube must be proper on the contrary: what was at the bottom will be on top.

To secure our foundation, take one tube and penetrate around, as passing it between other tubes through one.

Now you can make the basket itself: for this, you will bend all the ends upstairs and begin to weave them around the same way as you did before. Complete 4 rows.

Unnecessary ends of penetration from above and shock, some can just trim. Pick up a gouache basket.

Make holes at the bottom of the ball and with the help of a thread fix the basket. Balloon Ready!

Cheerful animals
It turns out, you can quickly and easily make yourself a striped friend. And to be able to play with friends, let's find out how to make not only a tiger, but also other animals.
What will take:
colored paper
scissors glue
Sequence of work:
Take a sheet of colored paper and lay, as shown in the figure. Square ends to get a strip.

Sogns striped "accordion" in three places to get the letter "M".

Cut out of colored paper blanks for an animal.

Boots on the basis. Ready! You got a tiger.

Home Theater.
And what if you arrange a real theater at home? It will be possible to invite adults to the performance and show them some fairy tale, such as "Kolobok". I think they will define your skills!
What will take:
colored paper Circle Scissors Glue
feltolsters chopstick
Sequence of work:
Draw on a sheet of colored paper a blank, as shown in the photo.

Cut out the workpiece and splashes.

Cut out of colored paper Foundation for an animal
Basic fittings. Look who happened

Take the basis of your favorite fairy tale with animals and make all the characters from the paper. If you stick to the billets of the stick, it will be possible to show the performance due to the screen, as in the puppet theater.
Paper crafts for children: Funny caterpies and spiders
Have you ever seen a real spider? And caterpillar? Let's make out of a cardboard box from the eggs of funny animals with shaggy legs. They will look like real!
What will take:
cardboard box from under eggs
scissors glue
colored paper
wire
Sequence of work:
Cut out from the cardboard box of the workpiece: three cells for caterpillars, for bugs and spiders - one.

Pick up the gouache of the workpiece.

Prepare details for animals: eyes cut out of colored paper, make legs from fluffy wire.
Make holes in blanks and sleep legs. Then the winding eyes.

Try to make them in the same way.

Amazing masquerade
You can unusually celebrate your birthday, setting up a masquerade. Invite friends, and let everyone make themselves an animal mask. It will be fun!
What will take:
cardboard plates
color cardboard and paper
scissors rubberbish
Sequence of work:
Coloring a plate in a blue color.

Cut the ears and also paint them.

Prepare from colored paper parts for a bunny.
Cut the holes for the eyes and cover the items, as shown in the picture.


Paper beads
What girl does not like decorations? Let's try to make beads from old magazines. You will get bright that you can wear with your favorite dress or give mom.
Sequence of work:
Cut out the log cabinet: strips of approximately 1 cm wide and elongated triangles.

Move the blank on the needles - it will be paper beads. Good short tip.

Make so many beads to have enough to decorate. Take a needle with a thread and carefully nasady all beads on a thread.

This is so easy to make unusual: original multicolored beads, bright bracelets. You can even give them to someone: what girl will give up such beauty?!
Paper crafts for children: jewelry for princesses
All girls dream of becoming real princesses. And what princess is without a crown? Let's make it from an ordinary cardboard roll.
What will take:
cardboard paint tubes
colored paper
scissors rubberbish
Sequence of work:
Cut from Rulon Corn. You can make a few pieces.

Coloring the workpiece in different colors.

Decorating the crowns. To do this, you can use beads, ribbons and a cord.
Make holes on the sides and grinding a gum so that the crown can be worn.

You can make the decoration for a real princess from a regular hoop: with the help of colored paper, turn it into a beautiful diadem.
Paper crafts for children: toy locker
Probably, like all children, you have a lot. Sometimes they are so many that it becomes difficult to carefully fold. Let's make a beautiful locker for storing small toys.
What will take:
boxes of different sizes
gouache white
napkins with drawing
stationery knife
tassel knob
Sequence of work:
Flood the box with white so that the drawings and text on them do not shine.

Plug box from all sides with a napkin. To do this, put it on the box, pressing along the edges, and with the help of the tassels, the thick layer of glue is applied to above so that it sticks.

Cut the doors with a stationery knife - here you will need an adult help. Welts superclosure of the handles and scrupping them the boxes among themselves to get a locker.
Everything! Our chest ready. Now we can fold your toys. Here mom will be happy when he sees what your order is!

Creative box
Do you like to draw? Or maybe you like cut something or cray? It's great! Let's make a creative bag-box where everything you need to be folded for creativity.
What will take:
shoe box
wrapping
colored paper
glue lace
Sequence of work:
Crightened the box and cover from all sides. If it is hard for you, ask someone from adults about it.

Make the workpiece inside the box. At the bottom of the sheet folded in half of colored paper make an incision to the middle, as shown in the photo. Two the same billets in length as the width of the box will supervise from above to the middle.

Insert the workpiece into each other and place the box - it will be the branches of our bag.
Make holes on the sides of the box: they must be located at such a level so that the box can be closed with a lid. Make the handle of the same length from the cord so that the box is convenient to take in hand.

Handmade photo albums
Where did you go to rest for the last time? Maybe it was a trip with parents on the sea or vacation in the village of grandmother? Surely you have memorable photos. Let's make a photo album for them in the form of a suitcase.
What will take:
colored paper І and cardboard
piecol scissors cord
Sequence of work:
For the cover of the photo album, take a sheet of color cardboard and lay in half.

For pages, take the sheets of double-sided paper of different colors and also lay in half.

Now combine the cover and pages: for this, there are all together and hole punch holes. Tie the sheets with rope or cord.

Cut out the details for a suitcase from color cardboard and cover them to the photo album.


Paper crafts for children: Funny bookmarks
What is your favorite book? Or maybe there are several of them? It's great that you love to read. Let's make an interesting bookmark for the book.
What will take:
colored paper
Sequence of work:
History using a ruler on a sheet of colored paper three squares, as shown in the photo. Triangles that are painted, you will not be needed.

Cut out the workpiece.

And it is shown in the photo: first hitting the inner corner, then on top of it different. Spool them between them. Cut out the details from colored paper.

Great happened, right? Now it can be easily found in the book place where you finished reading. You can also make a bookmark and in the form of another animal, for example, a dinosaur with sharp teeth.

Cardboard bag
Do you know how from a regular box you can make a bright bag? Very simple! Let's dream and make such a handbag that can be taken with you to the street in sunny weather.
What will take:
dry breakfast box
colored paper
scissors glue
Sequence of work:
Pick up a gouache box.

Cut out the bag with handles. Here you may need an adult help.

Cut out of colored paper striped and circle - it will be a flower heart. The strip of laying the harmonic and spool ends. To keep the flower, take it on a small square. Top cover the heart.
For butterflies, cut out blanks of 1 colored paper. So that the figure turned out to be volumetric, you need to make 5-6 identical details. Skill them between them in the middle. Box all details to the box.

Crafts do it yourself from paper: stand for a pen
Want to make a gift to a friend, but do not know what to choose? Do not worry, I have an idea! Make an original stand for office supplies from an ordinary cardboard box. Such a gift will definitely like your buddy!
What will take:
boxes
equal width
white and colored paper, cardboard
glue scotch
Sequence of work:
Make out of the boxes of the ship: cut the lid and cut them in height. The nose of the vessel and pipe do from the cardboard.

Okley every detail of colored paper from the inside and outside.

Cut and glue the windows, a lifebuoy, steering wheel, anchor.

Split boxes between themselves and the bonds of them on the base carved along the contour.

Applique with puzzles
Do you have unnecessary puzzles in which you have lost a lot of detail? I have an idea how you can apply them. Let's make a surprisingly colorful applique with autumn leaves.
What will take:
unnecessary puzzles strong paper
paint glue
Sequence of work:
Paint puzzles in bright colors autumn leaves: Yellow, orange, red.

From a strong paper cut the rectangle brown color - It will be a tree trunk - and make her green grass.

Cover brown blank in the form of a trunk: For this, somewhere you need to squeeze the paper, but to straighten up somewhere.
Make from the cooked pieces of a puzzle of a tree crown. Also glue several layers of grass to get volumetric.


Paper crafts for children: Volume Picture
Want to make a volumetric applique? This is quite easy! You will have a real picture, which will be able to give a grandmother's grandmother.
What will take:
box from candy
corrugated cardboard
double tape glue
Sequence of work:
Cut from corrugated cardboard the necessary parts for the picture.

Shooting on the bottom of the box the first layer of the application is, that will be in the background.
Other details are touched on top.

What's the beautiful! It turned out a real volumetric picture. In this way, you can make a city where cottages and high-rise buildings are standing, or underwater world with seashells, algae and fish.

Budget in postcard
Want to give mom unusual flowers? Let's make a postcard-bouquet of colored paper. Believe me, she will like it.
What will take:
double-sided colored paper
scissors ribbon
Sequence of work:
Draw on a sheet of colored paper the workpiece, as shown in the figure.

Cut out the workpiece and separate triangle.
The glue is a small triangle from below, and a large part of the folds as shown in the figure.

Draw, and then cut out flowers of different sizes and color. Make leaves for a bouquet.

Guns inside our postcard Flowers in the form of a bouquet, pressing from bottom to the ribbon.


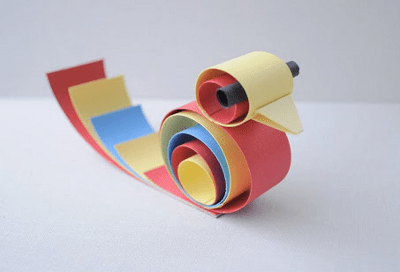
3D postcard
Surely you watched the cartoon in 3D and noticed how the characters come to life during the volume image. It turns out that it is simple to make objects three-dimensional. Let's try to make a postcard with a 3D effect.
What will take:
color cardboard, double-sided colored paper
scissors ribbon
Sequence of work:
Take two folded sheets folded: one - cardboard, the other - colored paper.

On a sheet of colored paper from the bend side, take suns, as shown in the photo. There should be 3 smooth squares of different sizes.

Now what you cut, put forward and inward. You must have a ladder, as if out of the boxes.
Shoot the workpiece on a sheet of color cardboard. Decorating the boxes: covered colored paper and ribbons.

By this principle you can make a postcard with balls

Postcard with palms
Want to make another one unusual postcard? For this you do not need anything special: just on the sheet of colored paper and cardboard, scissors, glue and your wonderful handles.
What will take:
colored cardboard and paper
Sequence of work:
Watch your palm on a cardboard sheet.

Cut out the blanks. You will need two such details.
Cut out of colored paper striped and put it by the harmonica.

There is one edge of the harmonica to one "hand", and the second to another. Cut out colored paper or write congratulations markers.

Converter
Do you know how to decorate a small present? For this, it is not necessary to be adults and do not need any special devices. Repeat after me, and you will definitely work out!
What will take:
colored paper glue
ribbon
Sequence of work:
Draw on a sheet of colored paper 4 identical circles. It is easy to do if you take a mug, put it upside down and circle.

Cut the circles and put them in half.

Split circles with each other, as shown in the picture.

Begins free halves of circles so that one turned out on top of another. Then the bottom from one side will get up.

Sweet gift
Have you ever seen a gift decorated in the form of candy? Maybe they gave you something similar? Let's make such a surprise, and you will be able to "treat" anyone.
What will take:
cardboard tube
clay paper glue
scissors ribbon
Sequence of work:
Cut from wrapper paper square. In size, it should be more cardboard tube.

Omes tube paper. Tie a ribbon one end of candy.

Some in the gift candy and start the other end.
3D-Figures
Have you ever wanted to unusually decorate your room? Let's make volumetric figures-decorations made of colored paper. They can be put on the bedside table or hang on a thread to the chandelier.
What will take:
colored paper glue
scissors ribbon
Sequence of work:
Draw on a folded double sheet of colored paper. Half of apple, as shown in the photo.

Cut out the workpiece and, using it as a template, take 5 such copies. Additionally cut out the details for the apple.

Screws blanks between themselves, as shown in the photo.

Wasted the rest of the details.

Fruits and vegetables can be anyhow!
Cardboard and Paper Crafts: Bright Flowers
Do you want to grow bright flowers on your window? Let's make them out of the cardboard tubes, but so that no one can guess which material they are.
What will take:
cardboard paint tubes
colored paper glue
scissors spanks
Sequence of work:
Make cuts from two sides of the tube so that they do not reach the middle.

Coloring the tube in different colors.

When the workpieces are dried, repeated petals, as shown in the photo.
Window middle cut from colored paper.

Skamp of bluing colored paper, cutting leaves.
Connect all the details. Skeleton Make a hole in a flower heart.
Such a flower can be put in a vase and give someone.

Frame from unusual flowers
Do you have a boring one-color frame? Let's make a real masterpiece!
What will take:
cardboard box from under eggs
scissors glue
Sequence of work:
Cut from cells of the cardboard box blanks of petals, as in the picture.

Color them into one color. You should have 15-18 such sets of different colors (depending on the size of the frame).

Split petals among themselves in the middle, carefully a priest and give them to dry.
Cover flowers on the frame. It will not be possible to attach everything to immediately, so do it statenly and wait until everything is dry.

Frame is ready. Now you can insert your favorite photo.
Cute cactus
How do you like a pretty cactus? It is completely safe for children, because the spines are drawn on it. Let's make such a cactus and put it on the windowsill.
What will take:
feltolsters
Sequence of work:
Draw on cardboard cactus in a pot.

Color the picture on both sides and make another exactly the same.

Do not cut: on one cactus from below to the middle, and on the second - on top to the middle.

Insert the workpiece in each other. Cactus ready.
In the same way, you can make a rocket or a bear.
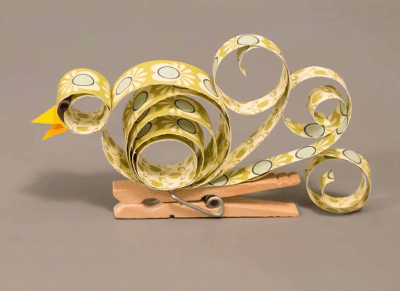
Colored lanterns
You have a birthday soon, and you want to decorate the room to be festive and beautiful? Then let's make unusual colored lanterns.
What will take:
toilet paper tubes
square paper
ribbons
scissors glue
Sequence of work:
Cut out the square of the strong paper and placled one side of the tube.

Make a billet from a strong paper: cutting strips and finish cuts on one side along the entire length.

Start shook the tube from below. You have to get a skirt, as in the photo.
Thus, the whole flashlight attractions. From above on the sides, make holes and extending through them a ribbon so that the craft can be hung.

Such lanterns can be not just an ornament, but also a useful thing. For example, on the holiday you can arrange a game with prizes: hang lanterns on the rope and put something valuable in them by gluing the bottom. Each guest with tied eyes must cut off a gift with scissors.

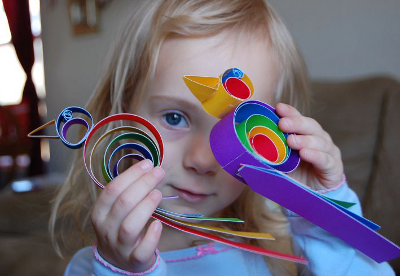
Room decoration
Do you dream to start a bird? Of course, nothing will be compared with this, but still an extraordinary and beautiful bird can be made from ordinary colored paper. See how this is done.
What will take:
double-sided colored paper
ski paper scissors
ribbons
wire
Sequence of work:
Draw on a sheet of paper silhouettes of birds.

Cut them. Do some such billets. They must be different colors.

Make the wings from the strong paper: for this, cut off the rectangles of different colors and thereof the harmonica.
In the billets of birds, make cuts and insert the wings there. Tie the ribbons to the figures and them on the circle cooked from the wire.