When looking for original accessories for your Christmas tree, you don’t have to visit stores or online boutiques. It’s much easier to make New Year’s decorations with your own hands using inexpensive and easy-to-use materials, clear diagrams and color photos New Year's decorations.
Even from ordinary felt you can create bright accessories for your tree that will delight you for many years!
How to sew a felt toy for the New Year with your own hands. Master Class
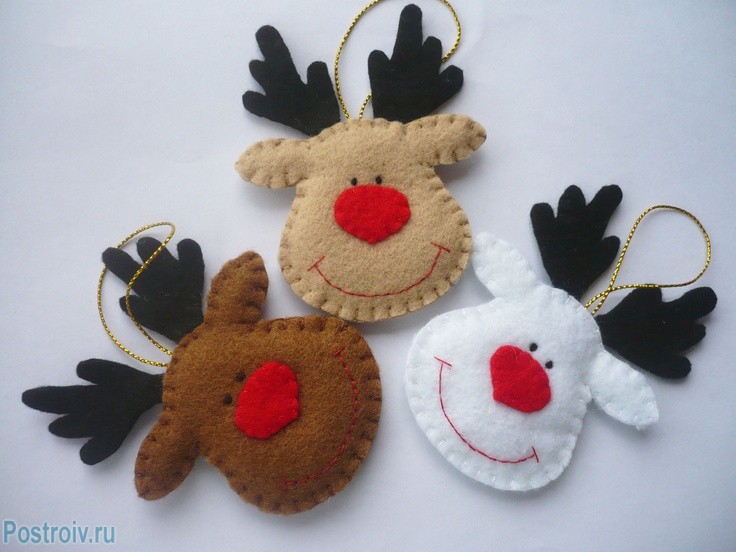
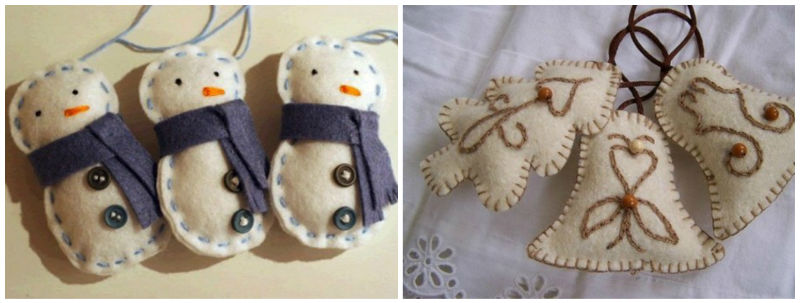
DIY felt toys for the New Year. Photo
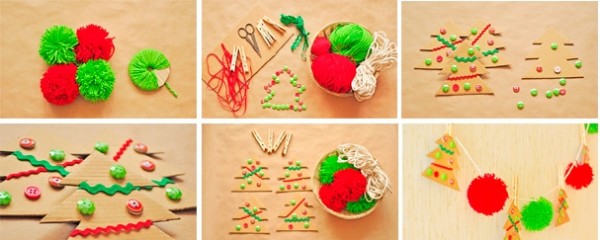
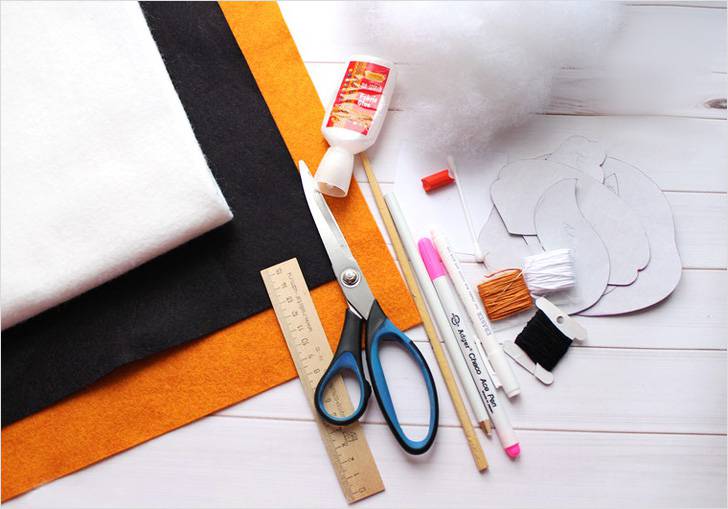
In addition to the fabric, you will need templates in the shape of a wreath, Christmas tree and bell, a sewing needle and floss threads (red), synthetic filler, classic and zigzag scissors, a washable pencil, wet wipes to remove traces of paint and a paint brush. As additional accessories A miniature bell, light and green threads, as well as a small piece of felt the color of Christmas tree needles will come in handy.
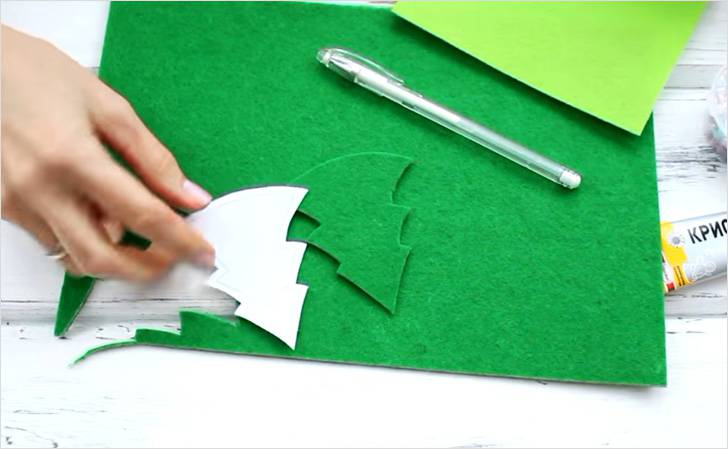
First let's start making fabric Christmas tree. After cutting out its template, measure out a piece of felt twice the size of the workpiece. Fold the flap in half, place a template on it and mark its outline with dots.
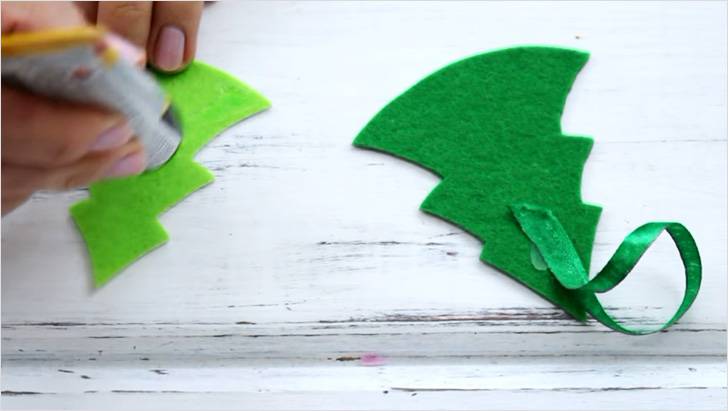
Secure the fabric with needles and cut out Christmas trees from it using zigzag scissors. Sew both fragments with red thread, leaving knots on outside toys, and make a loop in its upper part. Do not sew up the bottom edge completely at first so that you have the opportunity to add filler there for volume.
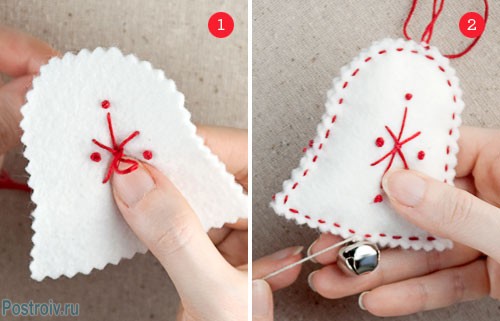
Making a toy bell-shaped It starts in a similar way: we put a stencil on a fabric folded in half and cut out a shape from it. On the front side you can embroider a red star (from floss).
Sew both halves of the toy, not forgetting to leave a hole for the filling, and at the end of the work, attach a small bell to the bottom of your decoration.
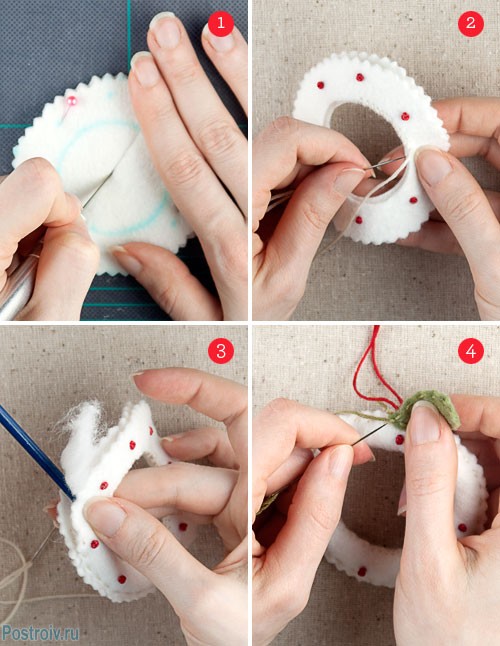
Manufacturing algorithm New Year's decor DIY - toys "wreath"- slightly different. The blanks must be folded in half, and inside them draw a circle, which is cut out with a stationery knife. The halves of the figures need to be sewn along their insides, using light threads. After half the work is done, add the filler inside the wreath. Then you need to cut out miniature leaves from green felt and sew them into the hole left for the filler. Later, make a loop in the same place so that you can hang the wreath on the tree or door.
 New Year's monkey toy made of felt

Felt toys for the Christmas tree. Photo
DIY Japanese New Year's balls. Master Class
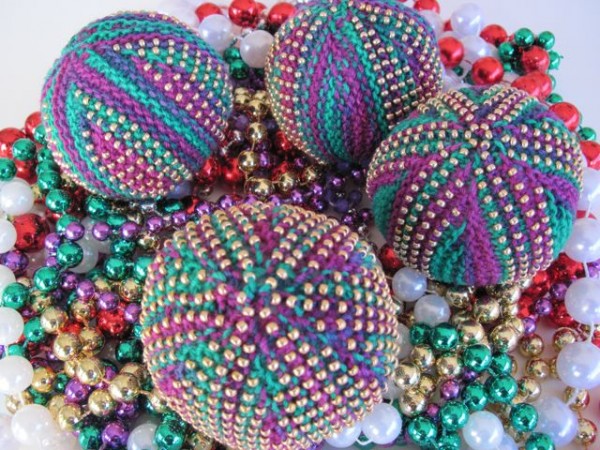
Many traditions of the land of the rising sun, which arose dozens of centuries ago, are adopted in other parts of the planet. Thus, temari, a hand-painted decorative ball, used to be a favorite type of needlework among Japanese women, and today such accessories are widely used to decorate Christmas trees.

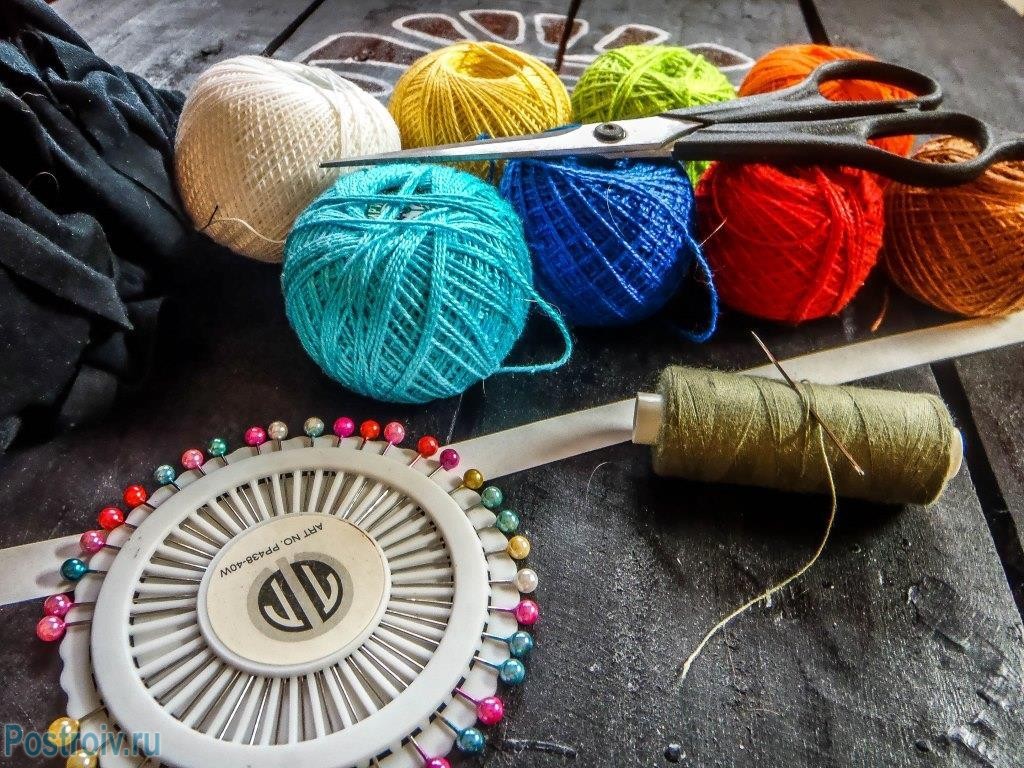
Do you want these New Year's decorations to be in your holiday photos too? Their manufacture does not require expensive materials; it is enough to have ordinary sewing supplies on hand:
- pins with multi-colored needles;
- thread on spools and a sewing needle;
- floss or iris type threads;
- scissors and multi-colored scraps of knitted fabric;
- a narrow (about 1 cm) strip of paper 20 cm long.
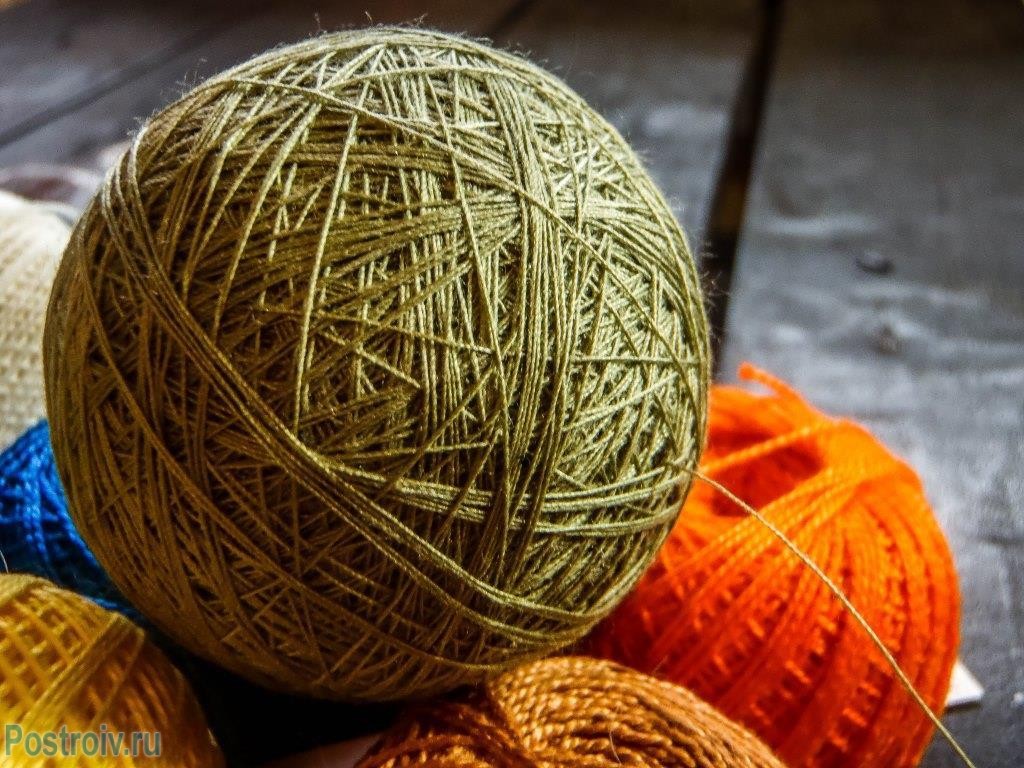
The basis for decoration will be small scraps of knitwear, wound into a tight ball. Then it is covered with bobbin threads, placing them evenly over the entire surface of the ball. For one temari, a whole coil is usually used. When it ends, you need to leave a long end of the thread and use a needle to make a few stitches. This will securely fasten it and maintain the shape of the ball.
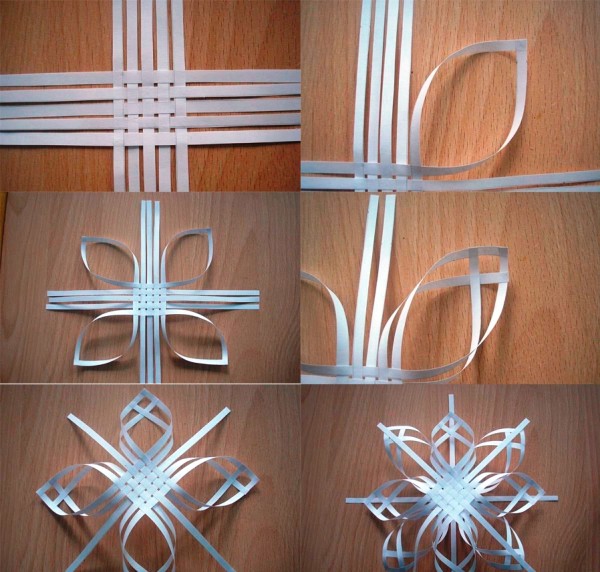
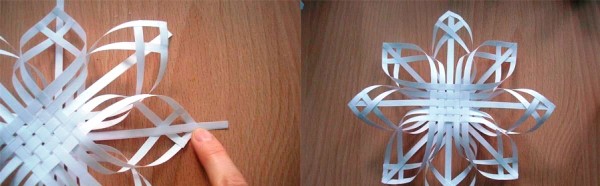
The next stage of creative work is temari marking. To do this, you need to pin a strip of paper to the ball using a colored pin. After wrapping the paper around the base, make folds where it meets the pin and cut out triangles on them. Then we divide the strip into four parts and wrap it around the ball, using another pin for the other end. In the middle of each paper element we stick needles, indicating the “equator”.

Making Christmas tree balls with your own hands from threads. Photo master class
Now you can proceed to the main stage - embroidering the pattern using thread and needle. The needle should be brought as close to the pins as possible, pulling the thread harder. We wrap it around the ball, return to the starting point and start a new stitch, deviating 90 degrees from the original pin.

In places where the needle and thread reach the surface of the temari, you need to make several securing stitches (crosses). After such actions have been performed around all the pins, they can be pulled out of the ball: they have already completed the “tag” function.
![]()
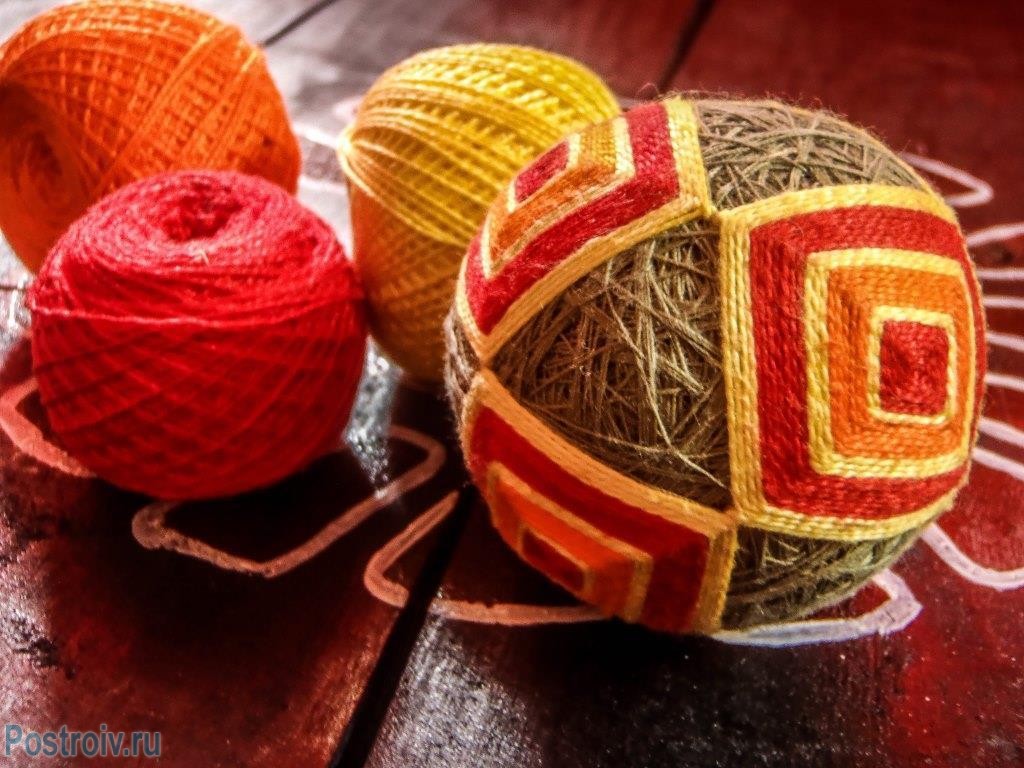
Now, using a thread of a different color, we begin to make spiral stitches around our crosses until a square is formed. Do the same with the remaining control points, changing the color of the threads if desired. When the squares made from different crosses touch their extreme points, the temari is ready and that means you have managed to make a toy for the New Year with your own hands!
DIY magic lantern for New Year 2017
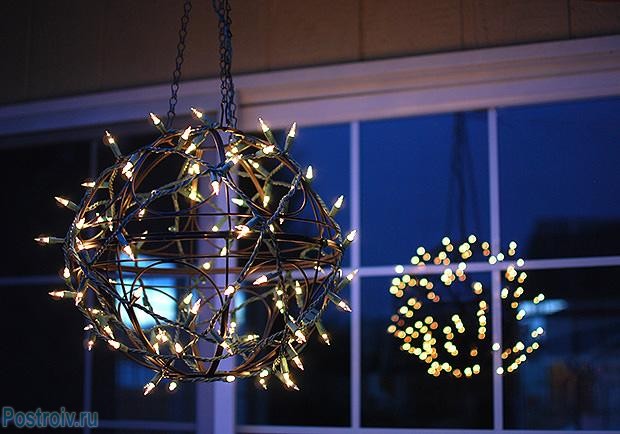
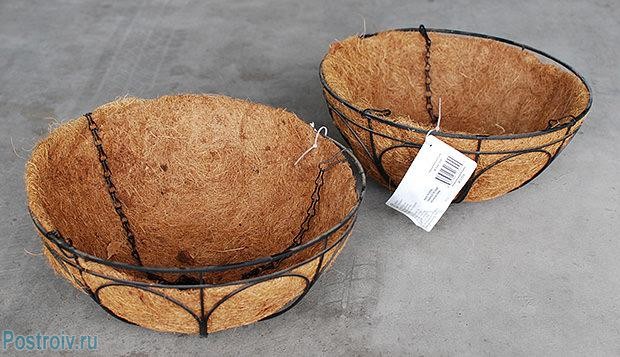
Using a regular garland and a few other accessories, you can make a unique glowing decoration that will help create a festive New Year's atmosphere. Additionally, this will require two semicircular hanging flowerpots, thin wire and compliance with the rules of the master class on decorations for the New Year.

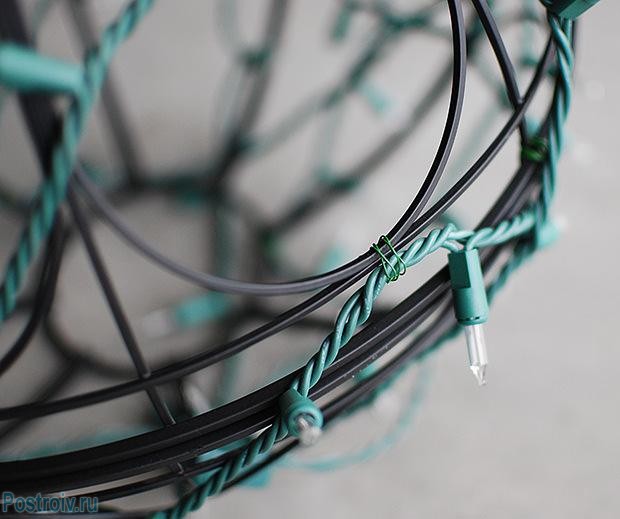
Hanging flower pots need to be freed from decorative elements and connected to each other using wire. The resulting round frame should be evenly wrapped with a garland, attaching it to the elements of the flowerpot using tie rods. The end of the wire is left free, leading it to the top of the resulting decoration. You can hang it using fittings, which are sold complete with hanging flowerpots.

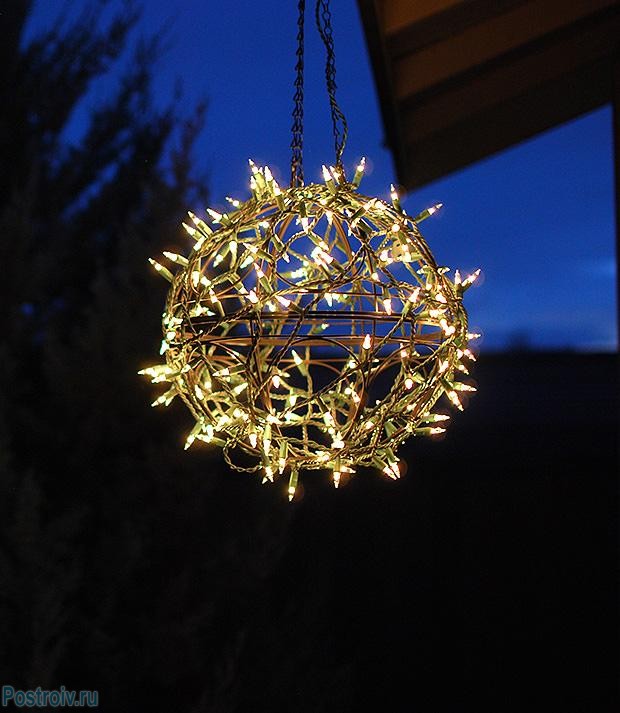
This decoration looks original in home interior any style, and can also be placed in the garden, on the porch, on a fruit tree, etc. Subject to certain safety measures, luminous balls can be placed on the floor or lawn in the yard, and used to make a symbol of the coming year or an original illuminated snowman.
Making holiday decorations for the New Year with children
Eve New Year holidays- a great time to create festive holidays with your child family traditions. One of them may well be the joint production of New Year's toys with your own hands for the Christmas tree and at home from scrap materials.

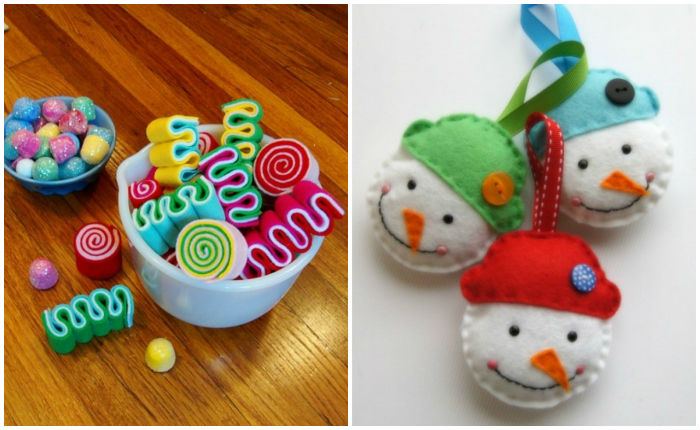
DIY Christmas tree toy “lollipop”. Photo
The first proposed option for a simple New Year's decoration is lollipop pendant. It will require a minimum set of materials and items: pieces of multi-colored felt, candy sticks, thin satin ribbons and a hot glue gun.
Master class on making Christmas tree toys
To make your own New Year's decoration, cut the fabric into long narrow strips (width 1 cm, length 15 cm) and fold them on top of each other in 7 pieces. From each such pile, roll a roll, the ends of which are secured with glue from a gun. All that remains to do to the resulting “lollipop” is to glue a stick handle and a ribbon, with which the decoration can be hung on the Christmas tree. A round piece of fabric will help hide the remaining glue and the places where the tape is attached.
For the next craft, we will need colored or white paper (preferably for scrapbooking), glue, golden threads and a figured composter.
Cut a napkin or sheet of paper into two rectangular parts and fold each of them like an accordion (the optimal fold width is about 1 cm). Using a shaped composter, make perforations on the blanks, or better yet, entrust this work to your child, because all children will be happy to participate in the creation of New Year's decorations!
Fold the accordion and trim its ends to give the workpiece a rounded shape. Now bend each strip in half and connect them to each other using gold-colored threads (there is no need to cut the tails, loops will be made from them later). Now your child can straighten the paper accordions, and all you have to do is glue their edges together using double-sided tape or a glue stick.
Tie loops from the ends of the threads so kids can hang their own decorations on the Christmas tree!

Even less materials and time are required when making the next decoration for the New Year 2016 with your own hands. For Garlands you only need colored paper, glue and regular scissors.
Cut the colored sheets lengthwise into two equal parts. Take one half of the paper, unfold it horizontally on the table and make several vertical cuts, not reaching 1.5 - 2 cm from the end of the sheet. Now turn your workpiece over and do the same on the other side, dividing the existing “tails” into two parts.
Having prepared all the sheets of colored paper in this way, ask the child to slightly stretch them to the sides, and he will see how they turn into a bright decorative garland. Glue several fragments together to get a garland of the desired length, and your New Year's decoration is ready! This accessory is absolutely safe, so you can hang it throughout the apartment, including ceilings, windows and walls, not limited to just the Christmas tree decor.
Give beautifully! How to beautifully wrap gifts for the New Year
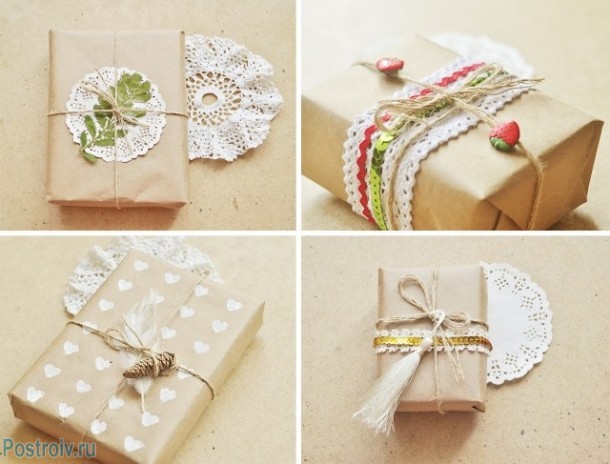
You can pack a gift in an original way not only in specialized departments of stores. Using regular craft paper and DIY New Year's decor, you can create a beautiful and bright wrapper for souvenirs, books and other items that you have prepared for your relatives, friends, and colleagues.
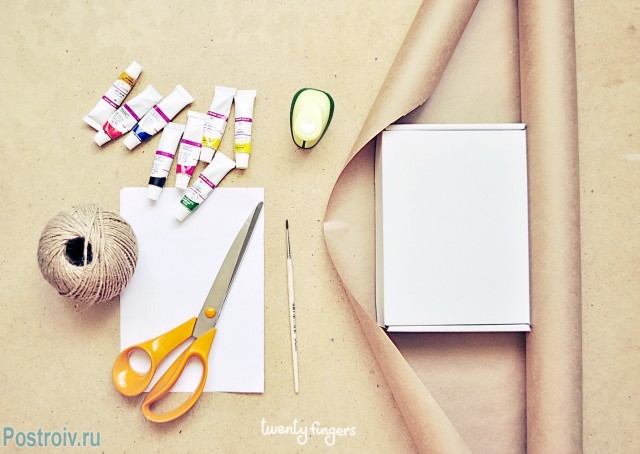
Regardless of which method you decide to use, the first step should always be to wrap the gift in paper, the edges of which can be secured with tape or glue. For convenience, imagine that the object inside has a rectangular shape (for example, a book, photo album, frame).
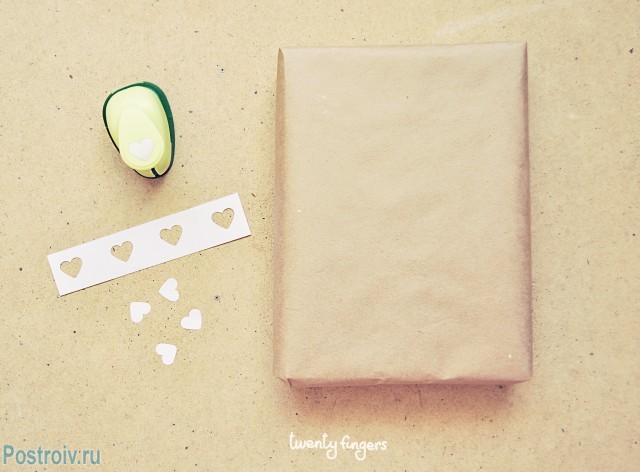
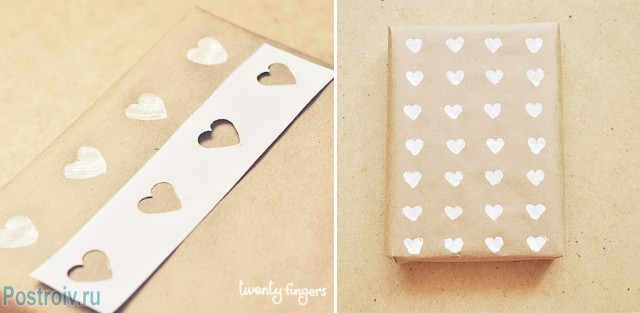
Make a stencil from the remaining piece of paper by cutting holes in it in the shape of hearts, flowers or Christmas trees. Attach the blank to the package and paint over the drawings with acrylic paints, pencils or markers.
After this, you can tie the gift with twine, under which you can put a small feather or decorative cone. Instead, lace ribbons will look great.


Using thick yarn and wire you can make the packaging even more original and personal. Wrap the metal with woolen threads, after lubricating it with glue. From wire decorated in this way, you can make any shape, the initials of the person to whom the gift is intended or another significant symbol. The last step: wrap the gift in craft paper, tie it with thread and attach the finished accessory to it.
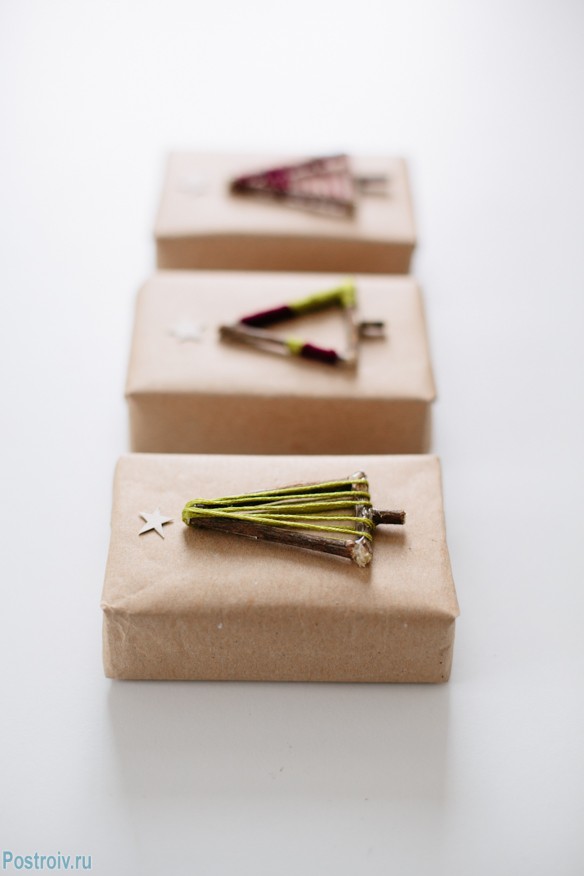
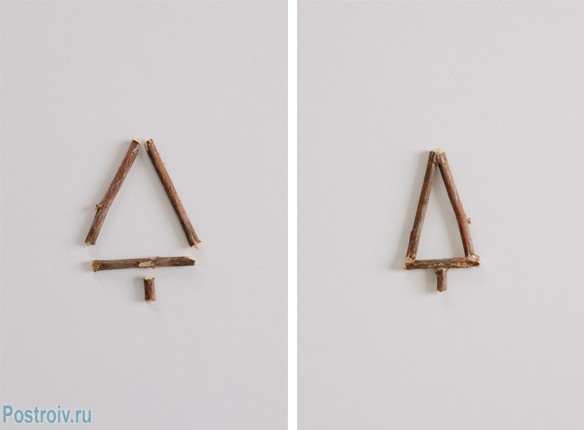
Another idea for decorations for the New Year involves using a regular stick or branch (not too thick). Break it into fragments 4-5 cm long and fold them into a Christmas tree, securing its elements with wood glue. After the structure has dried, wrap it with multi-colored threads in a random order, using PVA for this, which will prevent the threads from tangling or sagging. Our Christmas trees are ready, they just need to be glued to the kraft paper packaging.
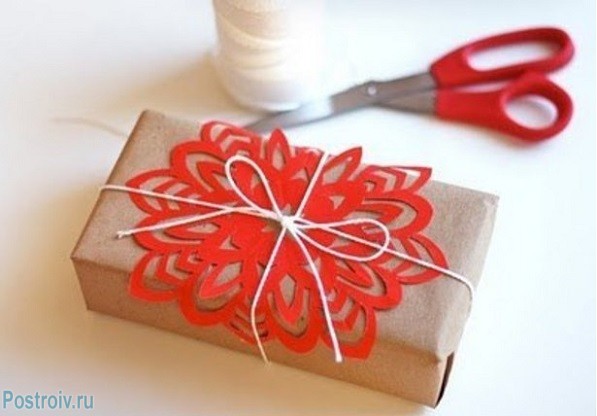
If you have a lot of gifts to decorate, you can use an easier and faster way to decorate them. Take colored paper, stationery scissors and white thread, print or draw a snowflake stencil.
Having attached the blank to multi-colored sheets, cut out unusual snowflakes from them and stick them on the craft paper in which the gifts are wrapped. Wrap each gift with a rope or tourniquet, and the work of decorating the packaging can be considered complete! When choosing the color of snowflakes and threads, you can use contrasting combinations or shades with which astrologers associate the coming New Year.

Gifts for close relatives and friends can be highlighted by using joint photographs to decorate them. Attach the printed cards to craft paper using glue or decorative thread (satin ribbon), and your personal gift will definitely surprise your loved one!
Hi all! The approach of the New Year requires, so to speak, pleasant chores and preparations. In this article you will find many ideas for DIY toys (balls, snowflakes, snowmen and many others)
This master class inspired me to create. It turned out that even ordinary cardboard from a box can be made into such beauty:

Unfortunately, I don’t know what they sprinkle on the photo on the right, but I can recommend dry wallpaper glue and glitter. In the article about You can also read about sparkles (where to find them and what they look like).


I really like the idea of sock snowman toys. You can put these under the Christmas tree or make a craft in the kindergarten. This is not new, but they look great... and do not require special skills or material costs!
![]()
They won me over :)
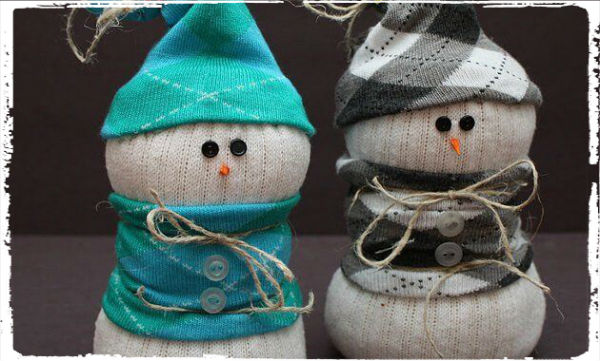
Watch a video on how to make these snowmen on our channel.
They turned out so cute!
The most simple toys on New Year These are felt toys. Felt available material, and patterns do not need to process sections.
My sister has been able to do hand stitches since she was 6 years old. I think it won’t be difficult for any girl to sew such felt toys under the supervision of her mother!
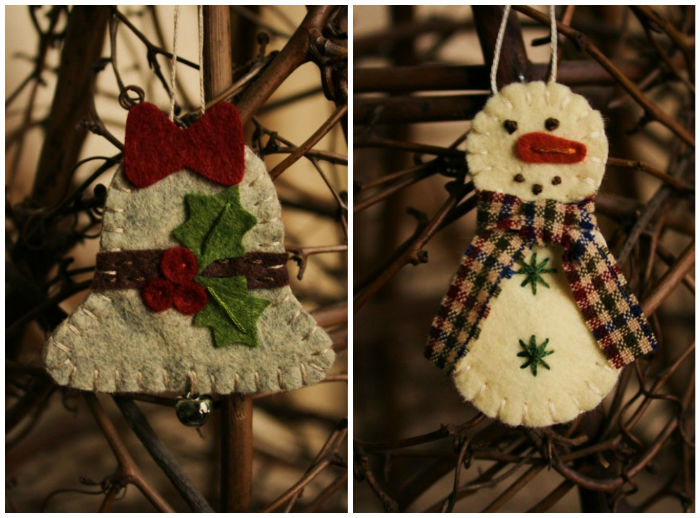
Available for sale bright colors which will make interesting decorations that will look great on the green needles of the Christmas tree and are also safe for the child. I remember the eldest, when he was still small, climbed onto the back of the sofa and tore a glass toy “icicle” from the Christmas tree...... and took a bite... Fortunately, it only cracked and he didn’t swallow anything. Good thing I was there. But I was convinced that I had secured the toys high. This year we will hang safe toys on the lower tier and secure the tree more tightly, otherwise the youngest one will be a hurricane!

Light bulbs + imagination + some drawing skills =
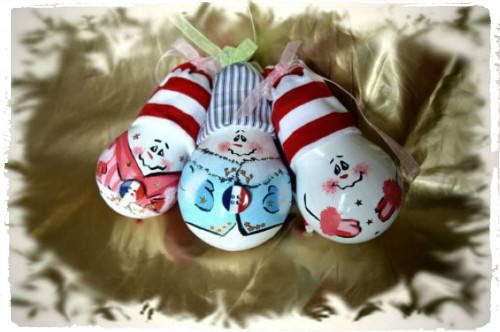
All children love to draw! So give them free rein for their creative imagination!

Balls, balls, balls...the most popular New Year's toys:

![]()
I suggest you look at an interesting technique for decorating a ball:
I found these photos as an example. After all, if you think about it, there are a lot of ideas for decorating balloons, just change the color of the ribbons, fabric, paper, glitter and paints... Go ahead and create, friends!
Where can I get a blank for a New Year’s ball if I can’t buy it? Do it yourself!
The video shows in great detail how to make a high-quality blank for the ball.
And this video will tell you how to make a papier mache base:
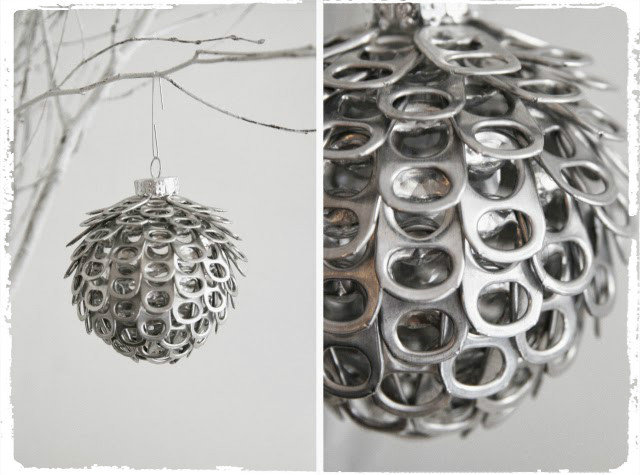
Originally, yes, from bottle openers. I wonder if the author collected from friends or if he drank so much soda!
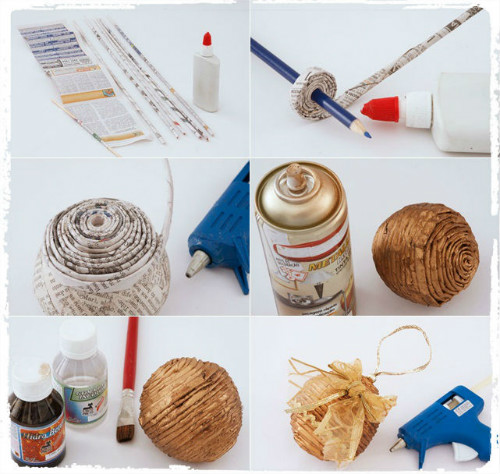
Well, anyone who knows how to weave from newspaper tubes will not have any difficulty in weaving such a ball:
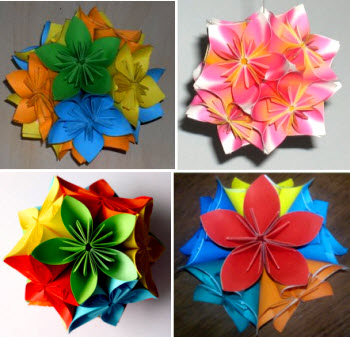
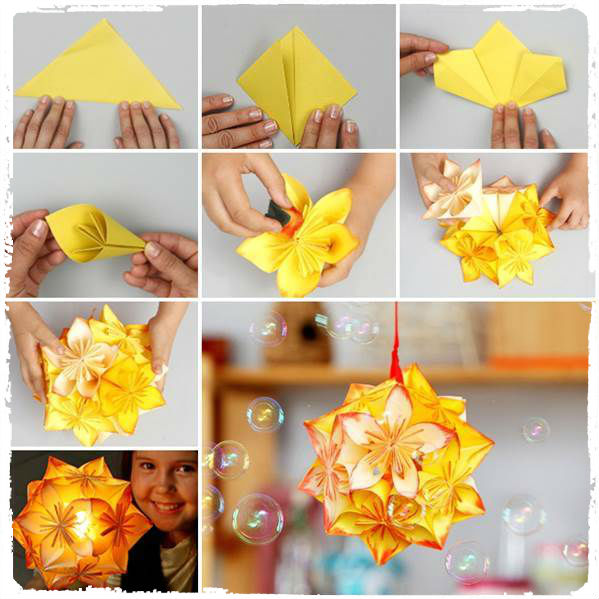
A voluminous ball of kusudama paper is perfect for decorating a Christmas tree if you sprinkle it with a little glitter.
How to make a kusudama ball:
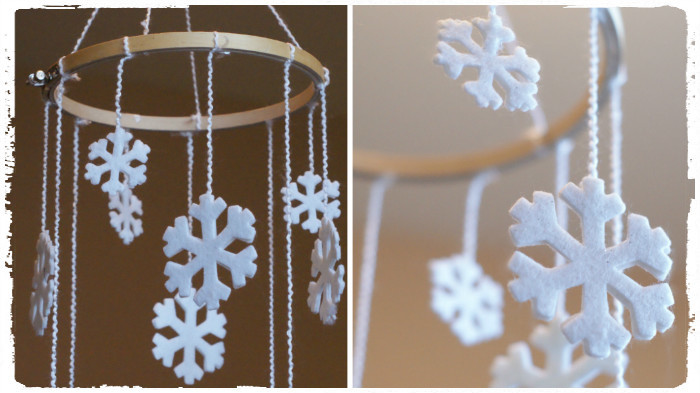
Very cute mobiles:
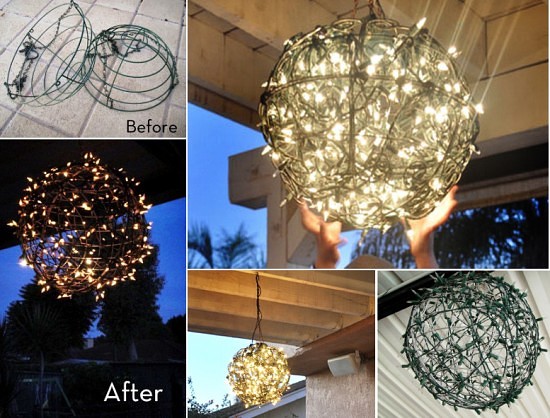
You can make such a lantern from two components from hanging flower pots and a garland. Especially relevant for terraces and verandas of private houses.
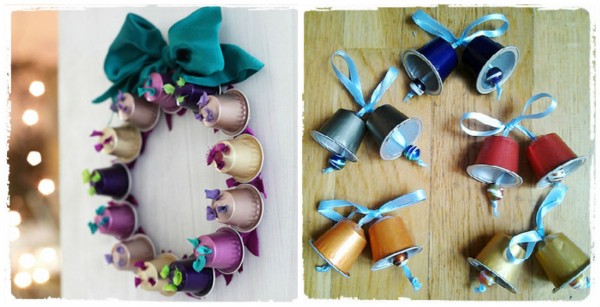
Colorful bells are made from coffee machine capsules:
![]()
Dinoyogurt cups are also suitable for this purpose!
Napkins come in handy too:

And what cute decorations you can make from pasta! For gluing, “Second” glue or a glue gun are suitable. Enough to cover acrylic paint and sparkles:
![]()


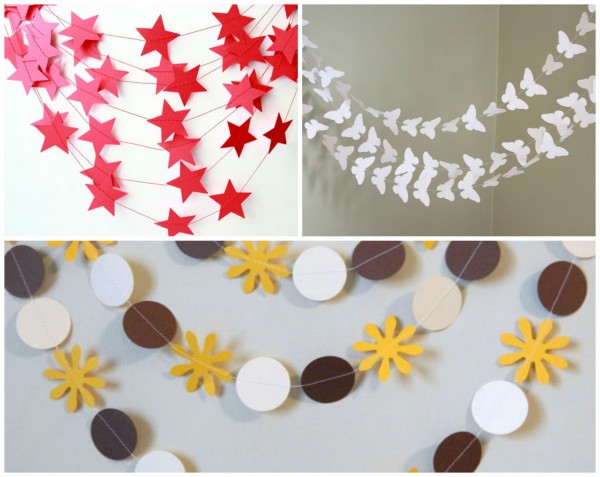
No home decoration is complete without garlands!

Christmas tree– the eternal embodiment of joy and celebration. And not just for children. Adults, too, with poorly concealed trepidation, await the coming of the New Year, when all their most cherished dreams come true. And for this you don’t need much - just decorate the Christmas tree with cute trinkets. They say that it is this ritual that helps any wish come true. Especially if these are made.
A house decorated with tinsel immediately becomes warmer and more comfortable.
DIY New Year's toys - Knitted garland
Of course, it’s easier to decorate the Christmas tree with expensive store-bought toys: huge glass balls, funny electric garlands, bright rain. No one argues that such a tree will look very presentable and elegant. But will there really be as much soul in a cold glass toy as in a touching cardboard toy made with one’s own hands, and even with children’s hands? Over the years, of course, both purchased and homemade toys will deteriorate and lose their former luster. But if you simply throw away an impeccable but aged factory decoration without a drop of regret, then you will not raise your hand to throw away the toy that you made together with your child. And then you try to breathe into her new life, repair torn parts, glue or tint. And not because you will be sorry to throw away a piece of paper or fabric, but because in this naive product there is a piece of your soul, a fragment of your life with your child. Touching this craft, you seem to be reliving moments of long-gone years, which can only be returned in such memories.

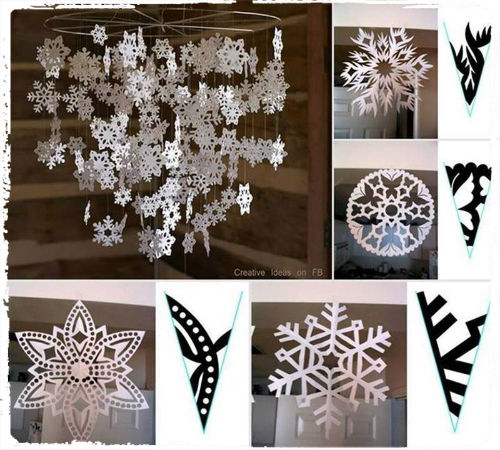
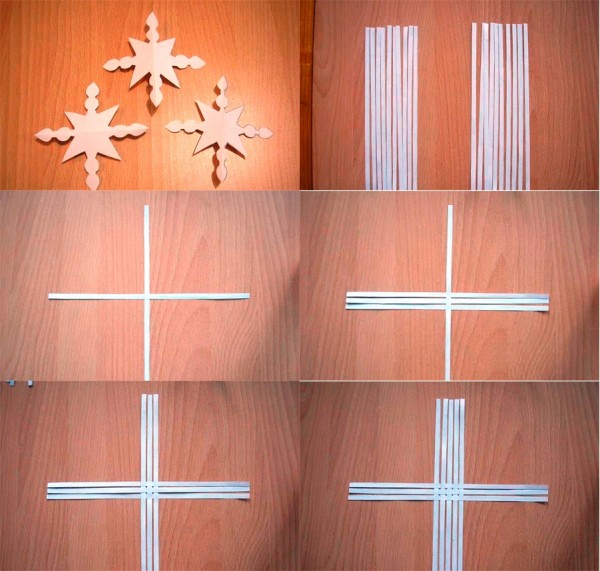
For this voluminous garland you need to cut out several snowflakes according to the pattern and glue them together.
So, let's look at what we can do. The simplest and most affordable thing we can do is repair our children’s old toys and sew ribbons on them, if this Stuffed Toys, pull the ribbon through the hole or tie it to the thinnest part of the toy made of hard materials. Such a small toy will look very cute on a Christmas tree branch.
The most common option for making Christmas tree decorations is paper toys. To make a simple but very cute holiday RING toy with your own hands, you will only need sheets of colored cardboard and paper, as well as scissors and glue. First you will have to work on a cardboard ring, which, however, can be replaced with a decorated one - pasted over or painted, a ring made from adhesive tape or any other suitable element. Then an accordion is made from a strip of white or colored paper, a width less than the radius of the ring, and glued from the inside into the base ring. After this, all that remains is to add bright touches using squares that contrast with the color of the base. They are bent in half and symmetrically glued into the folds of the accordion.
How to make Santa Claus with your own hands?
To make a New Year's toy with your own hands, you can come up with something of your own, unusual and interesting. A decoration in the form of a felt lamp or a magical snowflake made of beads, shining like a scattering of diamonds, will look original. Or you can make a real SANTA CLAUS. To create this good old man, which will become an original decoration for a child’s room, you will need a paper plate, cotton wool, sheets of colored paper, felt-tip pens, watercolor paints, white glue, white acrylic paint, scissors and, of course, good mood. So, let's get started.
- First, take a paper plate and paint it White color acrylic paint. After the paint has dried, a nose made from a ball of crumpled paper is glued to the back of the plate, which is covered with scraps of white paper according to the papier-mâché principle. Using the same principle, you need to make grandfather’s cheeks and eyebrows, and after the glue has dried, paint everything white.
- After the nose has completely dried, you need to mix a little white and brown paint until you get a natural complexion. The resulting shade is applied to the plate. A little red tint is added to the cheeks and nose.
- It is checked whether all the paint has dried, after which the facial features are drawn on with felt-tip pens. When a child doesn’t really like to draw or is not very good at it, you can glue the mouth and eyes from the same paper strands, paint them white, and then in a natural color: reddish lips and blue eyes.
- Next, a hat is made from a red paper triangle.
- Glue a small cotton ball onto the tip of the hat to make a pompom. After this, a wide strip of cotton wool is taken and glued to the lower part of the face. This is how you get the Santa Claus beard. To make eyebrows and mustaches, thinner small strips are taken that will imitate a chic mustache and bushy eyebrows.
- After the glue has dried, the toy is ready!

You can put this Santa Claus on a postcard, or you can make a double one and decorate the Christmas tree.
DIY Santa Claus - DIY Santa Claus
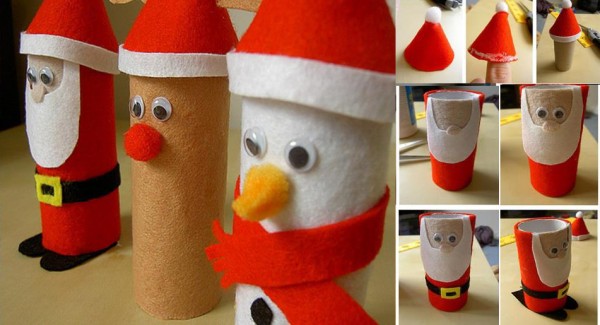
For example, I’m throwing out the basics from under toilet paper, but now I won’t, because with their help and multi-colored pieces of fleece you can make such wonderful Santa Clauses.

DIY Santa Claus - DIY Santa Claus
Here’s another interesting idea for a three-dimensional Santa Claus, also made from cardboard bases. In this way you can make the Snow Maiden and other fairy-tale characters.
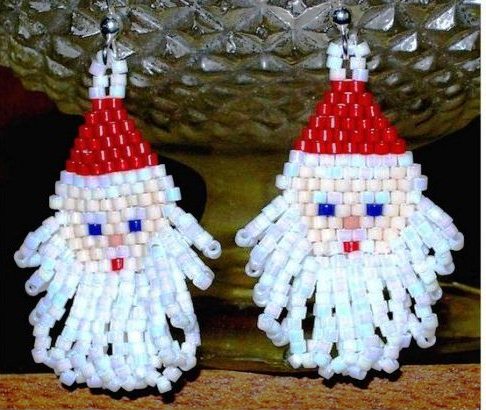
If you are an expert needlewoman, then weave Santa Claus from beads.
Using exactly the same principle, you can make the head of a SNOWMAN, Pinocchio or other funny face. If only there was a desire!
Another easy way make a beautiful toy - decorate a polystyrene foam heart with beads. To do this, use a glue gun to attach a string of beads to the edge of the toy. Then the beads begin to be glued, and they are laid strictly in one direction, forming turns from the edges to the center. The beads do not have to be the same. They can be selected in different colors and sizes. Having reached the middle of the heart, the thread of beads needs to be cut and then glue only small parts of it, cutting off the required number of beads with scissors. Once one side of the heart is completely filled, you can move to the other. At the end, a thread or ribbon is attached to hang the toy.
DIY New Year's toys: garlands and balls
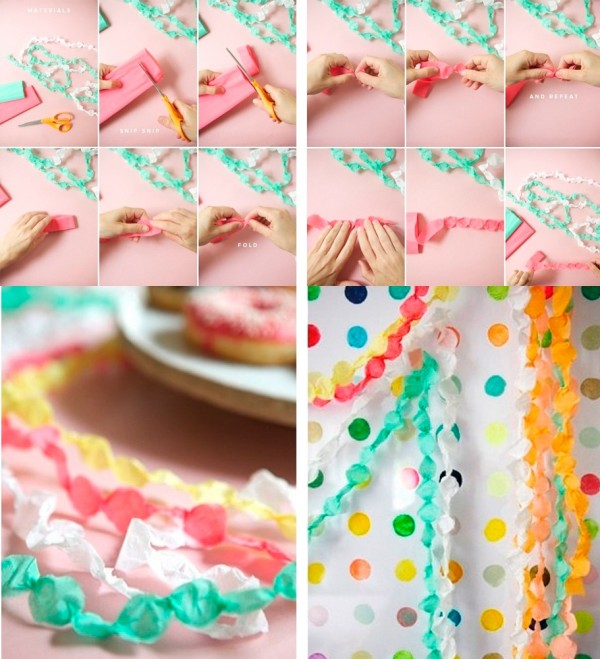
During the December New Year's Eve, decorate the house and create festive mood will help Christmas tree garland. And if you involve the whole family in its production, the warmth of winter evenings will be ensured. So, one of the simplest, but very original options for such decoration is a GARLAND made from paper pompom tassels. To make it you will need paper of different colors and different textures, scissors, rope and glue.
First, a piece of paper is folded in half widthwise, then folded in half lengthwise again.
Garlands made of corrugated paper turn out to be very delicate and light. For this garland, all you need to do is roll the paper and staple the strips together.

DIY New Year's toys - DIY New Year's toys
But this garland can be made within a few minutes. All you need is a hole punch, thread, glue and paper with brighter glitter.

You can make cute flowers from multi-colored napkins and put them on a thread. You will get a beautiful garland!
On the side without folds, an incision is made using scissors - a strip of half a centimeter in full length, leaving a fold of 6 centimeters. The sheet is unfolded and cut in the middle into two parts, one of which is set aside. The leaf opens completely and the result is a leaf cut on both sides into strips with a whole part in the middle untouched by scissors. Then you need to take the middle with your fingers and twist the leaf without touching the cut edges. After the center of the leaf is completely curled, you need to bend it to form a loop and then glue it at the base. After stringing this tassel onto a rope, you can begin making the next one. This furry caterpillar will be a fun addition to your Christmas tree decor.

DIY New Year's toys - DIY New Year's toys
The packaging material makes wonderful garlands, doesn’t it? What do you do with the packaging from your new iron and microwave? Save it and make yourself such a wonderful “star” garland.
DIY New Year's toys - DIY New Year's toys
You can create a masterpiece from napkins and LED garlands in just 10 minutes!

DIY New Year's toys - DIY New Year's toys
Using the quilling technique you can weave such a wonderful garland.

You can make such a fluffy garland from corrugated paper. I recommend buying corrugated paper today, otherwise everything will be taken apart)))

Cheap and cheerful, and most importantly - with your own hands and love.
DIY paper Christmas garlands
There are many types of garlands that are easy to make a quick fix, remember, we already wrote about how to make a garland yourself. So you can string scraps of multi-colored fabric onto a rope.
If you thread a rope through the fabric triangles, you get a great garland of flags! If you make pom-poms from fuzzy yarn and string them on a thread, you will get a garland that your child will just want to play with, it’s so cute and fluffy.
DIY New Year's toys - DIY New Year's toys
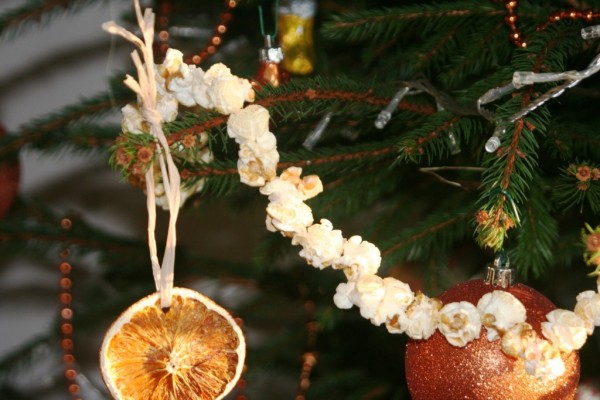
How do you like this popcorn garland? I personally really like it.

DIY New Year's toys - DIY New Year's toys
And if you string some berries (in our realities, more like rose hips) between the popcorn, it will turn out bright!
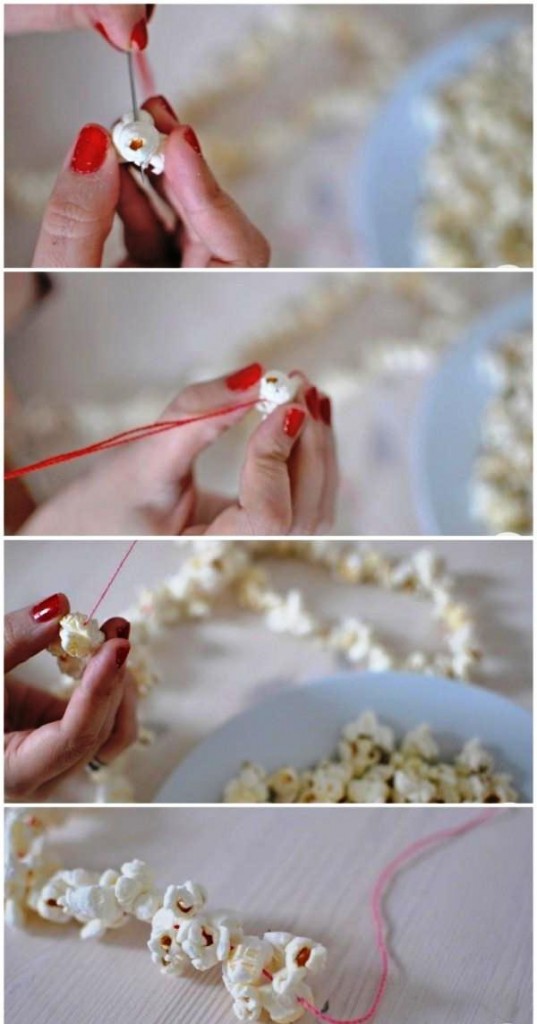
Popcorn is strung easily and simply using a needle. By the way, such a garland is a good snack!
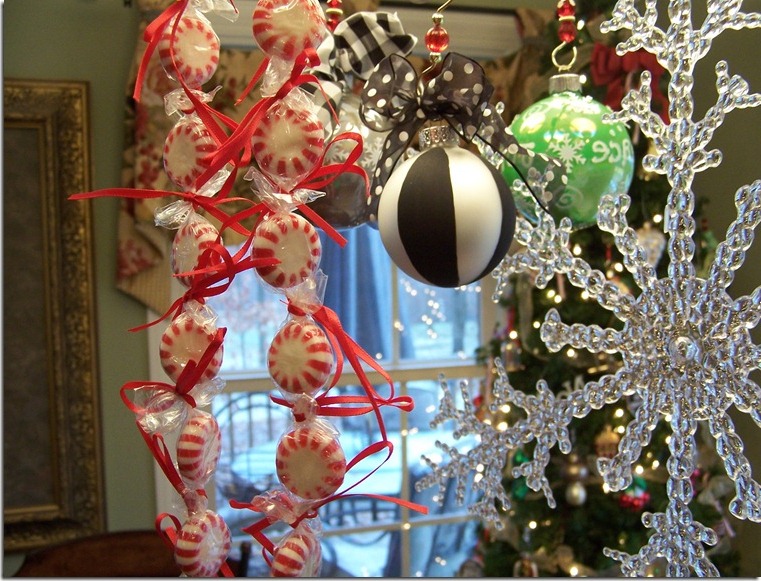
Well, another wonderful option for a garland of mint candies. where would we be without him)
And when you tie the fabric strips onto a rope with bows, you get a very flirty garland. And the remains of old wallpaper can also be quite successfully used to create New Year's garland. And even if carved paper napkins are folded in half, put on a rope, and glued together at the corners, you will also get an excellent garland. You can get a vintage garland by cutting out hearts from multi-colored paper and threading them with thread. Such a touching romantic garland can become not only a Christmas tree decoration, but also an attribute for Valentine's Day. This symbol of love may well provoke its appearance on New Year’s Day. Don't believe me? Check it out: invite your friend to help you decorate the Christmas tree, and, as if in passing, make a garland of hearts together. See for yourself that pleasant consequences will not take long to arrive.

And such a garland is easiest to make with sewing machine. Sew cardboard circles and it's ready!
Garland for the New Year - Garland for the New Year
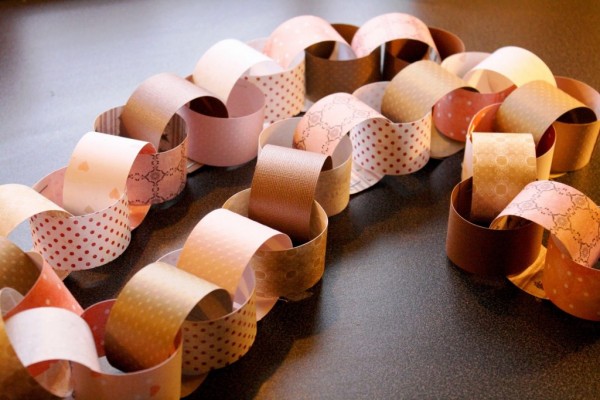
Classics of the genre - bright New Year's chains.

Garland for the New Year - Garland for the New Year
If you decorate the most ordinary LED garland with snowflakes, it will light up with a completely different light. Give it a try.

Everything ingenious is simple. Sometimes you shouldn’t be too zealous in decoration, but limit yourself to a minimalist star garland.

How do you like this knitted garland of snowflakes? I feel warm when I look at her.
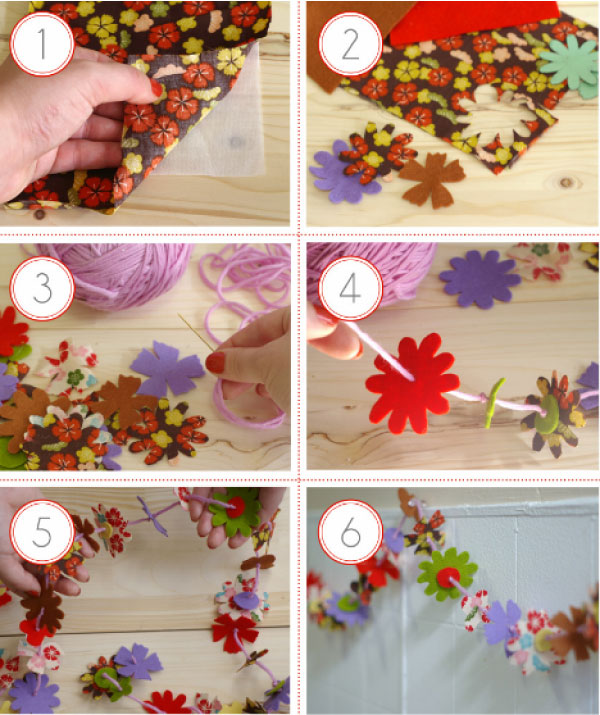
And this garland is also made of fabric and threads. Cut out different flowers from fleece and decorate the room.
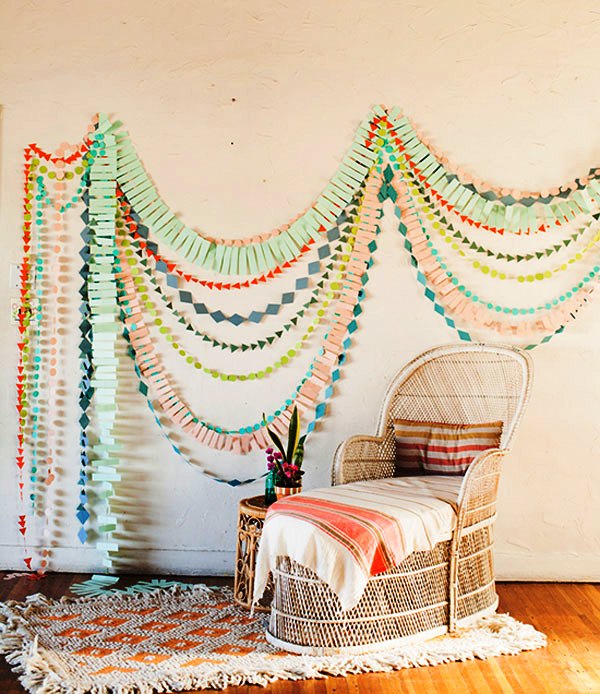
A riot of colors. Don’t even think about saying that you wouldn’t regret it three times before taking such a garland off the wall after the holidays.
Such Christmas garlands with your own hands It is most convenient to make it from ordinary colored paper for manual labor, but it is better if it is double-sided. For example, you can take red, pink and white paper. The combination of these colors will create a very delicate garland ribbon. To make it you will also need: a pen, scissors, a ruler and a stapler. Strips are cut from paper, the width of which is 3 centimeters. In order for your child to participate in the work, you can draw each cut line with a ruler, and ask him to cut them. Then each strip is folded in half. The ends are bent and stapled to each other. The same actions are performed with each subsequent strip. Each heart is connected to the previous and next ones. Work continues until the desired length of the garland is obtained. And so that the hearts do not stretch while stretching the garland, you can pierce the heart at the base with a stapler. Here's a heart garland for you.
Besides all, or rather - most often, BALLS are attached to the Christmas tree as decoration. These traditional homemade toys come in a variety of varieties: glass, paper, foam. By the way, while a glass ball can quickly break, a foam toy is very easily scratched, broken, and crumbled. If you have such spoiled-looking balls, then you can very quickly turn them into a real precious decoration, using a reel of small plastic beads and decorative cords for decoration - for example, milky white.
Tools you will need are a hot glue gun, scissors and tweezers. In this way, you can not only update old foam balls, but also decorate not very interesting plastic ones. And the diameter of the beads and cords used can be very different. But, naturally, it is better to decorate small balls with a thin cord and a string of small beads, and large toys can be covered with both large and small beads. Balls decorated with three cords or threads at the same time look even more original. First you need to unravel the finished garlands along separate threads. Then the cord is taken and its end is immersed in a foam ball using nail scissors or ordinary tweezers. A little glue is applied to the area of the ball near the place where the cord is attached, and the tip of a string of beads is attached to it. The next part of the ball is gradually covered with glue and slowly, layer by layer, beads and cord are laid until the entire surface is completely filled. The excess is cut off, the end of the lace is drowned in foam. At the end, using a thread and a needle passed through the cord, a loop is made for hanging the toy.

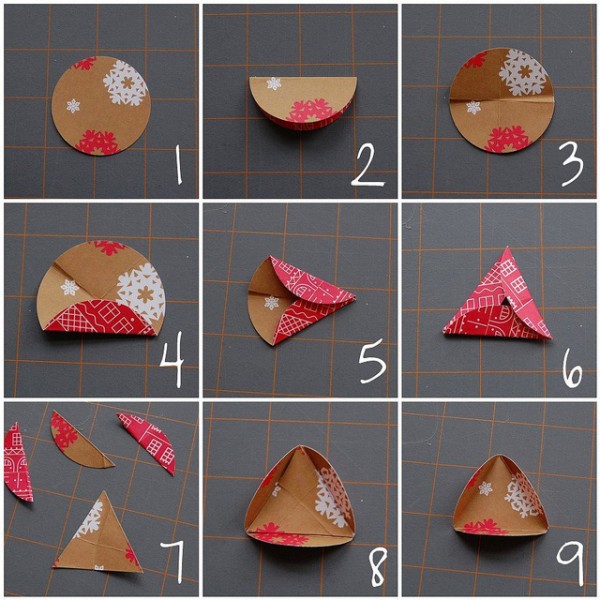
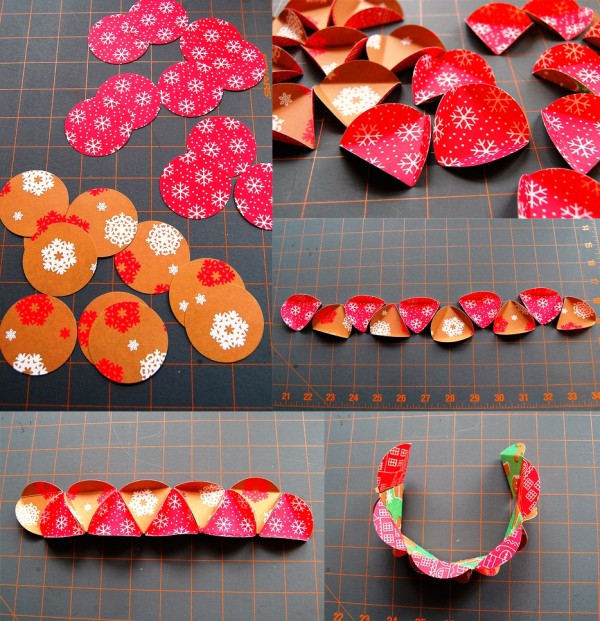
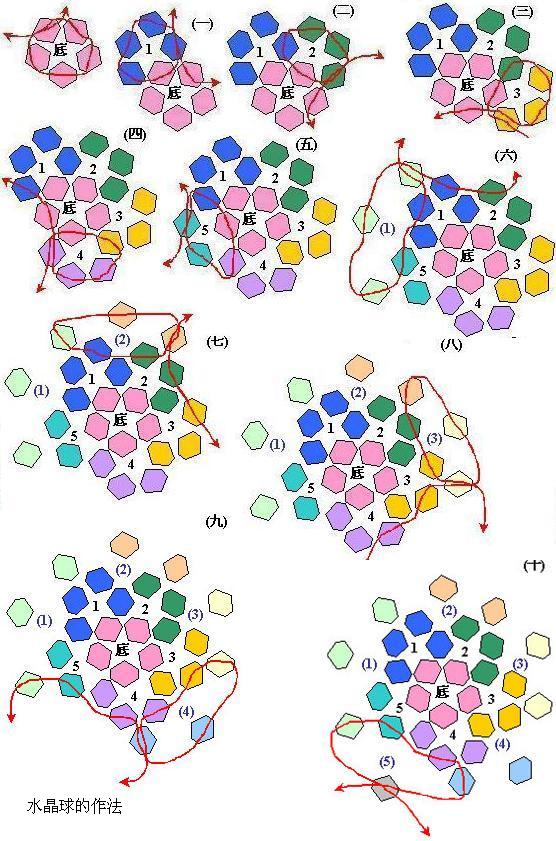
How do you like this ball? A very interesting thing that requires knowledge of geometry. Doing it is very educational. I advise you to try it.
DIY Christmas tree balls - DIY Christmas tree balls
To begin, prepare the base circles as shown in the picture.
DIY Christmas tree balls - DIY Christmas tree balls
To work you will need 20 circles of the same diameter.

DIY Christmas tree balls - DIY Christmas tree balls
Place them in sequence. It seems like nothing complicated.
![]()
DIY New Year's toys - DIY New Year's toys
But such a funny pinwheel is made from strips of paper according to the diagram.
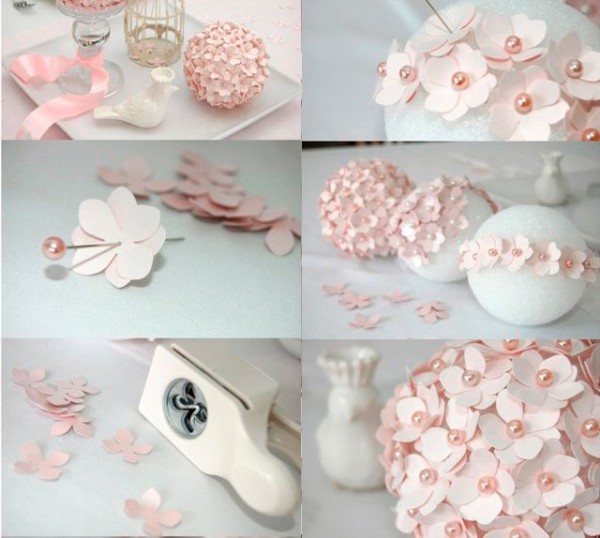
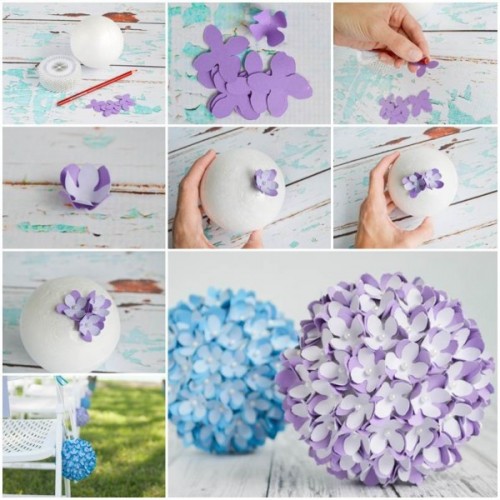
A foam ball or sponge ball can be wonderfully decorated with flowers and bobby pins with beads.
DIY Christmas ball - DIY Christmas ball
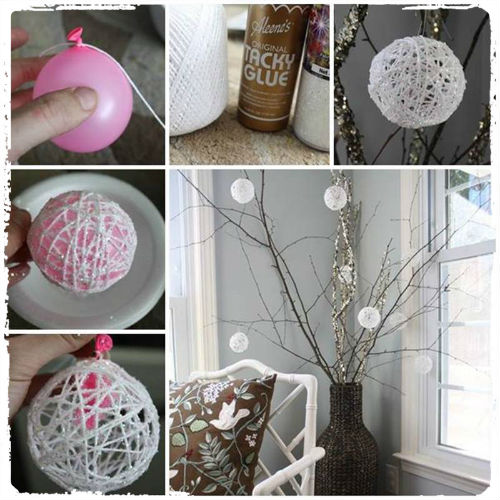
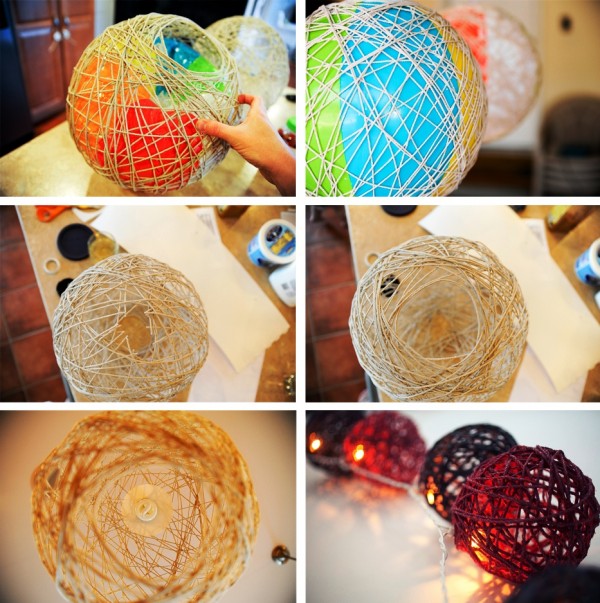
Making such a ball is simple, but takes a long time. To work, inflate the ball, wrap it with thread, spread it with PVA glue and wait until it dries. Then pierce balloon IR and take it out.

DIY Christmas ball - DIY Christmas ball
Balls can also be twisted from wire.
DIY Christmas ball - DIY Christmas ball
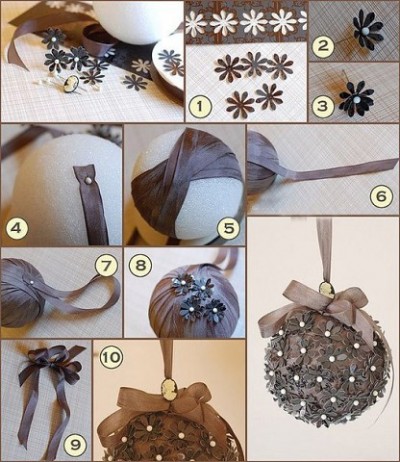
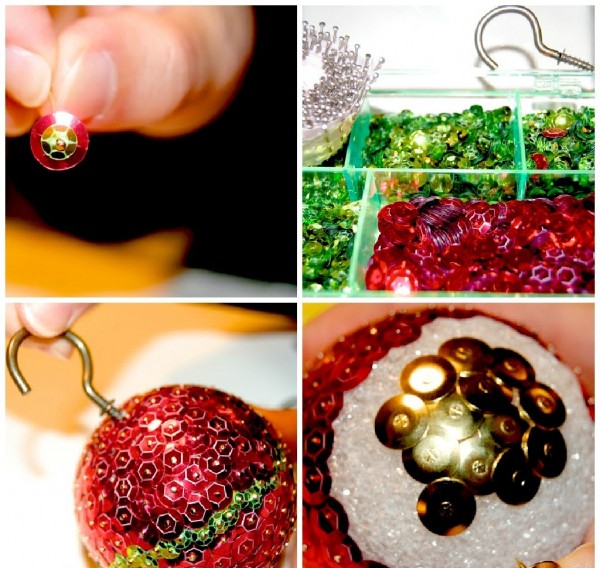
And this is how you can decorate a blank ball made of foam or sponge with sequins and bobby pins.
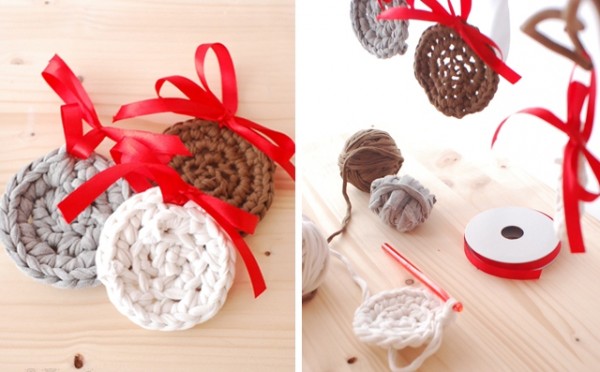
DIY Christmas ball - DIY Christmas ball
Knitted circles can be used as toys, and then as coasters for cups. How's the idea?

And here is another ball with sequins. I really like him.
Often we do DIY Christmas toys FROM BEADS. They actually make very cute Christmas decorations, which can be hung throughout the house, which will help create a great New Year's atmosphere, we have already written about how to weave a tree from beads. To make such charming toys, you will need red beads, ribbon and wire. So, beads are strung on a wire, and then wire toys are formed from ready-made hard beads, for example, stars, hearts or Christmas trees. No special work is required, but if you hang such toys on the Christmas tree, after decorating them with ribbon bows, the result will be very cute.
Returning to the same balls, you can try to make Christmas tree decorations using the decoupage technique. This requires aged glass Christmas ball IR, sheets from a music book, PVA glue or special glue - for decoupage, silver glitter and paint, a special stamp with a New Year's themed inscription, ink, a small bell, a ribbon for tying a bow, and thin twine for loops. Although all these components can be replaced with what you have on hand, leaving the main thing - a ball, glue and napkins. The technique for making the toy is very simple and does not require additional skills. First, a little white acrylic paint is laid out on the palette, then the sponge needs to be carefully soaked in the paint and white is applied to the entire surface of the ball. You need to constantly pick up paint on the sponge, then you get something like a snow coating. This way all the balls are prepared and left to dry completely. In the meantime, you need to prepare napkins. To do this, the top layer of the napkin, the most colorful one, is separated. Then PVA glue is diluted halfway with water and the motif is glued to the ball. Gluing begins from the central part of the motif with uniform advancement to its edges. All motives are attached in the same way. In general, everything is done in the standard way, as with any decoupage, just with more glitter and decorations.
If you want to make a ball for your Christmas tree out of beads, you don’t have to know how to weave, you can just stick the beads on.
Interesting balls are made from... book pages or, for example, pieces of felt. So, on the scraps of the material you have chosen, the contours of the circle are indicated (you can circle any household item, for example, a cup). Using a sewing machine, approximately 10 circles are sewn together along the diameter. If you don't have a machine, you can use a stapler. The line should go exactly in the middle through the centers of all circles. The edges are connected with paper clips in a checkerboard pattern: sometimes there is one connection in the middle, then closer to both ends of the seam there are two connections. And so on. It looks like a book turned 360 degrees with oval pages, fastened in twos either in the middle or at the edges. This gives the paper toy the effect of a voluminous corrugated ball. At the end of the work, a loop is attached. Even such a toy can be hung on a Christmas tree, but it is better to additionally decorate it with sparkles and glue. It’s better, of course, if you have ready-made glitter glue.
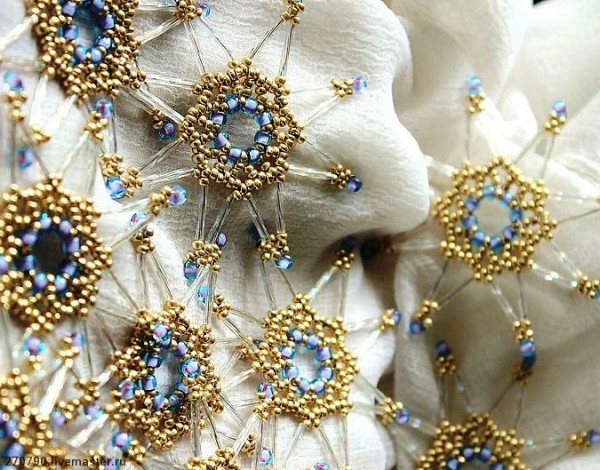
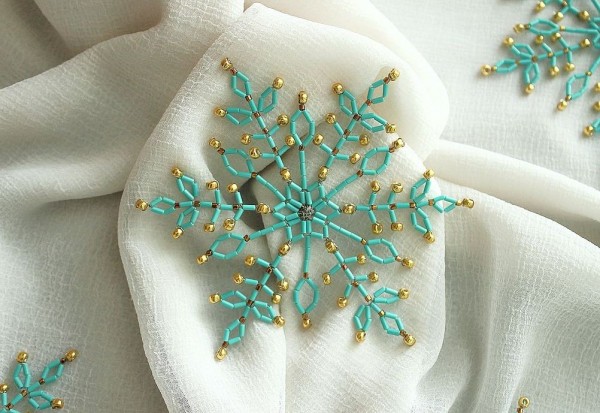
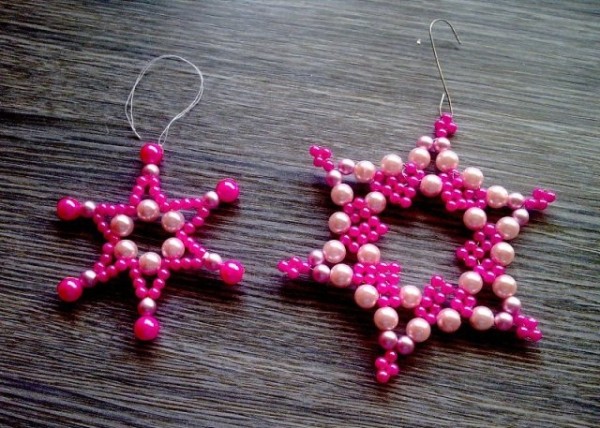
New Year's snowflakes made of beads
New Year's toys made of beads - New Year's toys made of beads
The ball-web looks very unusual and elegant. To make it you will need a simple balloon, any thread, good glue (PVA is best), as well as your imagination and perseverance. Naturally, the ball is inflated to the required size (according to the volume of the future decoration), tied well and lubricated regular oil. Then the thread is soaked in glue, excess glue is removed from it, passing the thread through tightly clenched fingers. Although you can make a special container into which glue is poured, and a small hole is punched in the lid. The skein is placed in a container, the tip of the thread is passed into the hole made and it is gradually pulled out, due to which it is dosed with glue. Then the entire ball is gradually entangled with this thread. In this case, you will have to stock up on considerable patience, since the first rows of thread can simply slide off the ball. The thread should be held in light tension (slightly tense). After winding is completed, the ball must be hung to dry. But you should not dry it with a hairdryer or over a heating radiator, as this may cause the ball to burst. The thickness of the thread can be selected at your own discretion. But there's no need to rush. Let the ball dry for a day, and then you will need to carefully pierce it with an ordinary needle and gradually remove the frame from under the threads. Frozen threads soaked in glue will hold their shape well. But that’s not all: the ball can be decorated, again, at your discretion.

New Year's toys made of beads - New Year's toys made of beads
If you braid a large bead with beads, you will get a beautiful toy.
The bead is woven according to this pattern.
New Year's toys made of beads - New Year's toys made of beads
Snowflakes-earrings and snowflakes-toys.
DIY New Year's toys: Christmas trees and snowflakes
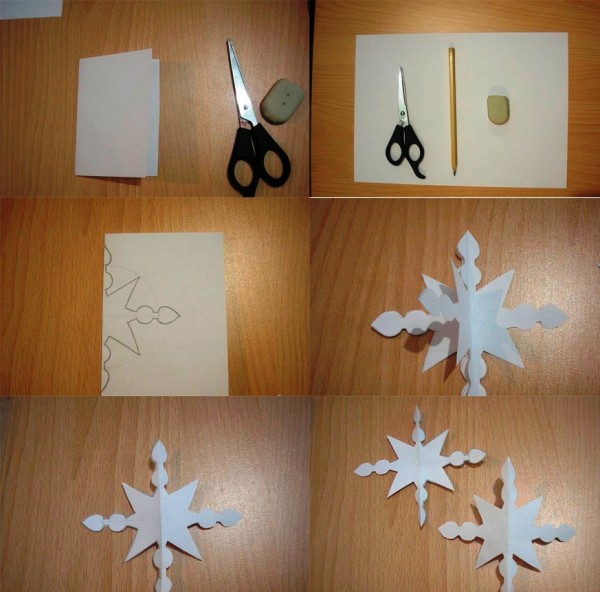
Most Popular DIY Christmas toys made from paper– these are ordinary SNOWFLAKES. They do not require any special skills from the performer, no expensive material, no special investment of time. Everything is more than simple, if not elementary. For such a New Year's decoration you will need ordinary paper - from white to colored, glue - better, of course, the same PVA, paper clips and scissors.
The methods for cutting them out are very diverse: from simple ones, like those that we cut out in school years from notebook sheets to complex volumetric snowflakes. Folding using the origami method or cutting using the kirigami method is done according to special instructions with each step demonstrated. If everyone is more or less familiar with origami, then snowflakes using the kirigami technique are made by first folding a square diagonally, then bending the corners towards the middle of the triangle, which will divide it into three identical triangles. Then several parallel shaped cuts are made along the folds and on top, the tongues of which, after unfolding the snowflake, will need to be tucked towards the center under the base to create a semblance of petals. In addition, you can decorate the snowflake by smearing it with glue and sprinkling it with glitter. This will make the snowflake even more beautiful and brighter. A card in the shape of a snowflake is made by gluing individual parts piece by piece.

This voluminous snowflake can be made using a simple pattern.

These giant snowflakes can be made from popsicle sticks. don't believe me? Watch the master class.
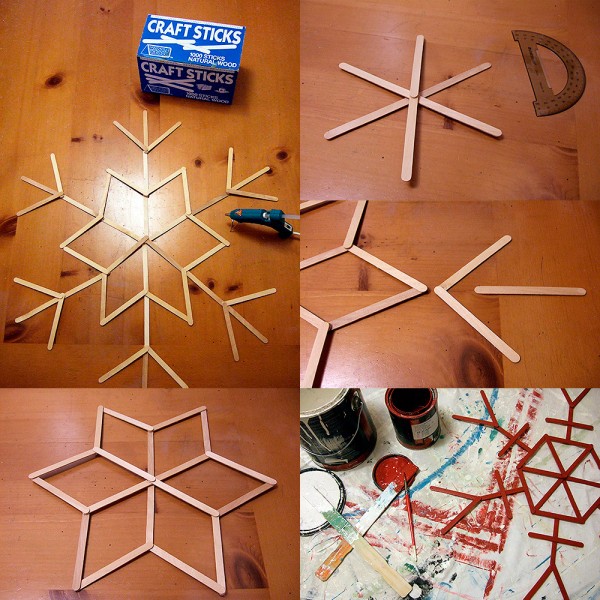
You will need a lot of Popsicle sticks. Didn't have time to collect? Then immediately treat your friends to popsicles and take away the wooden ones.

If you paint a snowflake in a shade contrasting with the color of the walls, then the New Year's ambiance will be 100% guaranteed.
DIY Christmas tree decorations - DIY Christmas tree decorations
This intricate snowflake is made from thin, thin strips of paper. she is extraordinarily beautiful. Carefully follow all the points of our tutorial.
DIY Christmas tree decorations - DIY Christmas tree decorations
DIY Christmas tree decorations - DIY Christmas tree decorations
Difficult? The main thing here is not to be nervous.
DIY Christmas tree decorations - DIY Christmas tree decorations
That's it, the finishing touches and it will be ready.

The result was worth it, right?
Unexpected DIY soft Christmas toys are obtained, for example, in the shape of a TREE, we have already written about how to make Christmas trees with your own hands. To make such a Christmas tree from tools and materials you will need:
- a hook, the size of which matches the thickness of the threads,
- soft material (as for filling pillows),
- package of white beads,
- the remains of three shades of green threads,
- needles and thin threads for sewing, matching the tone,
- golden waxed threads.
First, according to the pattern, a stand, a tree trunk and a triangular base are knitted. When knitting a triangular warp, a pattern is used in which each row is repeated four times. The Christmas tree is knitted striped, each strip will be three rows wide. The alternation of stripes is carried out according to the following scheme: dark green, green, light green.
So, first, five air loops are closed into a ring, and then knitting occurs according to the following pattern:
- three identical rows of 8 single crochets (dark green);
- a row of 8 single crochets (green);
- two identical rows of 14 single crochets (green);
- two identical rows of 14 single crochets (light green);
- a row of 20 single crochets (light green);
- three identical rows of 20 single crochets (dark green).
The toy is decorated with large white beads or seed beads as if it were New Year's toys. Beads are sewn to the base randomly. Then the base is stuffed with soft filling material.
Tennis balls can be turned into wonderful toys with a simple movement of the hook.
The tree stand and trunk are knitted according to the following pattern:
five air loops are closed into a ring, then three identical rows of 8 single crochets are knitted ( Brown color). This will create the trunk of a Christmas tree;
Next, the base is knitted according to the same pattern as given at the beginning of the work (dark green color).
Soft New Year's toys - Soft New Year's toys
I recommend making this soft knitted garland with your child. Both beautiful and educational.
To strengthen the base, a circle is cut out of cardboard, the diameter of which is equal to the diameter of the knitted stand. Then the knitted stand is sewn to the cardboard. The first row of loops runs around the trunk of brown threads, the second along the outer edge. All that remains is to connect the tree and stand together, and a real New Year's beauty will delight you for many years. And the real spruce can be preserved.
Soft New Year's toys - Soft New Year's toys
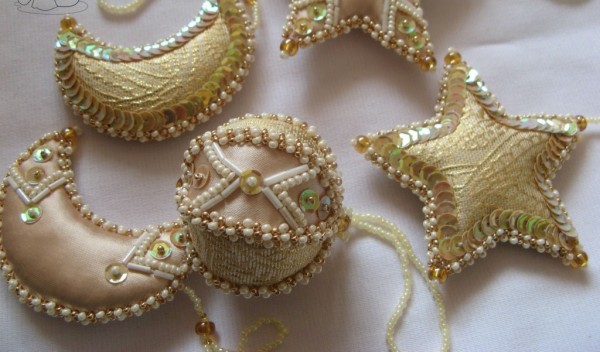
Soft toys made of brocade and beads: royal decoration.
There are many more different options homemade New Year's toys. You just need to turn on your imagination and try a little. And then certainly any of your wishes will come true. After all, the first thing - to make a creative Christmas tree decoration - came true. Well, who else doubts the magic of the New Year's toy?

DIY Christmas tree - DIY Christmas tree
It won’t be difficult for a craftswoman to crochet this Christmas tree.
A funny and cute Christmas tree made of felt and beads.
The New Year's period is the best time of the year for creativity and handicrafts. After all, it is the aura of magic that has the best influence on boundless imagination. No suitable materials? Don’t rush to go shopping at a store or handmade goods store. Perhaps you will find something interesting in boxes and chests. We invite you to familiarize yourself with interesting master classes on making toys on.
Christmas deer toy for the tree made from popsicle sticks
The first toy in the form of a cute deer made from wooden ice cream sticks. An entertaining process and amazing results are guaranteed!
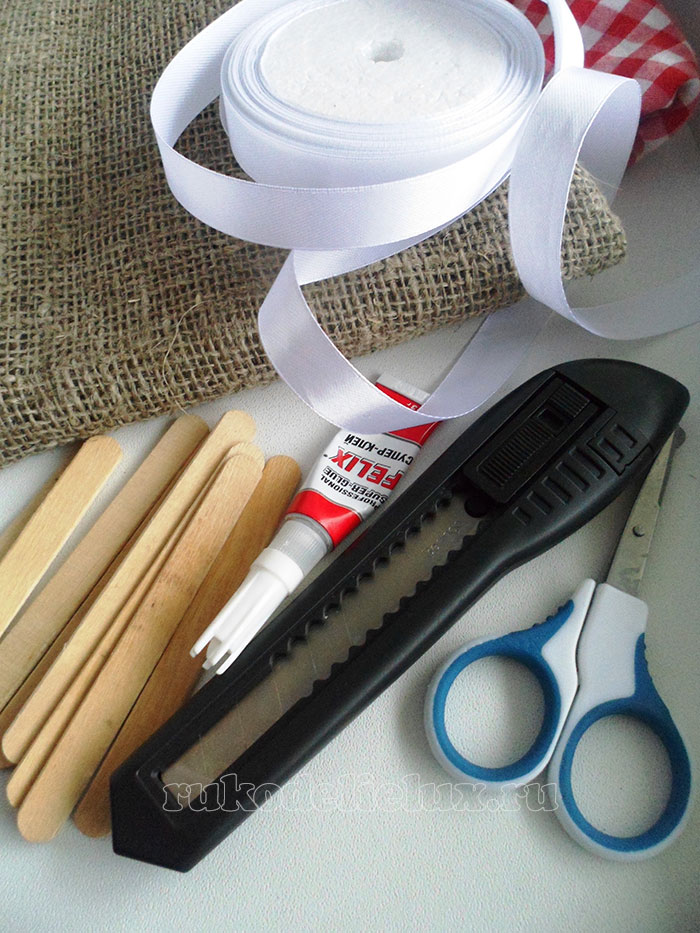
Required materials and tools:
- wooden ice cream sticks;
- stationery knife;
- glue;
- paint and brush;
- decorative elements.
At the initial stage, you need to prepare a paper stencil. You can do this in two ways: print it from the Internet or draw it yourself. In any case, the picture must subsequently be cut out with scissors.
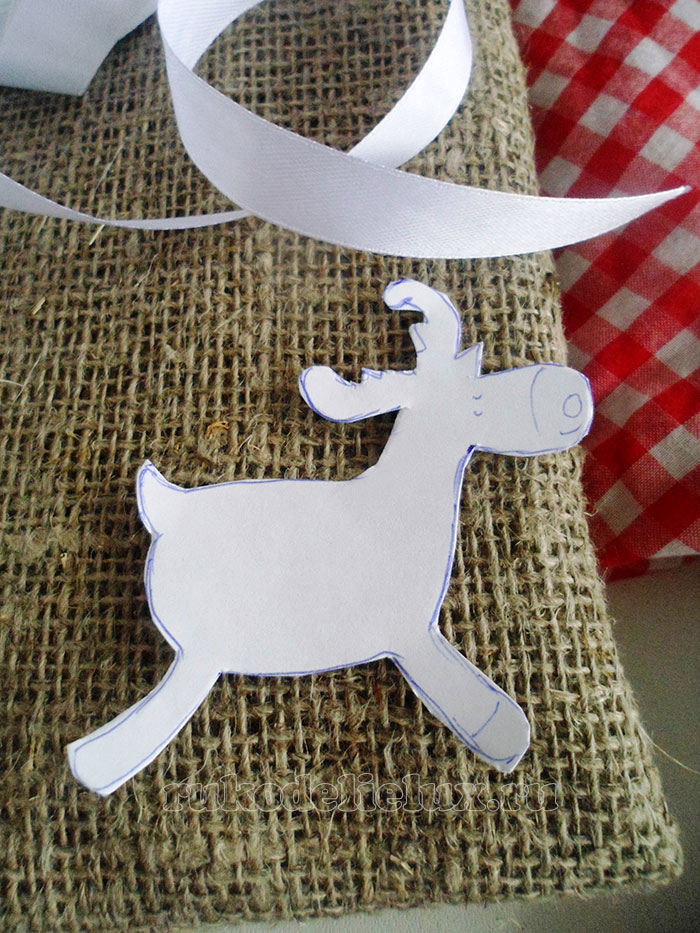
We lay out the wooden sticks close to each other and transfer the outline of the deer using the blank. A pencil is quite suitable as a tool. Its lead fits well on a wooden surface.

Next, using a stationery knife, you should work on each stick. It is better to do this as carefully as possible, since the wood may delaminate. After completing the labor-intensive process, all elements need to be glued together. The result should be the basis for a Christmas tree decoration.

We begin the entertaining stage of decor by painting a faceless deer. Colors can vary from traditional red to bright yellow. However, you should not combine more than two types. Otherwise, decorative elements may get lost against such a background.

At the final stage, we fasten the loop and decorate the base of the toy. Ribbons, buttons, beads are not a complete list of items that can be used to decorate a toy.
A cute handmade Christmas deer will certainly surprise friends and family with its originality. Using the described principle, you can assemble a whole hand made collection of toys in the form of Christmas trees, shoes or hearts. Creative inspiration and imagination!
 Another Christmas tree toy made from popsicle sticks
 DIY Christmas toys for decorating the Christmas tree in the yard
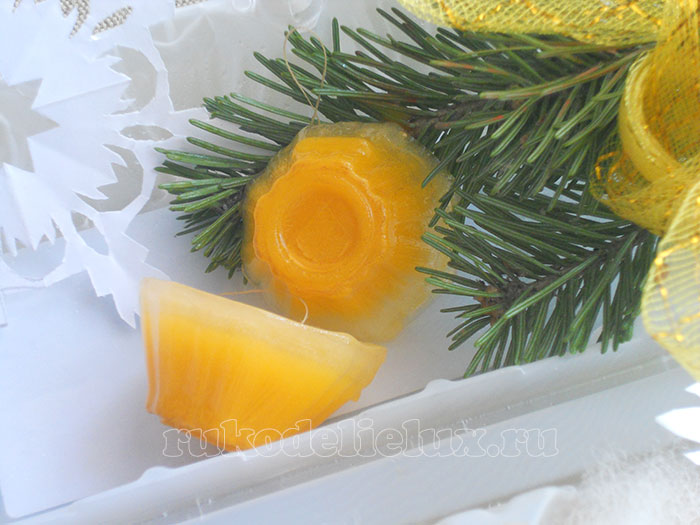
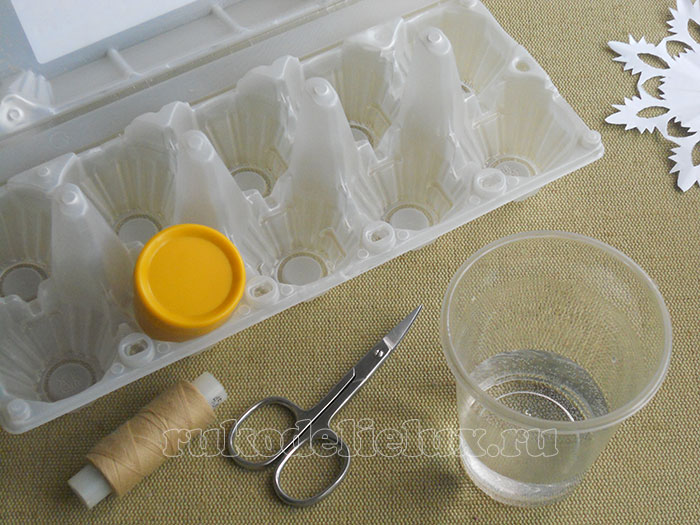
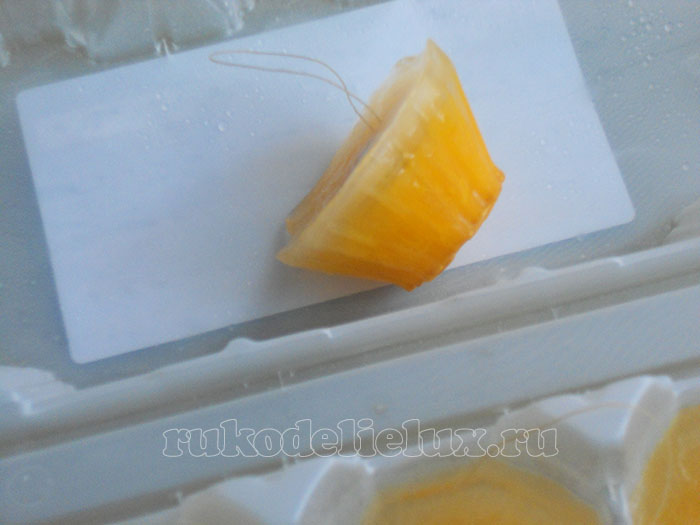
Original Christmas tree decorations can be made using egg packaging, water and gouache paint. Such toys will look original on the Christmas tree in your yard and will delight you and your guests.

To make a Christmas tree toy you will need:
- Egg packaging (store container);
- running water (from the home tap);
- sewing threads flesh-colored;
- plasticine for modeling;
- scissors;
- yellow gouache paint;
- freezer.

Pour tap water into a plastic cup.
Use yellow gouache paint to color the water in the glass. In the second glass, add clean water in case you need to add it to the form.
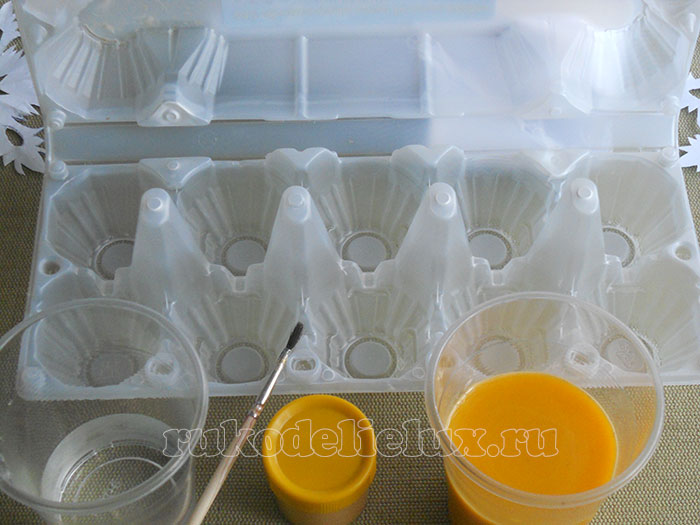
Pour colored water into the molds, but not to the brim. About half.

Close the egg cup lid tightly.

Place the package in the freezer. Let the colored water freeze into ice.


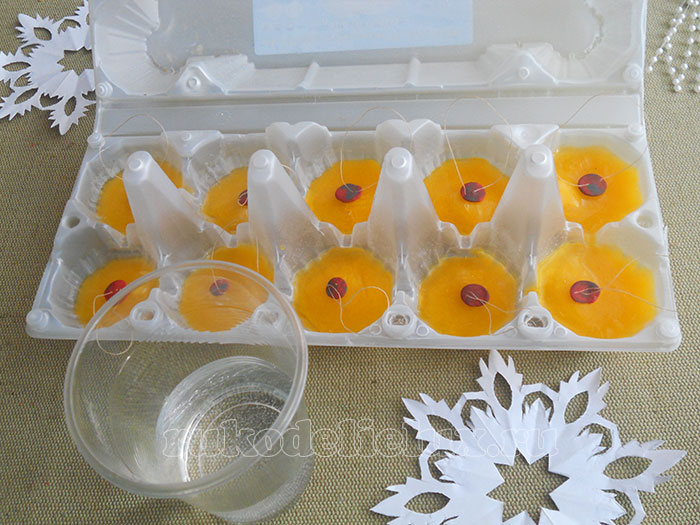
Cut threads for loops. You will need ten pieces of fifteen centimeters each.

At the next stage you will need a piece of plasticine.

Roll tiny plasticine balls according to the number of loops. Stick plasticine balls to the ends of the threads.

Flatten the plasticine balls.


Place the loops into the molds.

Now you will need a second glass of water.
Add water to the molds to the brim.
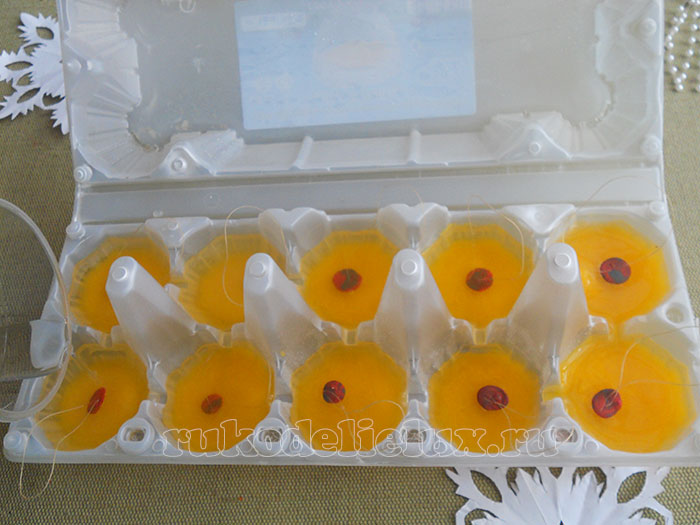
Close the mold again and put it in the freezer.

After the second layer of water freezes, remove the finished toy.

This is such an unusual Christmas tree toy.
You can decorate the Christmas tree in the yard. This made ten ice decorations.
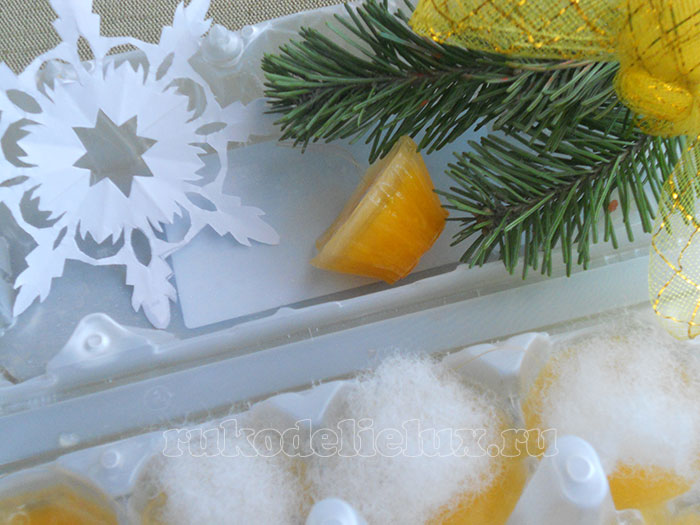
Ice toys will delight you until spring.
 DIY bright New Year's toys
 Original and simple! This is the story of one egg carton).
![]()
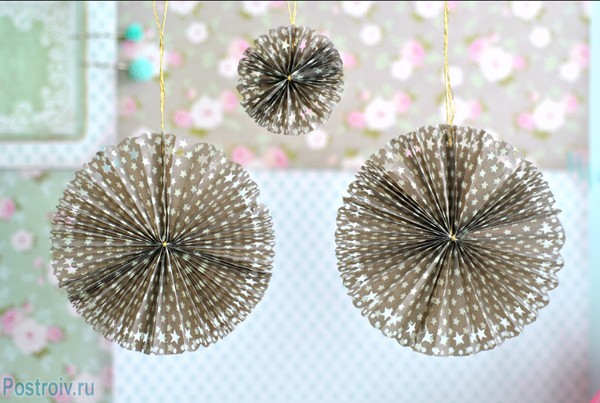
Toys - do-it-yourself paper umbrellas
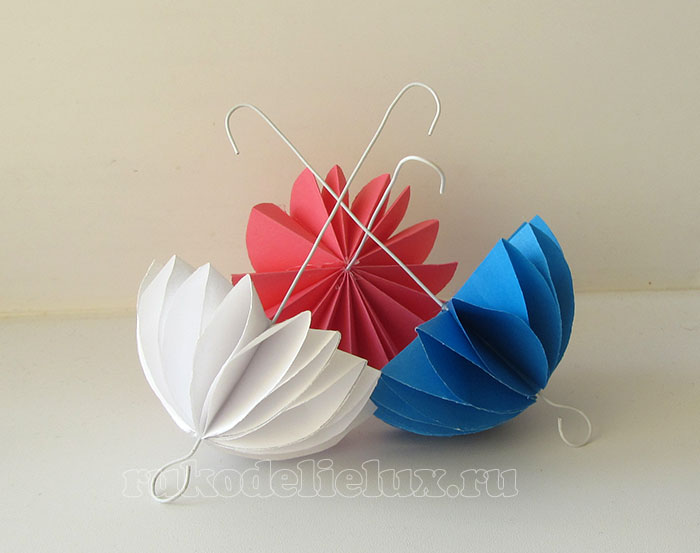
![]()
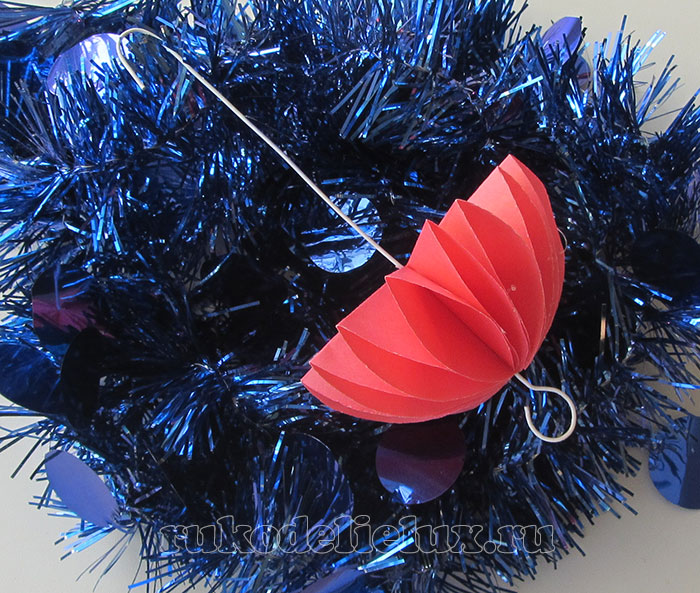

How to make such a New Year's toy - watch a detailed video master class
Solution for threads: take 50 ml of water and dissolve 3 teaspoons of sugar in it, add PVA glue - the more, the better. And we wrap the balloon with threads as shown in the video:
DIY 3D Christmas tree toy
Decorating a Christmas tree with the whole family is a real pleasure. The very preparation for the New Year causes dizziness and anticipation. fabulous holiday. Each family member is busy with his own business, for example, looking for gifts, recipes for the holiday table, or making New Year's decorations with his own hands.
On the eve of the New Year, why not decorate the Christmas tree with handmade toys from natural materials, in particular, a pine cone? This simple craft looks very harmonious on green branches.
For work we prepare:
- Pine cone;
- clothespin;
- tinsel;
- plastic snowflake;
- scissors;
- glue.

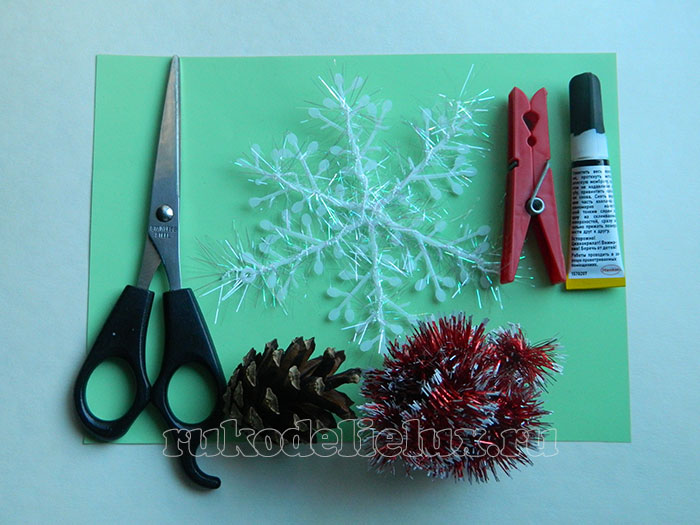
In this craft we will use an open pine cone. However, absolutely any variety of cones, for example, Crimean pine, is suitable for making this decoration.
And one more moment. A plastic snowflake purchased from a craft store is used as a decorative element. If it is not possible to obtain such a part, it can be replaced corrugated paper, plastic flowers cut from cups.
In general, there is something to think about in your spare time. How to make a decent frame for your bump? The process of making the craft is very simple. First you need to glue the snowflake to the clothespin.

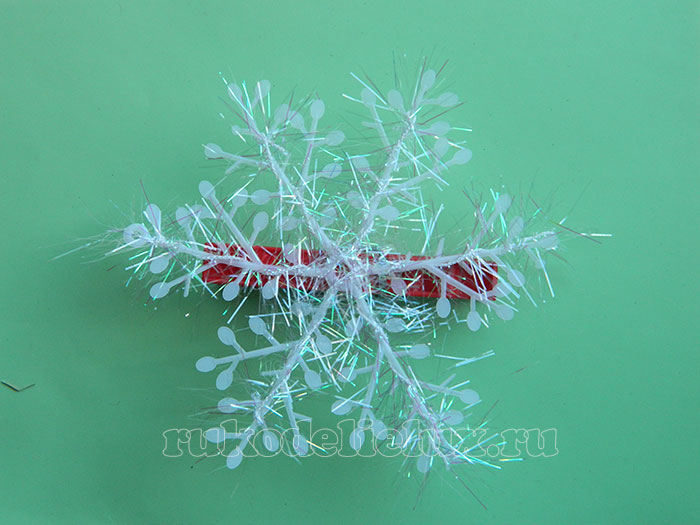
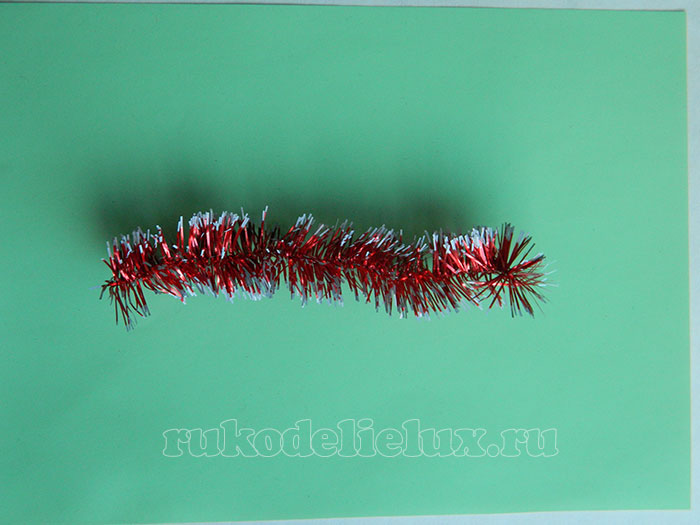
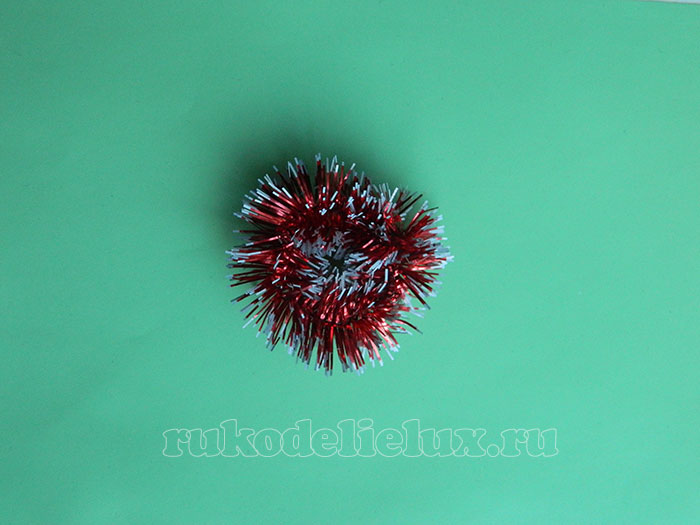
Glue a new decorative craft element in the center of the snowflake.

All that remains is to attach a pine cone on top. We don't regret glue. The cone should stick tightly to the plastic snowflake, not to the tinsel.

The decoration is ready. It turned out to be a kind of candle.
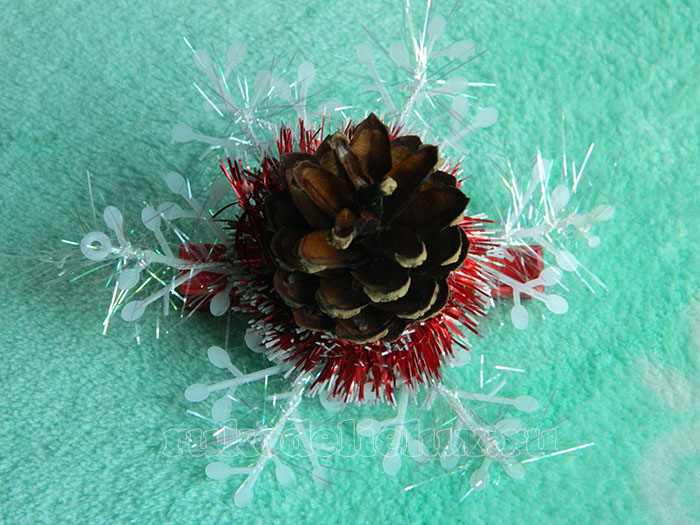
Of course, if you wish, you can paint the cones in advance different colors, decorate with beads or sparkles. We won't do this. The resulting candle looks very natural and harmonious on the green paws of our fluffy tree.

Here's proof of that. A bump, like a bump. Nothing extra. Even the red color of the clothespin does not bother the eye (although, without a doubt, wood would be better suited here).

A very original craft for a Christmas tree made from light bulbs - video tutorial
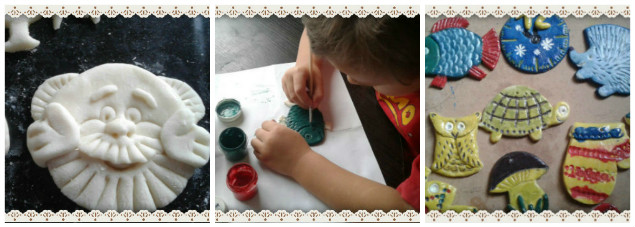
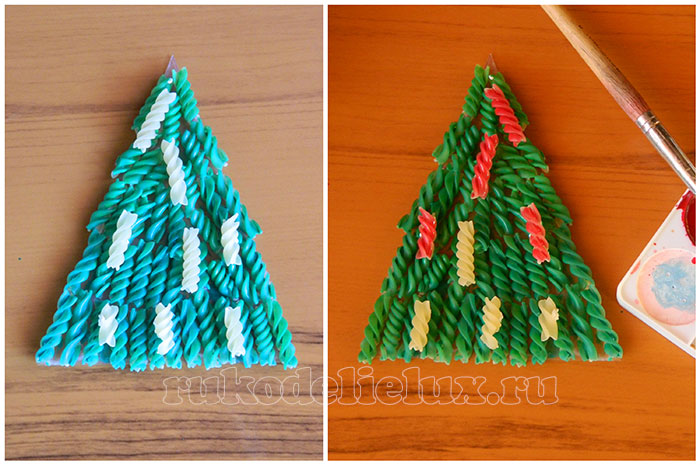
Children are preparing for the New Year celebration - learning scripts, poems, congratulations and making winter-themed crafts. These can be applications for windows, paper garlands or Christmas decorations. We'll probably stick to the last option. Our Christmas tree is already decorated with homemade bunnies, snowmen and other figures.
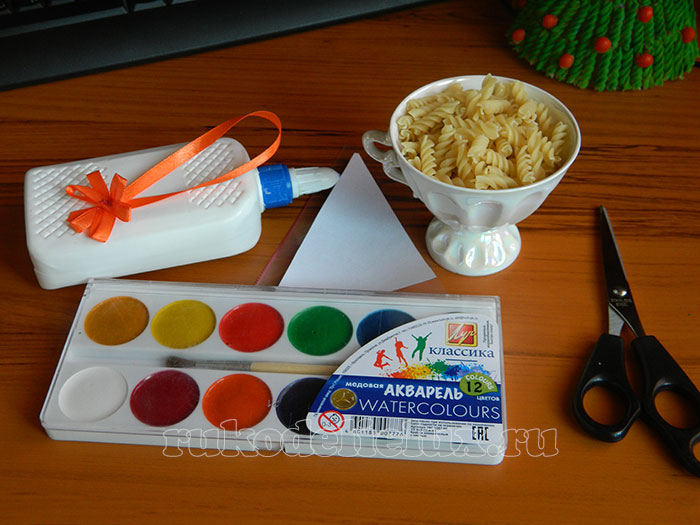
Today we will make a craft from pasta in the form of spirals. We suggest focusing on the simplest and most understandable master class, which children of primary school age can independently repeat.
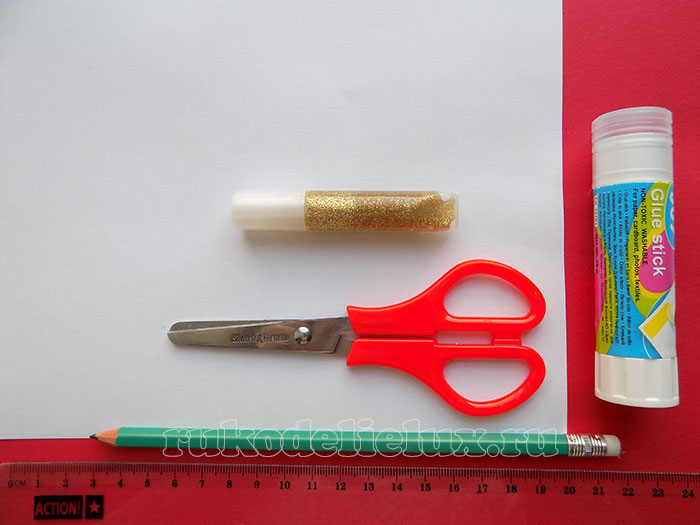
For work we prepare:
- Paper triangle;
- a piece of plastic from a folder or binder;
- PVA glue;
- spirals;
- watercolor with brush;
- ribbon or thread for a loop;
- scissors.
We have a primitive Christmas tree template made from white paper in the form of a triangle, scissors and a plastic rectangle from a binder.

Let's connect them together and cut out a transparent blank from plastic for a New Year's craft from pasta - a Christmas tree. 
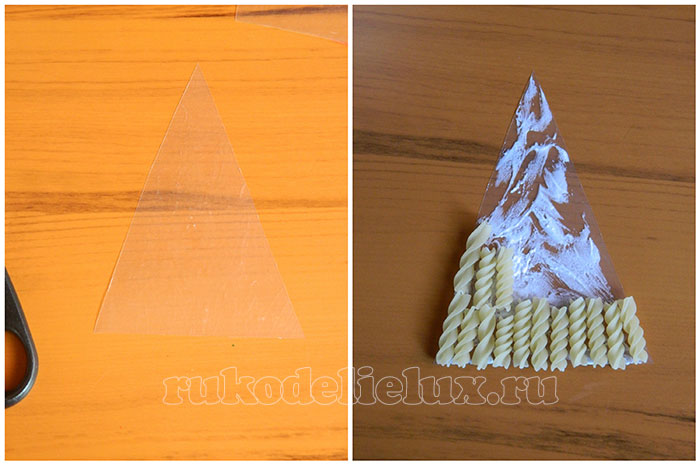
Of course, sometimes gaps will be visible between the parts, but they do not spoil the craft at all. So even better. The tree has clearly visible branches.
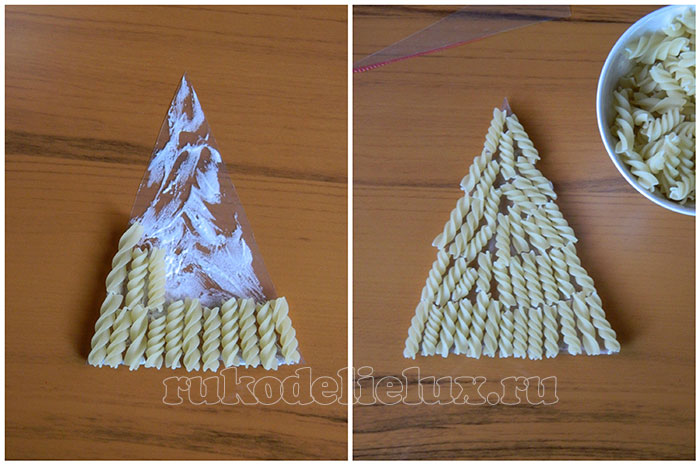
It’s time to pick up a watercolor and a thick brush and cover the Christmas tree with emerald greenery. In order not to stain the table, we placed a regular landscape sheet under the workpiece.

All that remains is to hang bright decorations on the prickly paws of the tree. Let's use PVA. These can be shells, bows or the same spirals. In our case, the curls represent long candles. Let's paint them rich red.
Attach a loop to the top of the craft. Here it is better to use a stapler or superglue. Otherwise, how can you hang a pasta toy on the Christmas tree?

A craft glued to an ordinary clothespin will hold firmly enough to the branches. Then you don’t have to deal with the loop.

This is what our decoration looks like on a real Christmas tree among the balls and tinsel. Beautiful?
 Children's craft - Christmas tree made from pasta
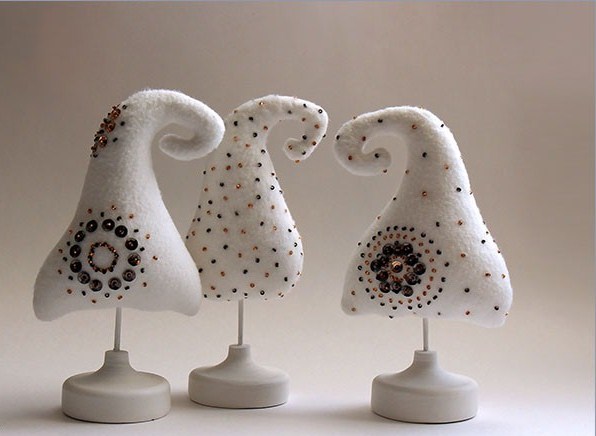
This New Year's toy can be made in 20 minutes from simple improvised materials.

The work will require the following materials:
- The basis for the cone is a foam ball or an egg from under children's toys;
- brown velvet colored paper;
- foam balls or cone-shaped blanks;
- narrow tape for loop;
- glue gun
We cut a piece 10 cm long from the satin ribbon. From velvet paper we cut out droplets - scales of the future cone about 1 cm in size. The paper can be absolutely any color, because New Year's cones are distinguished by a variety of colors and colors.

First of all, we glue the tape to the wide base of the toy - to the foam blank.
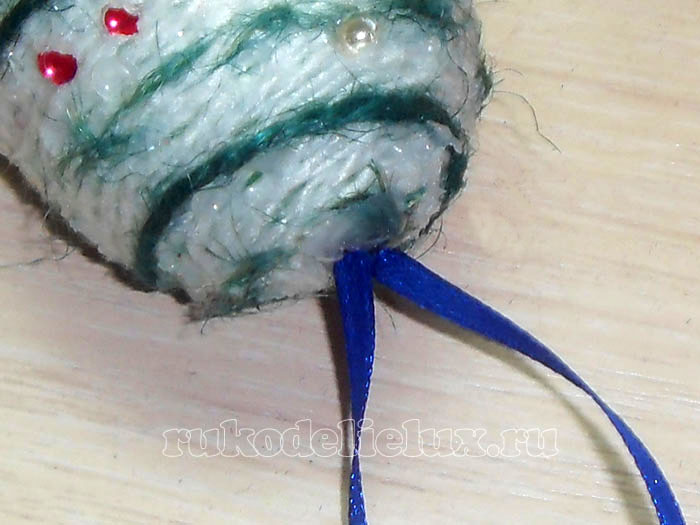
We begin gluing the scales from the loop side. We cover the entire surface of the workpiece with them.
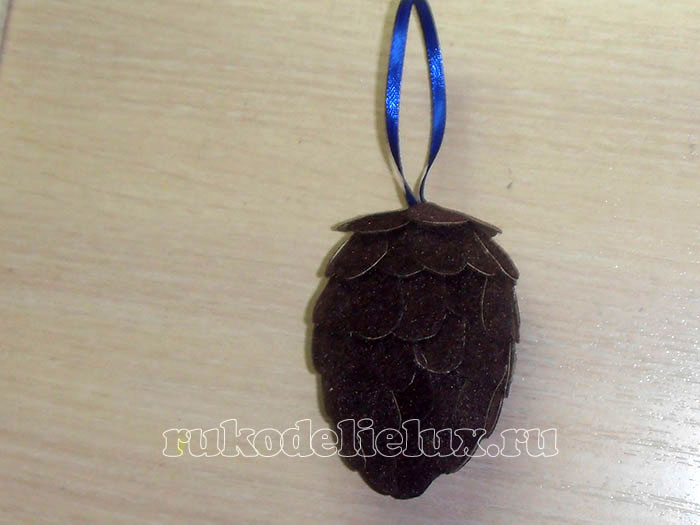
To prevent the cone from looking boring, we crumble the foam and attach balls to the edges of the scales at the top of the cone.

The New Year's snow-covered cone is ready in a matter of minutes. Such toys will not only save money on purchasing Christmas tree decorations, but will also decorate the tree and the interior of the room.

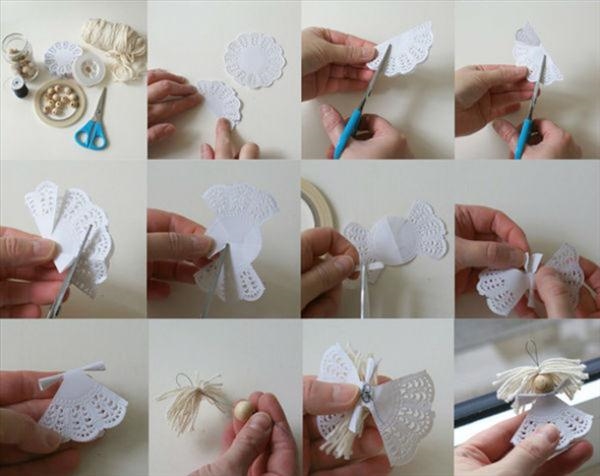
One of the most popular New Year's decorations can be called a Christmas angel made of paper, which can be made according to the proposed master class. This angel is made very simply and quickly.

Necessary materials:
- White sheet of A4 format;
- scissors;
- pencil;
- ruler;
- glue;
- gold colored sparkles.
First, cut out 2 squares of paper of the required size, on which the final size of the future angel will depend. In our case, the squares measure 9x9 cm.

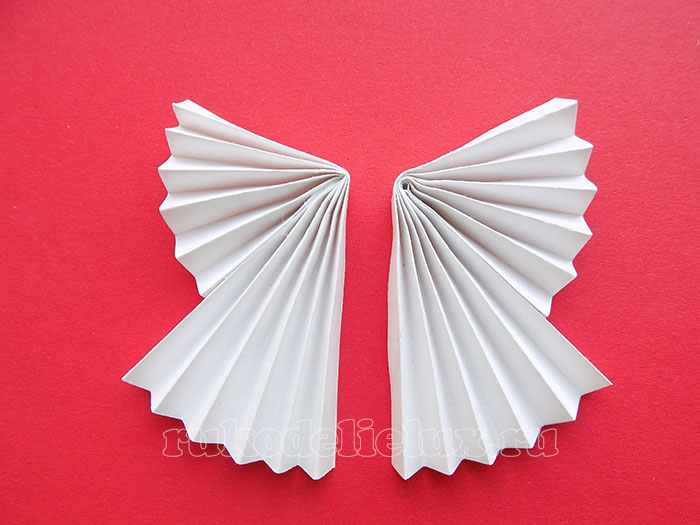
Now we fold both squares like an accordion.

On each of the blanks you need to make one fold in opposite directions. This fold should be located approximately 1/3 of the distance from the edge.

On each of the blanks it is necessary to glue the side side, the upper part will be the wings of an angel.
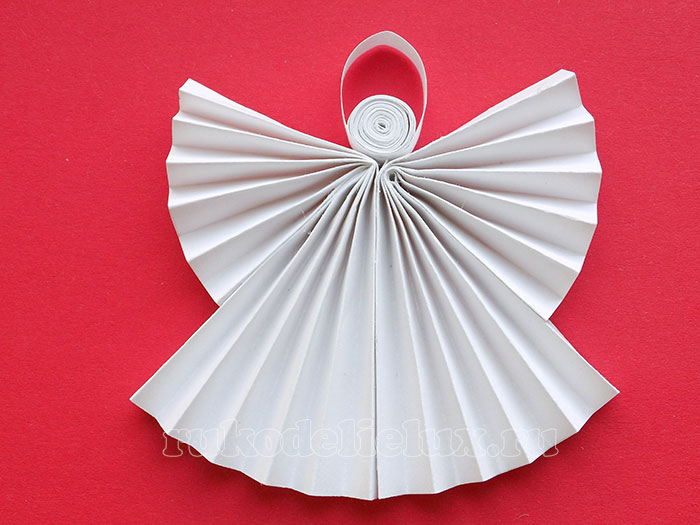
Now let's start creating the head. To do this, cut a strip from a sheet of paper, the width of which is equal to the accordion with which we folded the squares. After this, we begin to twist the cut narrow strip, periodically fastening it with glue. To create a head of the required size, several strips may be required; we take as many as needed to make a proportional craft.

We make the remaining end of the narrow strip free, creating a halo. We fasten a strip of paper at the bottom and leave a small end.

We glue the resulting blank between two previously bent accordions.
Using golden sparkles we decorate our craft.
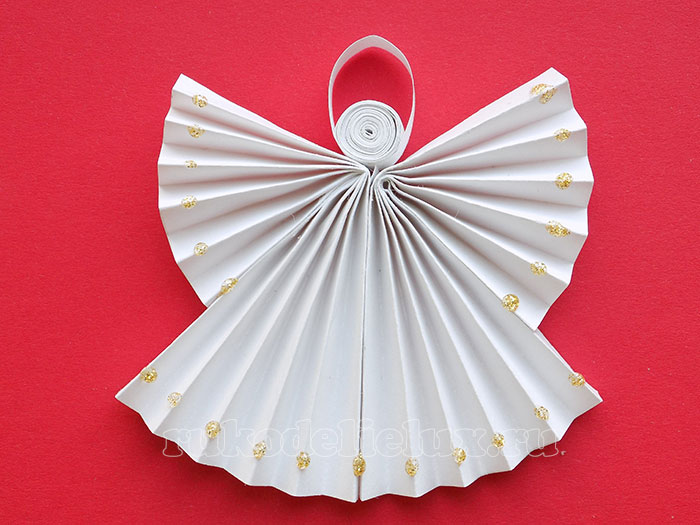
Our paper Christmas angel is ready.
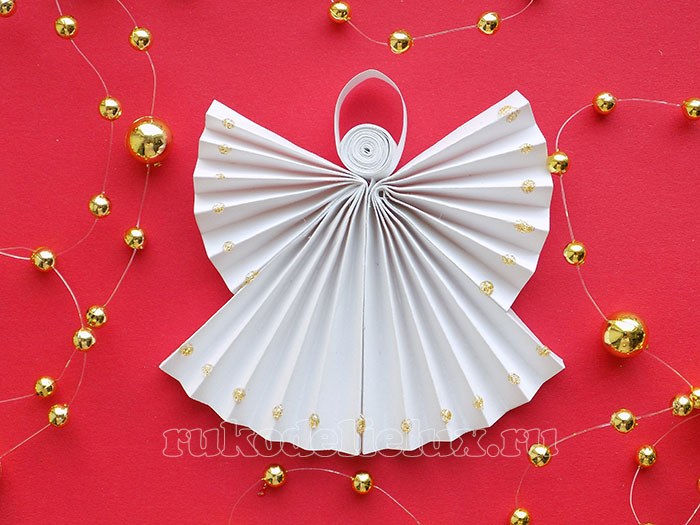 Christmas angel made of paper for the Christmas tree
 DIY Christmas toys photo gallery
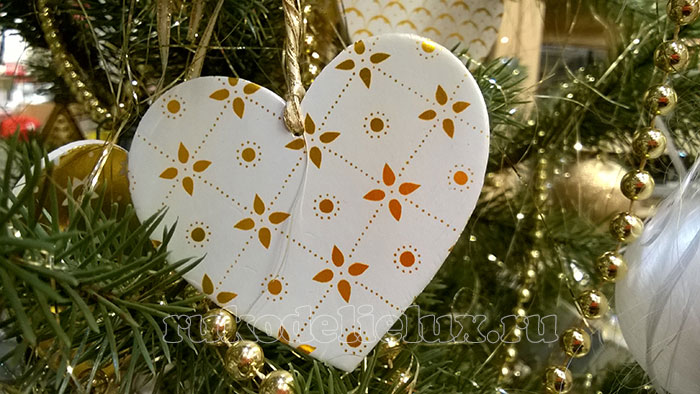 Cardboard heart
  Styrofoam toys covered with glitter
 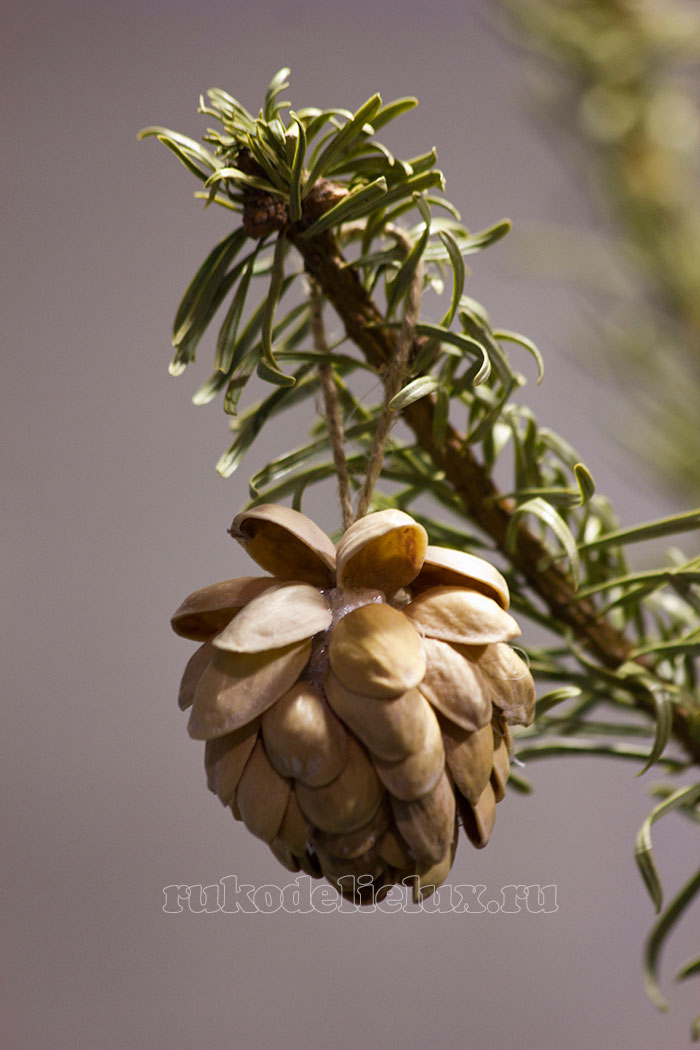 New Year's toy made from ordinary pistachio shells
  Plastic Christmas tree toy ( polymer clay) New Year's house
 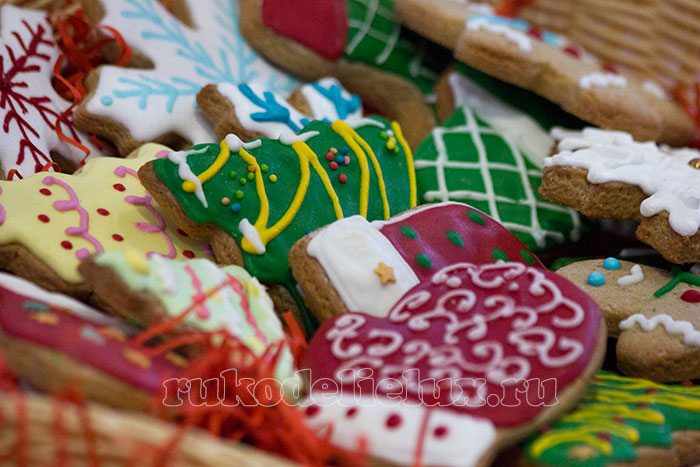 Gingerbread New Year's toys
 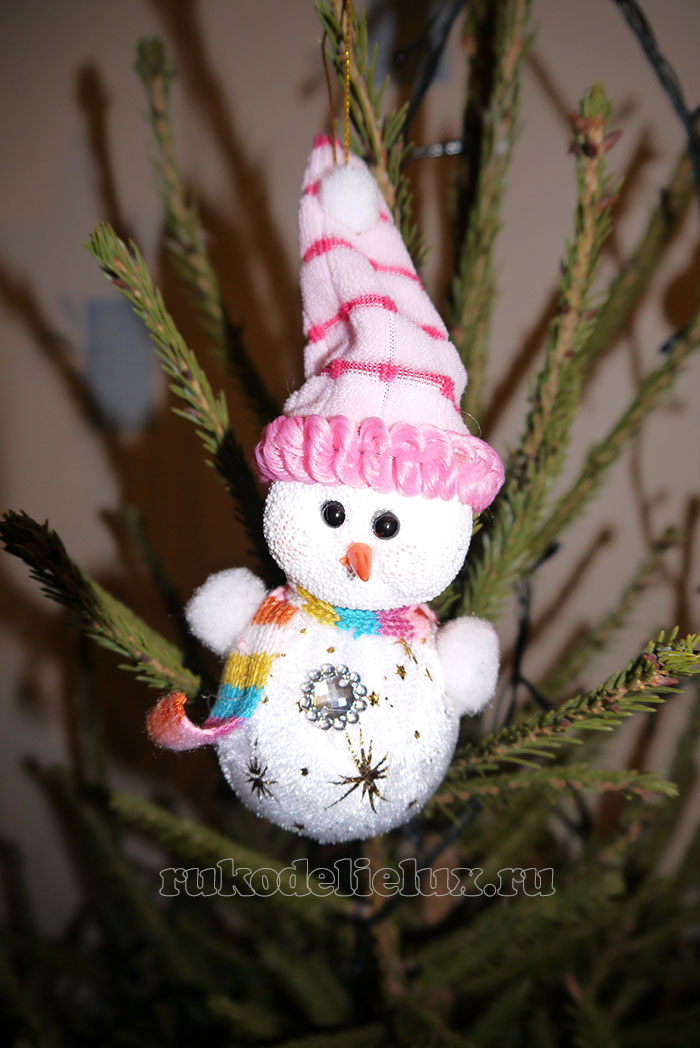 Textile toy

A very beautiful New Year's toy made from a regular napkin, master class
Master classes presented in this video article
With this we will say goodbye. I wish everyone a fabulous New Year's Eve! May the whole next year be incredibly successful, rich and happy!
Read about how to make and paint here.
When, before the New Year, all family members find time and get together to make decorations for the Christmas tree and the room, it’s wonderful. In the old days, when Christmas tree decorations were expensive, many had no choice but to make Christmas tree decorations with their own hands from scrap materials: pine cones, acorns, rags. Those days are long gone, but the tradition remains. In addition, the choice of materials has expanded significantly, and many interesting ideas based on handicrafts have appeared. different countries, which made the process of making Christmas tree decorations even more fun.
Fold and glue from paper
Paper is an affordable and pliable material from which you can make many different decorations. All its varieties are used to make toys: regular white, which is used for office equipment; colored, familiar to us from handicraft lessons at school, thin cigarette paper, corrugated cardboard, decorative cardboard.
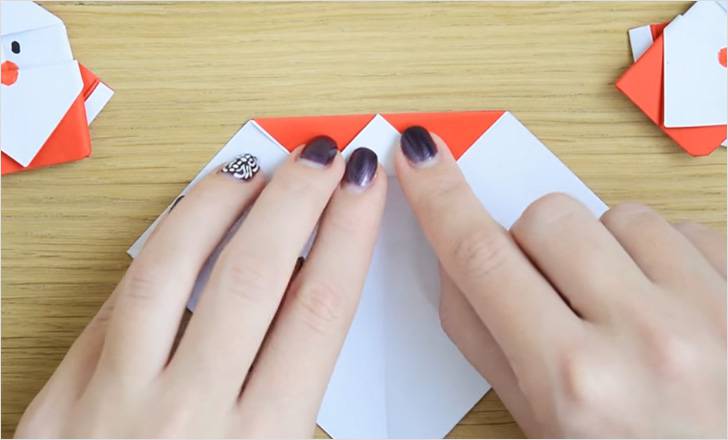
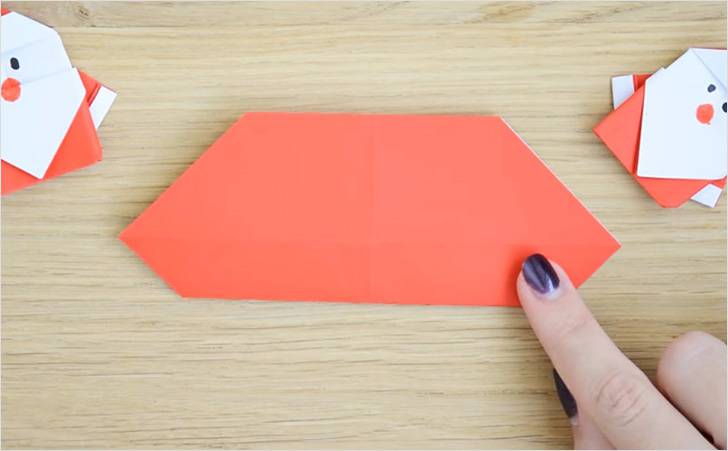
Let's make flat figures of Santa Claus from the most ordinary colored paper.
| You will need a square sheet of paper. The example uses a square with sides of 10x10 cm. But the size of the square can be taken as desired. You need a two-color square: red on one side, white on the other. If necessary, you can glue two sheets of paper with double-sided tape. | |
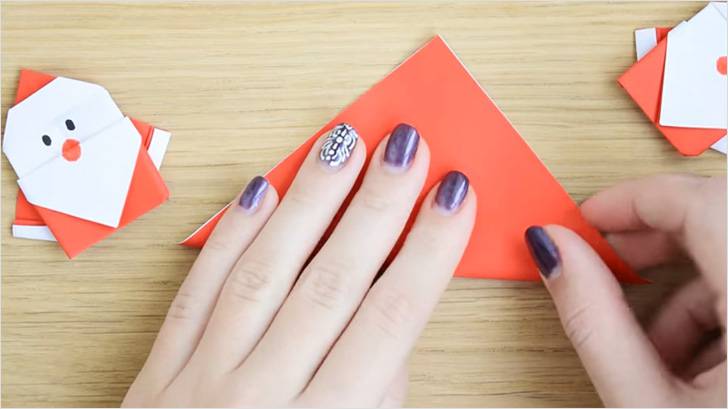 |
Fold the square diagonally. |
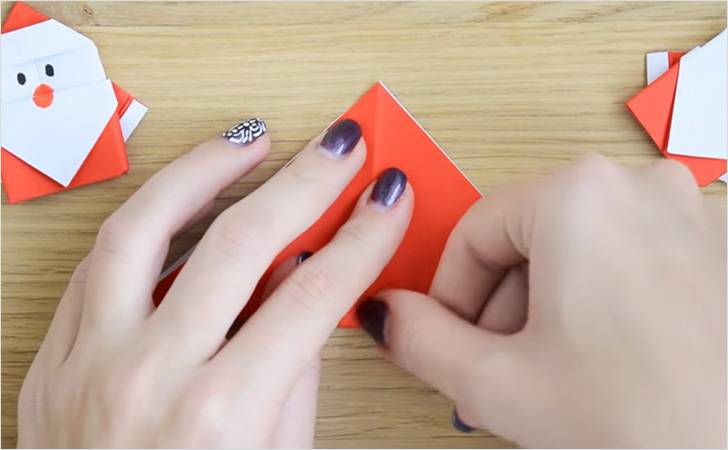 |
Smooth the fold with your finger. Lay it out. The result is a diagonal marking. |
 |
Fold the top corner towards the center point. We bend it. We see that we have a horizontal line. |
 |
Fold the corner back up to the edge. We bend it back. |
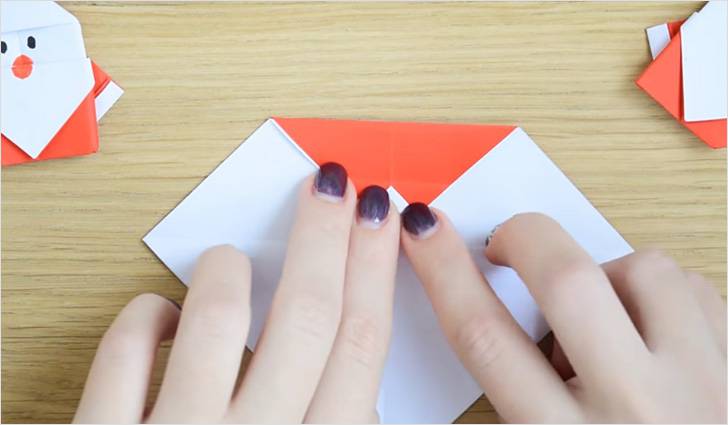 |
We bend a small corner to the formed line. |
 |
Now we can completely wrap the lapel together with the corner. The top part is ready. |
 |
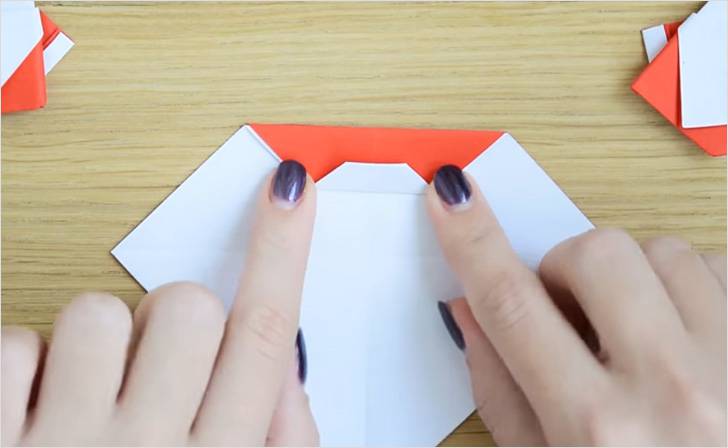
Let's start working with the bottom part. Fold the bottom corner to the opposite edge. |
 |
We make a lapel back to the bottom point. |
 |
We turn the workpiece from left to right and work with the back part. |
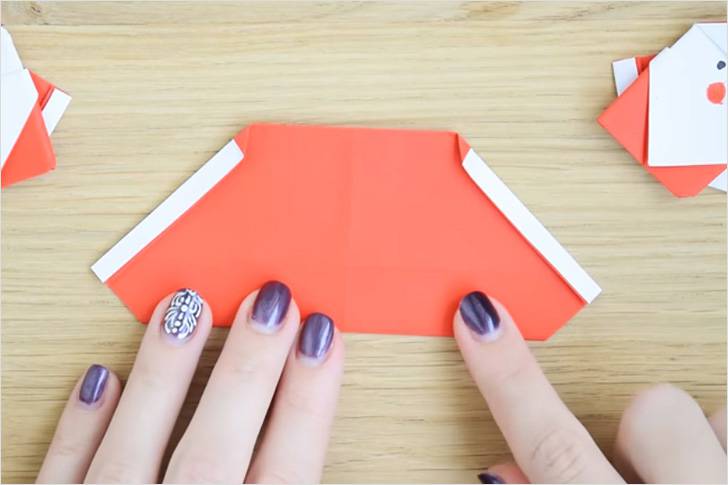 |
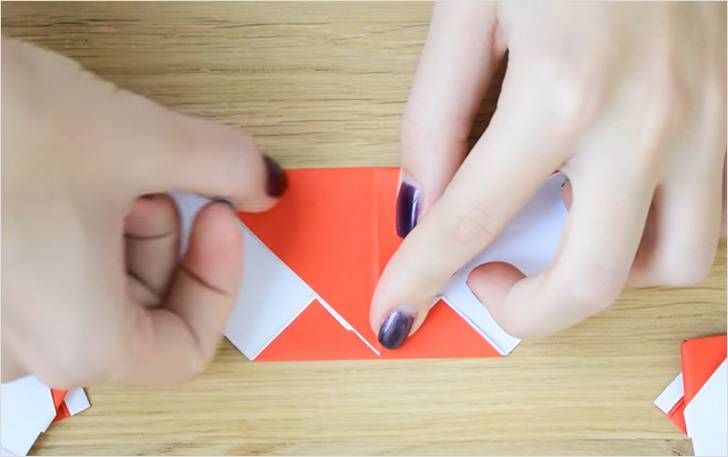
We wrap the sides. We make a narrow strip. We wrap the strip on one side, and exactly the same on the other. |
 |
We wrap both sides completely towards the middle line. |
 |
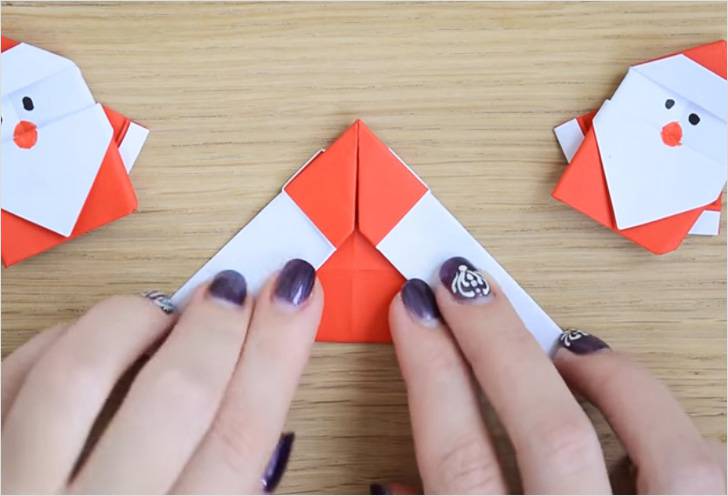
Now we wrap the lower corners, as shown in the photo, along the border of red and white. |
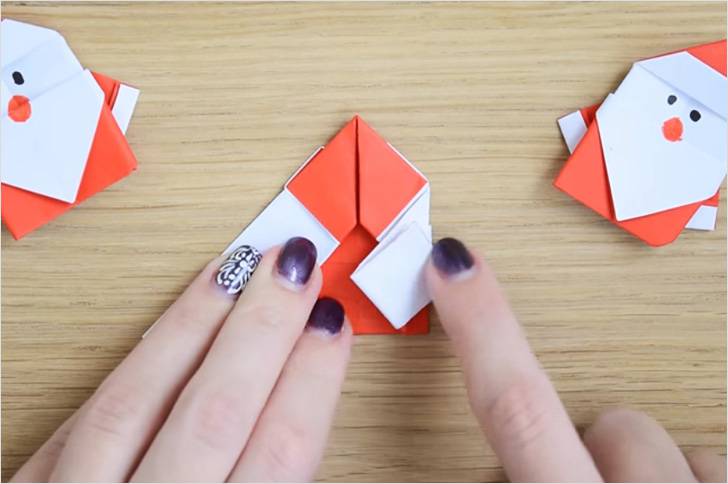 |
We turn the lower part up, again along the border of white and red. |
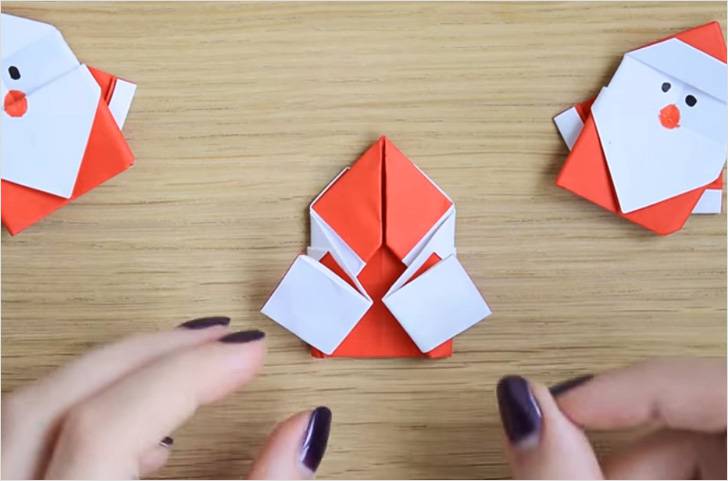 |
We repeat the same on the other side. |
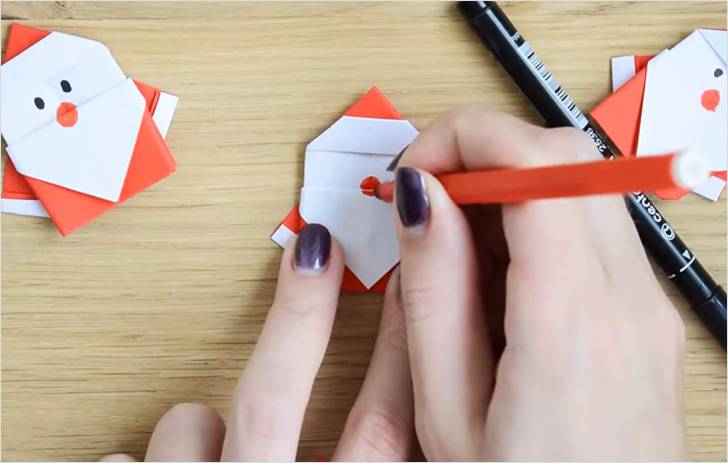 |
We turn the workpiece over to the other side, draw eyes and a nose. |
For working with children, it is worth recommending something simpler, since a preschooler is unlikely to master folding origami Santa Claus. But even a child can make a paper daisy. Have scissors, glue, thread, and colored paper on hand.
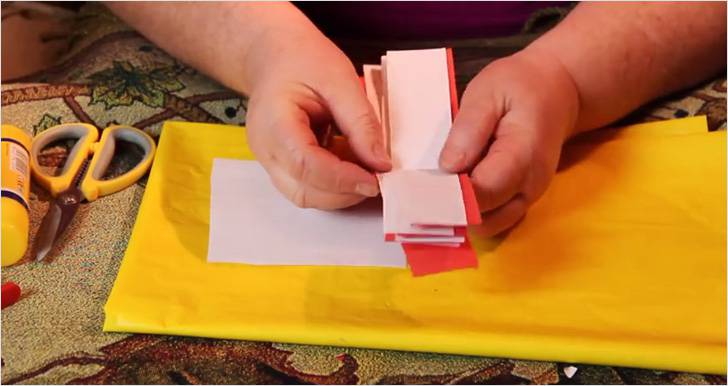 |
Take 8 strips of paper. The width of the blanks is any, but the thickness of the decoration itself depends on this. |
 |
Fold the strips together and then in half. From the edge, which is the middle of the strips, cut off the corners. |
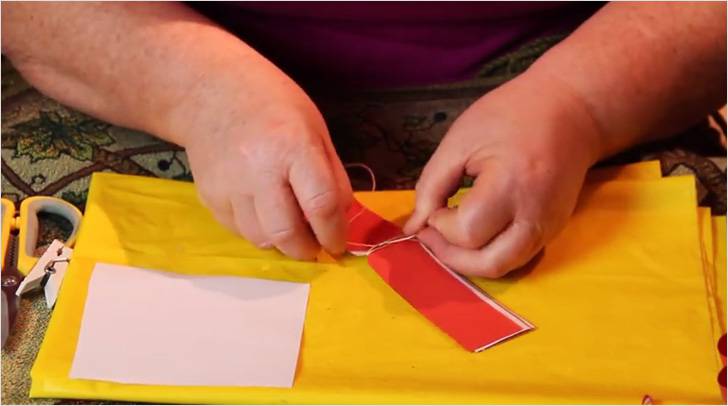 |
Lay it out. Tie in the middle with thread. |
 |
Coat the edge of each “petal” with glue and bend it towards the middle without smoothing the fold. |
 |
Decorate each “petal” in this way. |
 |
Thread a thread through one of the “petals” and tie a knot. |
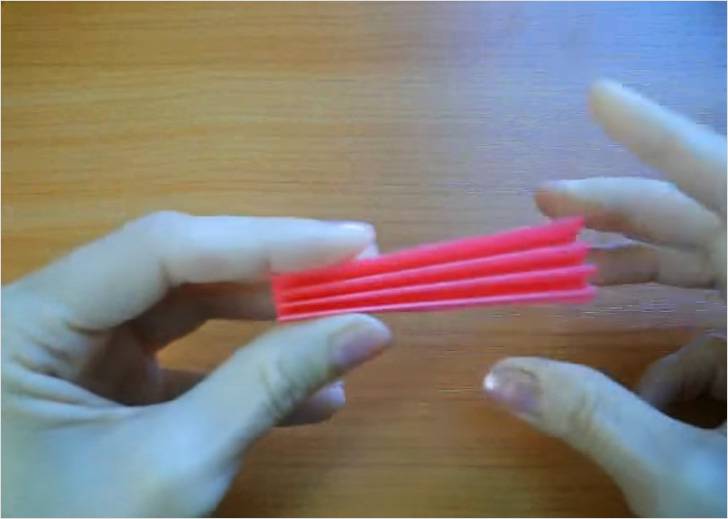
Round decorations are made from colored paper folded like an accordion. To make them, you can take paper of the same color or different colors, then in the second case the circle will consist of 3-4 multi-colored sectors.
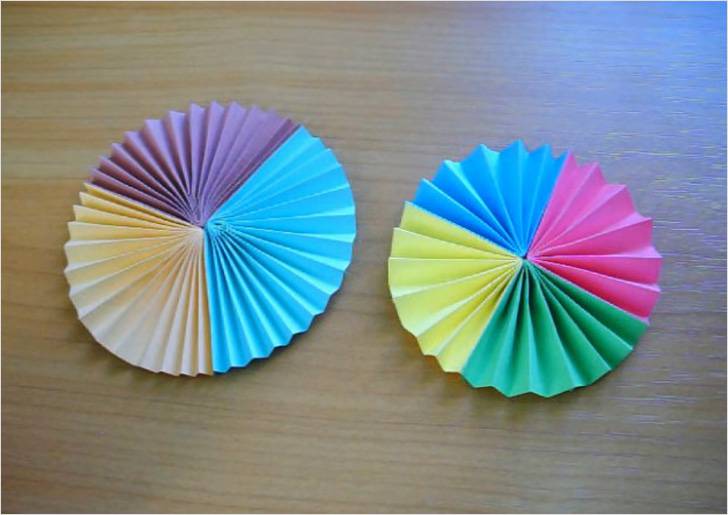 |
Beautiful decorations made from accordion-folded paper. |
 |
Take three or four squares of colored paper. If the square is large, then you will need 3 pieces, if it is small - 4. |
 |
Fold the square in half first. Expand. |
 |
Fold the edge to the resulting fold. Expand. |
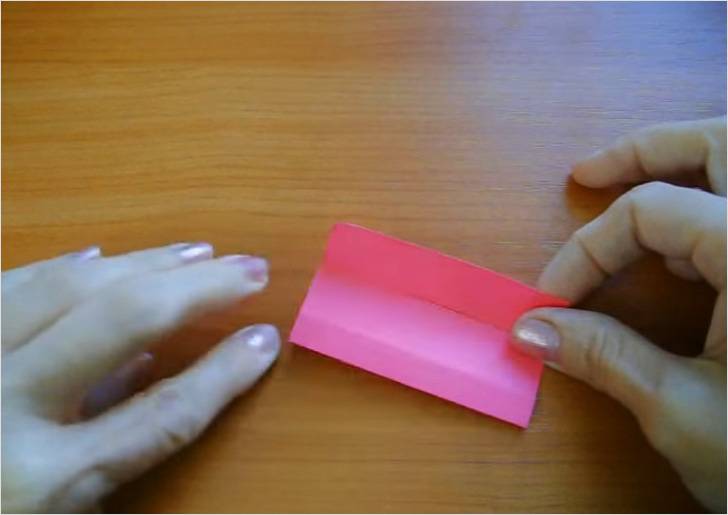 |
Then fold the last segment in half. |
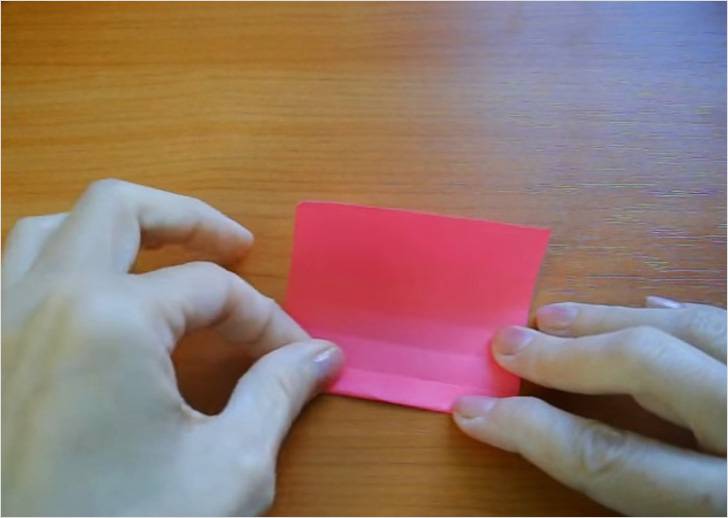 |
You now have a marked side. |
 |
Repeat on the other side. |
 |
Fold the sheet of paper along the folds like an accordion. |
 |
Bend the accordion in half. |
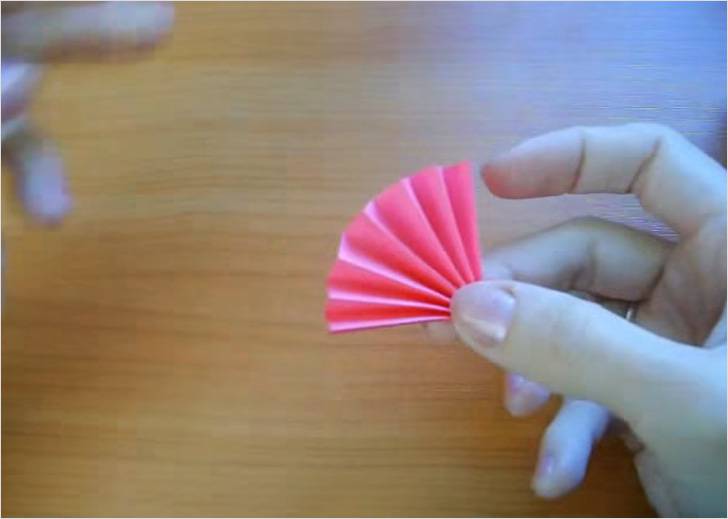 |
Glue the inner joint. |
 |
Assemble a toy from the “fans”. |
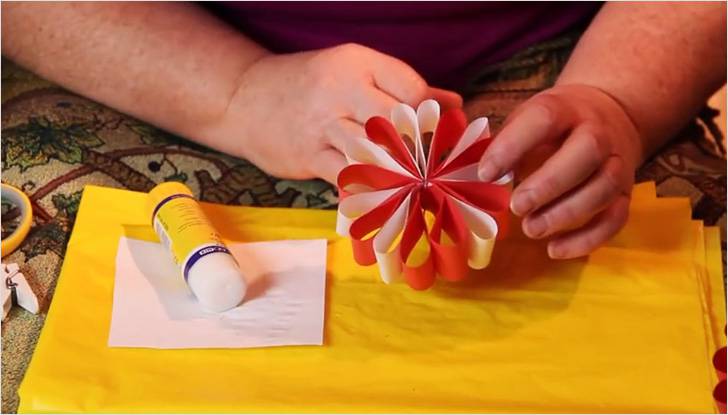
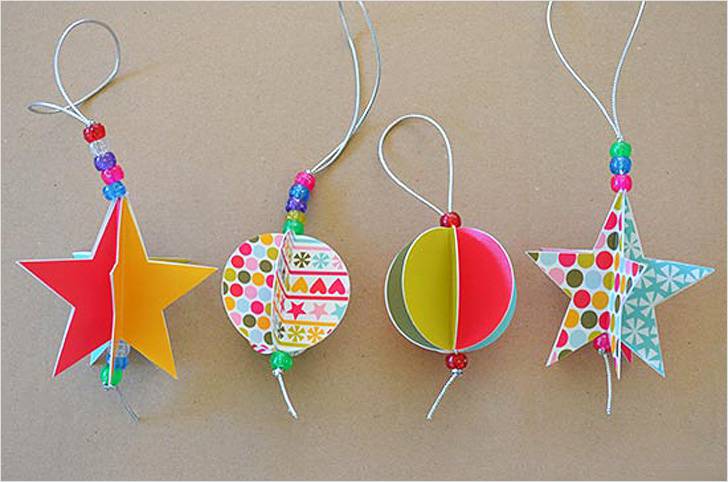
In general, a variety of Christmas tree decorations, such as balls, are assembled from paper or cardboard folded like an accordion. The technology is somewhat reminiscent of what was just described in the previous master class. These Christmas tree decorations are made from rectangular sheets of decorative cardboard. They look very much like balls.

Pseudo-volume is achieved by gluing identical parts, as shown in the photo. These crafts are also easy to make. The thread is glued between the parts.
Chinese look very decorative paper balls. It is not easy to understand the technology of their manufacture from a photo, so we put detailed video Master Class.
Video: three-dimensional paper Christmas tree ball
We also offer to make a Christmas tree using the origami technique.
Video: origami tree
Who remembers, candies used to be often hung on the Christmas tree. Why not hang large homemade candies on the Christmas tree today too? You will need:
- toilet paper tube;
- White paper;
- glue;
- red paint;
- cellophane as for decorating bouquets;
- cotton wool or padding polyester.
By the way, instead of cotton wool or padding polyester, you can put real sweets inside.
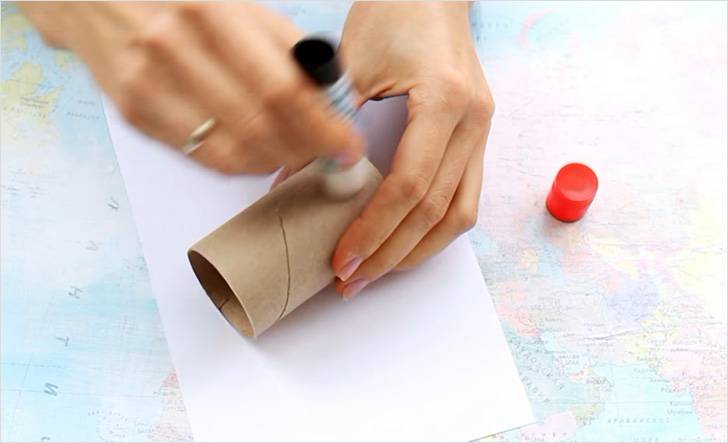 |
We coat the tube with glue and apply white paper. |
 |
Glue the edge. |
 |
We cut the free edges into strips, bend the strips inward. |
 |
Take some not very sticky tape (you will need to remove it) and cover the tube. |
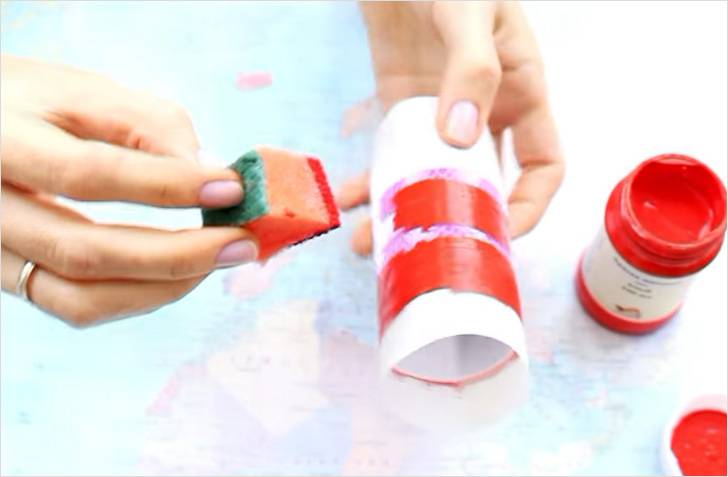 |
Paint the gaps with red paint. |
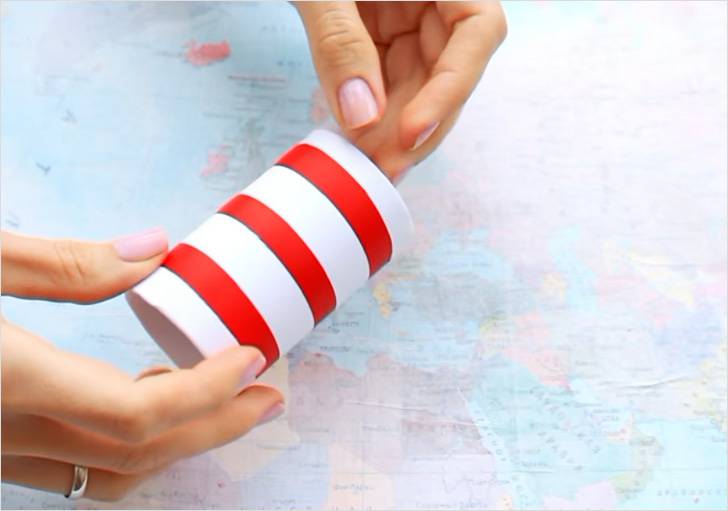 |
Remove the tape after the workpiece has dried. |
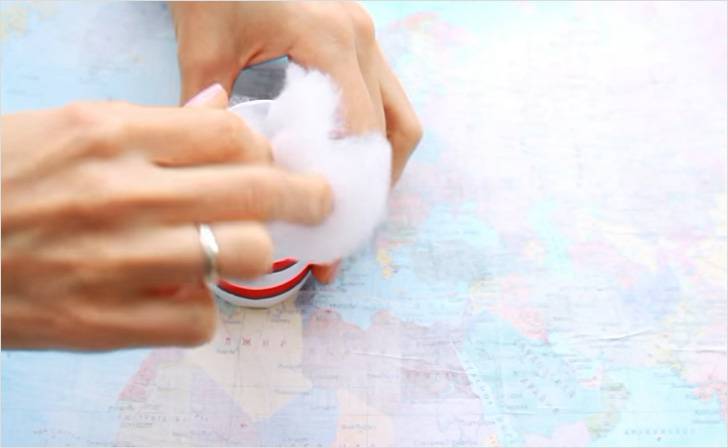 |
Fill the inside of the candy with padding polyester or cotton wool. |
 |
Wrap the workpiece in film. |
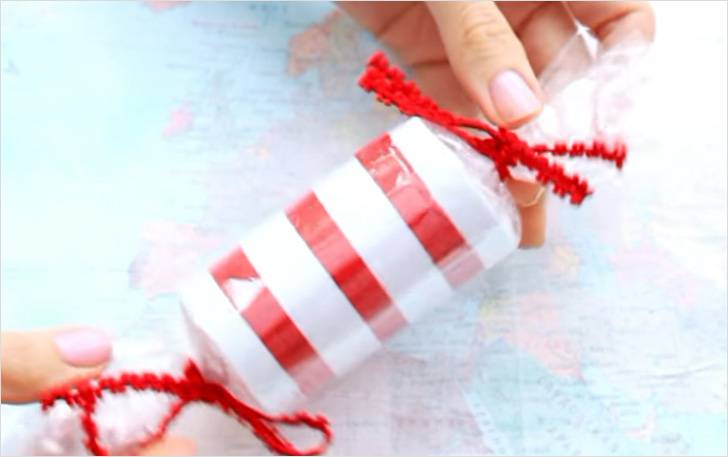 |
Secure the ends with braid or tape. |
Popsicle sticks - let's start "construction"
Everything is clear with paper, but there are materials at hand, which are also used to make New Year’s toys for the Christmas tree. Surprisingly, Popsicle sticks also work for this purpose. Although it is not even this that is impressive, but how original the decorations are. Let's find out how to make a Christmas tree house and decorate it.

To make a house you will need: glue, a napkin, a toothpick for applying glue, paint - white and blue color, tassel, decorations: beads, half-beads, sparkles, lace.
 |
The first thing we need to do is color the sticks blue. |
 |
After we have painted the sticks, we dip a wad of napkin into white paint and draw snow. We paint 8 sticks blue, 4 sticks gray. |
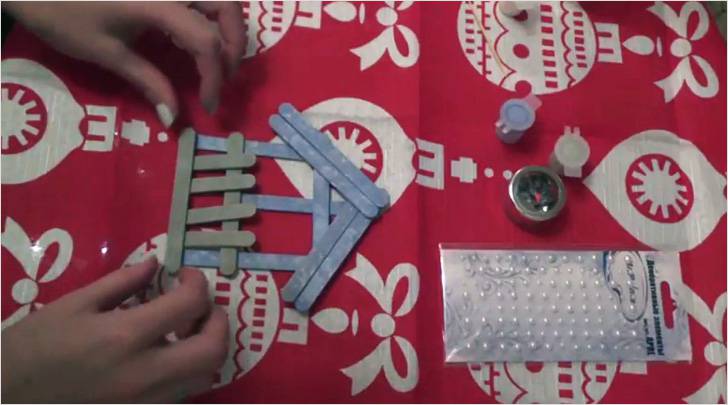 |
After the sticks have dried, lay them out in the shape of a house and glue them together. We cut one of the gray sticks in half and lay it out in the shape of a fence. |
| We glue everything together. We are waiting for the house to dry. | |
 |
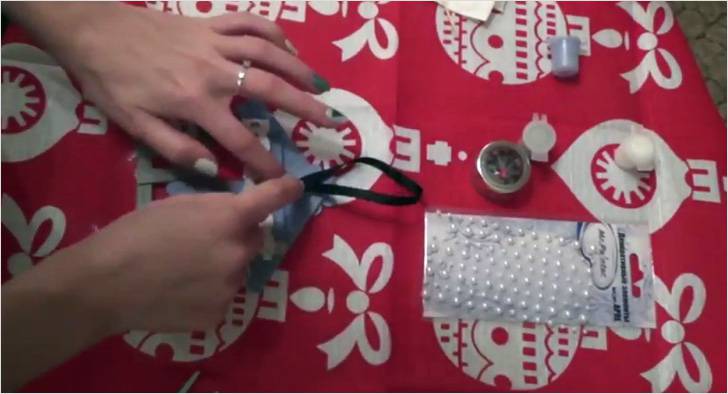
We make “curtains” from lace and glue them to the back of the house. |
 |
We also glue lace onto the fence and turn the edges back. |
 |
We also glue a loop. |
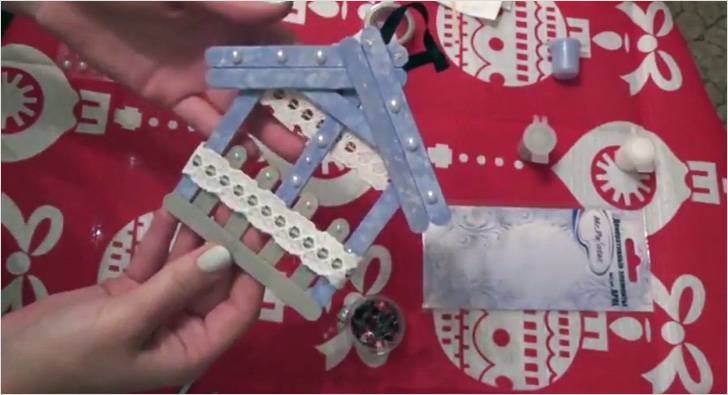 |
We decorate the house with half beads and sparkles. |
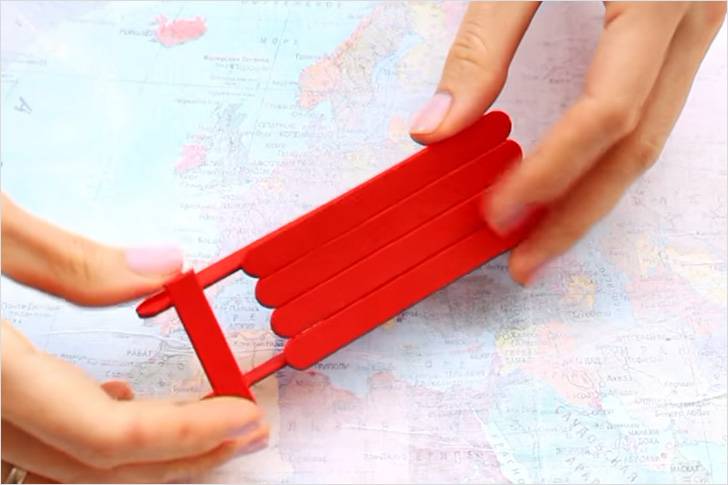
They made the house. You can also glue a sled from sticks and paint it any color you like. In principle, ice cream sticks are the kind of material from which anything can be assembled, the main thing is to use your imagination.
 |
Take:
|
 |
Glue four sticks together. |
 |
Cover a piece of cardboard with hot glue and glue it to the sticks. |
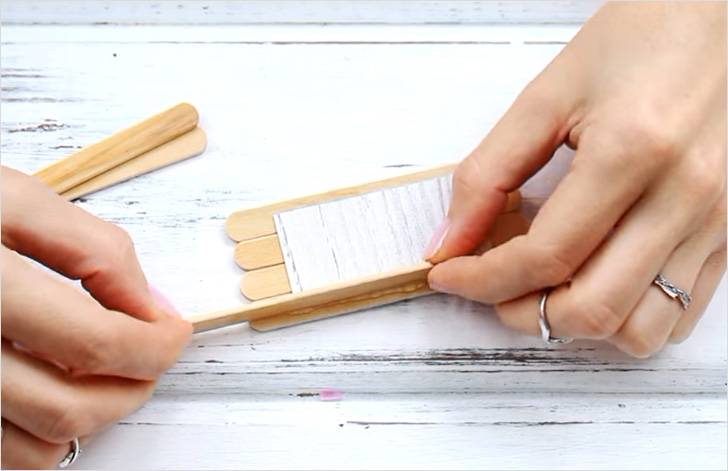 |
Glue two more sticks like sled runners. |
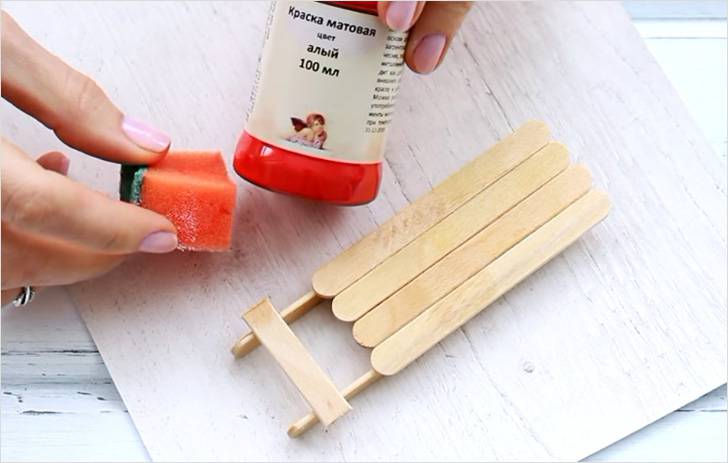 |
Trim the edges of the last stick and glue a jumper for which we will hang the sleigh on the tree. |
 |
Take red paint and a sponge. Paint the sled. |
 |
We tie a loop to the dried sled. |
The rich we are, the happier we are: natural materials
Natural materials have never failed. They always look very organic on the Christmas tree, be it pine cones, nuts, cinnamon sticks or orange slices. It’s enough to bring a few cones from a walk, look for acorns in the park or buy a few walnuts and you can already create.
 |
Take some walnuts. Carefully empty them of their contents, being careful not to damage the shell halves. Although you can leave the nuts whole if you want. |
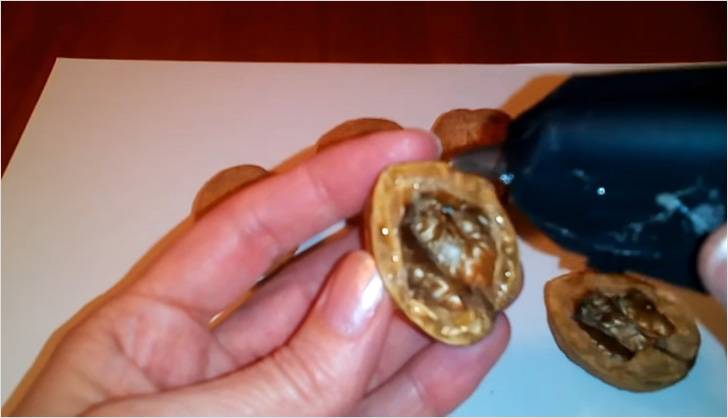 |
If you are using empty nuts, glue the halves together using a heat gun. |
 |
Paint future toys with silver spray paint. |
 |
Glue on the bow. |
 |
Don't forget the loop to hang the nut on the tree. |
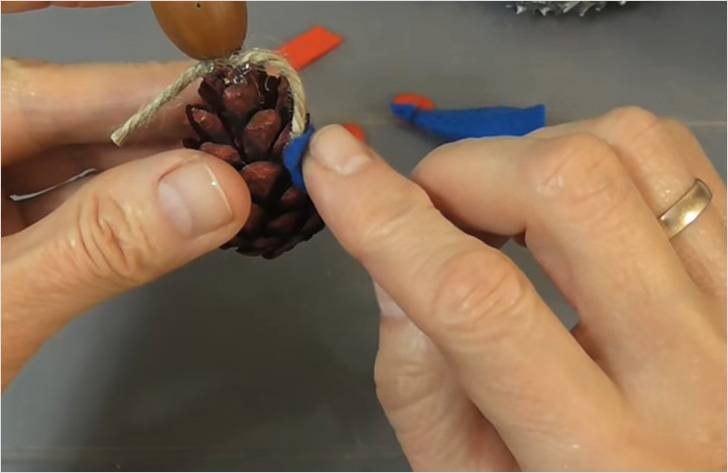
If you combine different materials, then the possibilities of creativity will expand even more. Let's make, for example, a man out of felt, a pine cone and an acorn without a hat.
 |
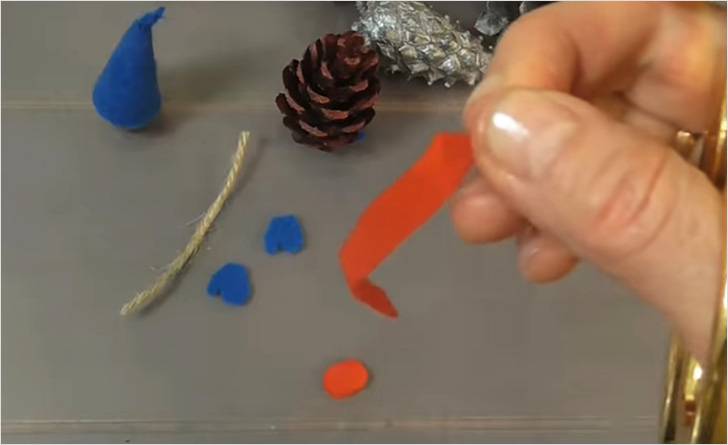
We will prepare all the materials. |
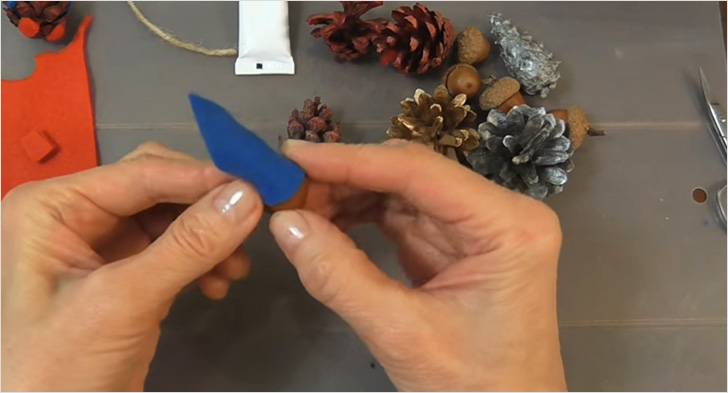 |
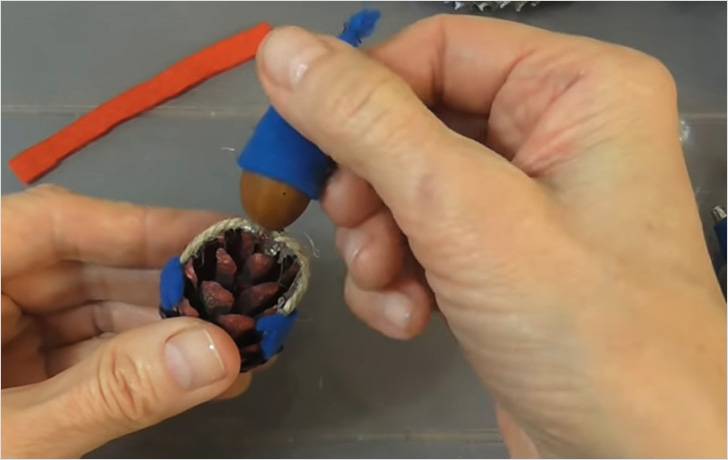
Take a triangular piece of felt and try it on the acorn. From this piece we will sew a pointed hat. |
 |
Sew the sides of the triangle over the edge. |
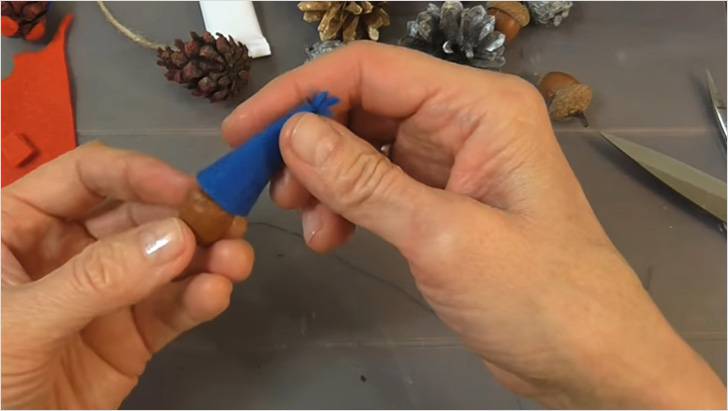 |
Trying the hat on the acorn. |
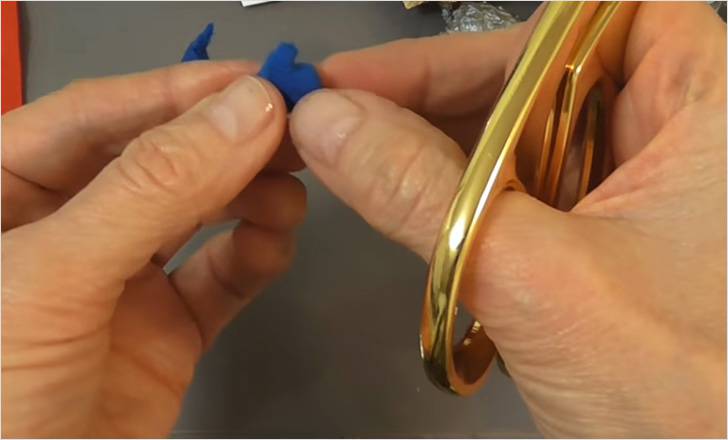 |
Cut out small mittens from blue felt. |
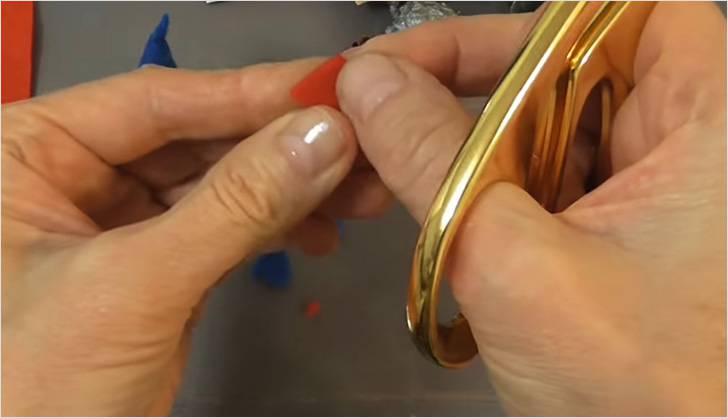 |
Then the legs are made of red felt. |
 |
Cut a small piece of twine. From it we will make hands for a man. |
 |
Cut a narrow strip of red felt to create a scarf. |
 |
Turn the pine cone over with the pointed side facing up. |
 |
Glue a piece of twine and an acorn. |
 |
Apply glue from a heat gun to the tip of the twine and press the mitten to the twine and to the pine cone at the same time. Glue the second mitten on the other side. |
 |
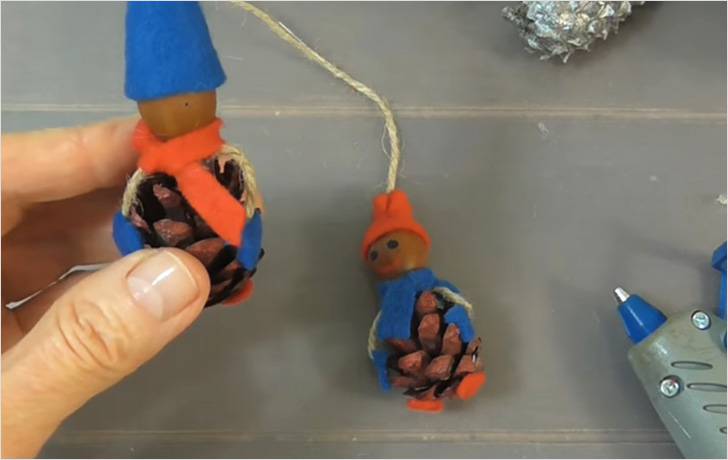
Glue on the hat. |
 |
Then the legs, straight to the bump, from below. |
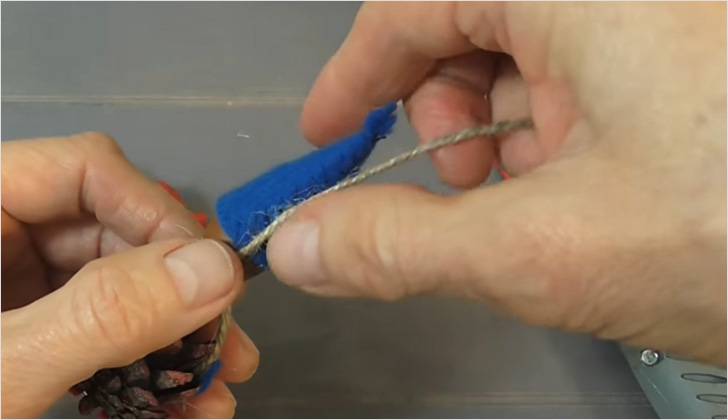 |
If you make two people, you can connect them together. Glue the twine to the backs of the people's heads. |
 |
So that you can throw the toys over the branch. |
 |
Tie a scarf around your neck. Make a fringe. |
Wooden log houses can be purchased at a handicraft store. Although, if they put up a natural Christmas tree, sometimes they cut down some part of the trunk. This piece can be used.
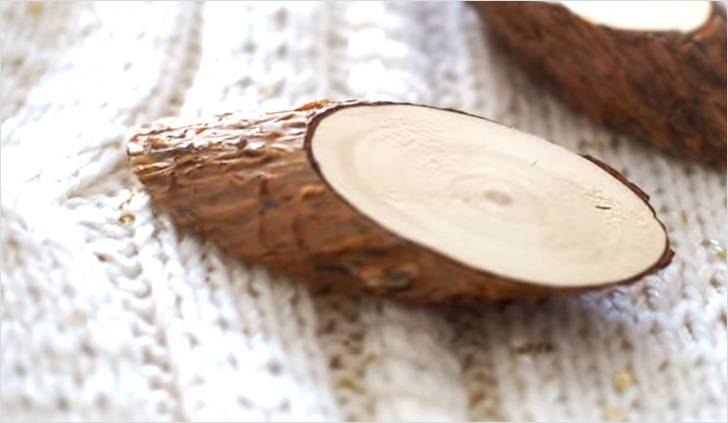 |
Saw it diagonally into several pieces. |
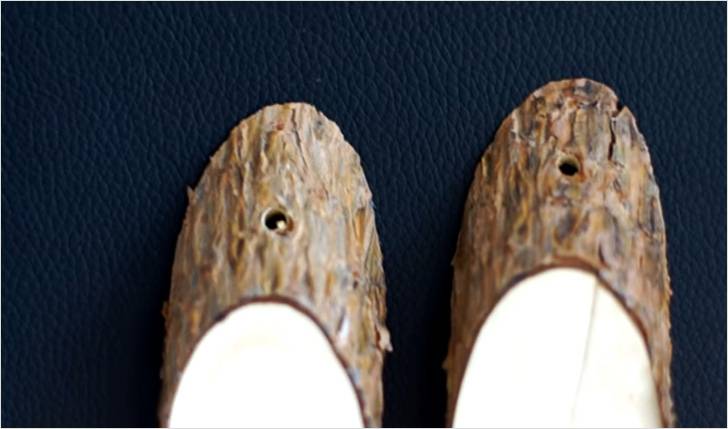 |
Drill holes in the workpieces. |
 |
Paint the surface of the frame with acrylic paint in any color. |
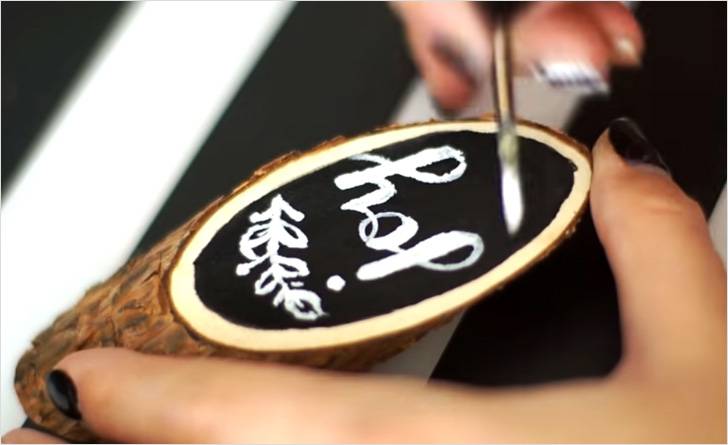 |
Write a wish, an inspirational phrase, or the names of family members. |
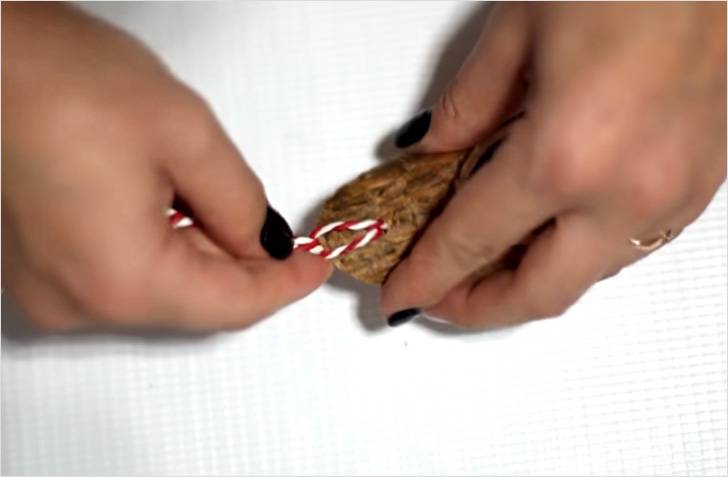 |
Pass a loop through the hole, pass the ends of the cord through it, and tie a knot. |
Crafts from ribbons
Ribbons of different colors will transform your Christmas tree. In Europe, the Christmas tree is traditionally decorated with red bows, they are hung or tied to the branches or the top of the head. How to tie beautiful bows, see this article. You can stop there, or you can go further and make something more interesting, for example, lanterns from ribbons.
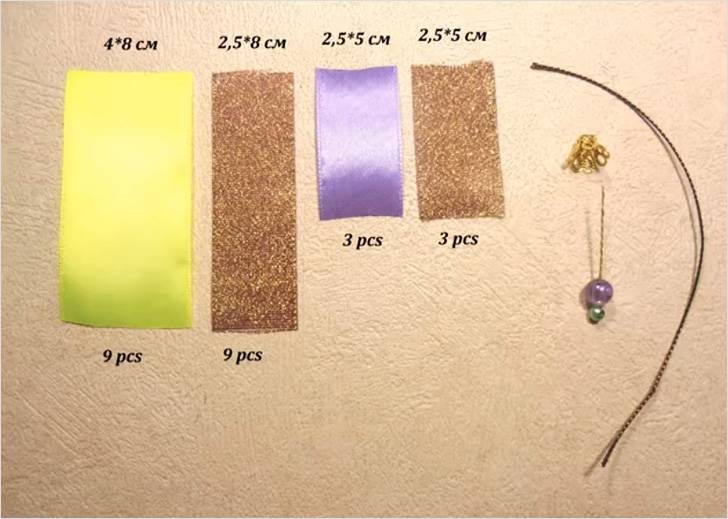 |
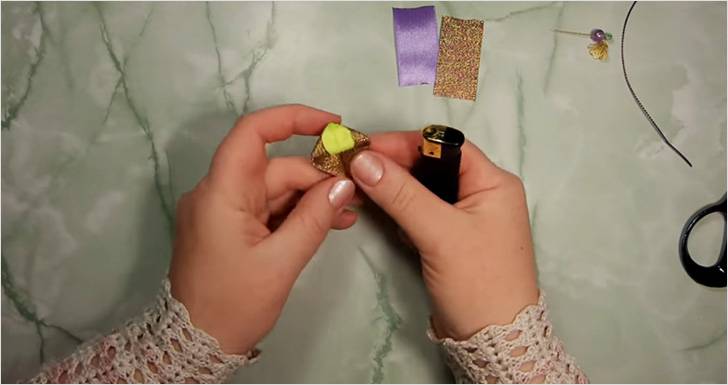
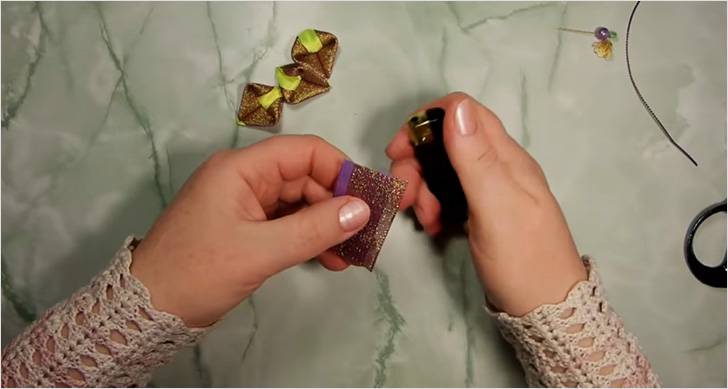
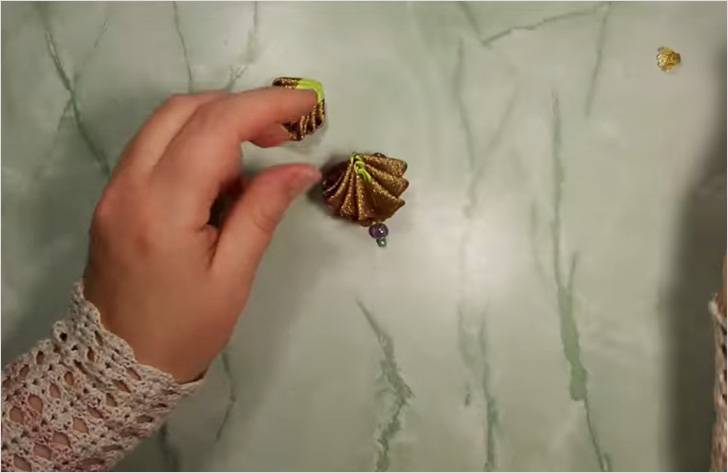
You will need: yellow ribbon 4 cm wide, 8 cm long - 9 pcs., golden ribbon 2.5 cm wide, 8 cm long - 9 pcs., lilac ribbon 2.5 cm wide, 5 cm long - 3 pcs., golden ribbon 2.5 cm wide, 5 cm long - 3 pcs. A pin with two beads, a “bell” for securing a loop. |
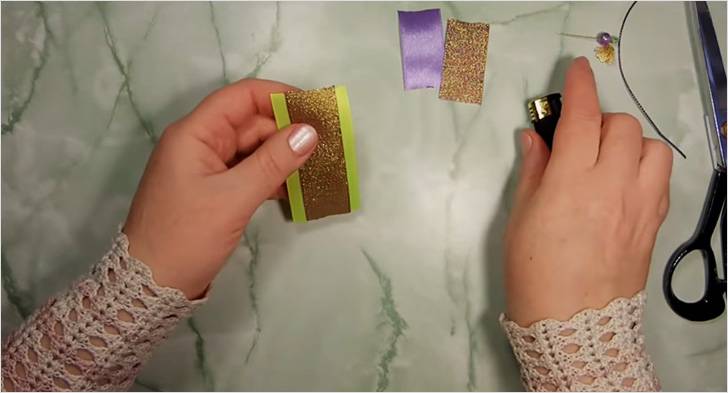 |
Take two ribbons 8 cm long. Place one on top of the other. We melt the ends with a flame from a lighter. |
 |
Fold the edges towards the middle. |
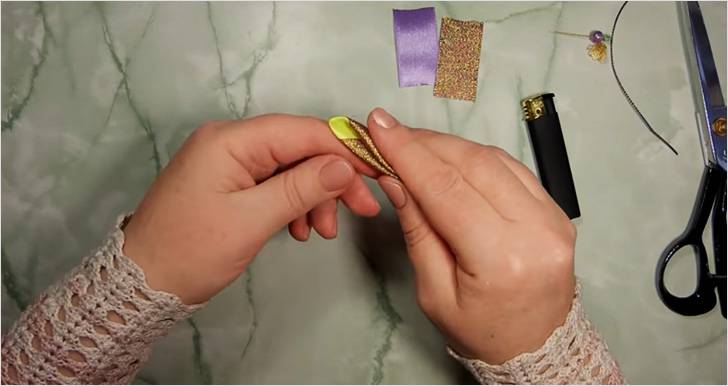 |
Fold in half. |
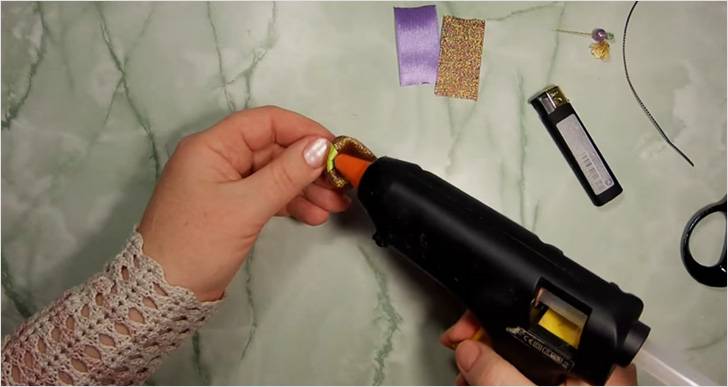
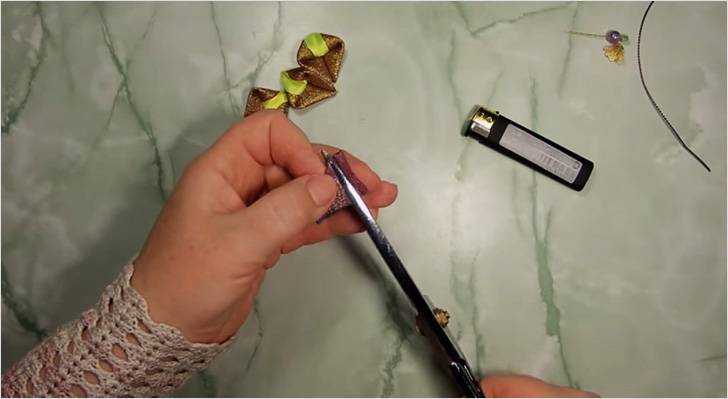
| Cut the wide ribbon on one side. | |
 |
We melt it. |
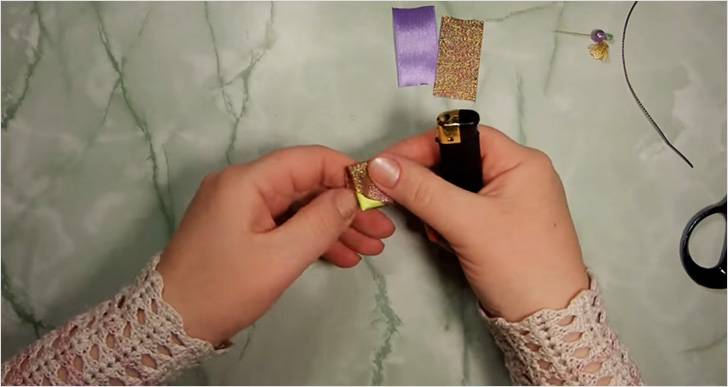 |
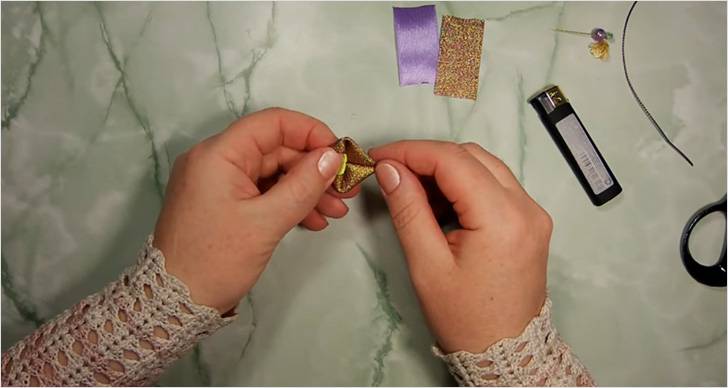
Connect the top corner to the bottom. |
 |
We bend one corner up. We fuse the corner so that it holds. |
 |
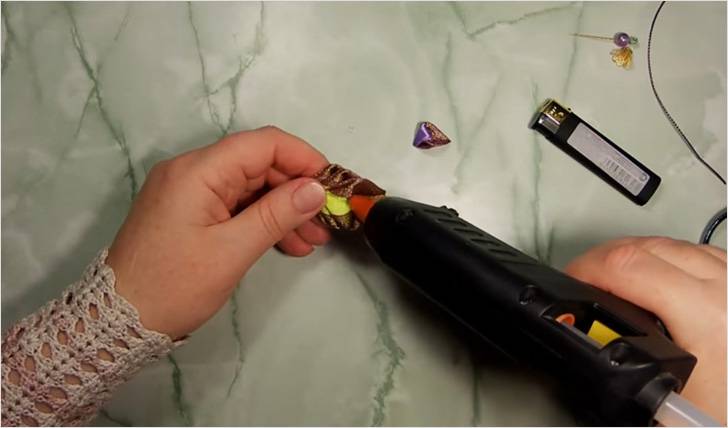
Apply glue to the recess of the petal. |
 |
We press. |
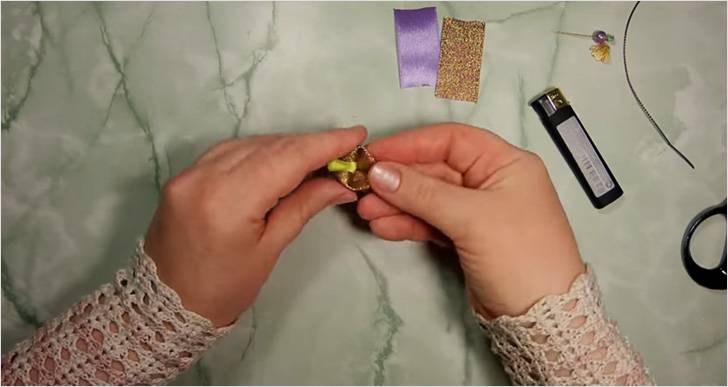 |
Fold the sides of the petal slightly. |
 |
In the same way we make petals from short pieces of ribbon. But we apply the golden ribbon not in the middle, but with an offset. |
 |
We cut off the excess part of the golden ribbon. |
 |
We overlap three petals with yellow tape. |
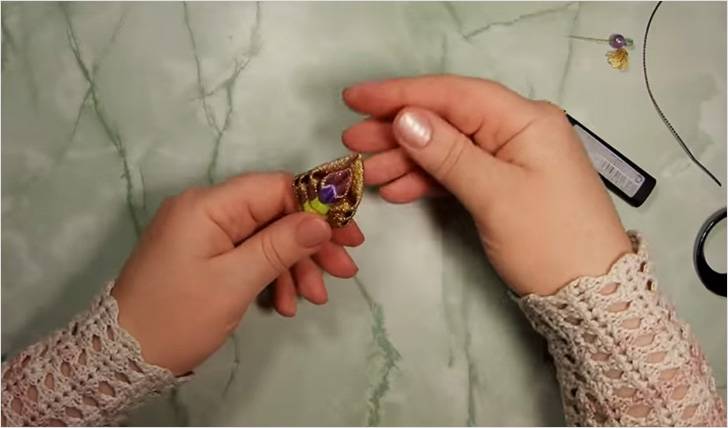 |
Add one lilac petal. |
 |
We repeat the steps of gluing the petals together. |
 |
We put the loop inside, as well as a pin with beads. Apply glue. |
 |
Glue the third blank for the flashlight. We put on the bell. |
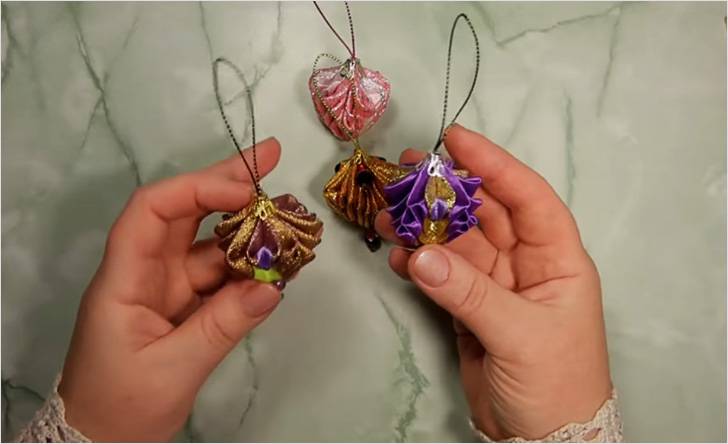 |
We hang toys on the Christmas tree. |
Such lanterns will sparkle and shimmer in the reflections of an electric garland.
Video: Christmas tree pendant made from ribbon
Video: how to make a bell and a lantern
We use fabric: we make lace hearts, Christmas trees
You have already seen how varied Christmas tree decorations can be. A practical material for jewelry is fabric: regular cotton, linen, burlap, knitwear, lace. In order for the toys to be neat, symmetrical, and even, you must first make a template out of paper, and use it to cut out fabric blanks.
 |
You need a cardboard blank in the shape of a heart, a piece of lace, a jute cord, and glue for gluing the lace. |
 |
And also beads and rhinestones, acrylic paints, brushes and scissors, also braid for a loop and glue for gluing rhinestones and beads. |
 |
We will glue the lace onto a cardboard blank. Once the glue dries, the ends will be easy to trim. Don't skimp on the glue; when it dries, it will become invisible. |
| The lace is stuck. We cover the workpiece with black acrylic paint. We cover thoroughly, avoiding unpainted areas. Leave the workpiece to dry. Painted on both sides. | |
 |
Let's select the lace. This will require White paint and a hard brush. Take a little white paint on the brush and remove the excess. We apply it to the workpiece, highlighting the lace ribs. Let it dry. |
 |
The workpiece took on a completely different look. |
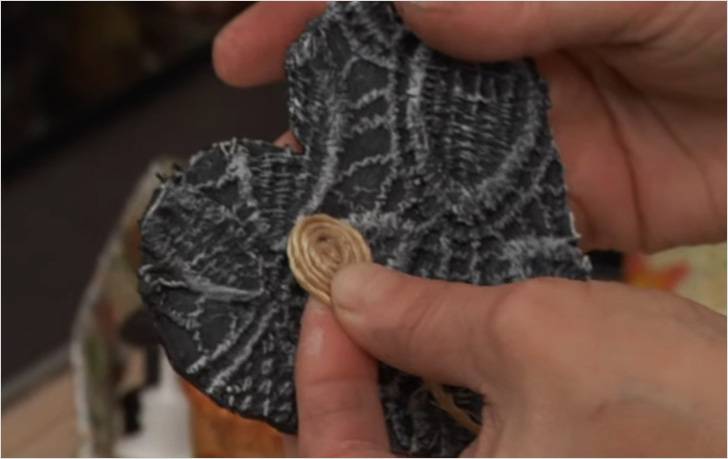 |
Next we need a jute cord. We will use it to make decorations that will be placed on the workpiece. Take a jute cord, tie a knot, and cut off the end. Roll up the jute cord. We try on the size to the workpiece. Secure the coils with drops of glue. |
 |
We make several jute blanks. |
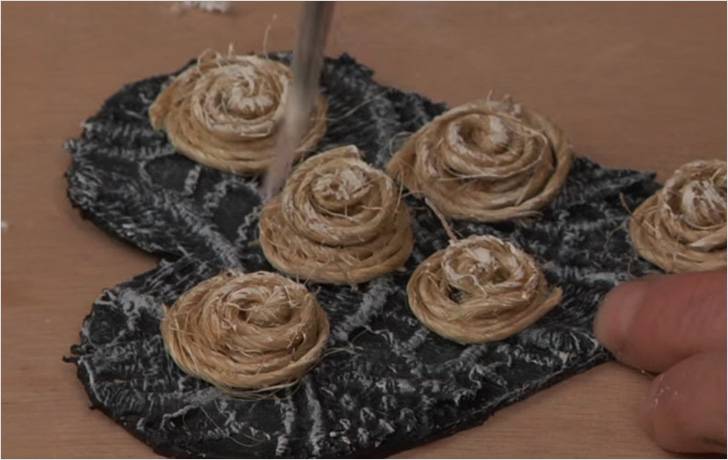 |
We place them on the heart. Glue it. |
 |
Decorate with beads and rhinestones. |
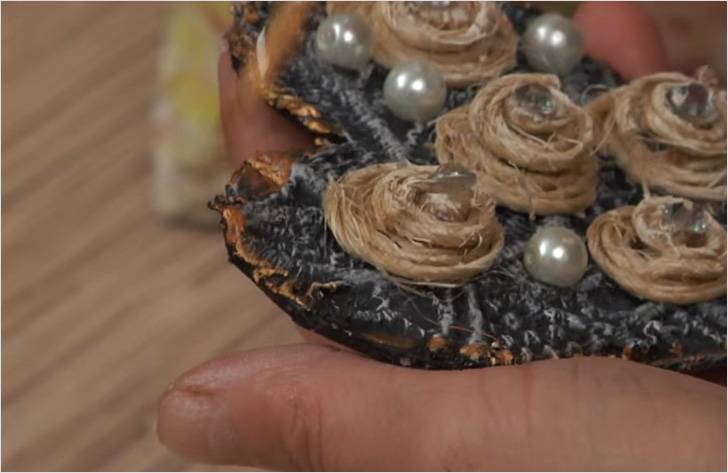 |
The edges of the heart can be painted with gold or silver paint. |
Maybe we can sew another plump toy Christmas tree? In this master class, light-colored polka dot fabric was used, so the toy turned out to be especially cute and delicate. But any scraps of fabric, any color or pattern are suitable for sewing.
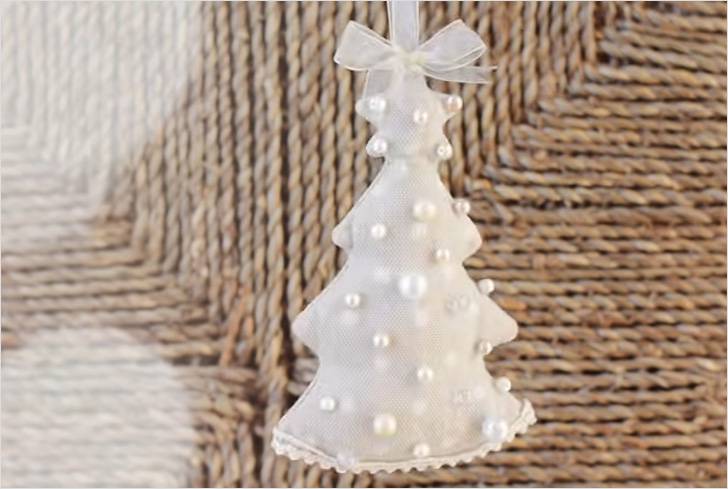 |
Let's make a Christmas tree filled with padding polyester together. |
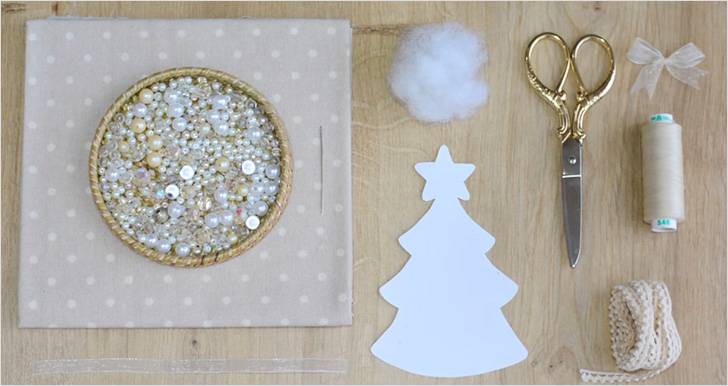 |
You will need fabric, a template, decorations, padding polyester, scissors, threads, a needle, a ribbon bow, and braid. |
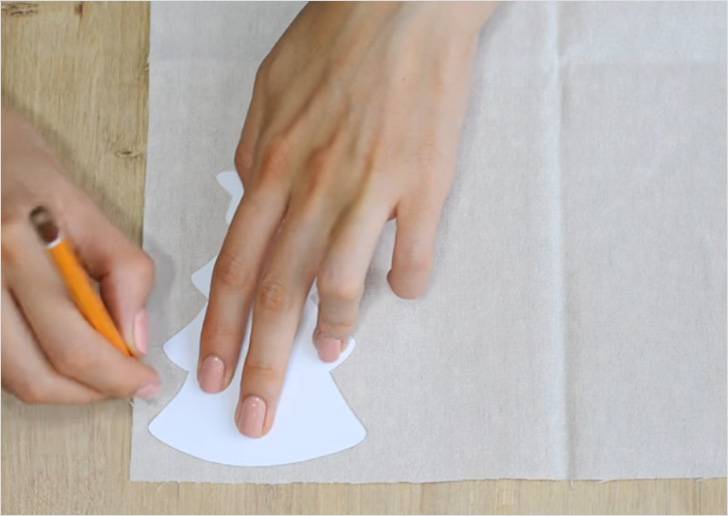 |
We outline the template, making two pieces of fabric. |
 |
We cut out the blanks. |
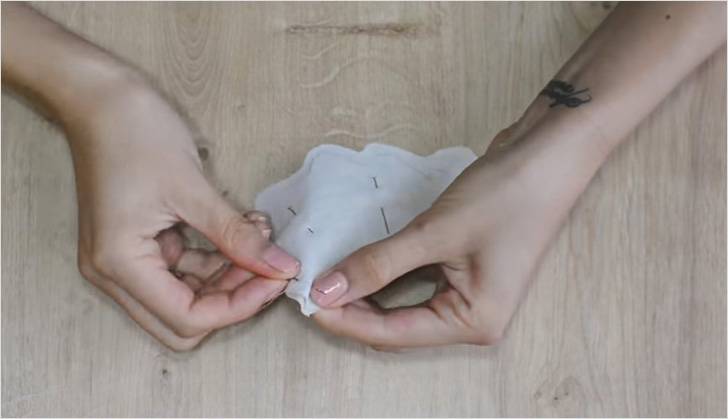 |
We chop off the parts, connecting them right sides together. |
 |
Sew to the top. We put a loop of ribbon inside. We continue to sew the details further. We leave a small hole at the bottom. |
 |
We turn the part inside out. |
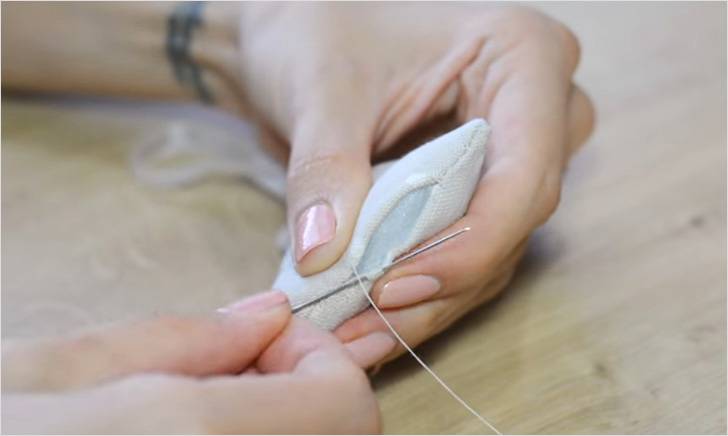 |
We stuff it with padding polyester and sew up the hole. |
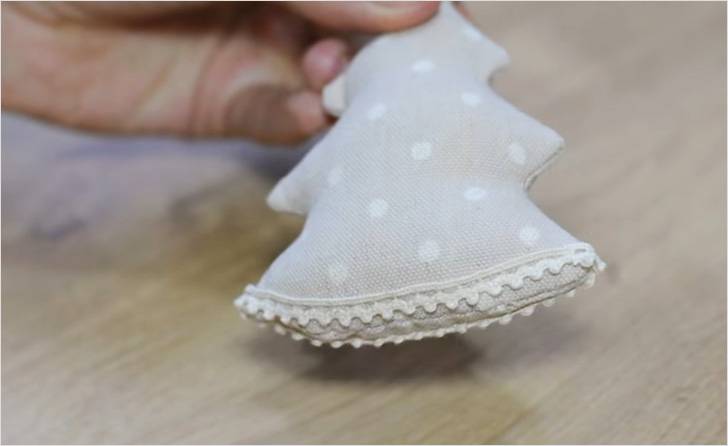 |
We decorate the lower part of the Christmas tree with braid. We sew it on. |
 |
We distribute beads over the entire surface, glue or sew them. |
Complex decor from simple threads
It’s even easier to make a Christmas tree toy from threads. The needle and thread are used minimally here. Typically, thread decor is mounted on glue, but often some kind of base is required.
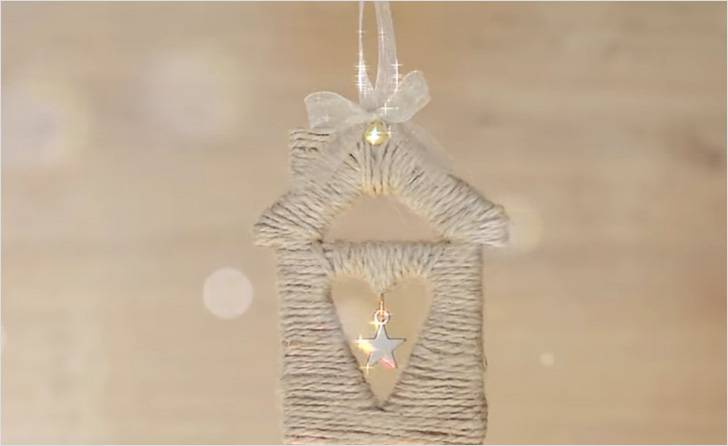 |
Let's make a house pendant wrapped with jute cord. |
 |
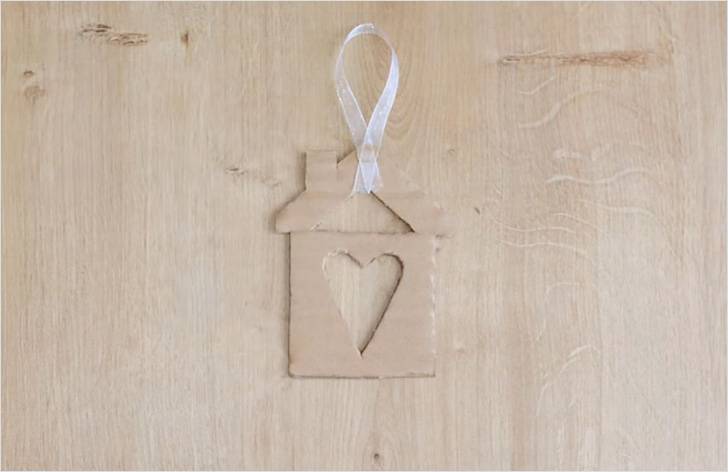
We will need a template, cardboard, jute cord, thread with a needle, scissors, glue, pencil, a bow made of narrow ribbon, a pendant, a bead and a piece of ribbon or lace for the loop. |
| We trace the template on cardboard. Cut it out. | |
 |
Glue the loop. |
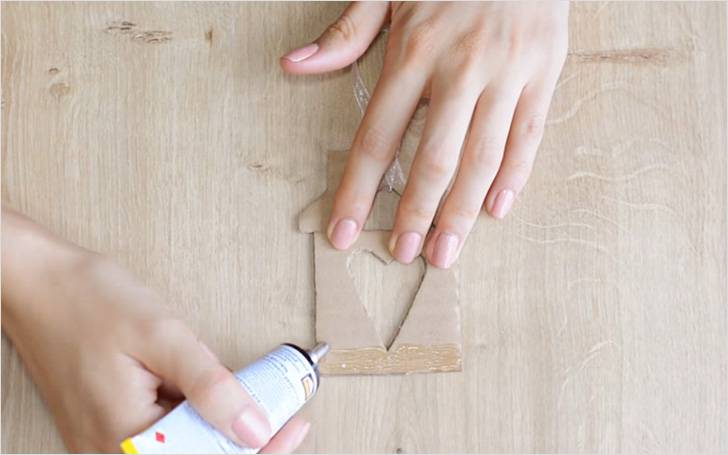 |
Lubricate the area of the house with glue. |
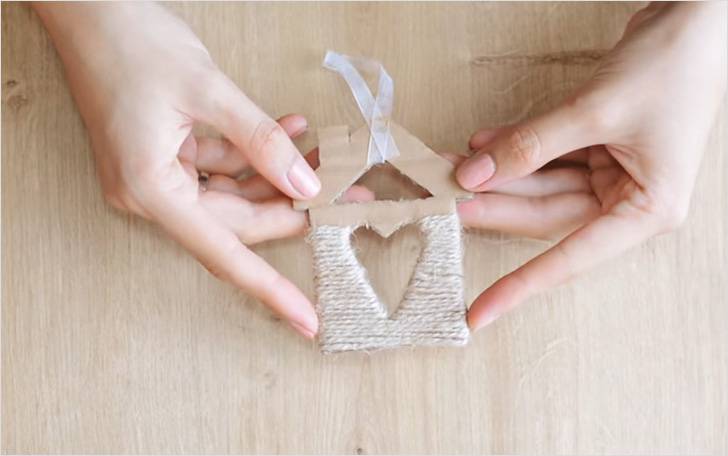 |
We wind the jute cord tightly until the point shown in the photo. Then we make several tight rows up to the roof. |
 |
Then we change the winding direction. |
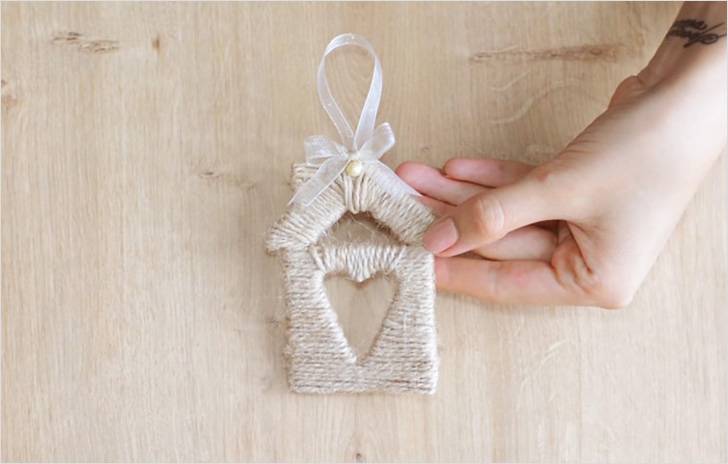 |
Let's move on to the design of the roof. |
 |
Sew on the pendant, glue the bow and bead. |
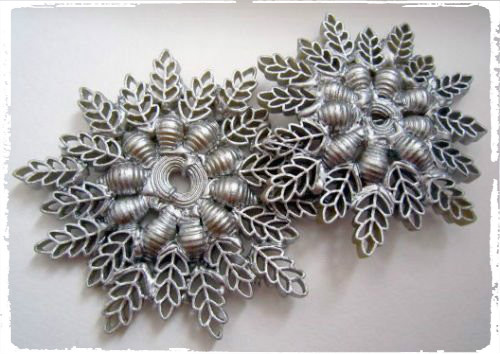
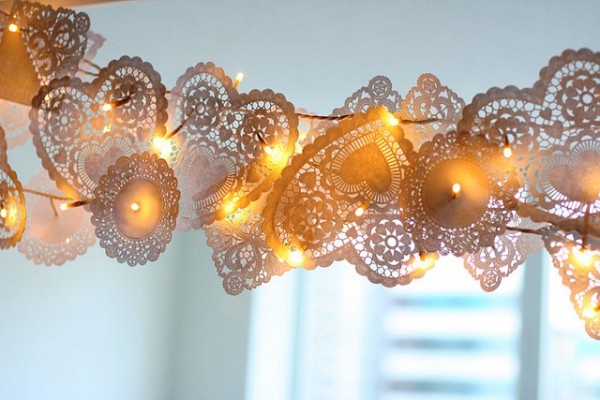
If you have unwanted lace doilies lying around the house, use them to make large Christmas tree decorations. You can specially crochet napkins by making them smaller or larger.
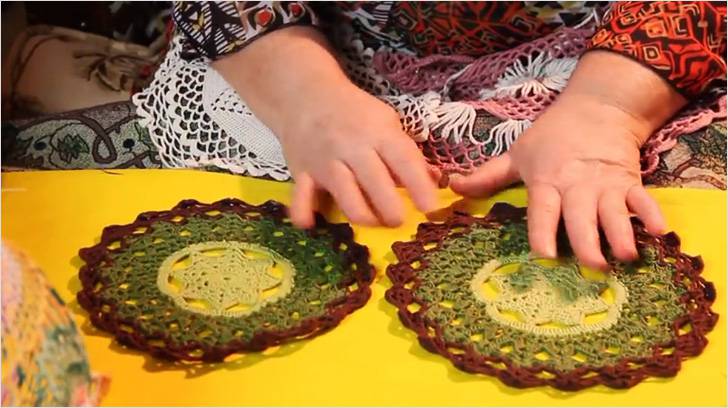 |
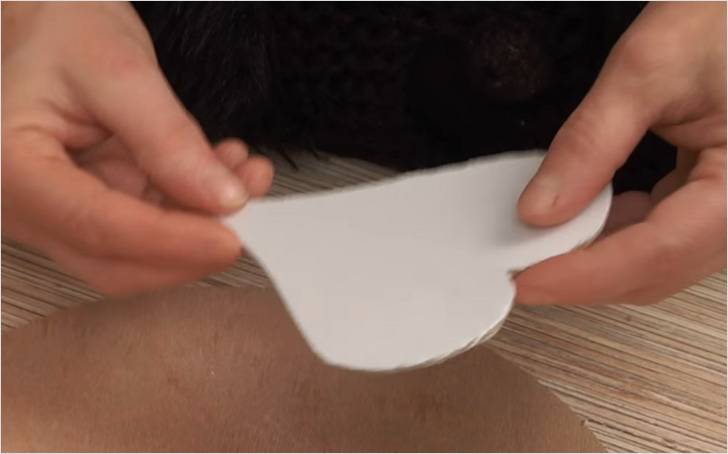
You will need two napkins. |
 |
Sew them together with matching thread. |
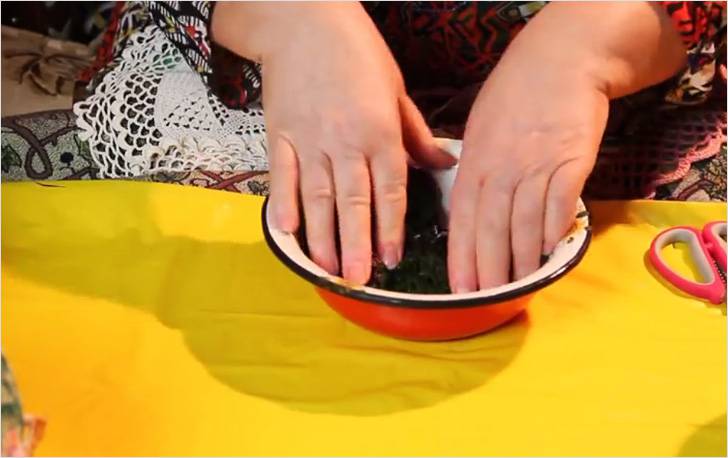 |
Soak in a bowl of water. |
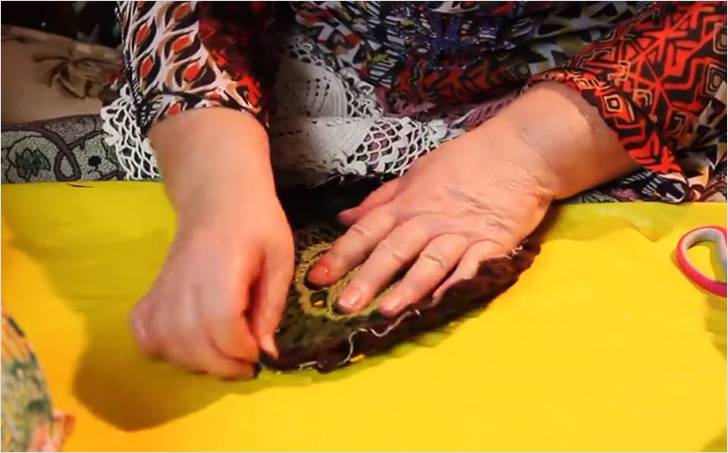 |
Pull in different directions. |
 |
Place the ball into the hole. |
 |
Inflate it so that the napkins are stretched over the balloon. |
 |
Apply PVA glue and hang to dry. |
 |
When the ball dries, it will become hard. Poke the balloon and remove it. |
And here is an angel, which can be easily constructed from the remains of white knitting threads.
Prepare:
- white knitting threads;
- felt;
- cardboard;
- glue.
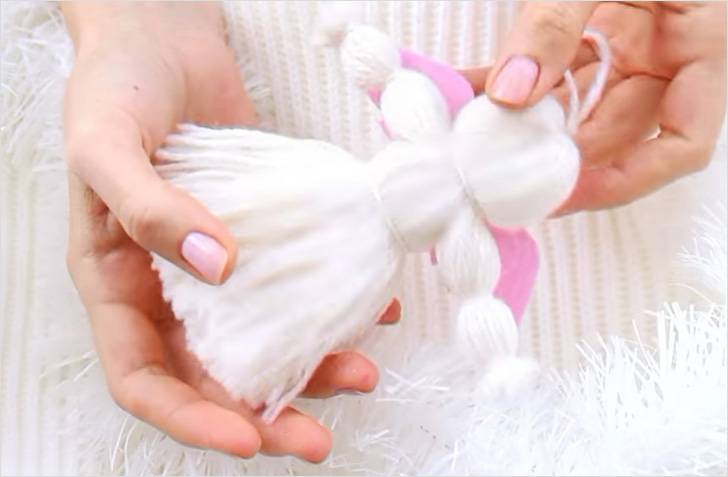 |
We will make such an angel. |
 |
We wind threads onto a piece of cardboard until it seems enough. |
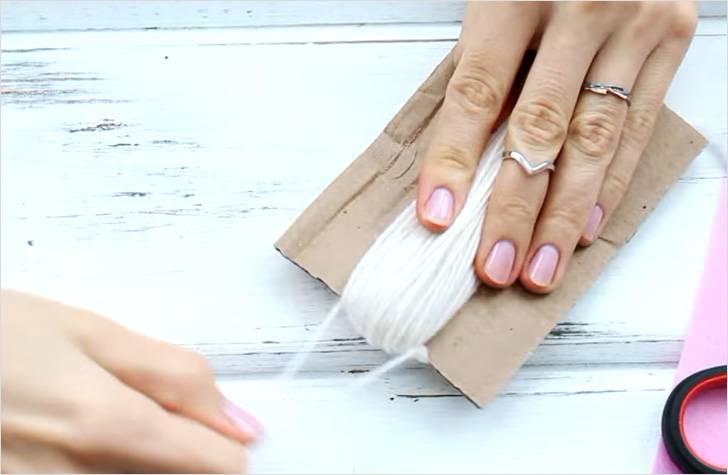 |
Take a piece of thread and thread it under the wound threads. |
 |
Cut the threads from the bottom. |
 |
We tie it exactly at the top of the head. Make a loop for hanging. |
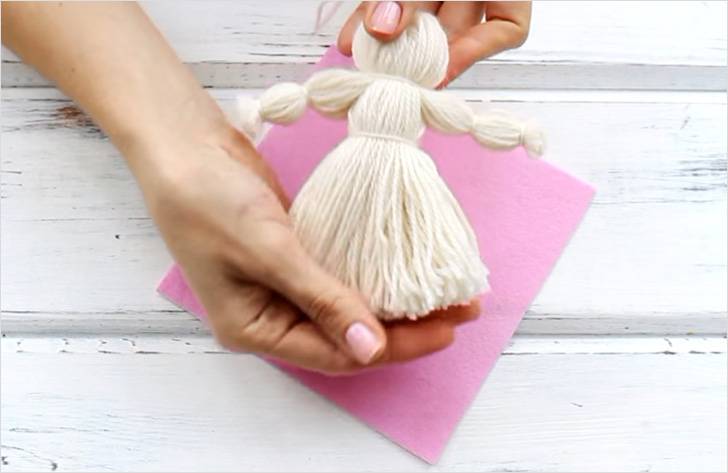 |
We form the head, arms and waist. |
 |
Making a template for the wings. Cut out the wings from felt. |
 |
Glue the wings to the angel. |
Felt New Year symbol and other toys
Well, where would we be without felt? Recently, Christmas tree decorations made from it have become a fashion trend; not a single New Year can do without them. Fortunately, there are many patterns and images of ready-made toys in the public domain, from which you can make your own jewelry.
We propose to make a not quite ordinary toy. Here felt is used not as the main material, but as a base.
 |
You will need a circle template, a piece of thick white felt, beads, thread and needle, scissors, pencil, and ribbon. |
 |
We outline the template. |
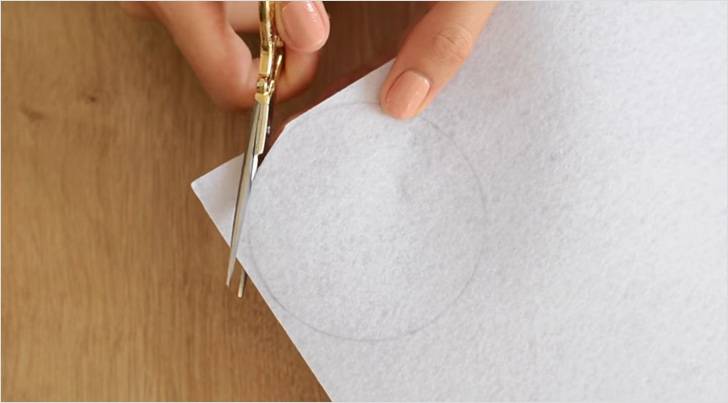 |
Cut out a circle from felt. |
 |
Sew or glue a ribbon loop. |
 |
We embroider the felt tightly with beads. |
 |
Let's make a bow. We trim the edges figuratively. |
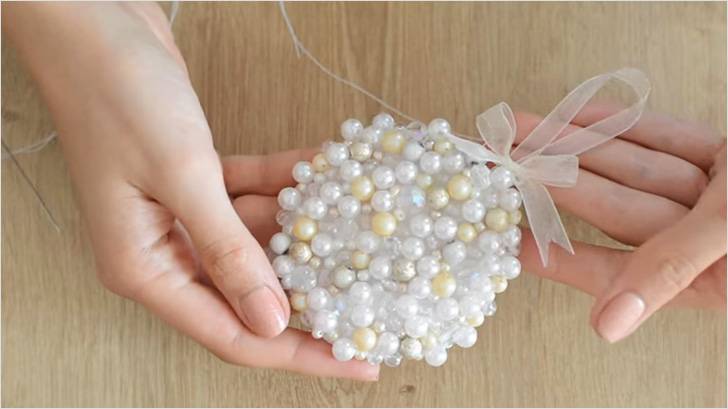 |
The charming Christmas tree decoration is ready. |
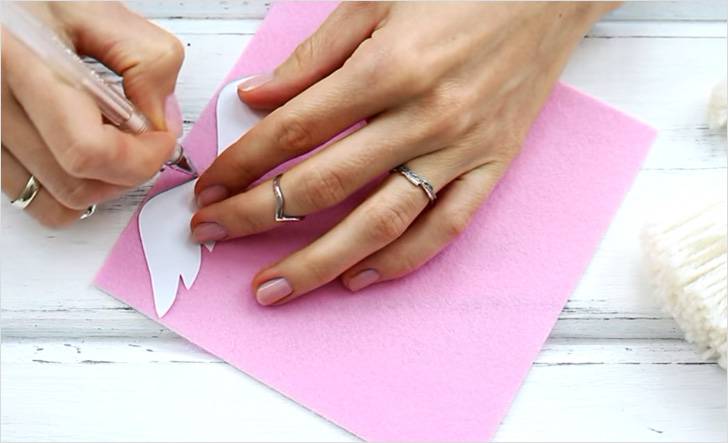
As you know, next year will pass under the sign of the Dog, so you should definitely make a toy in the shape of a dog. Felt is just the material that is convenient and quick to work with.
 |
A cute felt dog will be an excellent gift or Christmas tree toy. |
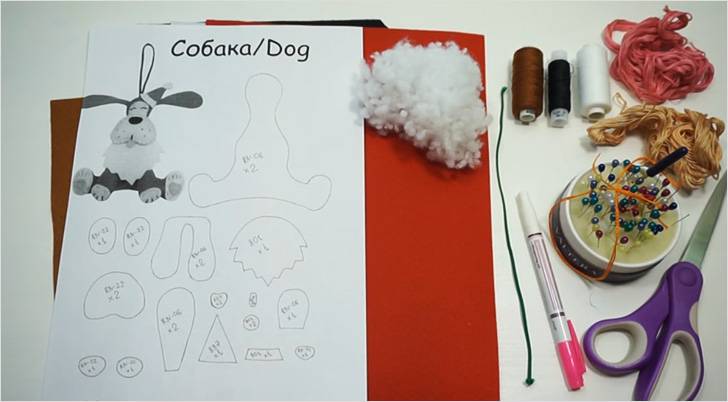 |
You will need soft felt in brown, beige and black, hard felt in white, red and Pink colour, matching threads, except red, cord, braid or ribbon, filler, disappearing marker, needles, scissors, pattern. |
 |
We cut out from brown felt: body - 2 parts, front legs - 2 parts, ears - 2 parts, From flesh-colored felt: muzzle - 2 parts, small muzzle part - 1 pc., hind paw parts - 2 pcs., front paw parts - 2 pcs. Made of black felt: nose - 1 pc. Made of pink felt: tongue - 1 pc., heels - 2 pcs., red cap - 1 pc. Made of white felt: beard - 1 piece, cap edge - 1 piece, pompom - 2 parts. |
 |
We lay out all the details in in the right order to make sure everything is in place. |
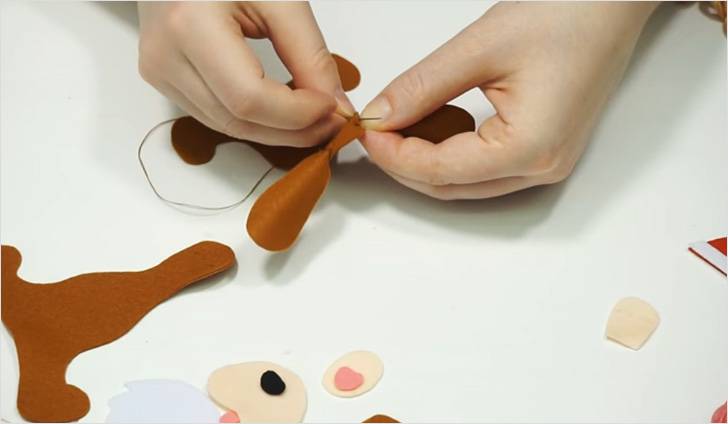 |
Fold the ear in half. Sew the lower part of the upper body to the top layer. We repeat the same with the second ear. We fasten the thread. |
 |
Now, using a “forward needle” seam, we sew the bodily parts of the paws to another part of the body. The ends of the threads can be hidden inside the felt. |
 |
Then we sew the muzzle with an “over the edge” seam. |
 |
We sew on the heels with several stitches and embroider the pads of the toes with a chain stitch. |
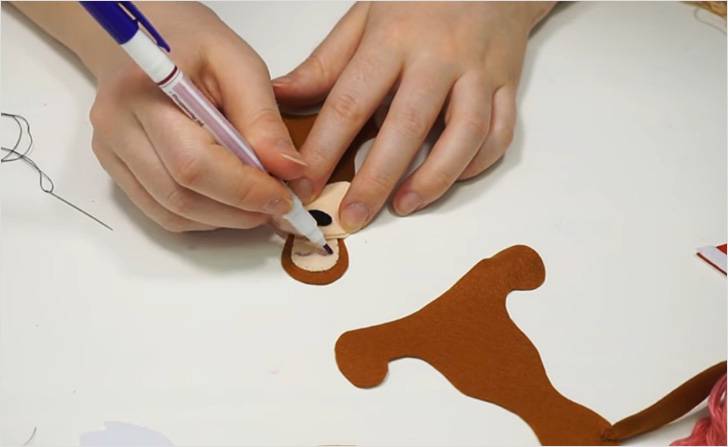 |
The next step is embroidering the eyes. First, draw them with a disappearing marker. Then we embroider with a chain stitch using one thread. |
 |
We outline the mouth and mustache on the muzzle. |
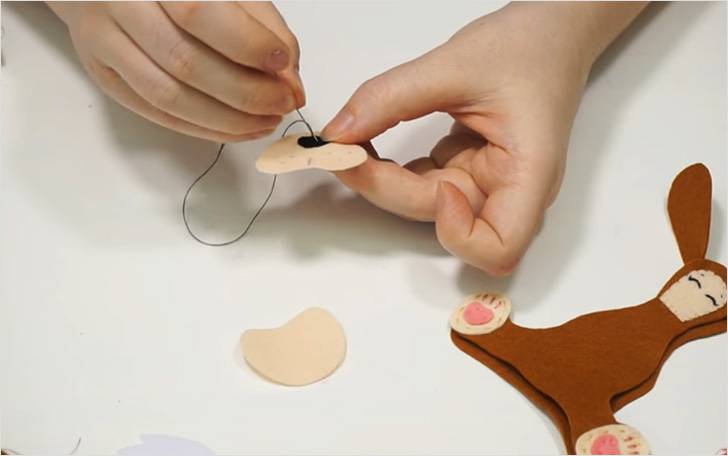 |
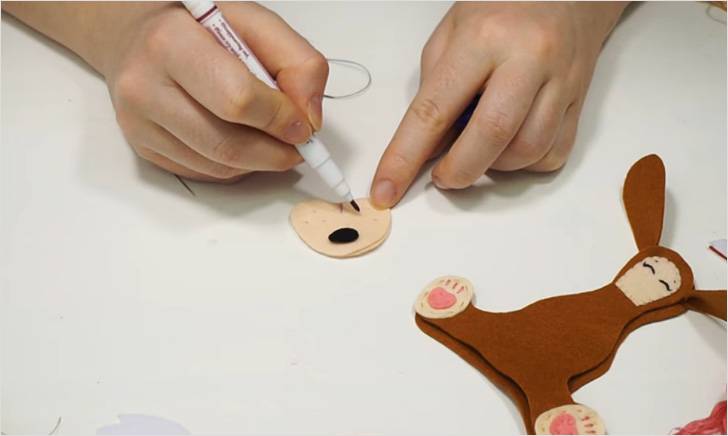
Sew the nose with the seam forward with the needle. |
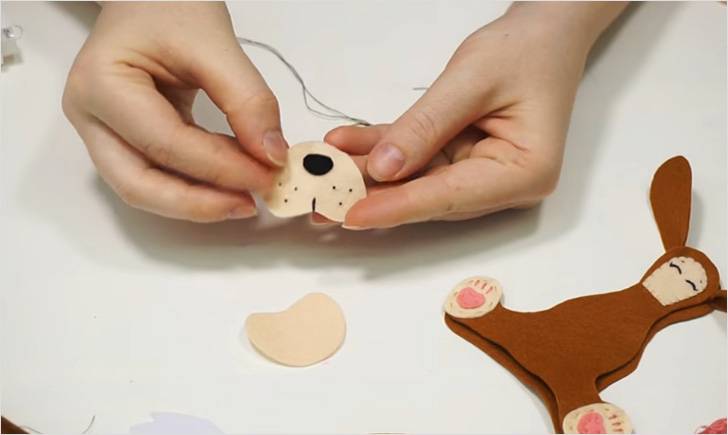 |
In place of the whisker dots, we make French knots. We embroider the mouth with a chain stitch. |
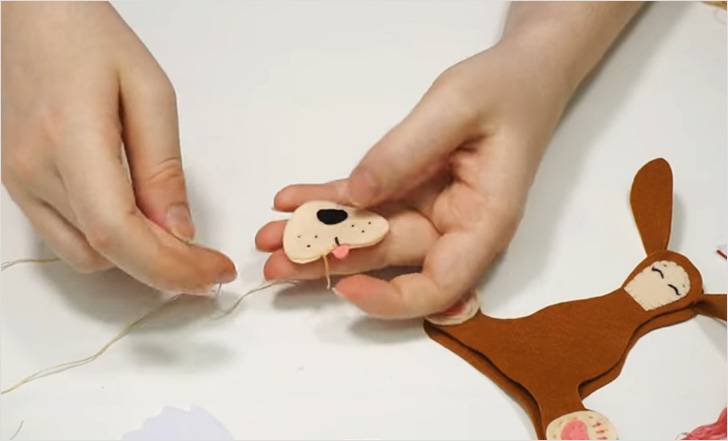 |
Sew the pink tongue to the top layer inside muzzles. |
 |
Then we sew the muzzle with a buttonhole stitch. We stuff a little filler inside and sew the parts together until the end. |
 |
Using a chain stitch, we embroider a tail on the back part of the body using flesh threads. |
 |
We sew the flesh parts of the paws to the front paws using a “forward needle” seam. |
 |
Then we put the two parts of the front legs together and sew them with a buttonhole stitch. |
 |
Lightly fill the parts with filler. |
 |
We sew the paws to the upper part of the body with a seam over the edge. |
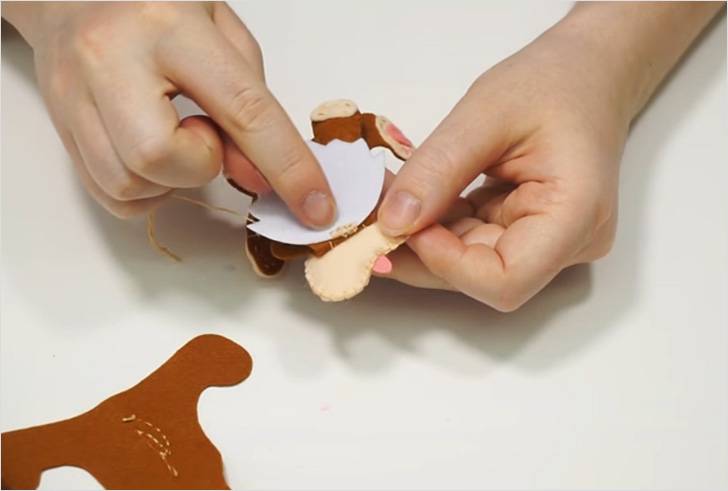 |
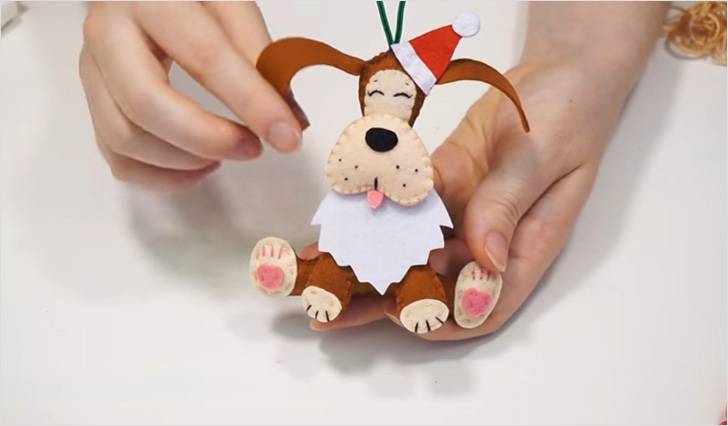
We sew the beard to the same part with a seam over the edge, and then sew on the muzzle, capturing only its lower part. |
 |
We put the body parts together and sew them together with a buttonhole stitch. When we reach the top of the head, we sew in a loop. We tie a knot on the lace and sew a loop to the back of the body. |
 |
We fill the toy with filler. Sew the parts together until the end. |
 |
The toy is almost ready. |
 |
We sew the pompom parts together through the tip of the cap. We sew a white edge to the red part of the cap. |
 |
Now we sew the cap to the toy. We make a seam under the white stripe. |
 |
We embroider the claws on the paws. |
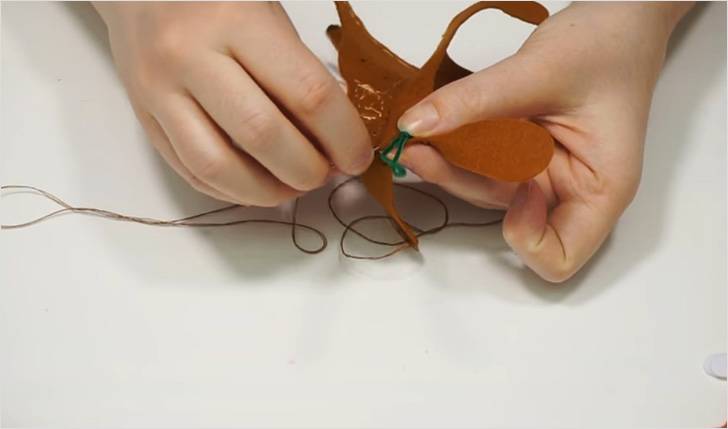
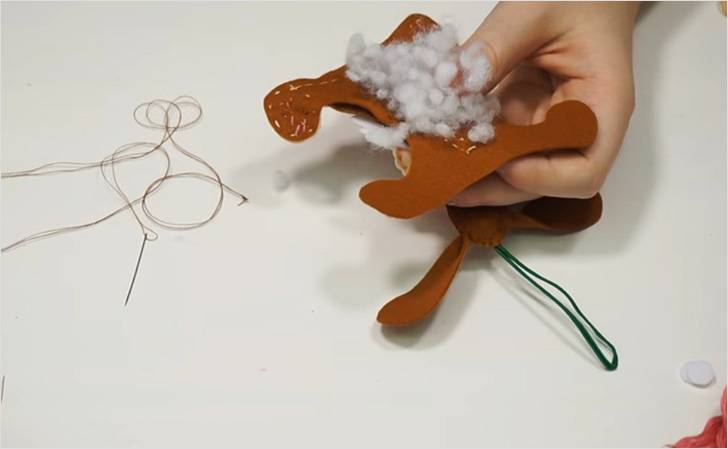
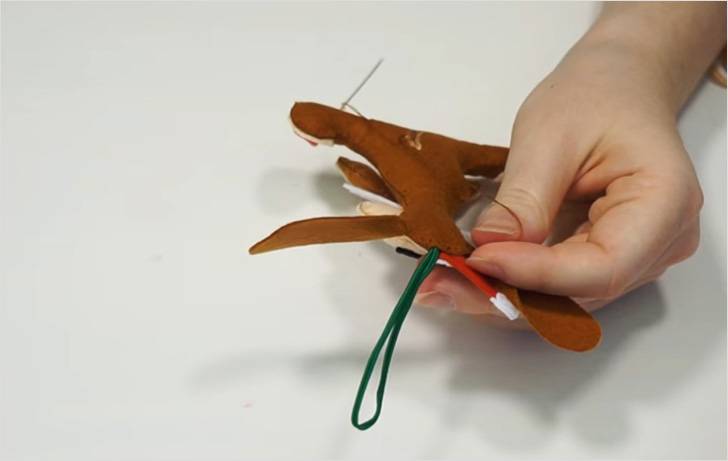
The fox belongs to the canine family. She will make an excellent pair for a felt dog. Make a girl fox like this. The kids will be delighted with it.
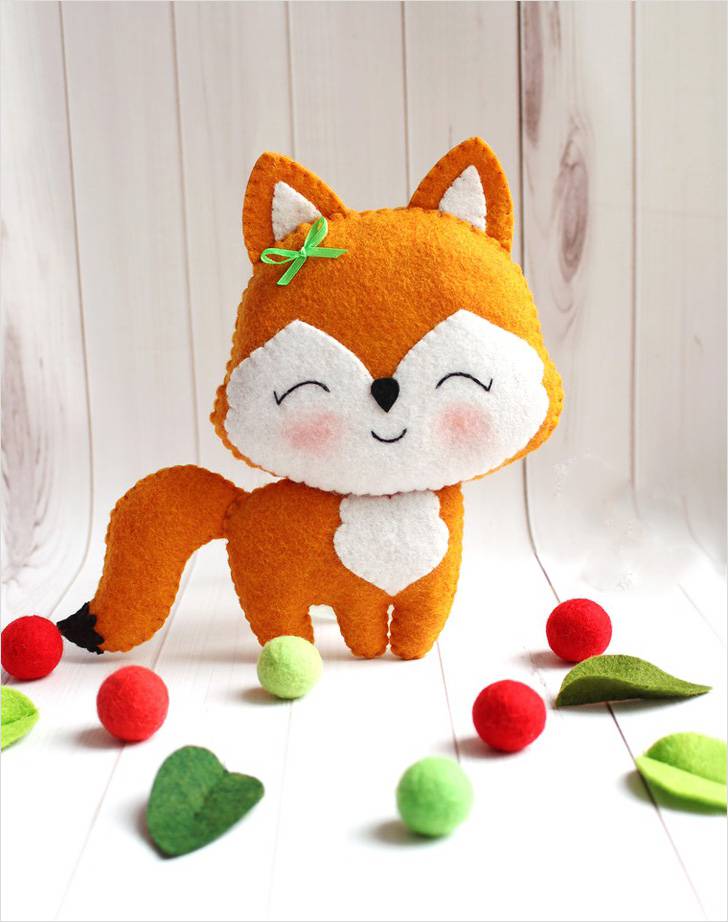
Here are all the necessary materials.
And this is a pattern.
Well, if you want to make a simpler toy, start making a Christmas tree.
 |
An easy to make felt Christmas tree. |
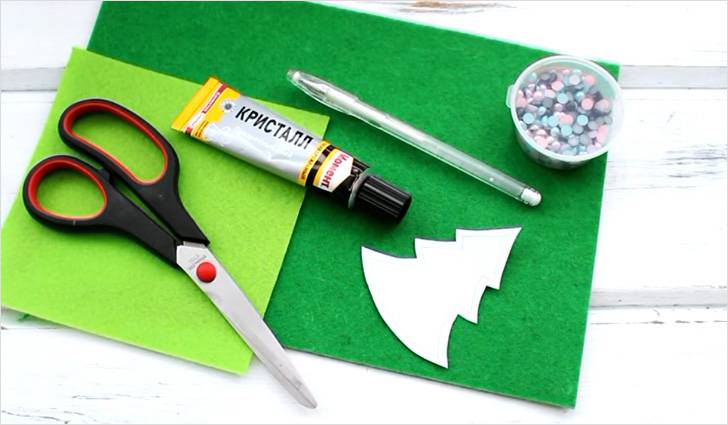 |
You will need: scissors, glue, felt in two shades of green, beads or half-beads, a Christmas tree template, decorative tape, a pencil or marker. |
 |
We cut out a Christmas tree from green felt using templates. |
 |
We reduce the template by 0.5 cm on each side. |
 |
Cut out a Christmas tree from light green felt. |
 |
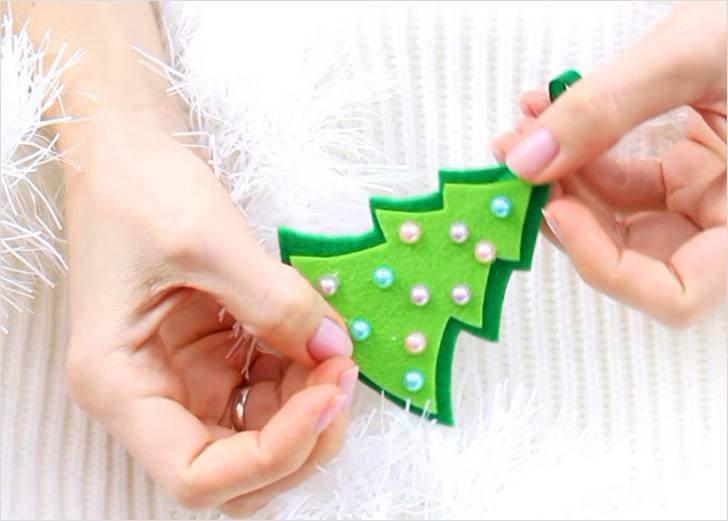
Glue the ribbon loop using hot glue. Using Moment-Crystal glue, glue the light green Christmas tree to the green one. You can decorate with half beads, rhinestones or buttons. |
You can combine felt with fabric.
![]()
Below, see a few more patterns and instructions for making felt Christmas tree decorations.


Video: felt puppy
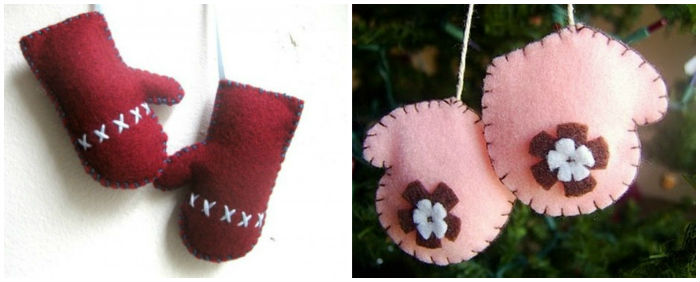
Video: boots and mittens for the Christmas tree
Festive balls made from old toys, foam, plastic
It's hard to imagine a more ordinary Christmas tree decoration than a New Year's ball. But the most ordinary ball or blank with the help of a pair of hands turns into a product that demonstrates your creativity.
We invite you to look at three interesting instructions for transforming simple Christmas tree balls.
Ball "Minnie Mouse"
 |
Take a red Christmas ball. Use black acrylic paint to paint the top of the ball. |
 |
Add large polka dots with white paint. Let dry. |
 |
Draw the ears on black cardstock. Cut and bend the ends. |
 |
Paint the top of the ball with glitter nail polish. Cover your ears with it. |
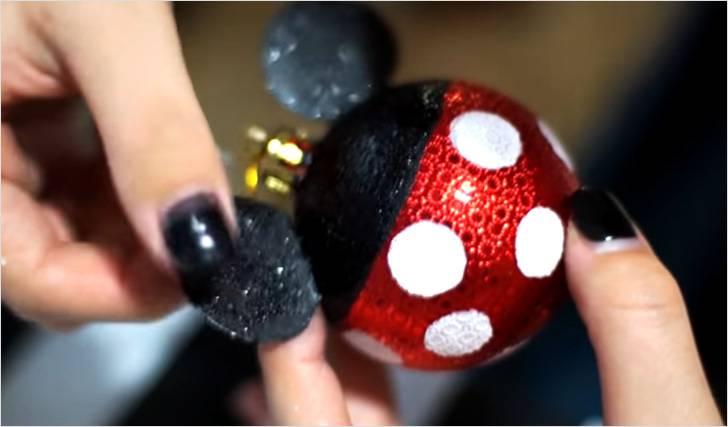 |
Glue the ears to the ball. |
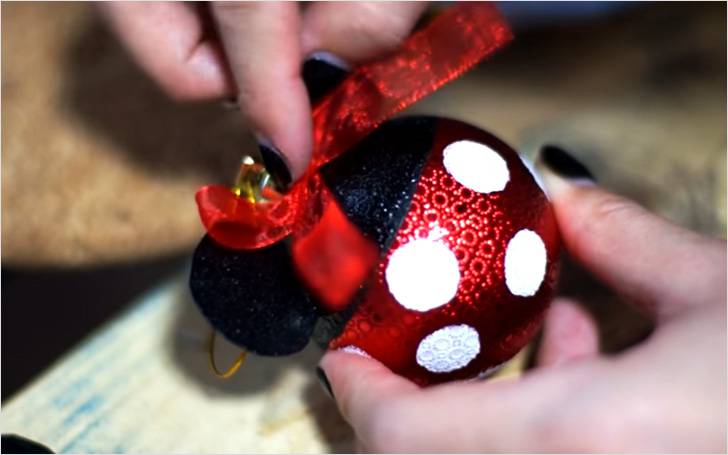 |
Tie the red ribbon into a bow. Glue to the base of the ball. Mickey Mouse is ready. |
Plastic blanks
For the next two master classes you will need plastic balls consisting of two separable halves. Balloon blanks are sold in a craft store.
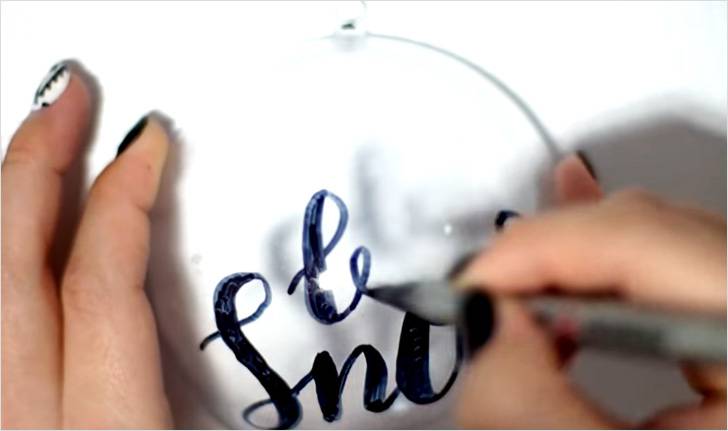 |
Write a New Year's phrase on a plastic ball with a black marker. |
 |
Separate the halves. Place the crumpled tape inside. |
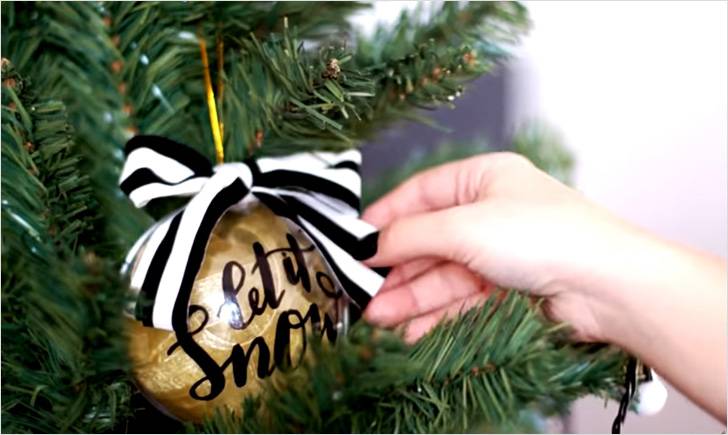 |
Make a bow from ribbon or cut ribbon from fabric and tie it into a bow. Glue the bow to the ball. |
 |
Let's draw a New Year's silhouette on the same plastic blank. Pour cocoa inside and put marshmallows. |
 |
Close the ball. The halves of the ball are well fastened to each other. |
 |
We thread the thread and glue a bow made of red silk ribbon. All. Can be hung on a Christmas tree. |
From foam plastic
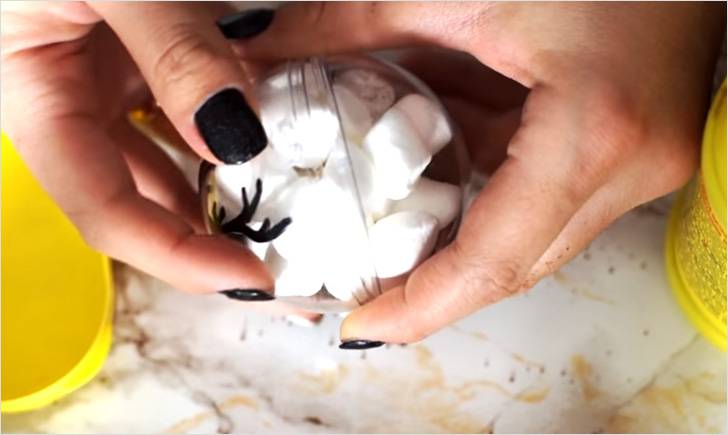
Foam blanks are widely used in the manufacture of Christmas tree balls. Although for the next master class you can also use ordinary glass balls. You probably have several Christmas tree decorations that would be a pity to throw away, and that have already lost their appearance. Let's transform them.
You will need:
- red knitting threads;
- foam ball;
- clip;
- PVA glue;
- wire cutters;
- lace;
- glue Moment-Crystal.
 |
The ball will look like this. |
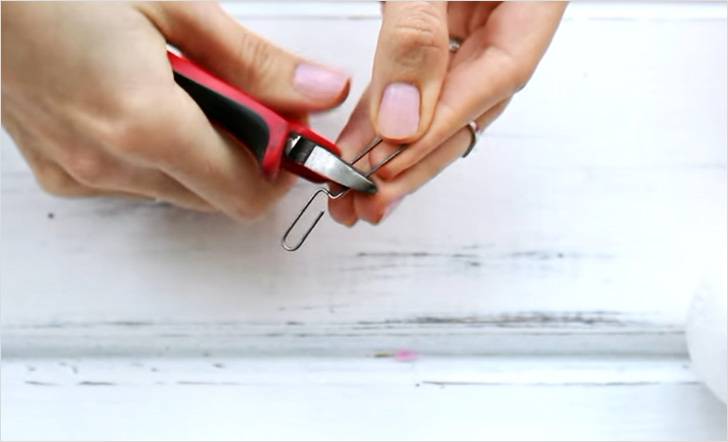 |
Cut off the eye of the paperclip. |
 |
Insert into the ball. We take it out. Cover the ends of the paper clips with hot glue and insert them into the marked holes. |
 |
Cover the top of the ball with PVA glue and tie a thread to a paper clip. |
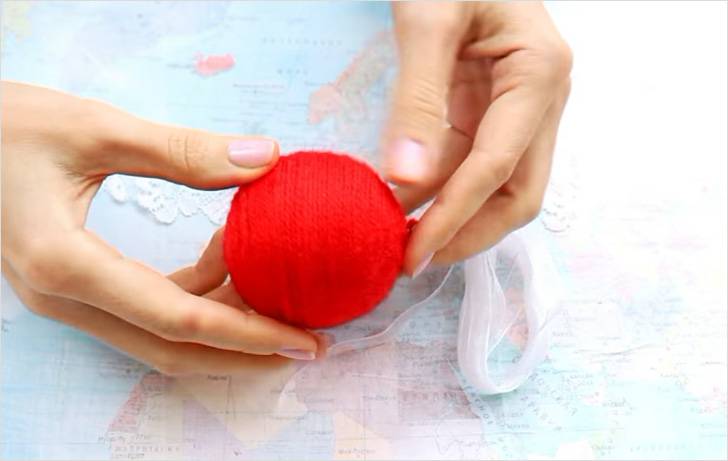 |
Gradually wrap the glue-covered ball with threads. We press the threads as we work. When the ball is dry, decorate it with white lace. Glue with Moment-Crystal glue. Make a loop from the chiffon ribbon. |
More more options look for New Year's balls.
All the many ideas are difficult to somehow structure. Some craftswomen use combined materials or materials that are not intended for needlework at all.
Let's make a star from beads on a wire.
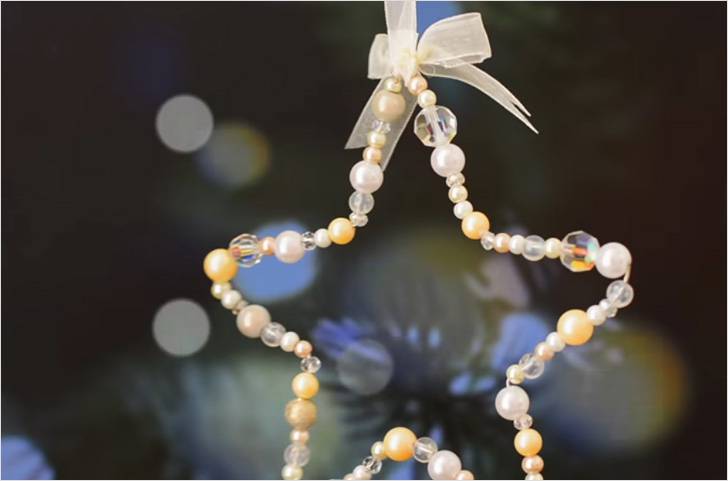 |
This is how it will turn out. |
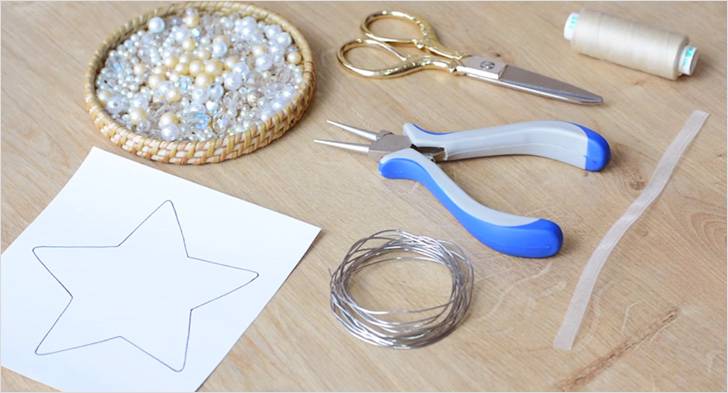 |
You will need a star drawn on paper, wire, beads, pliers, scissors, thread, a needle, ribbon for a loop and for a bow. |
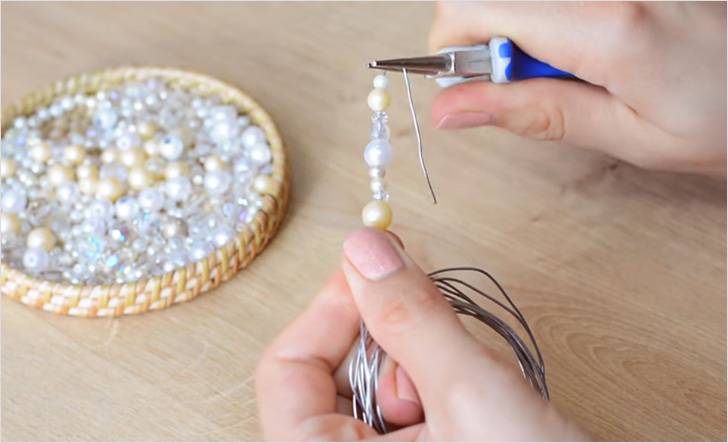 |
We string several beads onto the wire. Using pliers, we form the outline of the star. |
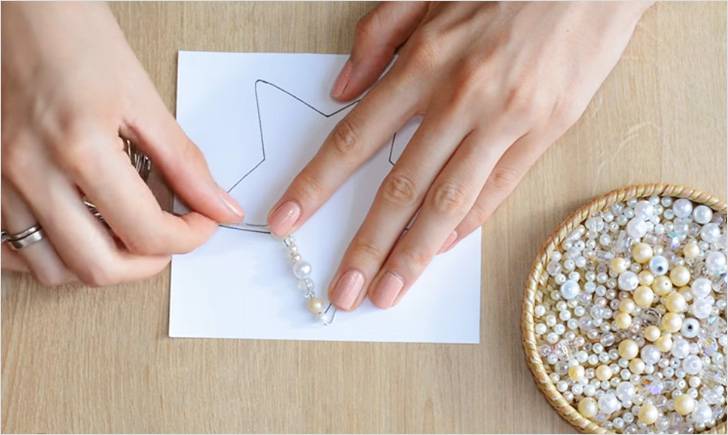 |
We attach the wire with beads to the template and align the base. |
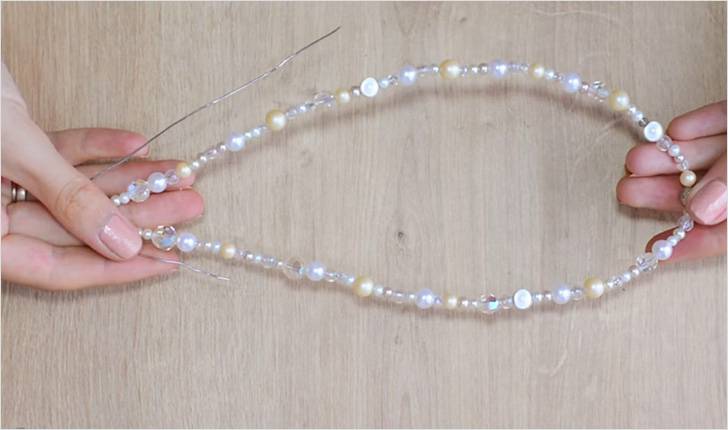 |
We string a lot of beads onto the wire at once. |
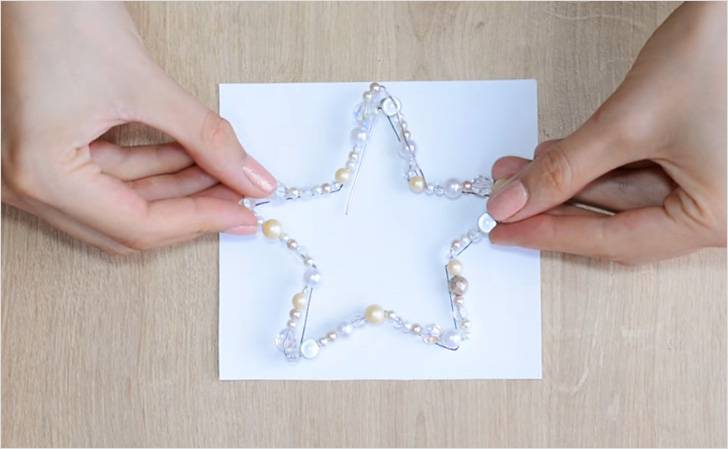 |
Forming a star. |
 |
Bend the end of the wire into a loop. |
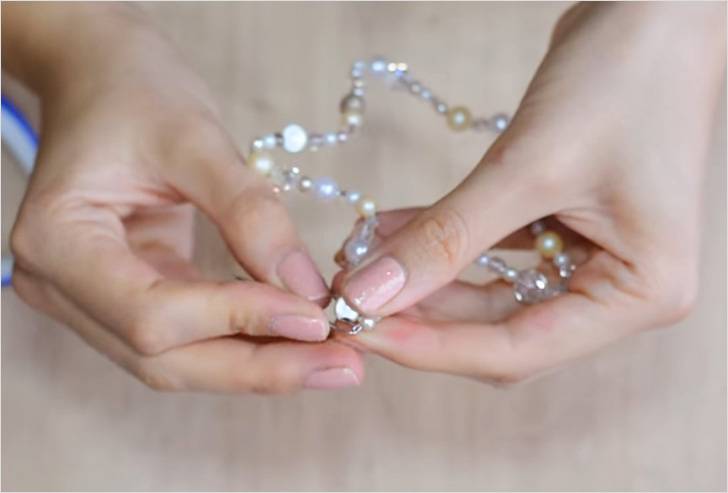 |
We pass the other end through it and bend it. |
 |
Sew on the loop and bow. |
 |
The star for the Christmas tree is ready. |
Have you ever thought that you can make fun Christmas tree decorations out of light bulbs that are no longer usable and usually go in the trash?
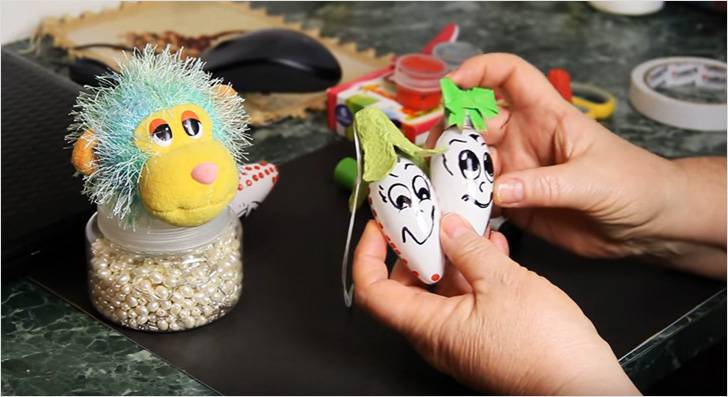 |
Here they are. |
 |
It’s good if the light bulbs are white; if not, they can be covered with white paint. Use a marker to draw eyes, nose and mouth. |
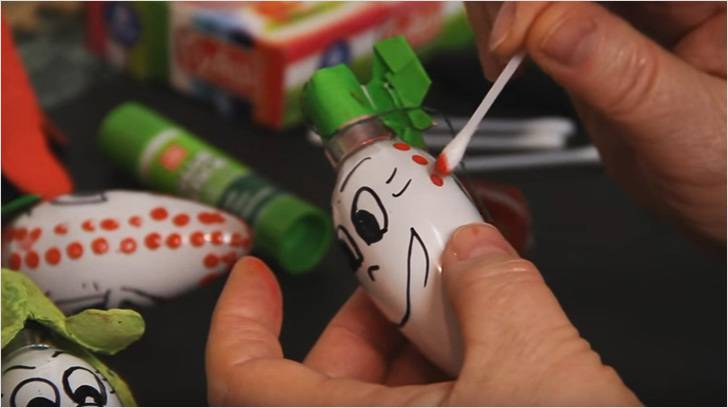 |
Use red paint to paint dots on the sides. |
 |
Wrap the base in green colored paper, placing it on double-sided tape. |
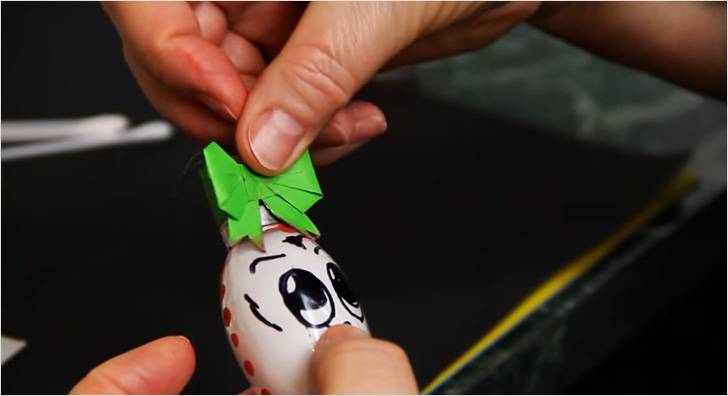 |
Glue a paper bow. |
We hope that you have found it for yourself interesting ideas. Have fun decorating your Christmas tree. We wish you a creative mood.