Original and simple in the manufacture new Year's paper garlands can do it yourself . Decoration of home garlands is a wonderful New Year solution, because every year you can make a new homemade garland and decorate the holiday in different styles. Deterist with what kind of paper garland you will be easier to make with your own hands and boldly into battle ... New Year's garlands From paper made by your hands will help to plunge into the atmosphere of the holiday ...
Simple New Year's garlands of colored paper do it yourself
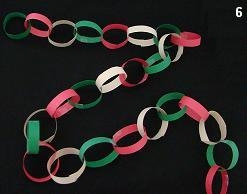
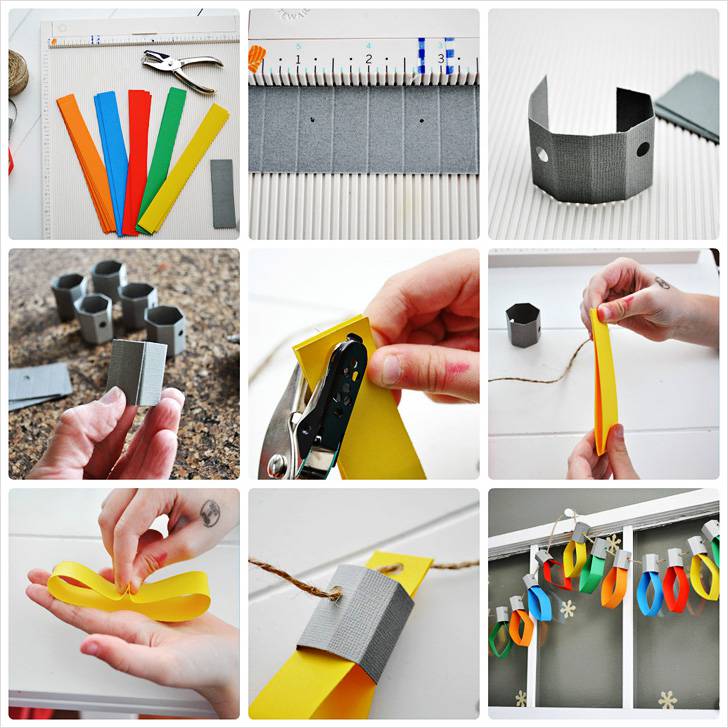
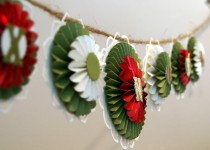
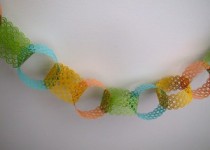
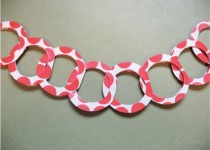
New Year's garland from the rings of colored paper with their own hands
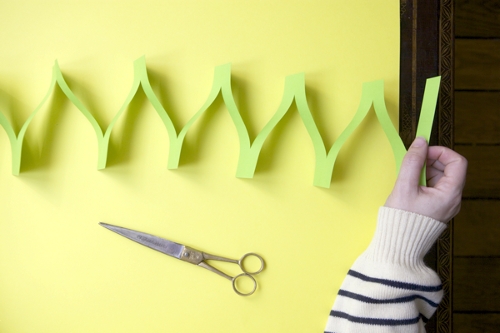
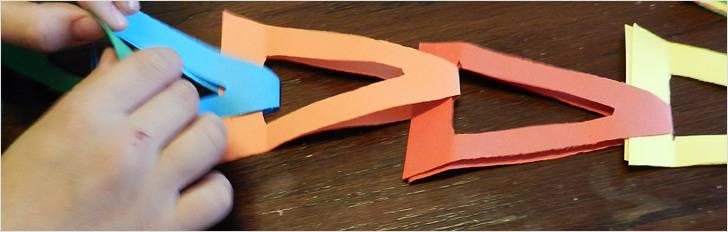
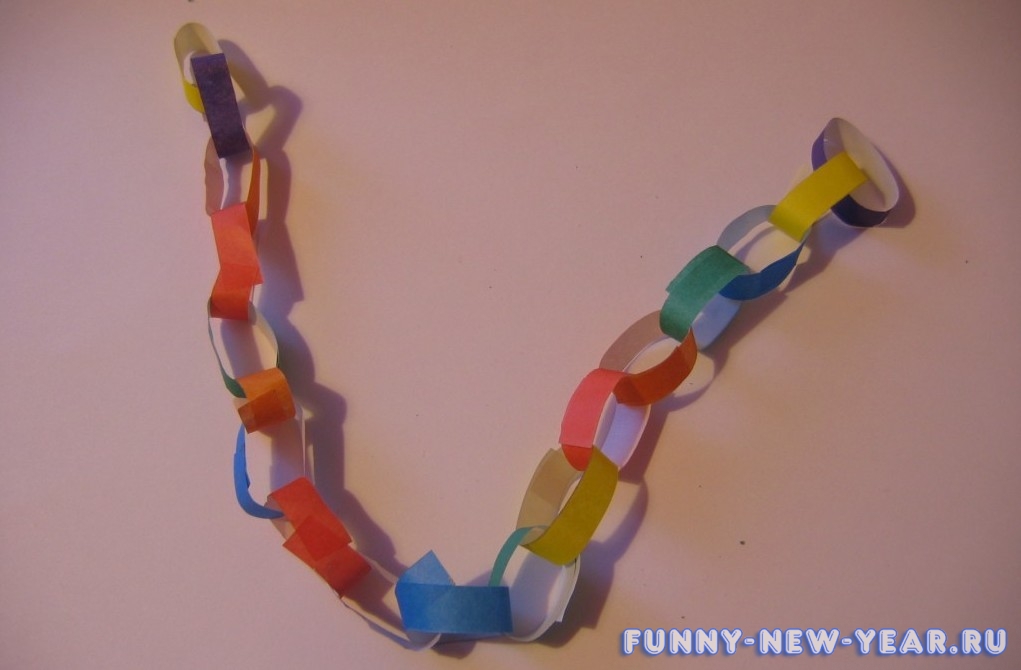
This classic garland is known to the name chain. Make such new Year's crawl Surely the child can even. The deployed description of the master class does not require, so look at the photo and boldly make your garland.
Approximately such an exercise result in your original form.
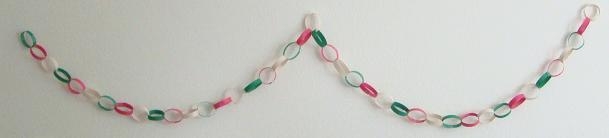
And so the paper chain looks on the wall:
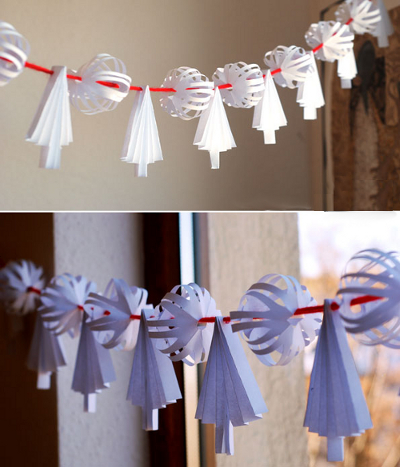
Vertical New Year's paper garlands do it yourself
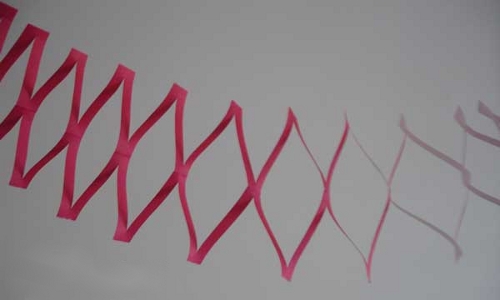
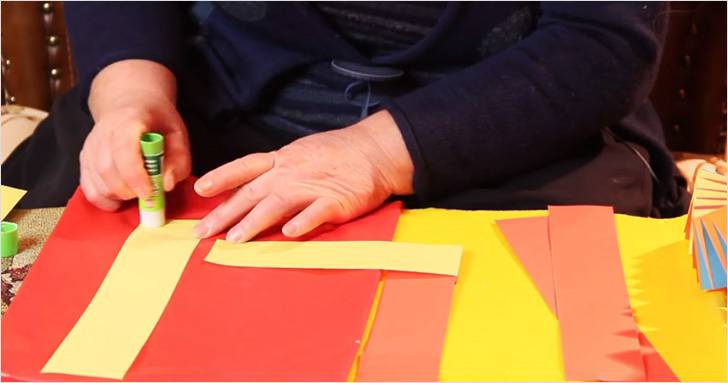
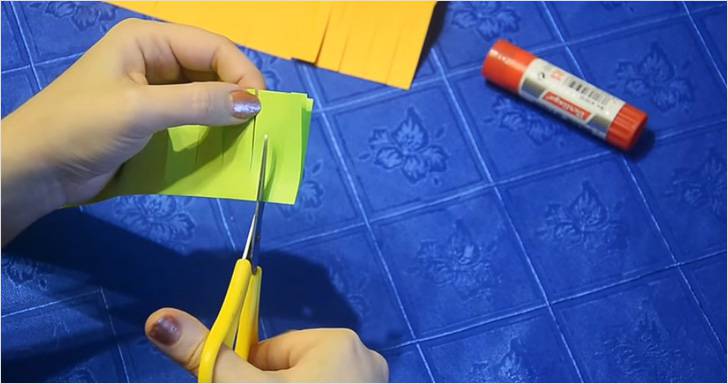
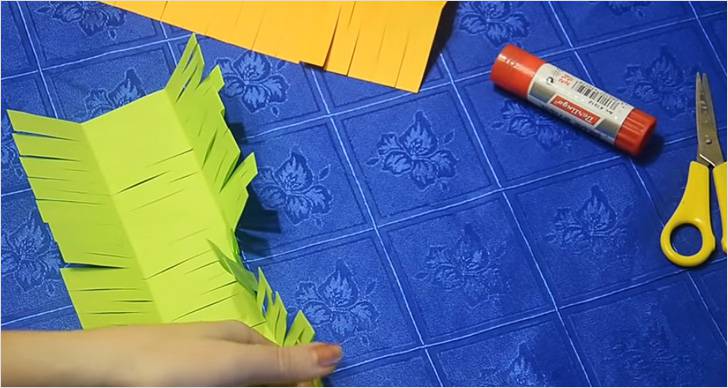
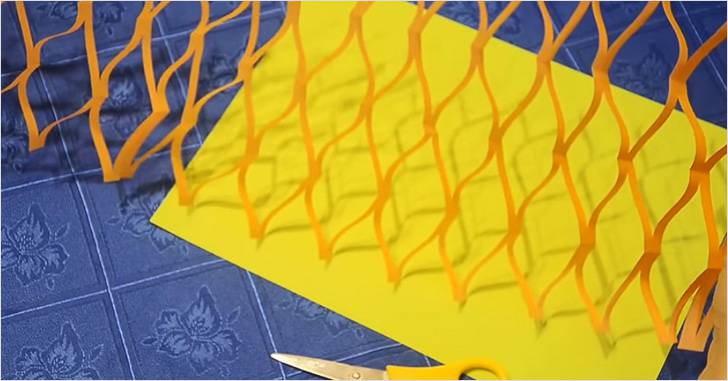
Not difficult in manufacture, but a fairly spectacular paper garland can work in the shortest possible time. To make such a handicraft you need to arm with non-ferrous paper, scissors and glue.
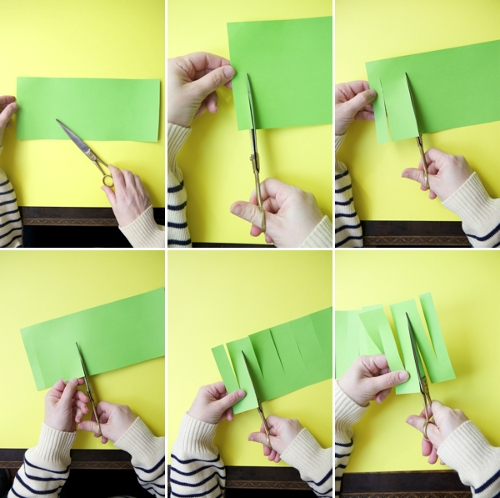
Approximately such a workpiece should work with you.
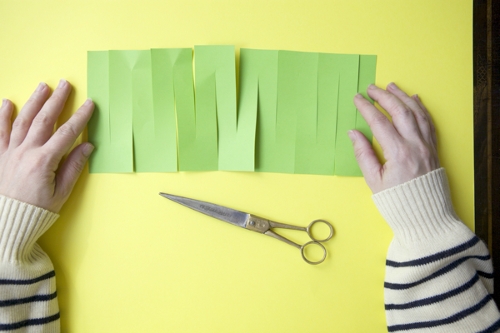
You can fold the sheet of paper twice and do similar cuts. As a result, get a more complex garland.
New Year's garlands of paper do it yourself video
See how beautifully looks a festive room, decorated with paper garlands.
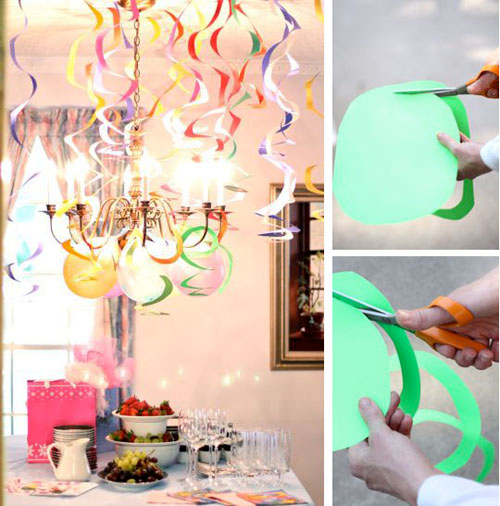
Spiral New Year garlands of colored paper do it yourself
You can also make a spiral New Year's garland. Round the edges and cut the paper sheet with a snake on a spiral. How to do this - see photo:

New Year's garlands from color cardboard with their own hands
Simple and original New Year's garlands can get from cardboard chopped on strips and fixed on the thread. Customize cardboard strips can be used with a sewing machine or manually - needle with thread. The principle of work is as follows: the pieces are put next to each other and stitched with a thread. On the sewing machine it will work easier and faster.
To make such a garland you can use plastic strips - bookmarks that are sold at any stationery store.

When the garlands are ready to secure one end on the chandelier or stream, and the second hit a small cargo. It is necessary that the garland is not very dangling. You can use as a cargo: a piece of plasticine, buttons or any other small item.

Such a New Year's garland can be suspended in a vertical position - the decoration will look very interesting.

Mixed simple paper garlands do it yourself
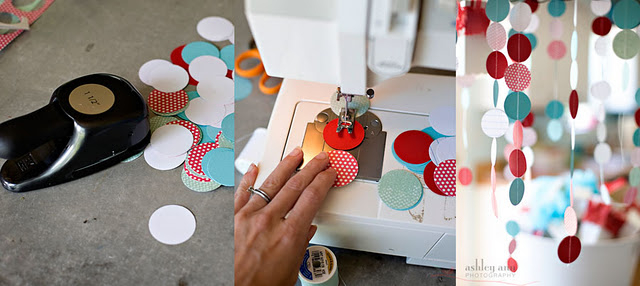
As you already understood, beautiful New Year's garlands from paper can be done very quickly. The next master class is good proof. The principle is the same as in the previous lesson ... cut out the circles using a special "hole punch" or draw them a circulation and cut out. And then sew them on the sewing machine. By the same principle you can make the original textile garland.
We hope our ideas will help you make original decorations for the holiday and you can clear your home in the best way. Good luck!
No titleNew Year's garlands do it yourself
To create festive mood Himself and your loved ones, do not regret the time to decorate your home for the new year. Together with children make new Year decoration do it yourself. One of the most familiar Christmas decorations is garlands. About how to make christmas garlands with your own hands, we will tell you in this article.
New Year's garland of paper (option 1)
The classic version of the New Year Garland is a paper chain. Making this New Year's crafts can be completely small children.
Download Beautiful background for paper circuits You can link \u003e\u003e\u003e\u003e

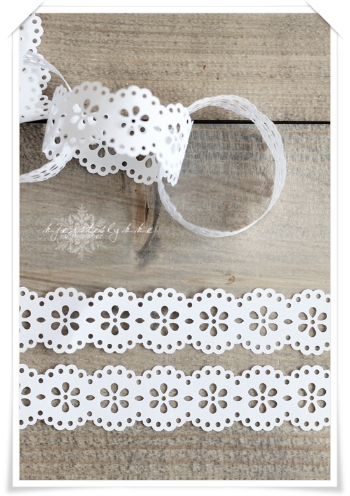
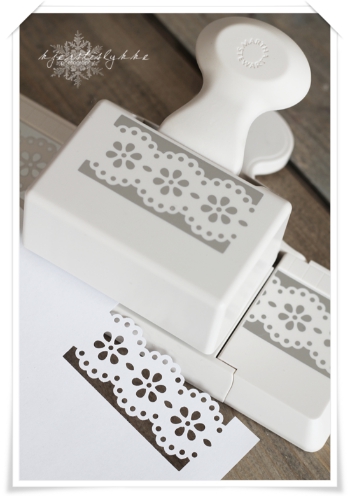
If you have a figurous hole, then you can make such openwork paper chain garlands.
How to make a paper garland (option 2)
For the manufacture of such paper chains you will need only colored paper and scissors. How to make them you will understand if you carefully look at the photo below.
Here is another option for making paper chains.
Cut the rectangles from the paper and put them in half. On one side of the folded rectangle, draw a profile of one chain link, cut it out, straighten the paper. In order to get a long chain, you need to prepare a large number of such links. Then one to turn one link to another. Some of the links can be made multicolored. In this case, colors need to be alternating successively.
New Year's garland of paper (option 3)
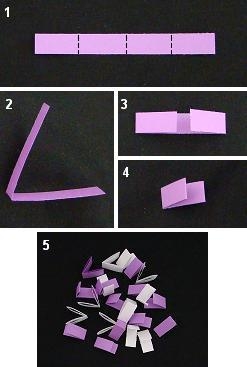
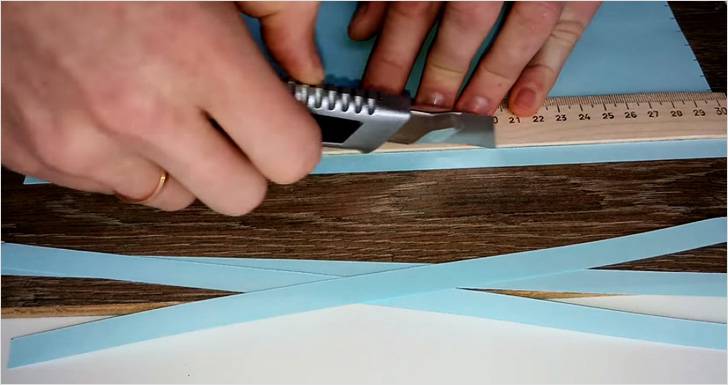
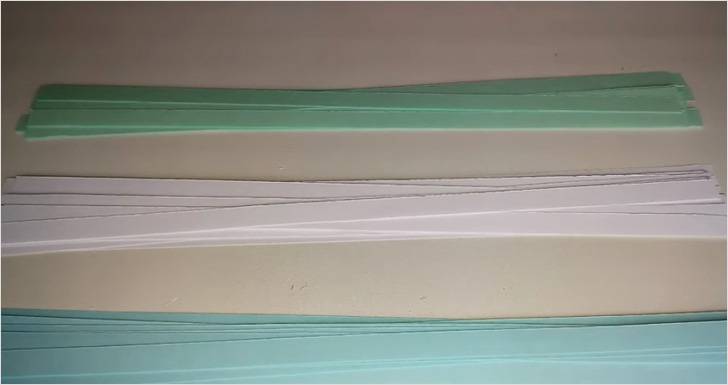
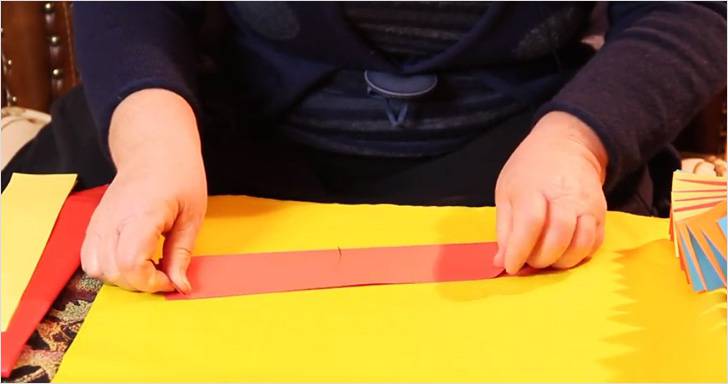
1. Cut the paper strips of two different colors. Striped width - 2 cm, length - 17 cm. In principle, you can use paper strips of any size, the main thing is to observe the following condition: width / length \u003d 1/8 + 1 (cm) spare.
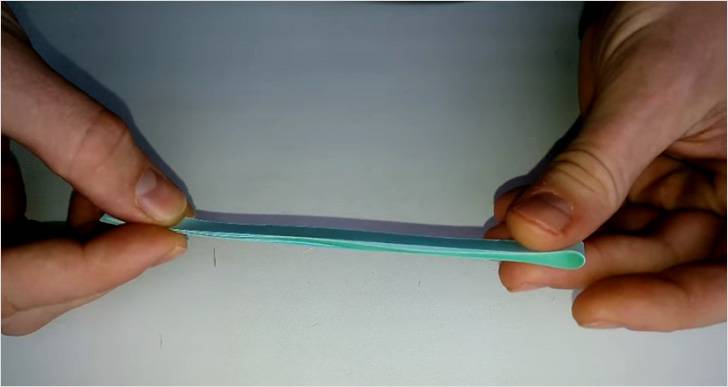
2. Bend the strip in half to schedule the center. Take it back.
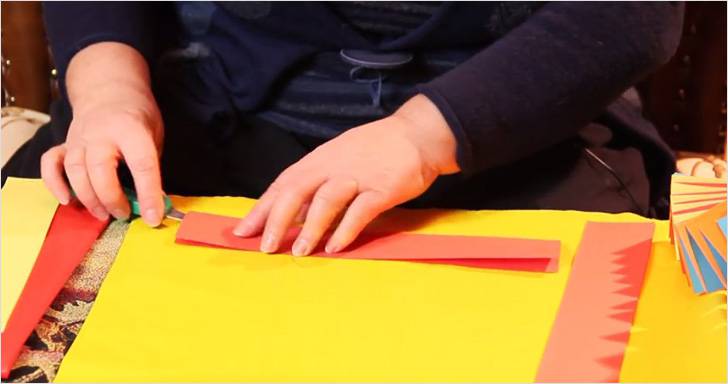
3. The left and right ends of the strips bend to the center, as shown in the photo number 3.
4. Bend the strip in half.
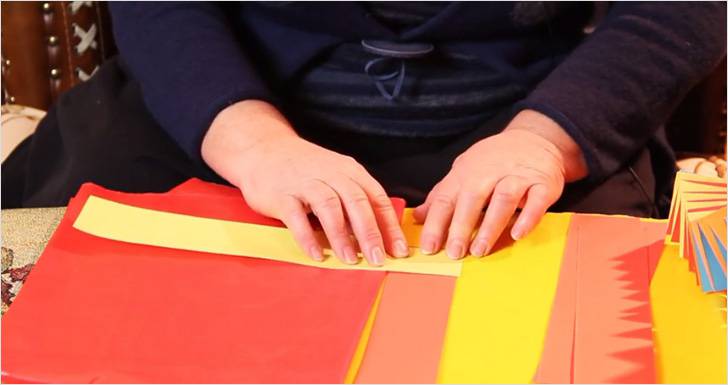
5. Make a necessary number of such billets.
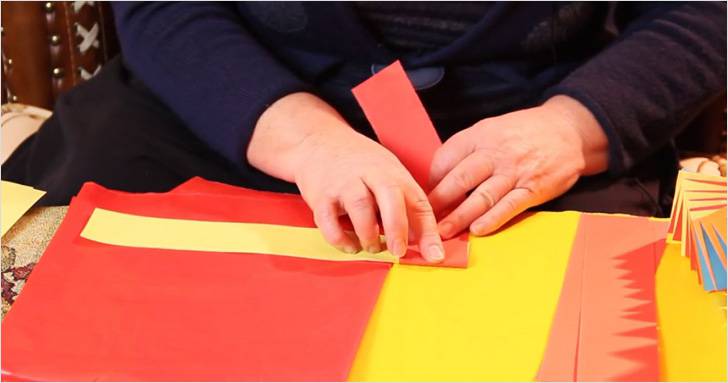
6. Connect the details of the future New Year's garlands with each other as shown in the photo below.
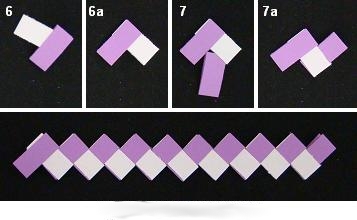
Girland is ready! Because This New Year Garland is quite bad, it is better not to hang it, but to punish it around the perimeter interior items.
New Year's garland of paper (option 4)
This paper garland can be made not only for the new year, but also by February 14, to the day of all lovers. For instructions, see the link \u003e\u003e\u003e\u003e
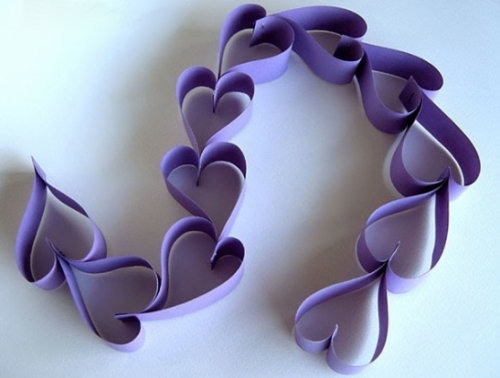
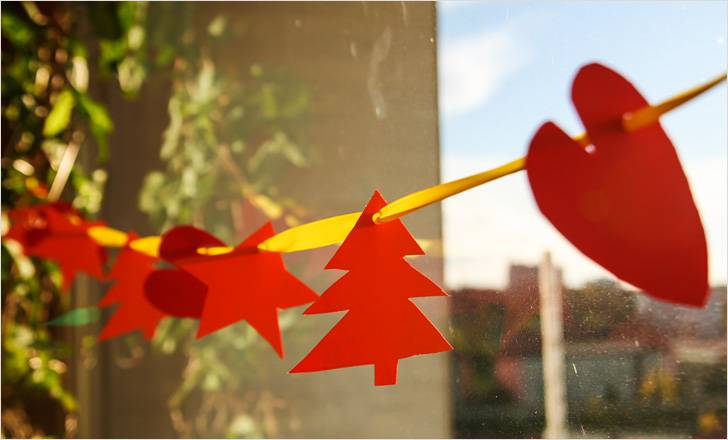
And here is a more complex version of the New Year Garland of Paper in the form of hearts.
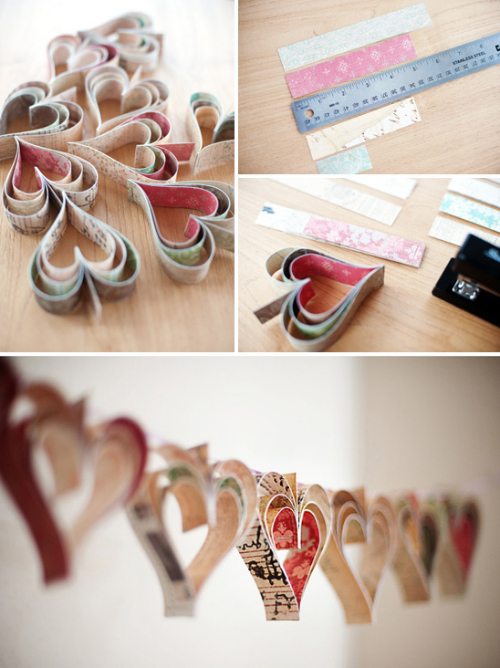
Christmas garland of paper (option 5)
How to decorate the house for the new year? As easy as pie! Very simple in manufacturing, but at the same time spectacular looking garland from paper with your own hands. For its manufacture you will need colored paper, scissors and glue (or stapler, or tape).
Separate blanks must be made with a glue, a scotch tape or a stapler. After that, suspend the resulting paper garlands under the ceiling.
From folded in half a sheet of paper for the same principle you can make such a beautiful openwork garland.
Detailed video instructions for the manufacture of this New Year's garlands, see the link. >>>>
And still colored paper for the New Year's garlands can be cut into a snake on the helix. Like this:
New Year's garland with their own hands (option 6)
Another very simple way to make a garland - cut the color cardboard with non-strokes of stripes or take plastic strips - bookmarks that are sold in every stationery store. With the help of a sewing machine or a regular manual needle, these pieces are put next to each other and stitched with a thread. One end of the thread attaches the cargo - a piece of plasticine, a heavy button, so that the garland does not hang much, and in the second end it is vertically suspended, for example, to chandelier.


You can make such a garland not only vertically, but also horizontally.
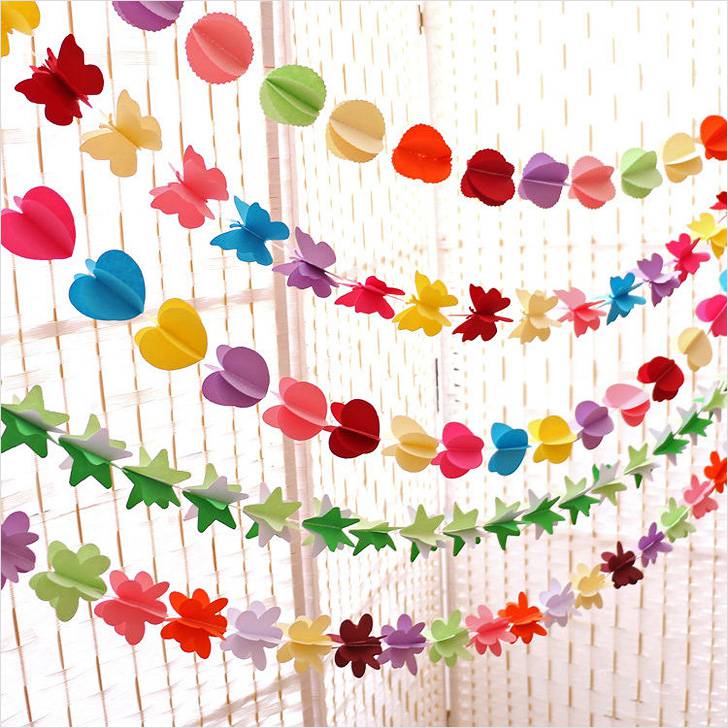
You can flash not only stripes of colored paper. Here are more examples of such New Year's garlands.
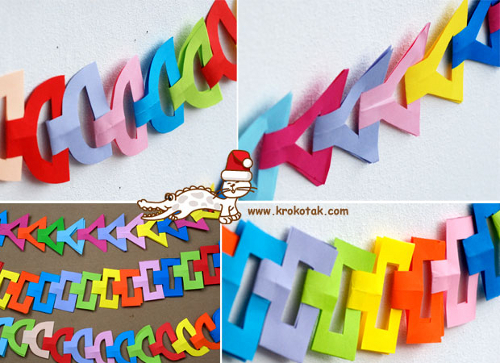
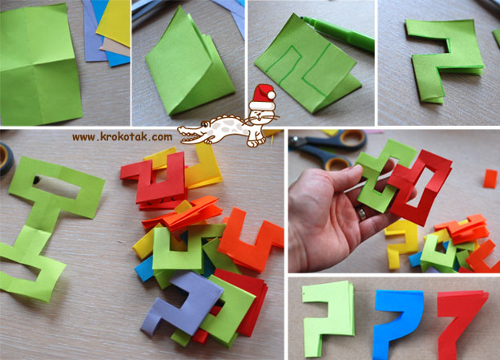
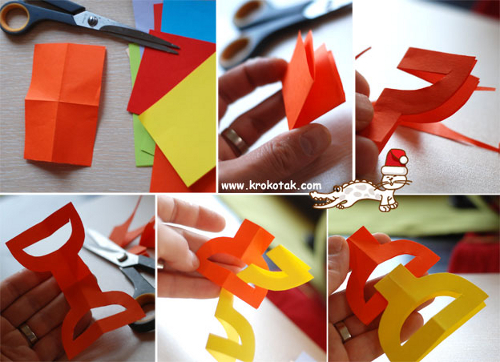
How to make a garland (option 7) The original New Year's garland from paper offers to make the Bulgarian site krokotak.com. Despite the fact that the instruction in the Bulgarian is to understand how this new year decoration is done, you can use photographs.
Garland from balls with their own hands
About how to make a New Year's garland from paper balls, read in our article "Production of New Year's balls with your own hands" \u003e\u003e\u003e\u003e
New Year's decorations for home do it yourself
How to decorate the house for the new year
Original New Year decoration with your own hands can be made of old postcards and family photos. For its manufacture you will need: clothespins, color tape (rope) and postcards, photos. Bright, beautiful pictures of New Year's topics from magazines and the Internet are also suitable.
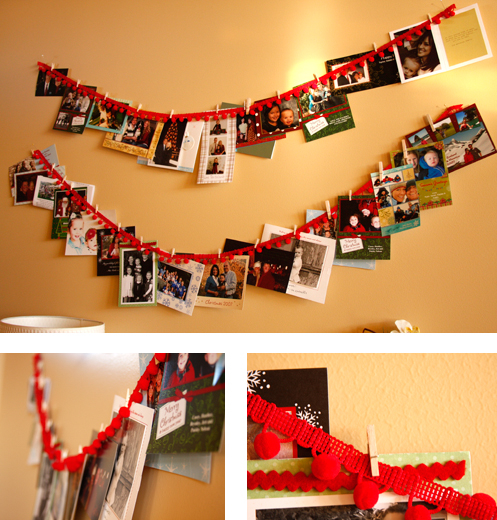
Detailed instructions for making a New Year's garland from old postcards and photos See link \u003e\u003e\u003e\u003e
New Year's decorations for home do it yourself
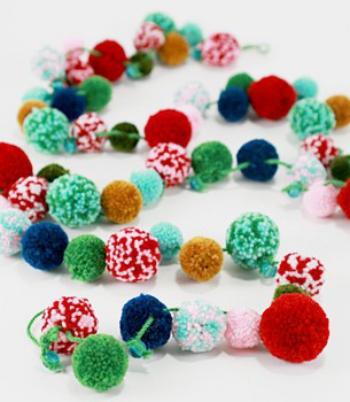
It is quite easy to make a New Year's garland from Pomponikov. About how to make a pompon, read separate pomponiki you can hang on the Christmas tree instead of New Year's balls.
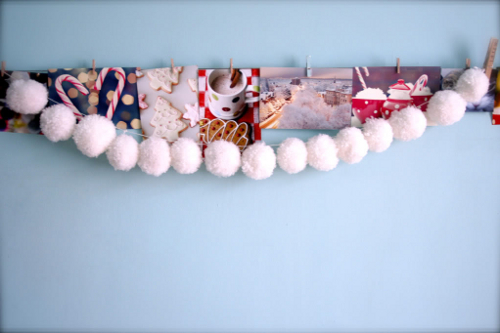
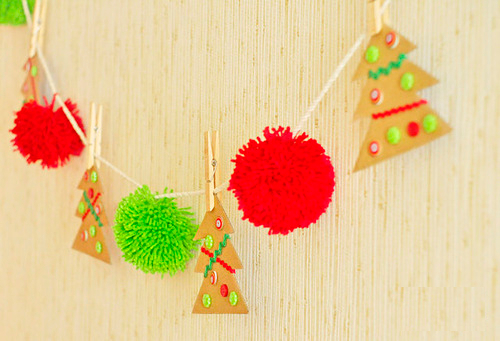
Pompona can be made multicolored.
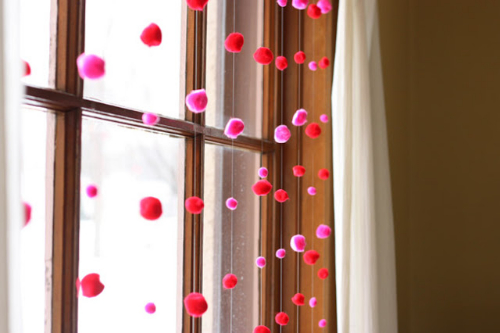
And the New Year's garland can be made of cotton balls or cotton discBy having driven them on the thread.
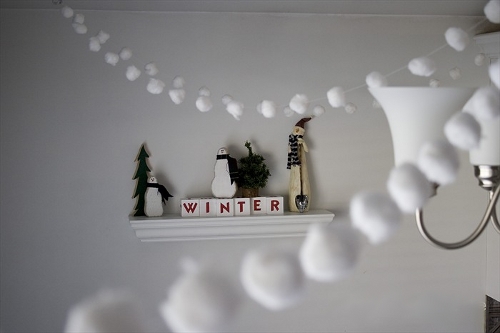
From cotton balls or purchased pumps you can make a new year decoration for the house - curtain. See link \u003e\u003e\u003e\u003e
Christmas christmas garland
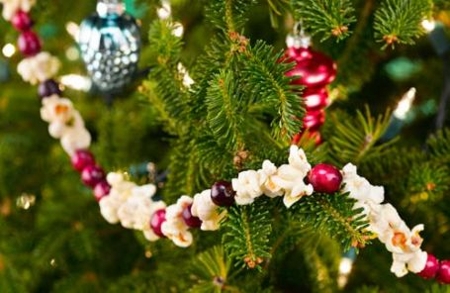
Garland from popcorn and berries Cranberries (Ryabines) looks great on the Christmas tree and in the New Year's interior decoration. For the manufacture of such beauty, you also need a needle and a long thread.
Edible New Year's garlands can also be made from dried fruits (for example, raisins), and so-called. "Dry breakfast".
Which of us does not remember how in childhood a chain of colored paper on the Christmas tree and just to decorate the room. Often in this exciting, but the whole family participated in the long process. Who does not remember the typical garland made by their own hands on New Year, looked like on the top photo. Now it is one of the simple options for New Year's garlands, which grandmothers teach his grandchildren.
Flight Flight: paper garlands
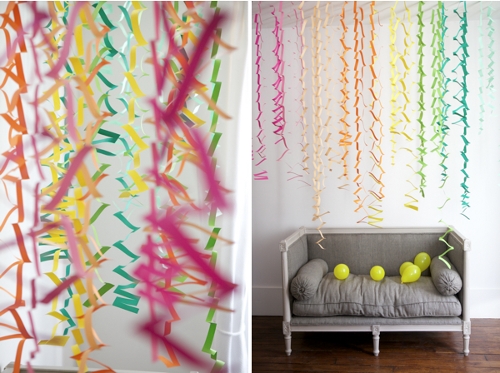
Let's see what other garlands options can make it easily. Perhaps some of them will be unknown for you, and you will gladly take them note. This section turned out volumetric, because there are really many interesting options. Paper is the material that has all the necessary qualities:
- It is easy to work with it.
- It is available.
- Maybe bright colors.
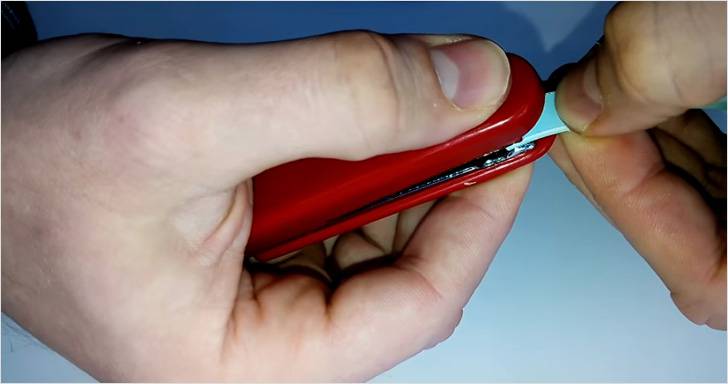
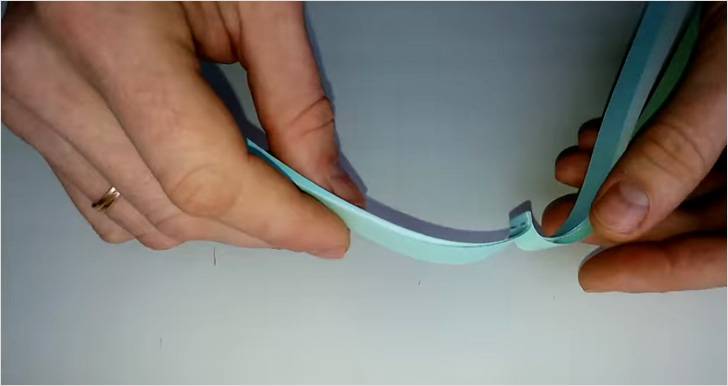
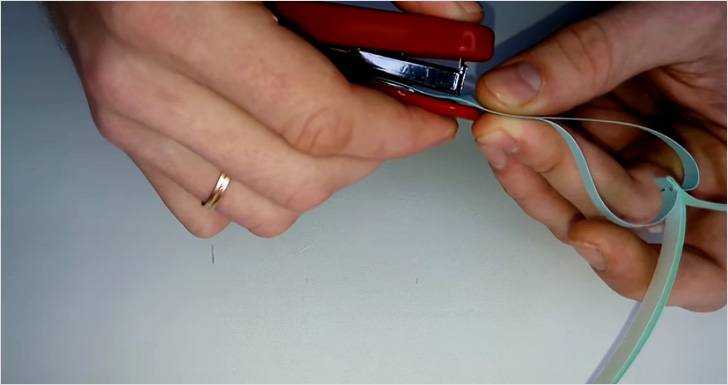
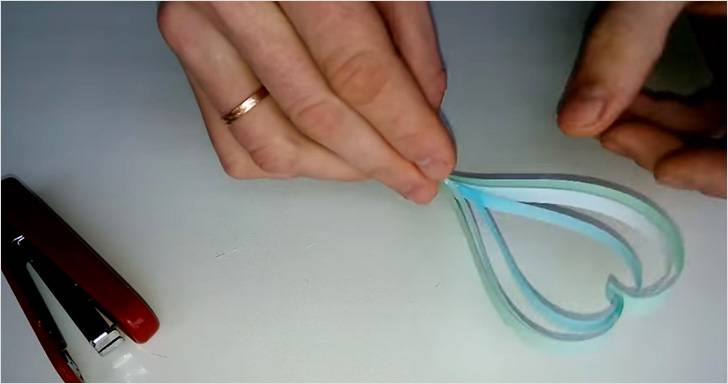
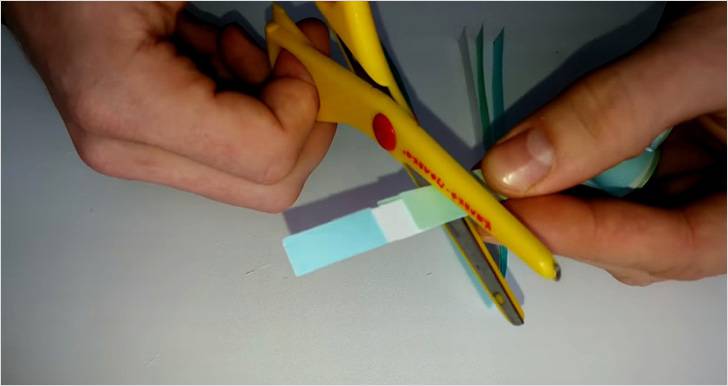
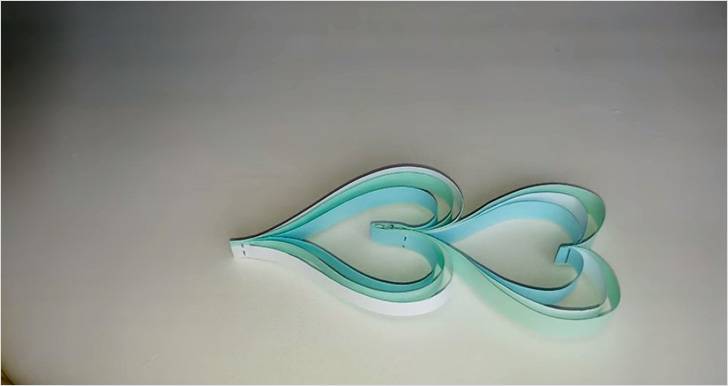
| Let's make a garland from the hearts in the New Year's colors: white, blue, mint. | |
 |
Candle paper strips of arbitrary width, but the same one by each other. Good width 1-1.5 cm. |
 |
Made a lot of blanks at once. |
 |
Fold paper strips together. Align the edges. |
 |
Bend strips in half. |
 |
Secure the folder fold. |
 |
Spread into two parts. |
 |
Secure the stapler every strip, overlapping them on each other so that they lay the air. |
 |
That's what happens. |
 |
Cut extra. |
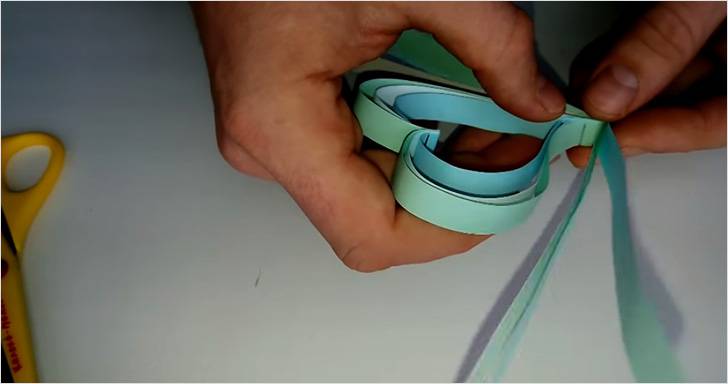 |
Match together three strips of paper and in half together. Attach a fold as shown in the figure. |
 |
Bend each strip and secure the stapler. |
 |
For each other, two details are connected. Repeating actions can be collected by the garland of the other length. |
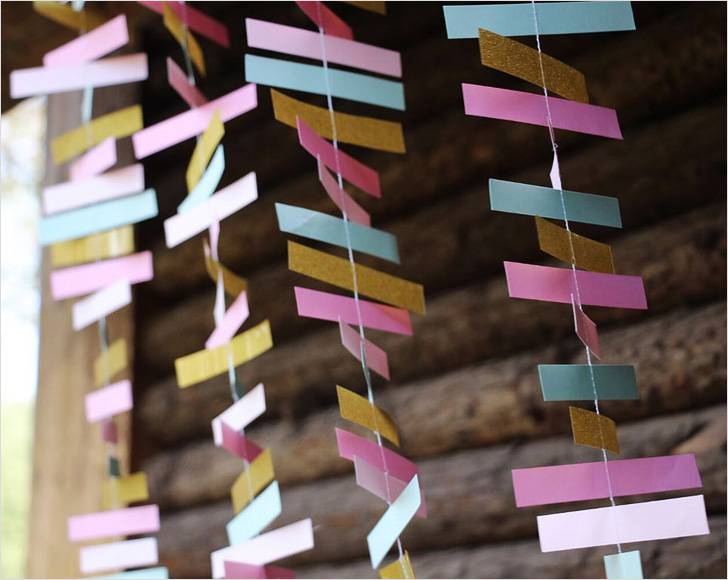
From ordinary paper or magazine is easy and easy to make a garland in the form of a harmonica. Such a garland hang on the Christmas tree, decorate an apartment. When stored, it does not take up much space, because it is very compact. It can be done almost endless.
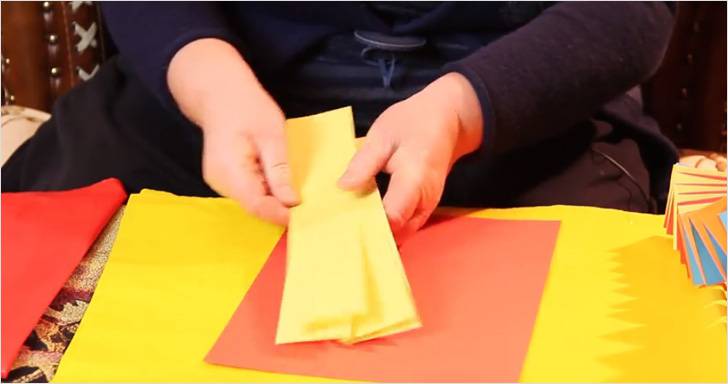 |
For the manufacture of garlands, color paper strips will be needed. What paper is: you can make thin stripes or wide. A sheet of paper should be divided into 4 parts. |
 |
Fold it. Strip will turn out to be a width of about 3.5 cm. You can make a garland of one color or different colors. |
 |
Cut the sheet of paper on strips by a stationery knife or scissors. |
 |
Put the red stripe from below, stick at it at the right corner of yellow. |
 |
Striped red bend to yourself, wrapped it on yellow. Send a fold. |
| Then cover the yellow stripe red. | |
| After turning the top is red, and continue, until the stripes are running out. | |
 |
Gradually increase the length of the strips, sticking up new strips, they can be of other colors. At the end of the work, the edges of the strips should be glued together. On the garland you can hang additionally decorations. |
 |
To attach a loop, you need to take a thread, fold it in a loop, tie a nodule. Cut from paper two squares, cut them on one side until the middle and glue them to the loop, placing cuts in the opposite direction from each other. The nodules hide inside, and release the loop in the slot. |
We offer to make an interesting and stylish garland with bulk balls from paper and stars. This beauty is performed from a silver and gold and gold cardboard, a special charm decoration gives the twine.
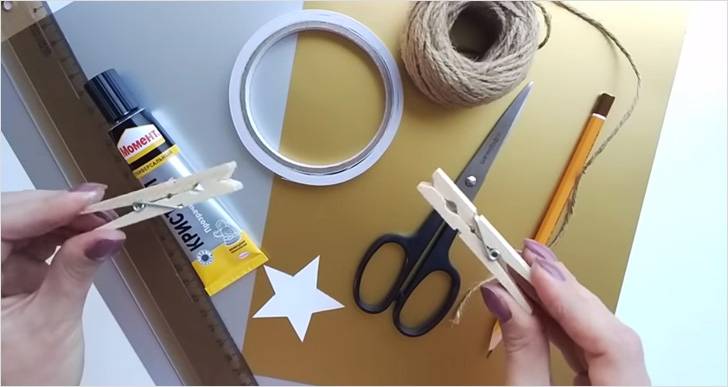 |
You will need: on a sheet of silver and golden cardboard, momentum-crystal glue, twin, double-sided tape, scissors, pencil, line, pattern in the shape of a star, two clothespins. |
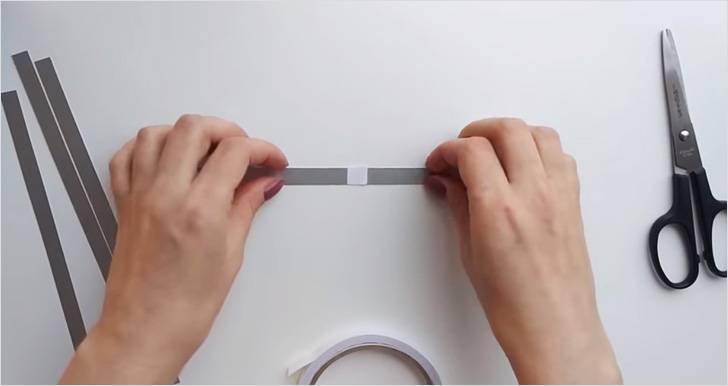 |
Cut from silver cardboard 4 non-strokes strips. Stick into the middle of one piece of bilateral tape. Remove the protective coating. |
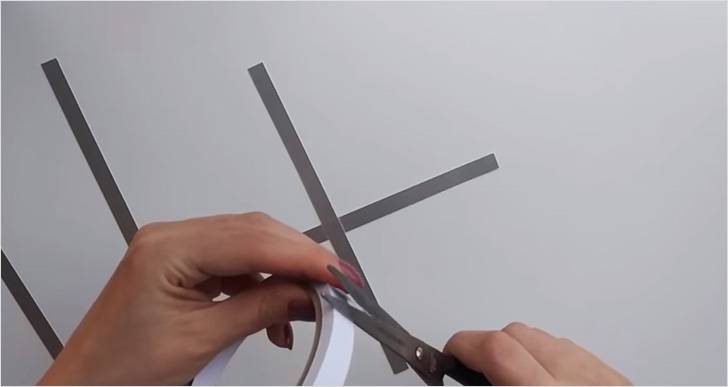 |
Enclose perpendicular to the second strip. Back to the center Place a piece of Scotch. |
 |
And continue as long as you glue all strips. |
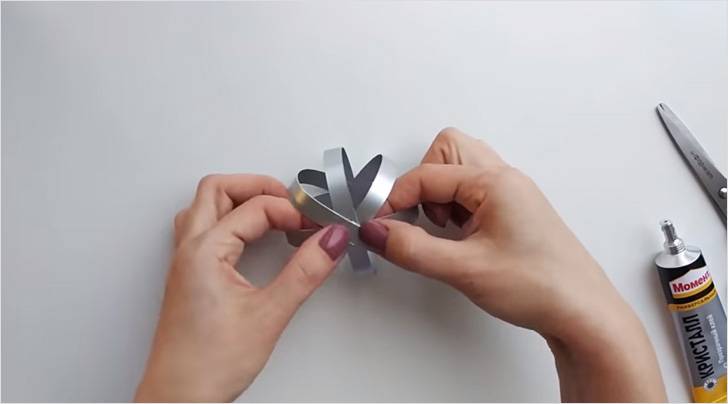 |
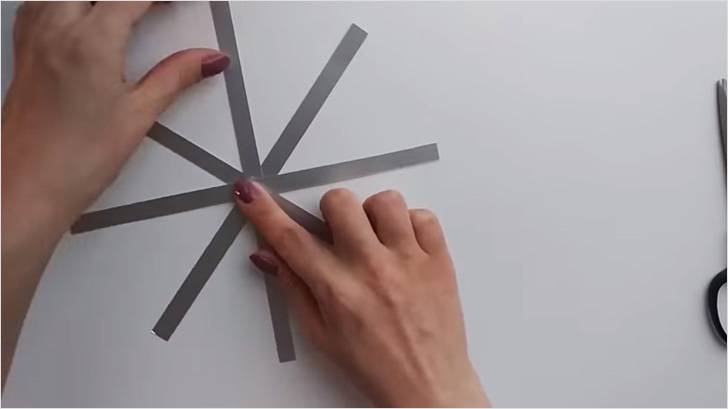
The edges of the strips are loaded up and connect at one point, without forgetting to glue each tip with a crystal moment. At the place of the gluing attach the clothespin to free the hands. |
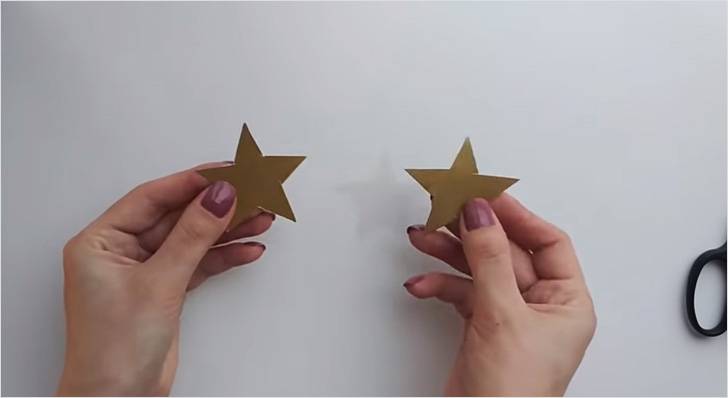 |
Of the two square pieces of golden cardboard, cut two identical stars on the template. |
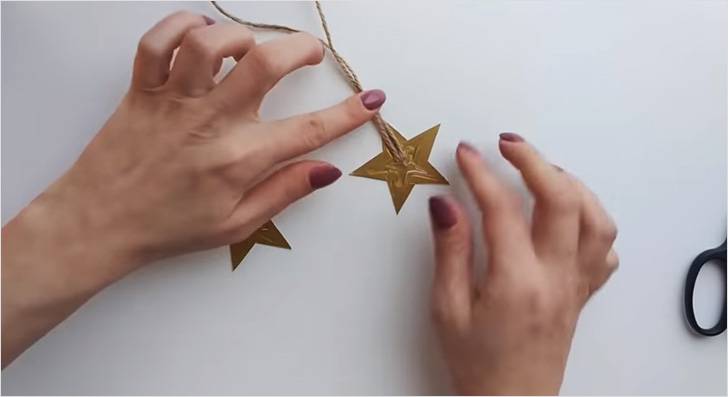 |
Place a loop from the twine and glue between them - it will be a suspension. |
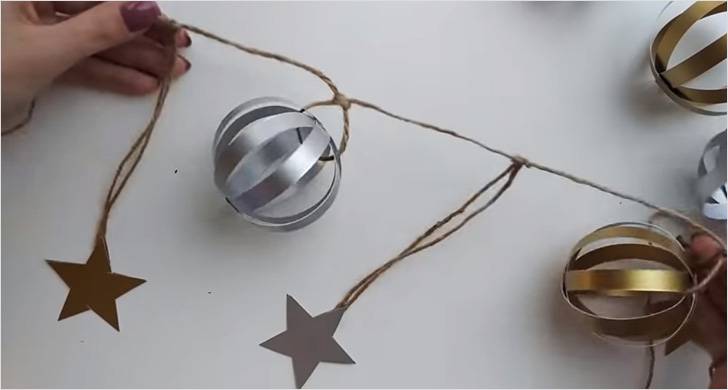 |
When the adhesive will dry, remove the clothespins and you can collect the garland. |
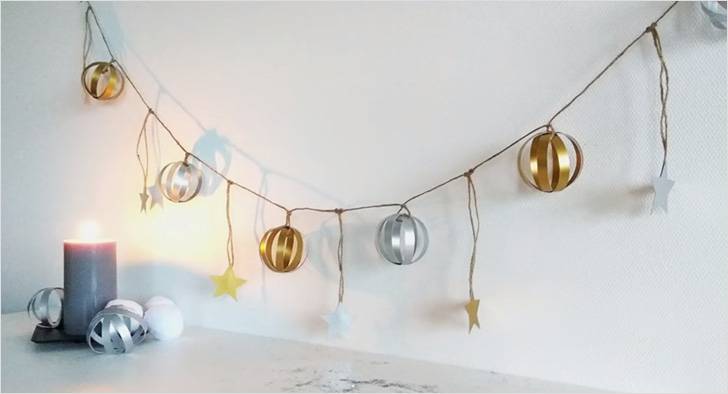 |
Decorate the garland wall or hang it under the ceiling. |
For the manufacture of garlands "Boots" you will need: scissors, hole punch, colored paper, ribbon, pencil or pen, boot pattern.
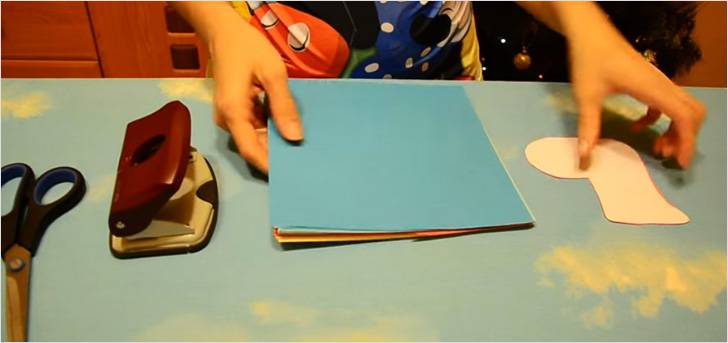 |
The pattern is easy to draw yourself. |
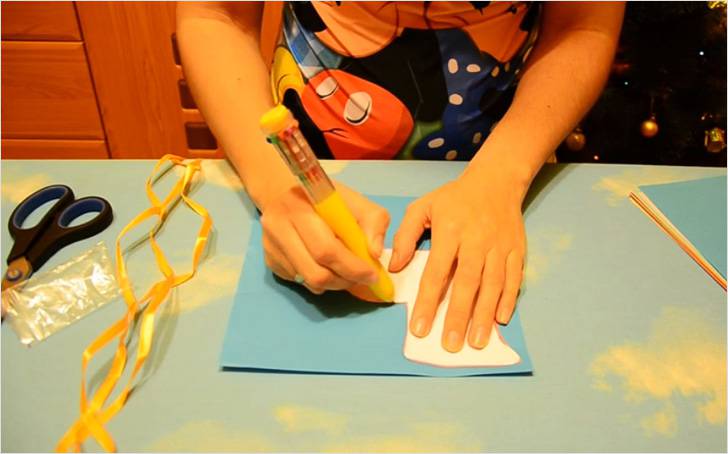 |
We take a pattern and get it on colored paper. |
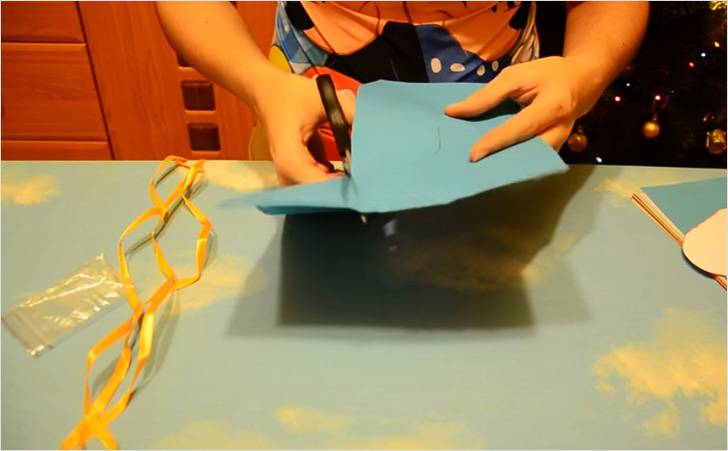 |
Circled boots cut out. We make the right amount of boots of different colors. |
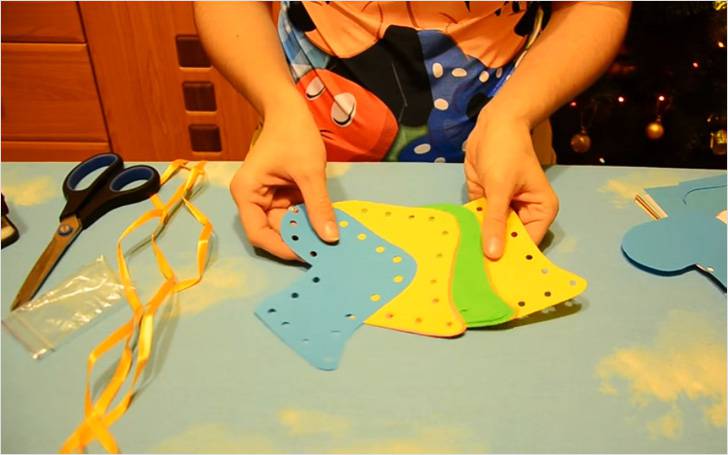 |
Then the hole punch the entire boot hole in the circle. |
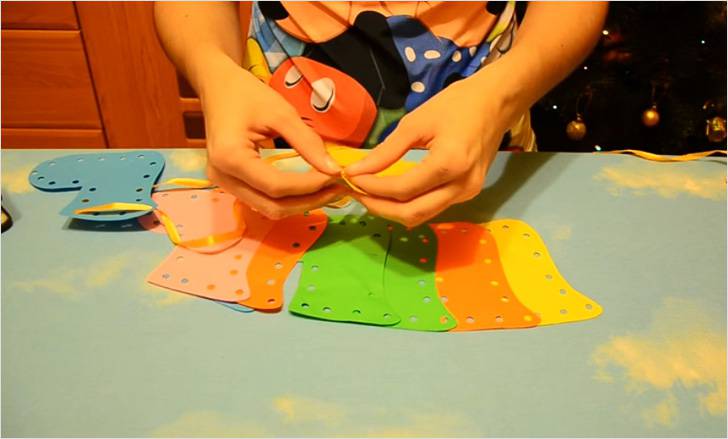 |
Take the ribbon on the top edge of the boots. |
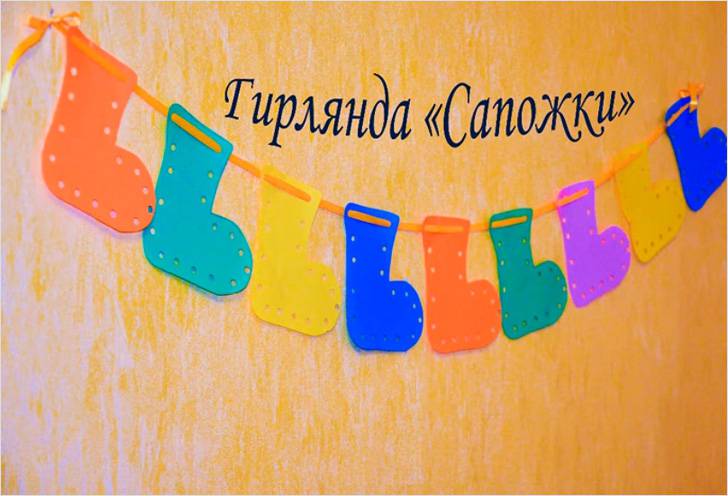 |
Let the garland. |
About the manufacture of two more garlands described below.
Video: Garland in the style of scrapbooking
Video: garland brushes
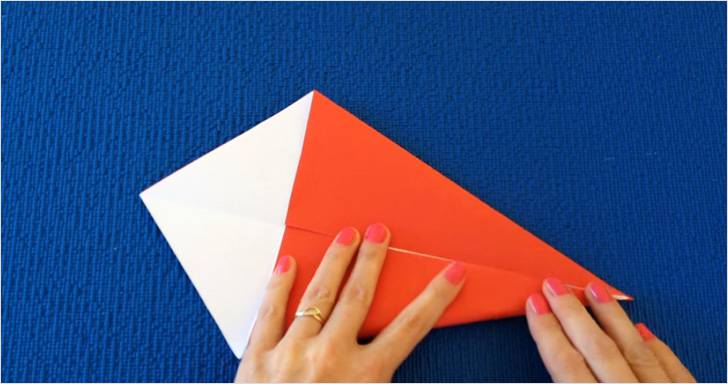
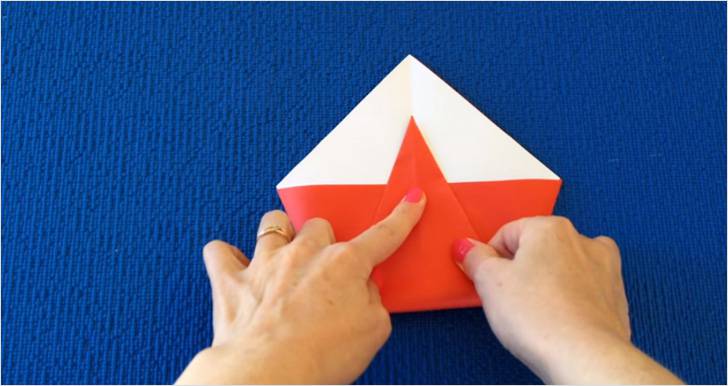
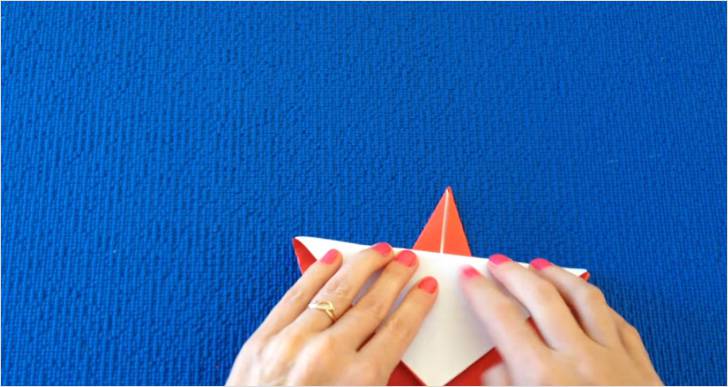
But such garlands are far from the limit of dreams. What if you make a garland from santa frost? Origami. Do not doubt, even if you have never folded Origami, you will succeed, because below you will find step-by-step instructions.
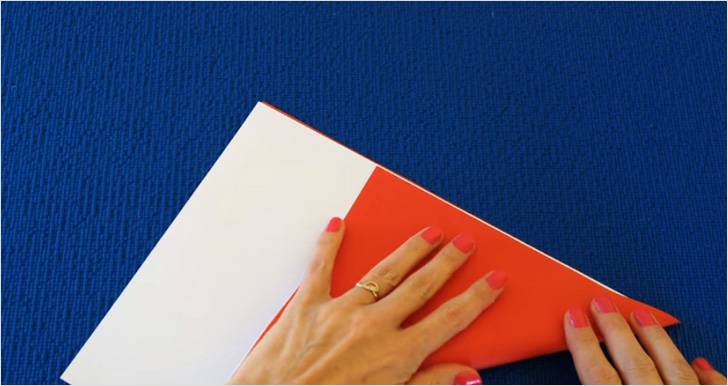 |
Connect together two sheets of paper: red and white. Fold diagonally. |
 |
Imprint cut. |
 |
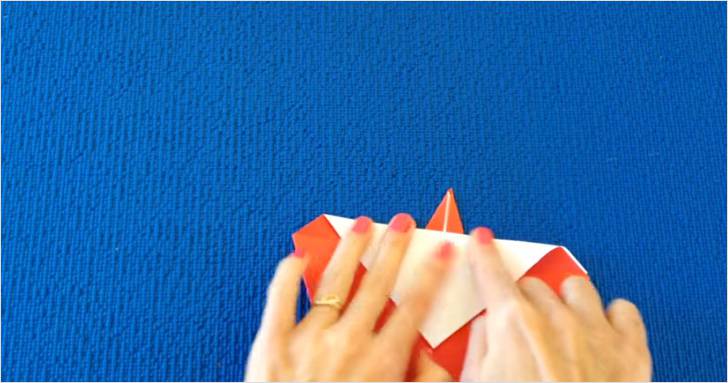
Expand the detail, the diagonal fold line was formed. Put the sheet so that the line is pointing to you, and bend the side corners to the middle. |
 |
Red corner bend up. The top of the red corner should have about the middle of the white triangle. |
 |
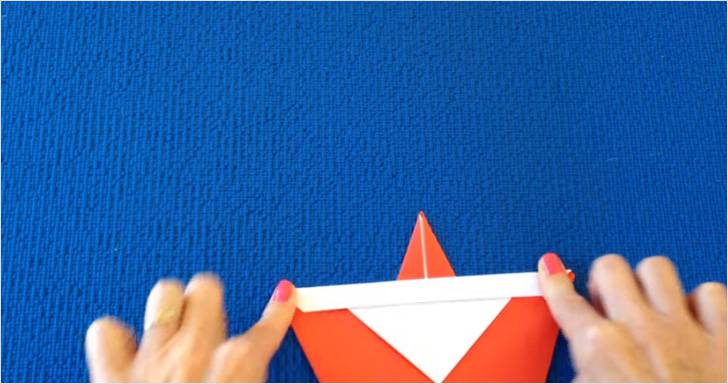
Billet turn over to the other side. Bend down the top angle, the fold must pass along the widest place, from the angle to the corner. |
 |
Then deploy the bend and retreating a bit, make a smaller size. |
 |
Make another odd shout down the previous fold. |
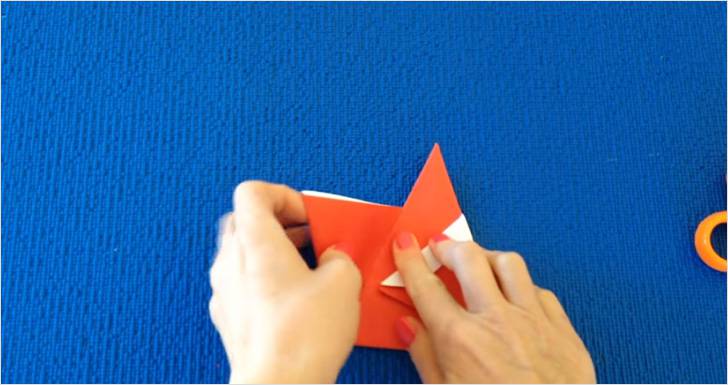 |
Turn over the workpiece. Side sides, bend on the edges of the triangle, which in the middle. |
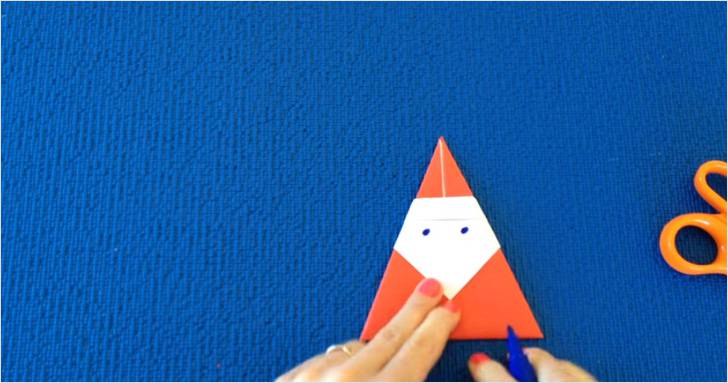 |
Turn the origami again again. Draw your eyes. So that the workpiece does not unfold, put the "wings" one to another or stick to the scotch. |
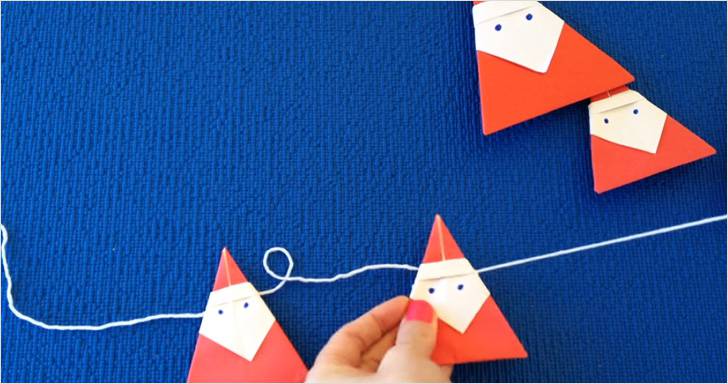 |
Slide the figures on the thread. |
Children will be delighted if you are in their eyes to turn the usual sheet of paper in the garland, as stated with a slight movement of the hand. This requires several sheets of paper, scissors and glue to connect separate parts into a long strip.
 |
Fold a sheet of colored paper in half along. |
 |
Then - once again in half. |
 |
Make long cuts along the entire edge. Turn over the workpiece with the other side and make similar cuts between the previous ones. |
 |
Carefully expand. Spread individual blanks with each other. |
 |
Stretch. |
According to such a principle, another version of the garlands is made, which can be glued in the form of flashlights.
Video: Stretching garland
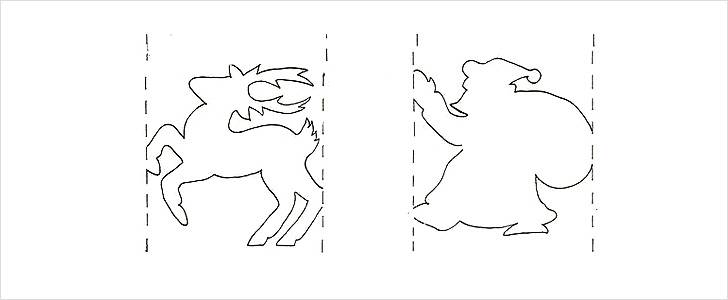
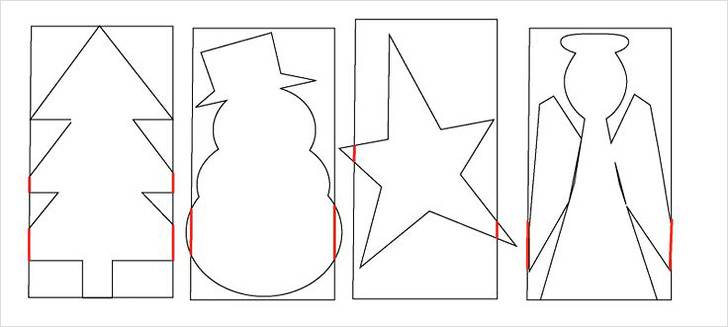
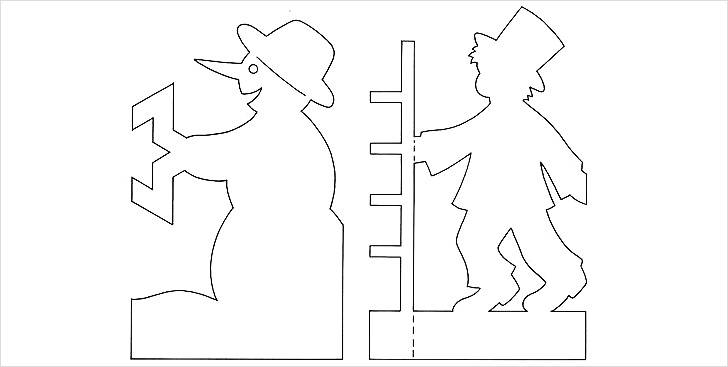
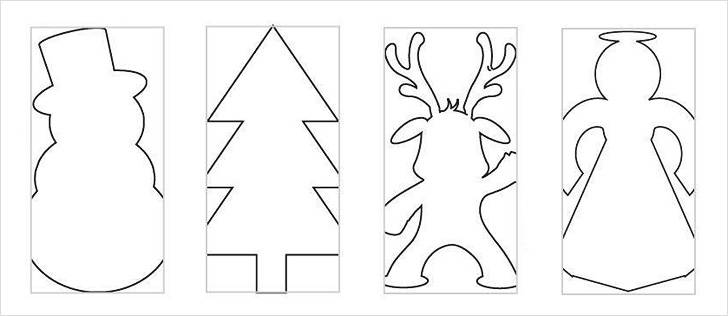
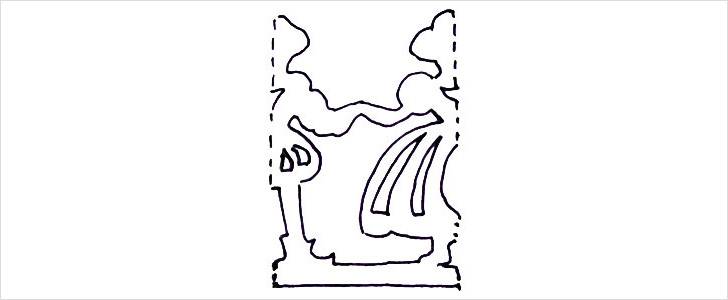
A very simple way to manufacture garlands, with which you can introduce children, the following: The sheet of paper is folded in half along and then the harmonica. From above on a pattern or from hand draws any silhouette. It is cut. The harmonica is stretched, and it turns out the garland from repetitive silhouettes of snowmen, deer, birds. How to make such a decoration, Read more in the video.
Video: Garland Accordion
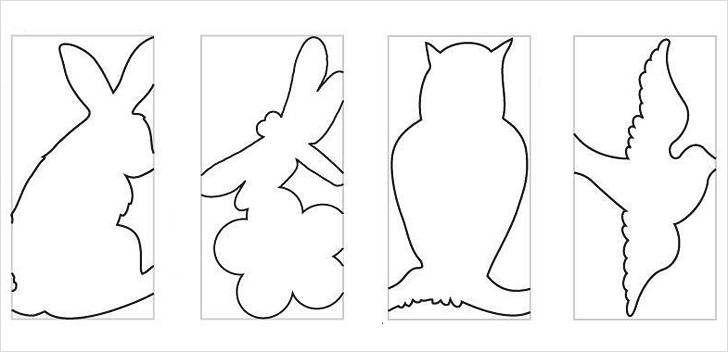
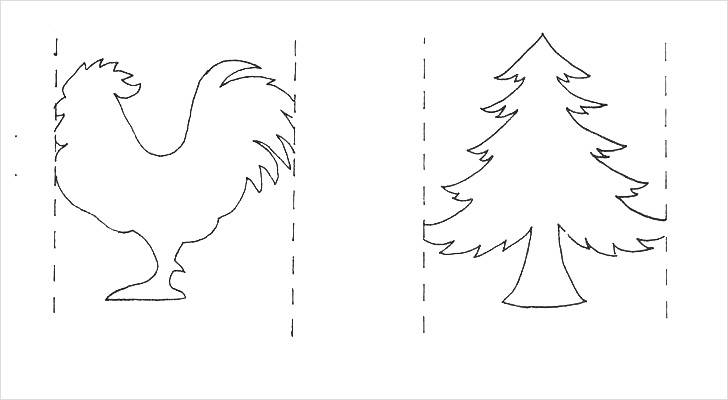
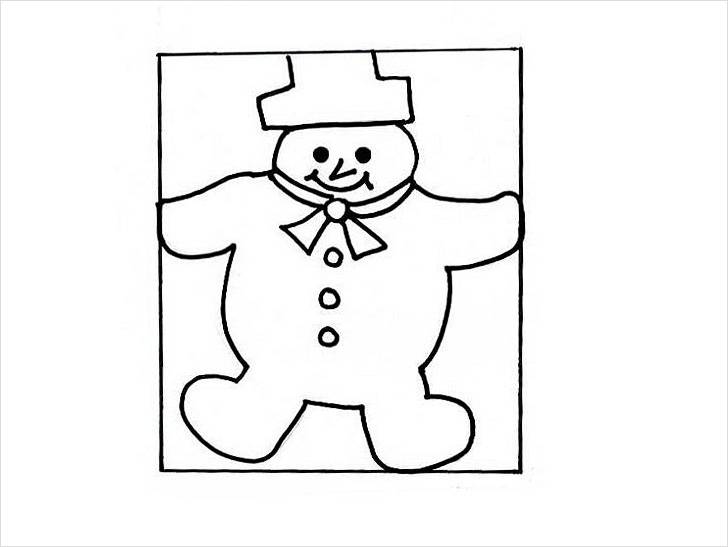
We place different templates here with the help of which you can make the garland on this principle.
![]()
There are still very entertaining schemes paper garlands. For example, such.
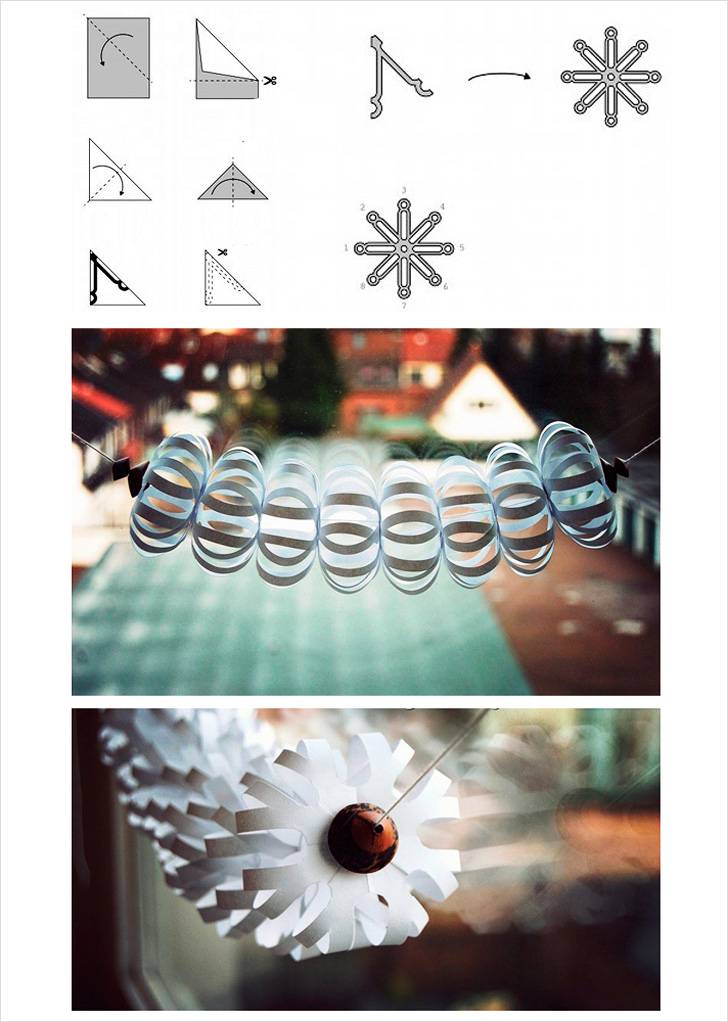
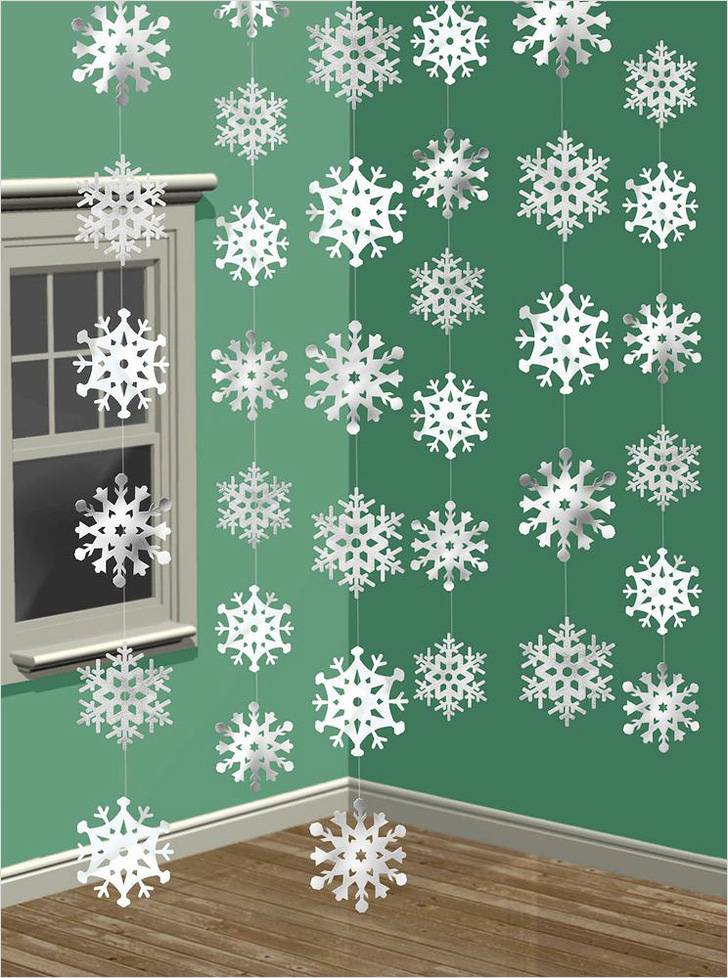
As you can see, it is necessary to cut a kind of snowflakes from a sheet of paper. When assembling the garlands, the threads are made through the middle of the details, and then all the rays are collected on it. By the way, the garlands of snowflakes are very popular, and this is not the only option. It turns out very beautiful if cutting a lot of small carved snowflakes and glue them together as shown in the photo, and then ride on the thread.
![]()
This is a garland intended for hanging in a horizontal direction. But you can place the threads vertically, collecting large or small snowflakes on them in such a way that their carved drawing is clearly visible.
Look a few more ideas. Maybe something you like more.
![]()
Electric himself
Now you can easily buy a LED garland. But just how long will it work? For craftsmen there is an option - collect electric garland Alone. Purchase LEDs. They can be sold already with wires or separately.
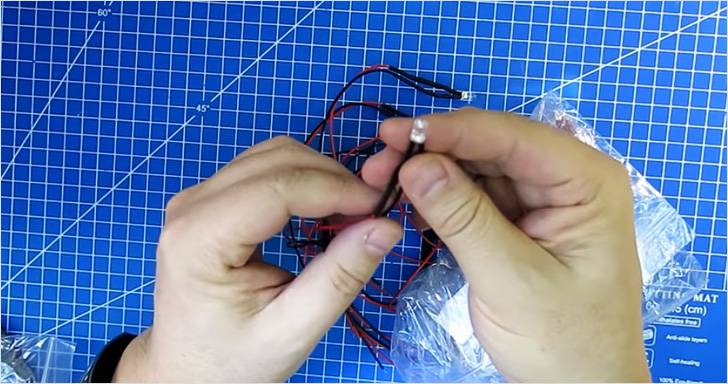 |
If the LED is sold with the wires, it turns onto the color LED, under the heat shrinking inside there is a current-limiting resistor. 40 LEDs are enough to make the garland. |
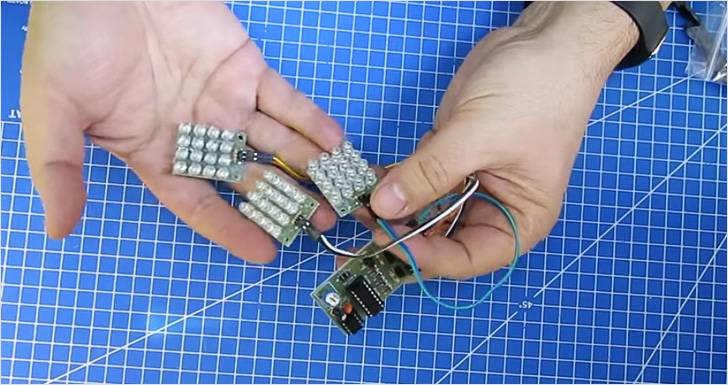 |
We need a driver. You can order this design. Food is served on the driver, and instead of cards with lamps we will make three garland branches. |
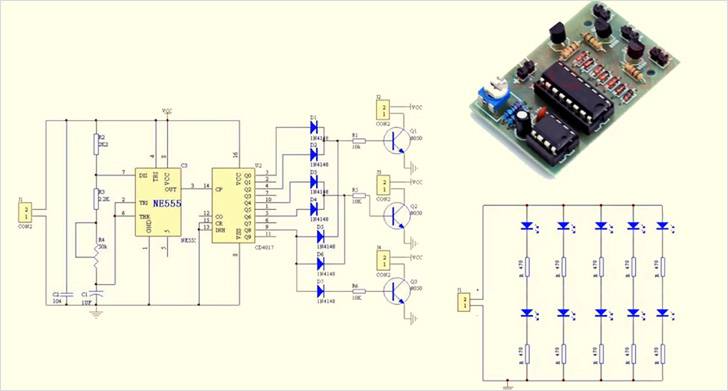 |
Here is the electrical scheme. |
 |
It is necessary to discharge the LEDs among themselves and make it so that there are three channels. Two lamps combine very simple. Spread plus with a minus, the location of the connection to close the heat shrink. It happens that the wires to the LEDs are not soldered, but fastened. In this case, the reliability of the design does not matter. We will have to get enough. |
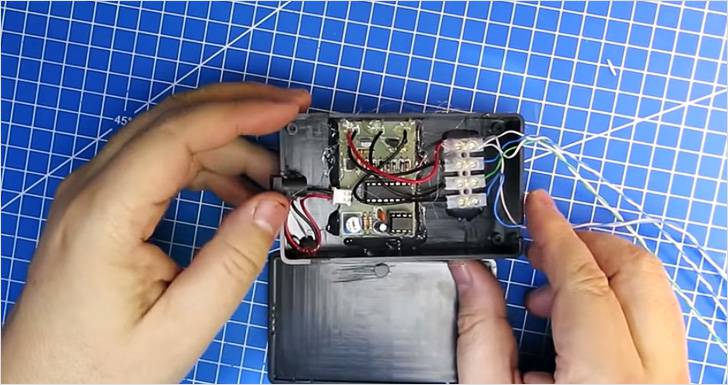 |
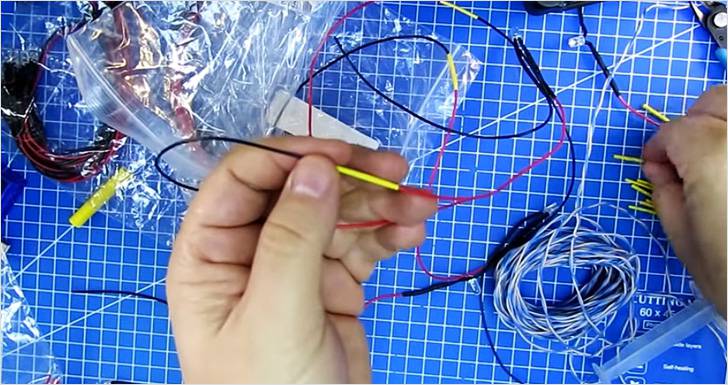
To give Garlands a noble view, purchase a plastic case in the online store - it is inexpensive, stick inside the driver inside. All wires are closed with a lid. |
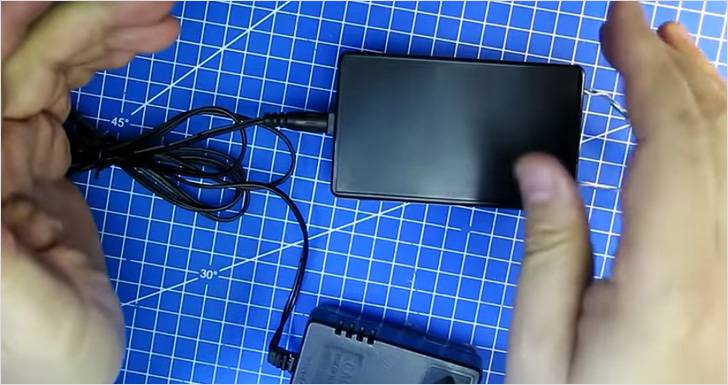 |
You can connect the garland to electricity through the power supply 12V from the old equipment. |
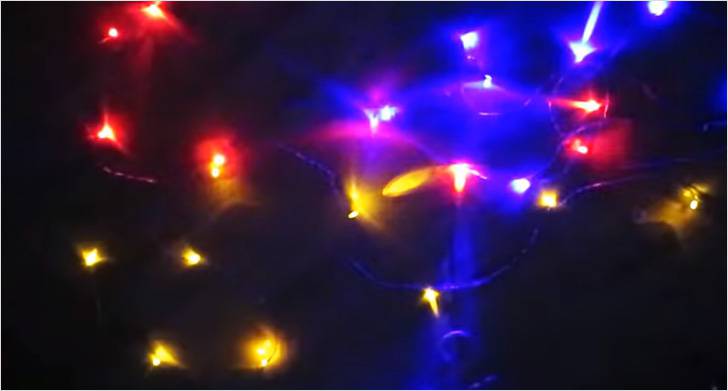 |
Garland works. |
If the LED garland is now sold everywhere, then garlands from ordinary incandescent lamps are now acquiring problematic, but they can be made independently. They greatly transmit the spirit of time and suitable for the organization of the New Year's party in retro style.
Video: Retro light bulb garland
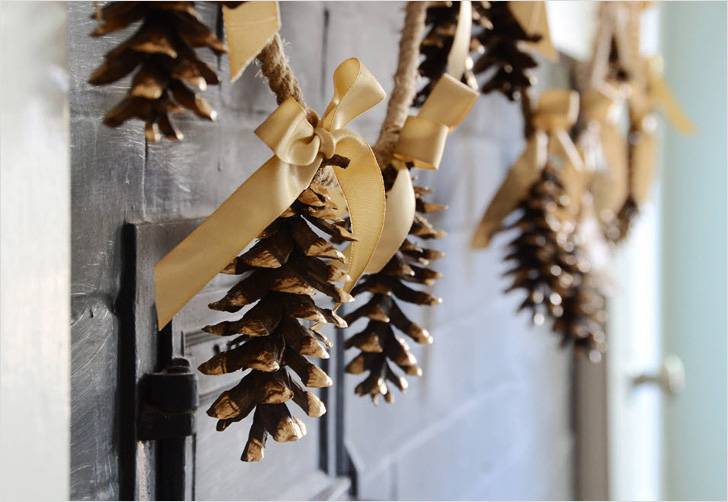
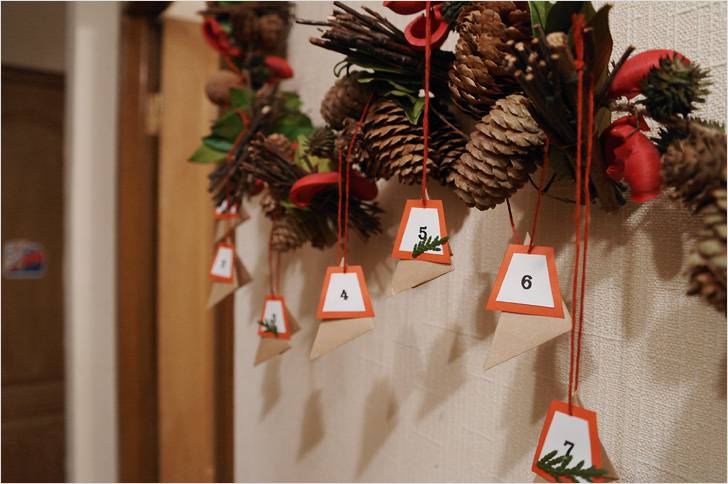
Cones and other natural materials
Many options for garlands of cones. The bumps must be prepared - wash and dry. Additionally use:
- lace;
- beads;
- braid;
- twine;
- tapes;
- branches;
- cinnamon sticks or stars carnations;
- dried citrus circles.
From the tools, a thermopystole or the glue type of crystal type is usually appreciated. The easiest cones can simply collect on a rich thread, pre-tightening the white paint depicting snow, or colored paints. As a dye apply gouache, water-emulsion, acrylic paints.
Video: how to paint bumps
Of the already prepared, painted cones collect beautiful garlands. Basic manipulations for the manufacture of garlands from cones are presented below.
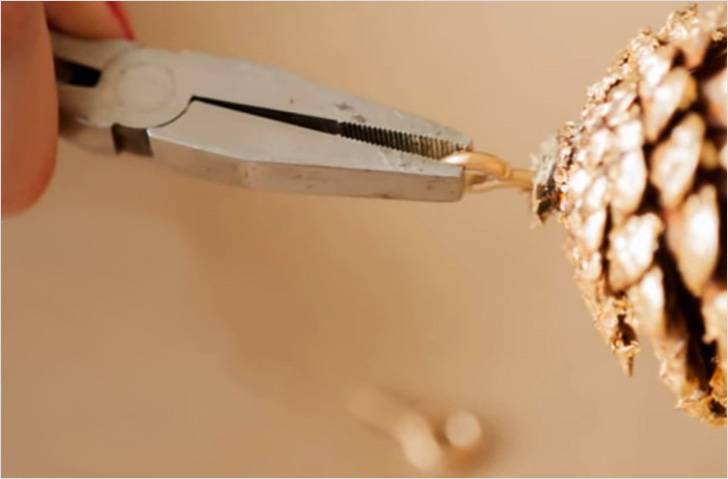 |
To bind cones on the rope, you need to screw the screw with a crochet into the conex. The screw can be pre-painted paint from the canopy in the desired color. |
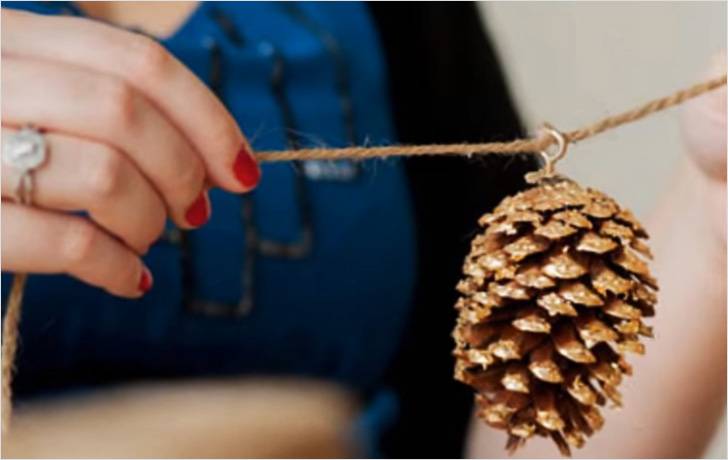 |
When all the bumps are already with hooks, cut the piece of the twine of such a length, what is the garland. Wean one bump. It is advisable to put it in the center. After that, we tie the knot to keep the bump. |
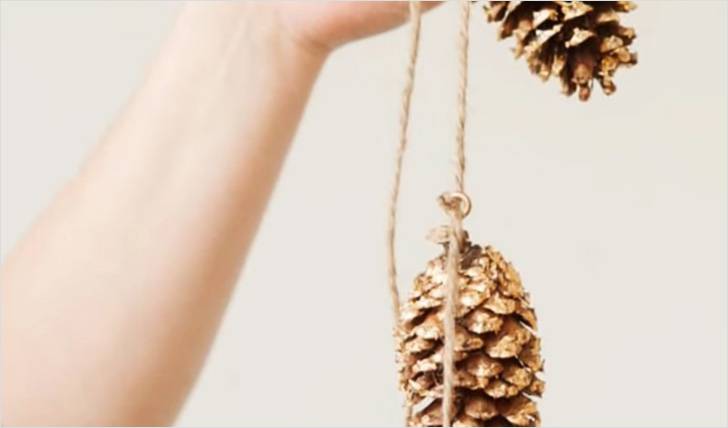 |
At the edges, add the required amount of cones. Do not forget to fix each of them with a node. |
And there you can already act at your own discretion, to strive the cones tightly, place another decor between them, decorate their bows. Cones, by the way, complement paper garlands, from the balls. For your inspiration, we place several photos of interesting design ideas.
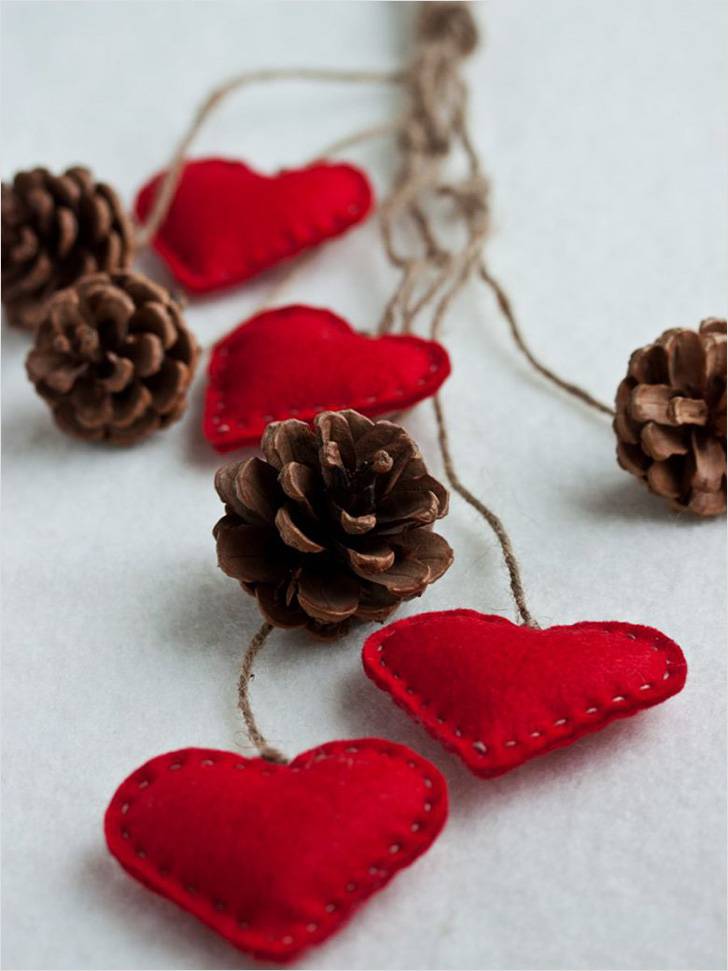
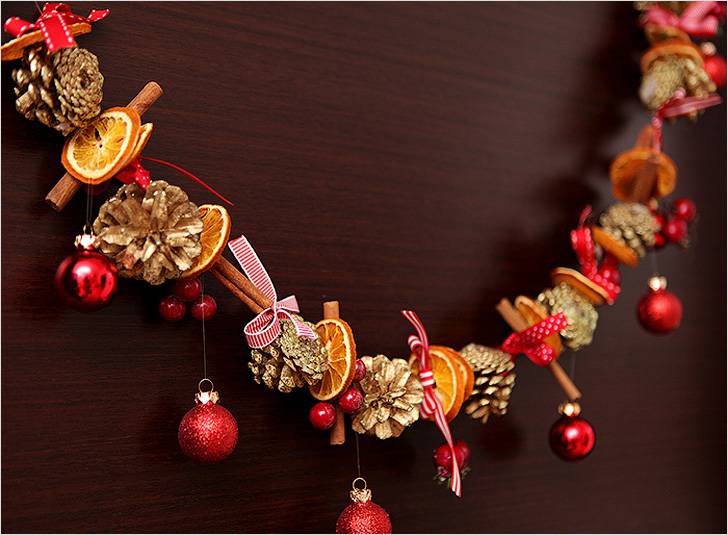

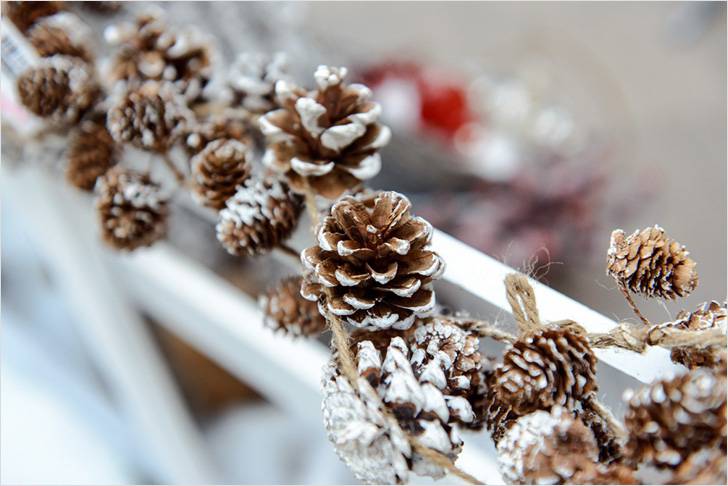
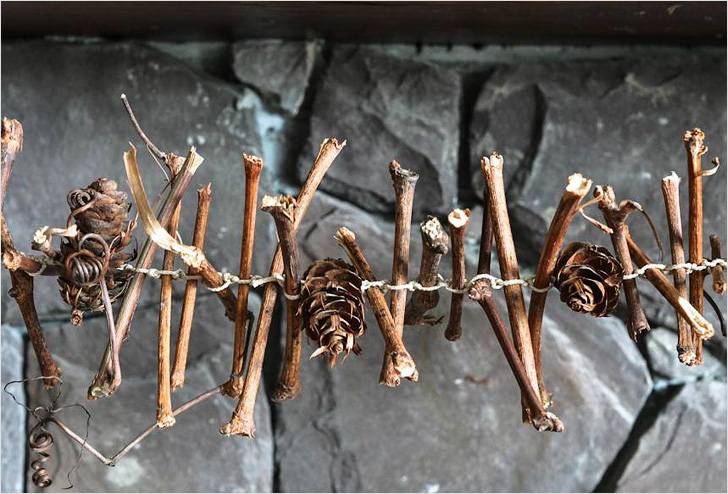
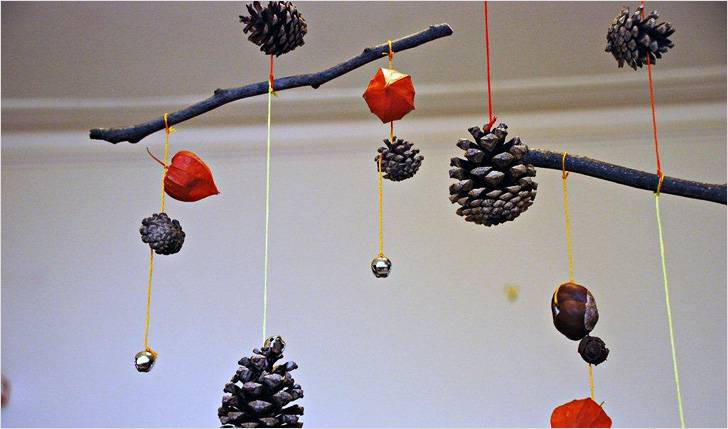
As you can see, garlands from cones are decorative, and some products are also distinguished by originality. There are even garlands from the branches of deciduous trees that are intertwined by the thread along with the bumps.
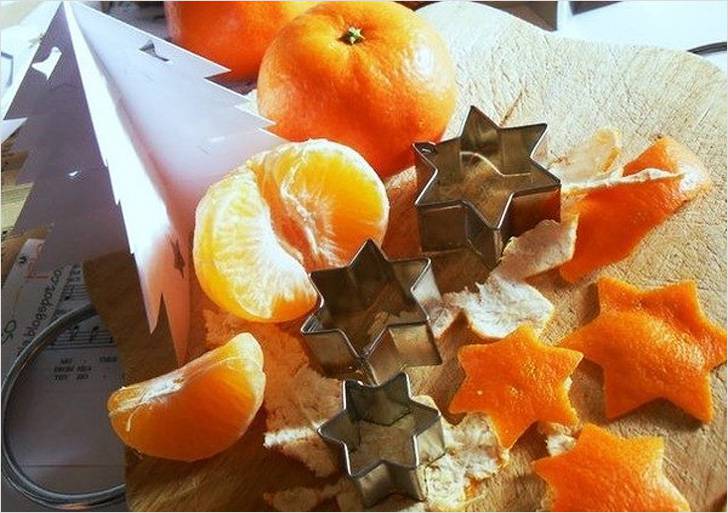
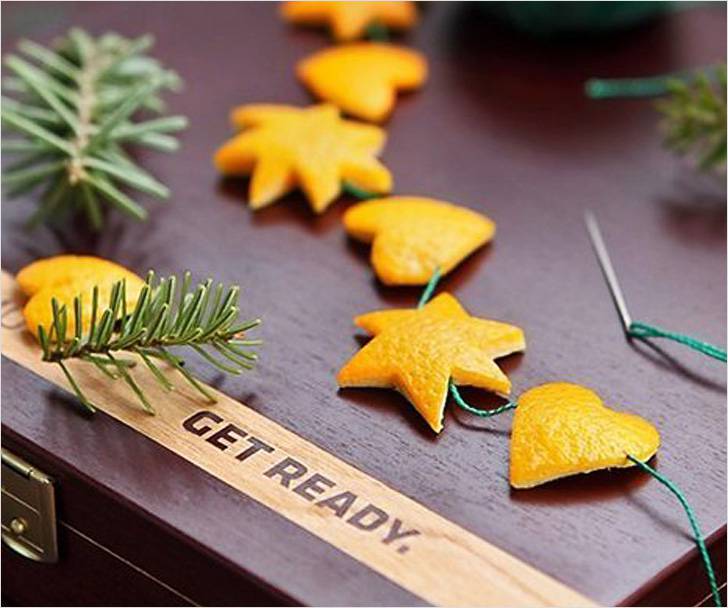
Without the smell of Mandarins, the new year loses the tolik of magic and a special charm. Corks from kilograms of tangerines eaten on the eve of the holiday can go for a good cause - the manufacture of garlands. And it will turn out not simple, and figure. Cut stars, hearts or other figures will help metal forms for cookies.
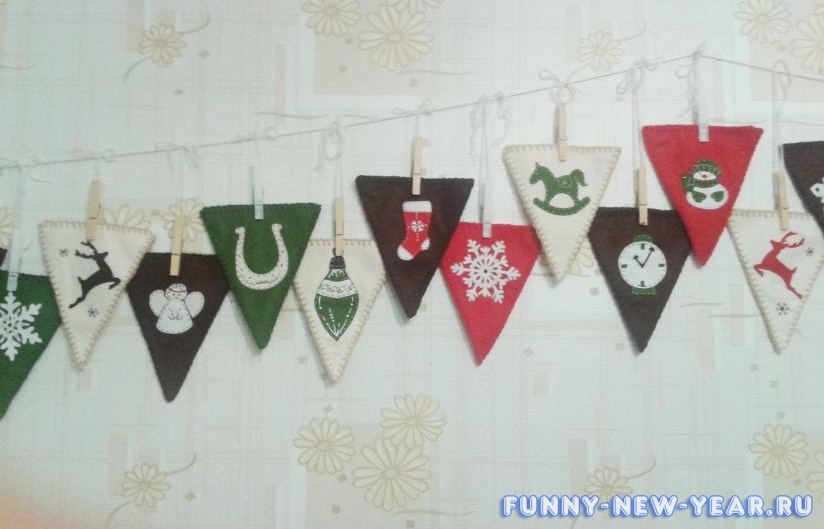
Crafts from felt: interesting ideas
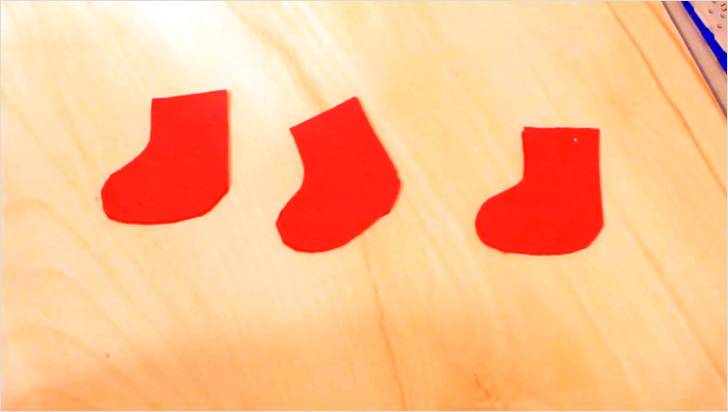
Felt is often used for the manufacture of toys and decor, especially Christmas decorations. Let's try to make New Year's garlands in the usual technique for this material.
It will take:
- green, red, brown (white) felt;
- knitting threads of red or tape;
- ordinary red threads;
- needle;
- scissors;
- suspension of New Year's subject;
- sintepon.
| We fold the red felt in half. Draw on it red stockings. | |
 |
Cut the blanks of two at once. |
 |
From brown or white felt, cut out thin stripes. |
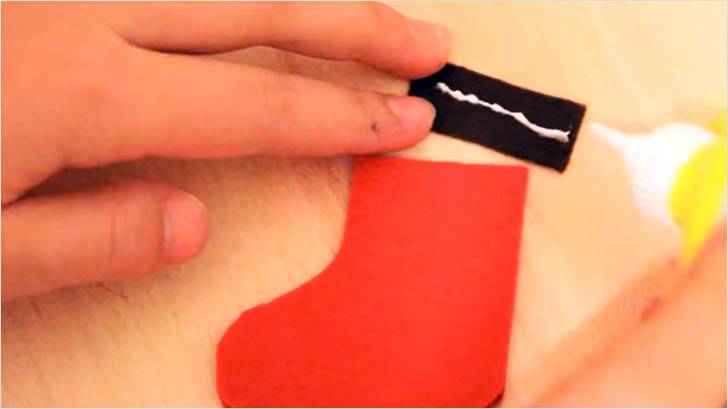 |
We are all the billets are also folded two together. We glue the strips of brown (white) felt with the help of PVA glue to stockings. We repeat the same operation on the reverse side. |
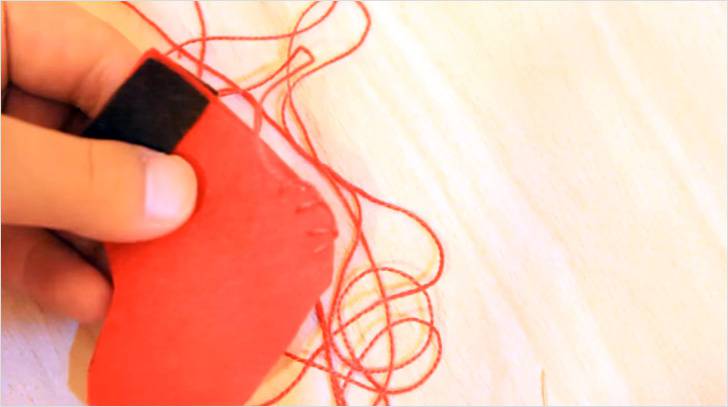 |
We flash the edge of the loop seam. The top is not sewn. |
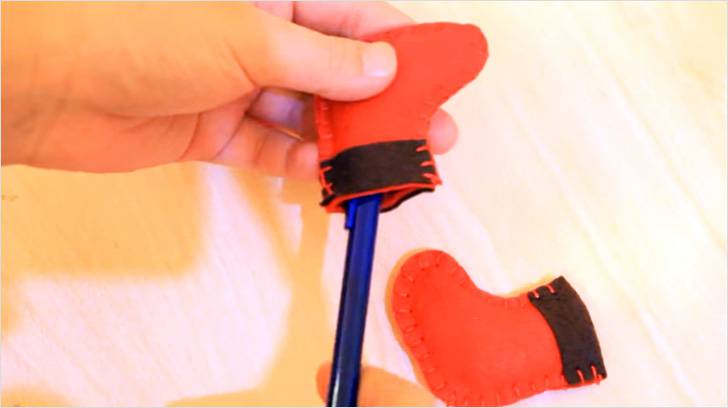 |
Through the hole left the bulls with Sinypruna. We use some filler. If the synthepson is not pushing inside, use a pencil or handle as a tool. |
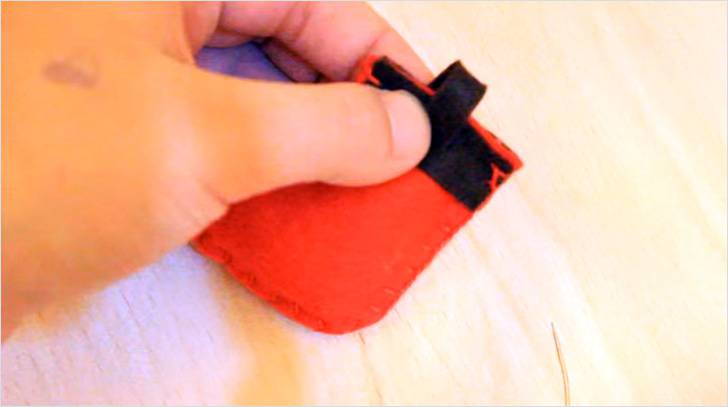 |
Send the loop from felt. |
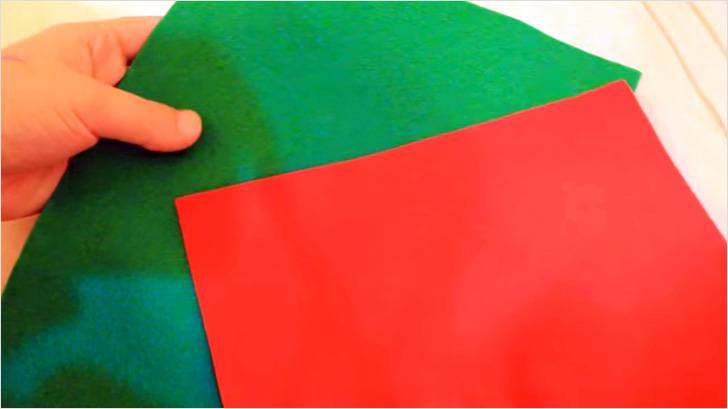 |
Gifts make a red and green felt. |
| From the green felt, cut the double squares, from the red - bows and stripes. | |
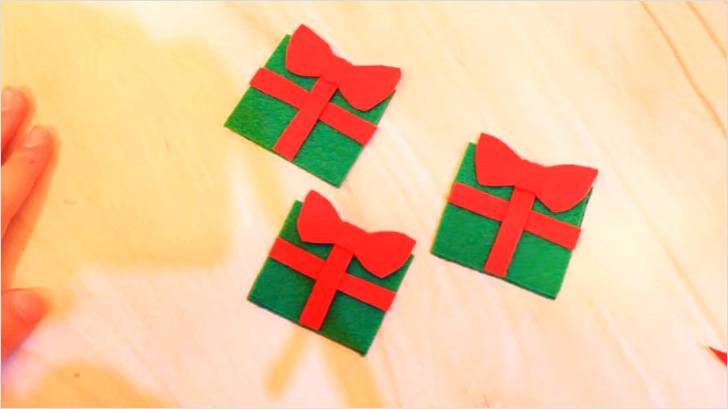 |
We glue the red decor with plow glue here in this form. |
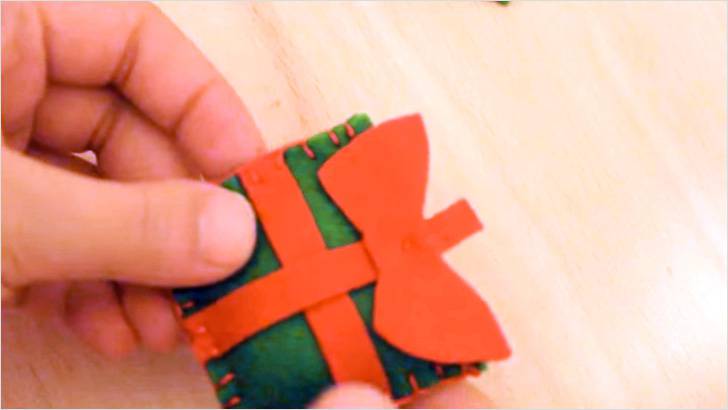 |
We flash the gifts with looped seam, leaving the hole at the top, and stitch the syntheps, like stockings. We make a peel from a red felt. |
 |
We ride everything on knitting thread or tape. |
 |
The suspension can be made of polymer clay. |
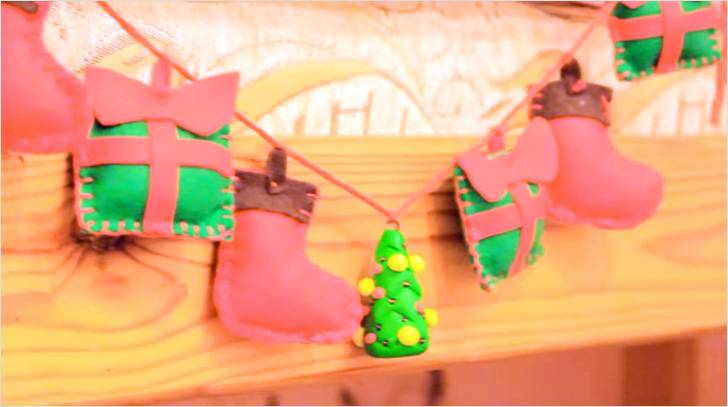 |
In general, it is necessary in order to grab the middle of the garlands and give it a form at a time when she hangs. |
Where to give pruning fabric
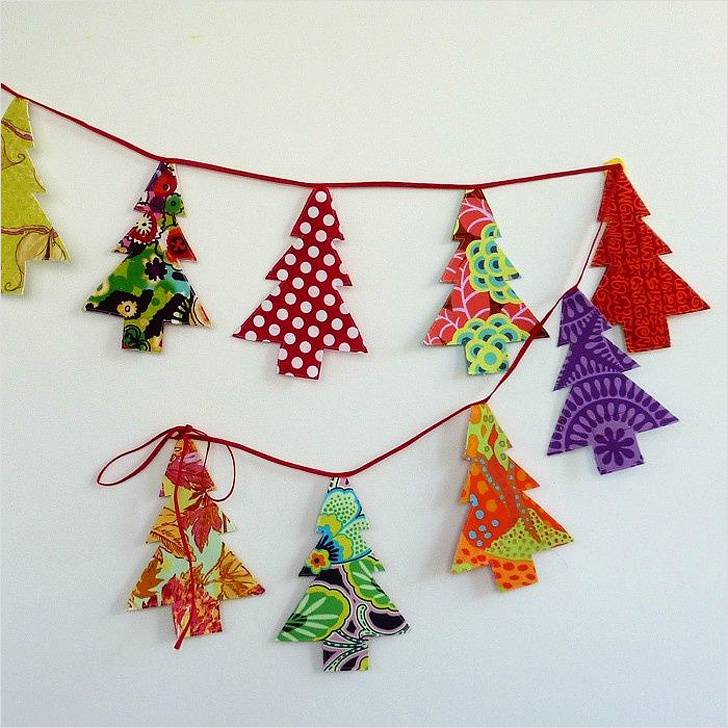
We have already considered a lot of ideas, but we should not forget about another material - ordinary tissue. Under the New Year, it is customary to get rid of old and unnecessary things, freeing the cabinet from clothing, which has suffered in it all year after a dead cargo. She can go to the patchwork for bright christmas tree garland. Paint from it flags, christmas, asterisks. Percehable like this or stuff the filler. The more diverse the color will be, the better.

Unusual garlands
And finally, a few words about unusual garland. These ideas are hardly the first to come to mind, since the approach to their manufacture was used non-standard.
First, it is garlands of lace. In one case, as in one of the previous ideas, forms for cookies are used. They are wrapped with PVA glue, the lace is glued on them, which is removed after drying and acquires the shape of the heart. It remains only to ride them on the thread.

In another version, the lace knit, and more accurately knit lace snowflakes, which also look great in the form of garlands.
The third option is a garland of cocktail tubes.
Video: Production of garlands from the tubes
Perhaps this is not all ideas, but, at least presented materials, it is enough to prepare an apartment and Christmas tree to the new year's offensive.
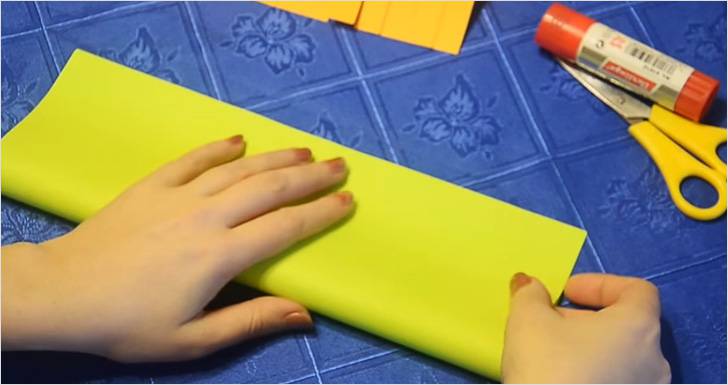
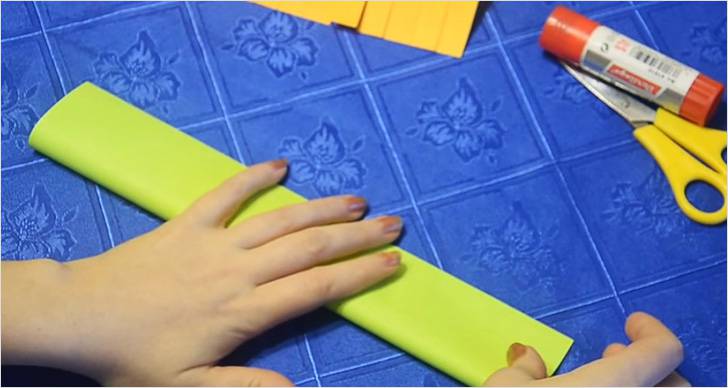
New Year's garlands is the most common way to decorate a house or apartment for the holiday. This decoration can be bought almost in any store, but it will be more interesting if you make it yourself. This process will enjoy all family members, and the main outcome will be the original garland for the new year 2017, created with your own hands, for this you will fit the most simple materials: paper, fabric, glue, scissors, hole punch.
Paper chain
Paper chain is the simplest and most common New Year's garland. Her making can be even a small child.
For its manufacture, you will need:
- Colored paper;
- Glue;
- Scissors.
Progress:
- Colored paper cut into strips of the same length and width.
- From the strip to make a ring, copper with glue.
- Through the ring to go another strip of paper, another color. Create a ring.
- Thus, connect the rings, while alternating various colors. It turns out a beautiful paper chain.
Such an ornament will be an excellent decoration in the New Year holidays.
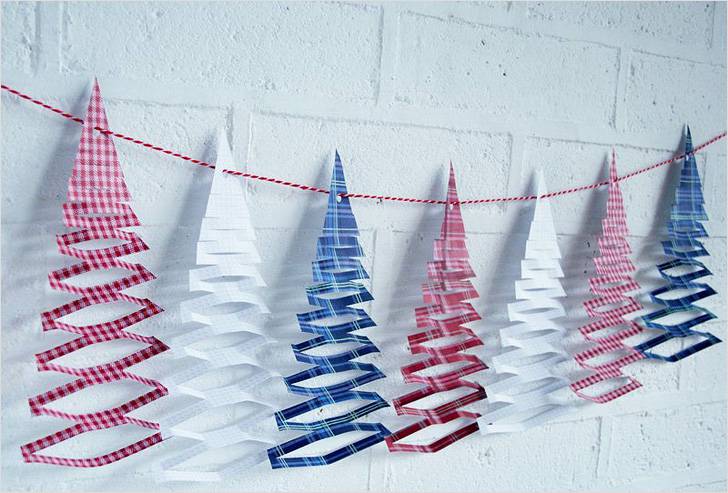
New Year Garland of Paper
This garland is attached to the ceiling and just hangs down. It looks very interesting in the form of room decoration for the new year.

Option 1. It is necessary to prepare:
- Colored paper;
- Scissors;
- Glue.
Progress:
- Cut the colored paper on the strip with a width of 5-7cm. Everyone must be the same.
- Make equal cuts on stripes after 1 cm., Alternating from different sides.
- The edges of the obtained bands glue each other to the required length.
- Hang the garland made with your own hands under the ceiling.
Option 2. To work on the garland you will need:
- Colored paper;
- Scissors.
Cut the circle from paper and gradually cut it with a spiral until the middle. The thickness of the helix can be made approximately 1-1.5 cm. Garland is hanging on the ceiling. On the free end of the garland can be glued with a paper snowman or a Christmas tree.
New Year's garland from bulk snowflakes

To create garlands from bulk snowflakes need to be taken:
- Paper A4 (color or white);
- Scissors;
- Stapler.
Progress:
- From paper cut equilateral square. Fold it into an anoscele triangle.
- Make cuts from a middle with a length of 1.5-2CM. Leaving from the opposite edge of approximately 1 cm.
- Expand a square. Corners of a small square resulting from cuts, copper with a stapler.
- Turn over and do the same with the next square in size. Thus, make all the corners, alternating side.
- The resulting petals can be copped among themselves in the middle and from the edge to get a snowflake.
- To combine snowflakes in the stapler at two points with each other, it turns out garland from bulk snowflakes.
Such a beautiful garland will become a luxurious Christmas decoration. It will ideally look at home or at work, and will also become an excellent decoration of the school office.
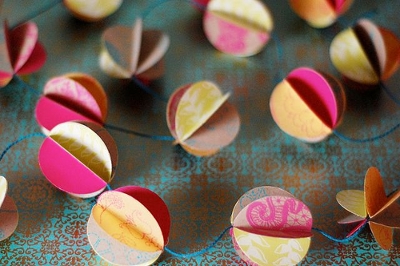
Paper Garland
Small and neat colored balls collected on the thread are a good New Year decoration. There are several options for creating such garlands. Below are the two most common.

Option 1. To create it will take:
- Scissors;
- Colored paper;
- Threads;
- Glue.
The most difficult in the manufacture of such garlands is your own hands is the creation of the balls themselves. In order not to spoil the sheets of colored paper can be accessed on the usual newspaper.
- Cut two blanks from colored paper. They consist of 2 tongues.
- Start a weaving of 4 tongues, while creating a ball shape.
- When the ball is completed, the tongs are fastened with glue. Extra trim.
- After it is ready enough to ride them on a thread.
- It turned out a multi-colored and original garland that will decorate the room or christmas tree.
Option 2. It is necessary to prepare:
- Color paper (preferably bright)
- Scissors;
- Glass;
- Pencil;
- Threads;
- Sewing machine.
Progress:
- On colored paper, rubbing a glass, draw circles (future elements of the garland);
- Clean cut.
- You can take 6 circles and more than one ball. Fold in color combinationthat is more like.
- On the sewing machine, in the middle of the circle to see a stack. At the end of the circle, without interrupting the line, continue stitching the elements.
- Upon completion, each circle is folded in half. There will be many bulk balls firmly bound by thread.
Beautiful garland is ready. It can safely decorate the classroom, an apartment or a group in kindergarten.
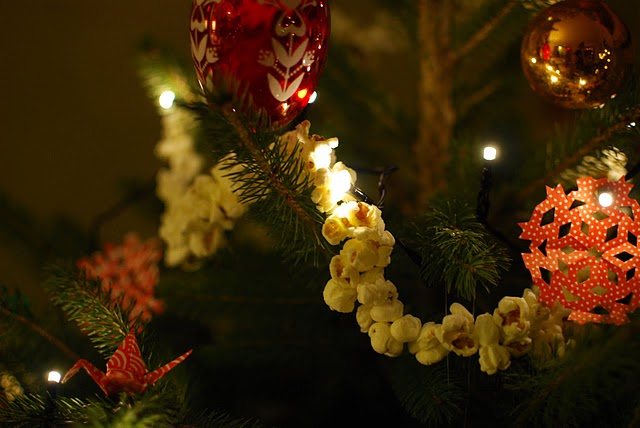
Garland from popcorn and cranberries will look original on the Christmas tree and will be a great New Year decoration. And most importantly, the creation of such a garland always carries joy and fun.
To create it, you will need:
- Popcorn;
- Cranberry;
- A thread;
- Needle.
Popcorn and Cranberry, alternating, as you wish, with the help of a needle to put on a thread. Gyrlynd is ready. But it is necessary to remember that the popcorn is better to prepare more than necessary, since part is eaten in the process of making decoration.

To create a mishura garland from the candy with their own hands, you will need:
- Phaliki;
- Scissors;
- Thread;
- Needle.
Progress:
- It should be started with the fact that from the candy cut the same rectangles. Sizes can be selected any, for example 3x5 or 2x4. It depends on the available candy.
- A rectangle twist into the tube and, with the help of a needle, through its middle to skip the thread.
- The same to do with the rest of the rectangles.
- After putting all the elements on the thread, it turned out beautiful tinsel for the New Year tree.
![]()
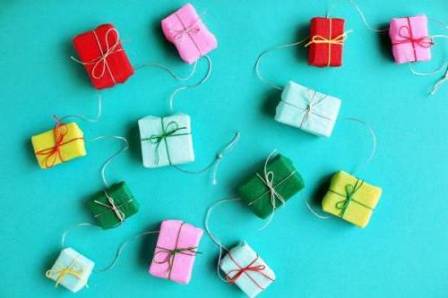
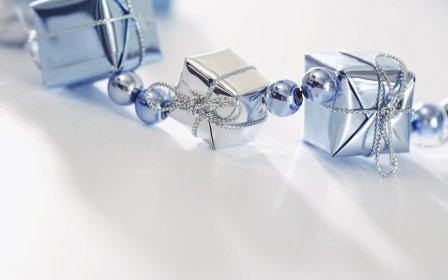
It will look original on the Christmas tree garland from gifts. To create it, you must prepare:
- Scissors;
- Match boxes;
- Thread or cord;
- Termoklay;
- Colored paper, wraps from candy, motley magazine pages;
- Narrow scotch;
- Needle with a wide ear;
- Beads;
- Thin ribbons or multicolored thick threads.
Progress:
- It is necessary to wrap every boxes in paper, and thereby create small gifts. Before using candies from candies, they should be smoothed through a paper sheet with an iron. Fixing faint bails better than a narrow scotch. Paper wrap clip off with hot glue.
- For gifts to have a finished look, they should be tied with ribbons or multi-colored threads. On the upper side of the gift, fasten the thread bows.
- Measure the desired stretch of the thread. At one end to tie a node.
- Using the needle, ride each box on the thread. Between the Gifts, you can tie a nodule or use various beads.
- Unusual garland with their own hands ready. It can be decorated with a Christmas tree or window. It will also look great along the wall or over the fireplace.

For lovers, cut snowflakes to the new 2017, a great idea will be garland of them made by their own hands. To create such a decoration you will need.
New Year holidays amazing time, because every year he is looking forward to both adults and children. That fairy tale, which is brought to our new year, does not give any other holiday. Still being children, in anticipation winter holidays We have done great pleasure. And that it interferes now to feel like a child and make a New Year's garland with their own hands, and even better - to introduce their children to this passion. After all, the pleasure that it will deliver your family will make holidays more fun and unforgettable.
For such jewelry, you will need the most affordable materials:
- paper;
- glue;
- scissors;
- the cloth;
- needle with thread.
We offer to make such materials very beautiful garland For the new 2017, but you have some interesting photo ideas.


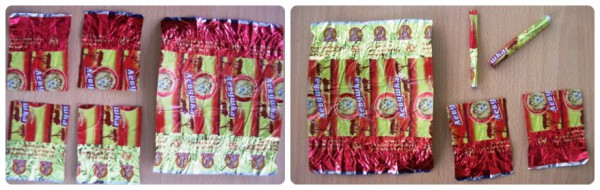
Garland from candy candy
For this garland you will need wrapper from sweets, a lot of diverse candy. Cut each phantine into several parts. Then roll out of these pieces of the tube, holding them so that they do not unfold. Tubes stripe on a solid thread with a needle. At the ends of the garlands, make knots so as not to score a candy. In the end, it will only be to shake the product, deploying candy in different directions, and Gyrlynd is ready.
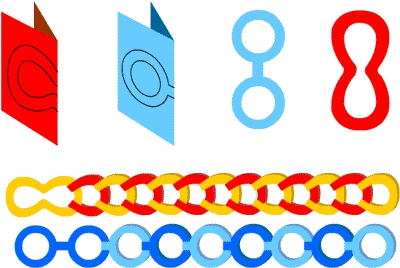
For such a decoration for the new year 2017, the most common colored paper will be required. You need to cut the sheets on the strips of the same length and width. After that, you need to take one strip, the ends are made with glue. Get the ring. Next, you need to take the next strip, to push into the plated ring and also the ends also connect glue. Strips must be glued in this way until the product is obtained for the necessary length. If you want to make such a decoration a little unusual, put one ring into another perpendicular.
Openwork New Year's garland
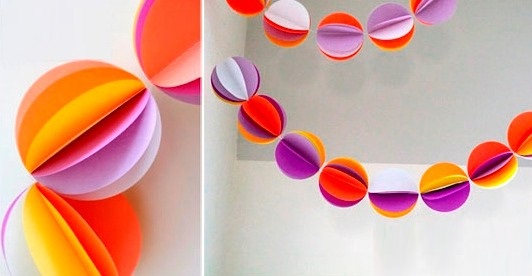
You need to take a regular sheet of colored paper and cut several circles from it. Fold every workpiece in half, then once again twice and again in half. It turns out a triangle. It needs 8 notches. Pencil mark the lines so that they alternate. The first strip should be on the left side, the second - with the right, and so on. For these marks you need to make cuts. After that, triangles need to be deployed. Lower strips, in places of bend, lubricate with glue and combine with another workpiece. Pull the resulting figurine for the middle. As a result, a beautiful openwork ball should be turned out. Make such balls need several pieces. Connect them between themselves with the middle of the Long Garland. Beautiful, Openwork New Year's decoration is ready!
Video instructions - how to make a beautiful garland with your own hands:
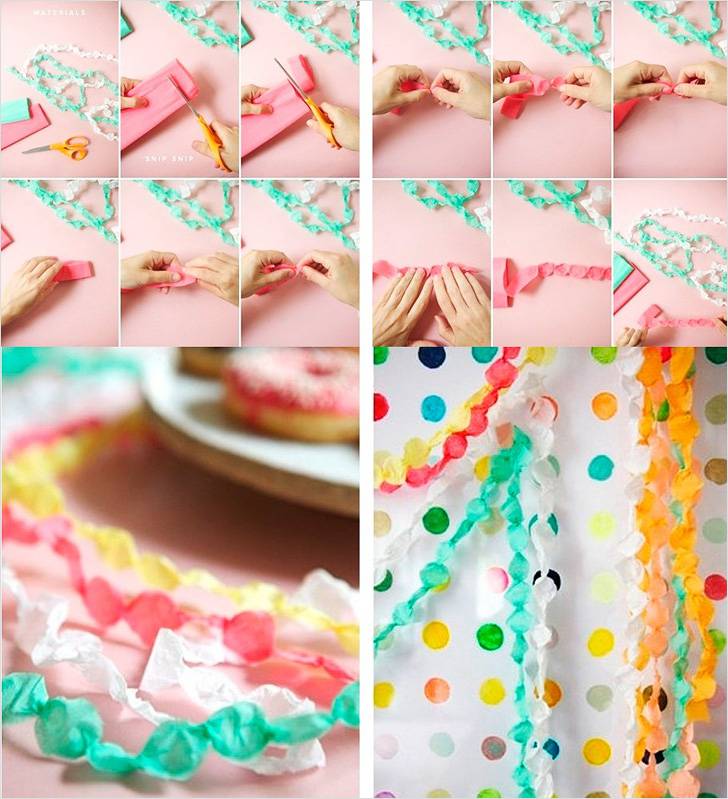
For such an ornament, you need to take sheets of thick colored paper and cut any figures. No need to cut too big blanks. The number of figures must correspond to the length of the future decoration. Such blanks can be decorated with sparkles, cotton, beads. For her you will need a braid. Spread it on a flat surface. From above, put the carved figures, strengthen them with pins and push on the sewing machine. If you do not own such an aggregate, you can sew the blanks to the braid manually. It will work out beautiful and fluffy if you make it from papyrus paper. Make fluffy balls from thin sheet, connect them, and decorate the New Year's Mishur.
If you have unnecessary postcards, you can make a very bright decoration for the new year 2017. Cut from them two identical blanks. Glue them in pairs. To strip such figures on the thread, depending on what length you want to do. You can do all figures different. Then the product will be not only bright, but also original. From postcards or calendars, you can make bulk balls, ride them on a thread and hang in the house.

New Year's garland from balls
For such a decoration you will need colored paper and scissors. From paper sheet you need to cut several circles. All of them must be the same form and size. The minimum number of circles - 4 pieces. You can do more. Then the ball will turn out to be more voluminous and lush. Cut circles must be folded in half and glue their halves one to another. As a result, the ball will be. There are several such figures. They must be rolling on a decorative thread and decorate the apartment.
Corrugated paper garland
This is a very unusual and interesting decoration. For him you will need match boxes, corrugated paper and small gifts. In each matchbox, you must put some surprise. For example, candy, jewelry or note, where the place is shown with a gift. Wanted each box in corrugated paper, Take a decorative braid. Connect such gifts to beautiful, shiny thread and rave on the Christmas tree. This decoration very likes to children. Baby love unexpected surprises.
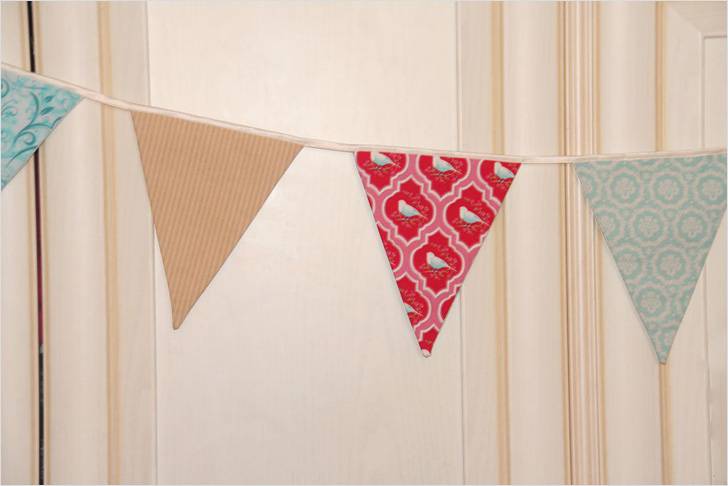
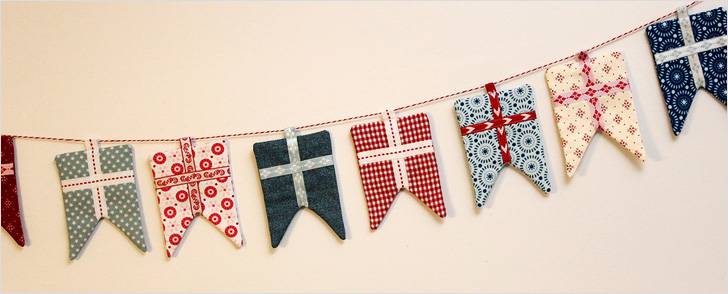
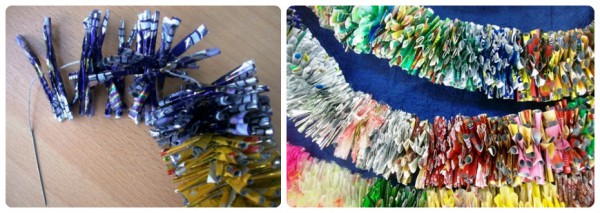
For such a decoration you will need multicolored fabric loskutka, decorative braid and scissors. From the fabric you need to cut the figures and sew them with a solid seam. It is best to do this with the help of a sewing machine, but if you do not have such an opportunity, you can do it manually. At the ends it is necessary to sew a decorative braid. These will be strings. Such products are perfect for window decoration.
You can make pompons from tissue flasks. Hang them on the decorative thread, leaving some distance between the figures. Festive and beautifully looks like this option, if you hang it vertically. It looks very original, if there is such a decoration if there is some new year figures or toys between the pumps or toys, then it should be hung horizontally.
Beautifully looks like textile garland from triangles. To make such a decoration, you need to take multicolored bright patchwork and cut on the diagnosis of the same size. If the fabric is too thin and the edges are creepy, use scissors with zigzag blades. After that, rhombic needs to be decomposed in a row on a flat surface. Through all the centers of quadrangles put a braid. Each rhombic to overload in half and sew two ends. As a result, a number of triangles should be obtained. It looks very nice and originally, if the diamonds are decorated with brilliant lace or position the triangles at some distance from each other, and in the intervals of the New Year's shiny balls.
Finally
So our article ended on how to make a New Year's garland with your own hands. Such New Year's decorations can be made not only of the listed materials, they can be made almost from anything. Stylishly looks like a decoration made from felt. It is quite tight material, and figures made from it look beautiful and festive. Very nicely looks like a decoration for a tree from a decorative thread of nuts, dried fruits, candies, coffee beans, cones and so on. Everything will suit your fantasy. A little creative, and your holiday will be unique and original. Happy New Year 2017! WITH NEW HAPPINESS!