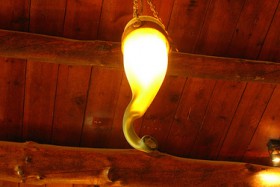
People who have developed creative abilities, very often create interior elements personally, and make a chandelier master class will not work. Only bathroom lamps are better to buy factory, because they should be small and reliable.
Housing, in which handmade objects are present, acquire an exquisite and original look.
We make a chandelier with your own plastic bottles
To make a chandelier of plastic bottles we take:
- If there is an old chandelier, you can take her island
- Many multicolored bottles
- No more than ten steel twist
- From plastic bottles with scissors cut out any figures that you want to see on your chandelier (animals, flowers, etc.)
- Multiple twist places on the island of chandeliers. From the rest, we do something similar to the hedgehog, connecting the rods in the middle. We remove one rod, where there will be a light bulb
- Next, we complement the resulting frame cut from previously films from plastic
- We connect the island and hedgehog.
Now you know how to make a chandelier of plastic with your own hands. To secure the material, we recommend that you watch the video in which there are examples of plastic bottles chandeliers:
Making a chandelier with your own trees
For the manufacture of a chandelier of wood we will need:
- Twelve plates for facing the door of 30-45 cm.
- Lithuanian banks from which we will make plafones (6pcs).
- White and wood paint.
- Self-tapping screws.
- Sandpaper.
- Switching machine.
Description of the principle of manufacture.
- We make smooth bar using sandpaper
- We need a place for the electric pipe, so we make a recess from the back of each plank.
- We drill three planks to which clamps will be attached.
- Planks paint in the woods.
- We make from plans the right hexagon.
- Cartridge Breppy to the hole in the lid.
- We ride banks with light bulbs inside.
- Flaf stain in any light color.
Chandelier do it yourself from wood, photo below:
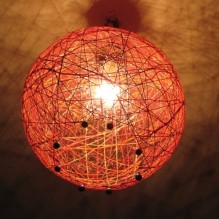
We make a chandelier with your own hands
To make the chandelier from the Kapron thread, we take:
- Abazhur make from plastic bowl
- Multicolored threads
- Paste for fastening
Description of the principle of manufacture.
- First of all, we will make a paste. We mix the floor of a glass of flour and two glasses of water, there are two glasses of water with temperatures above 60 degrees, boil and throw about three sugar spoons. Let's prevent and wait until you cool. Next, consider how to make lampshade with your own hands for chandeliers.
- Throw yarn in the paste.
- The resulting yarn is wound on a bowl.
- After 24 hours, we separate the resulting lampshade from the thickets from the bowl.
- Plafond Freak at the bottom and everything, the chandelier can be hung on the ceiling
Attention! Shade with their own hands for chandelier provides for the use of a light bulb not more than 60vatt, as it is made of flammable materials.
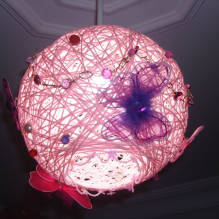
Did you decide to change your interior and want something unusual? The store offers a huge selection of different things, but why not do something yourself? The designer lives in each of us, you just need to wake it up, change the world that surrounds you, make as you see it!
Why not start with a chandelier? She can become business card Your house, which is no longer anyone. It will not only save your money but also give you a sea of \u200b\u200bunforgettable emotions.
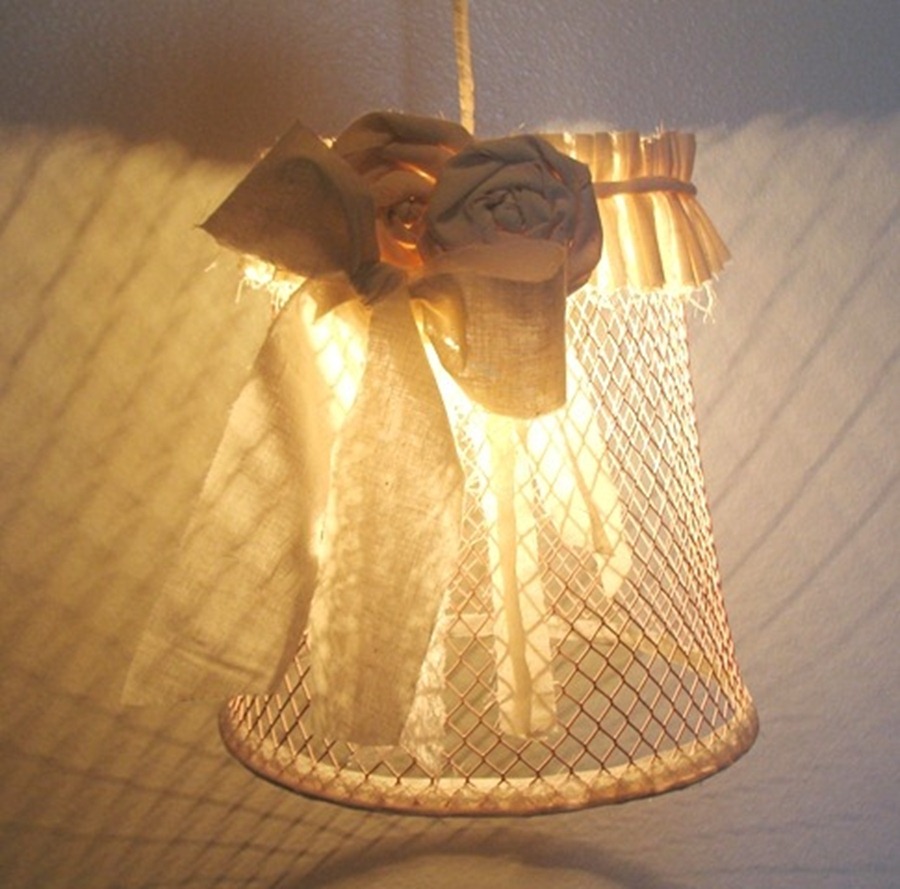
Make a plander for a chandelier with your own hands. You will be surprised that the things you were ready to have already thrown can be useful to you and reborn in your new invention.
First you need to decide on the stylist, which chandelier you want.
If you are young - a chandelier in a romantic style for you, you need to decorate a country house - Country style will have to be just right.
Chandelier do it yourself (photo on the scenery of the lampshar)
For the manufacture of chandeliers, we take with your own hands:
- Cartridge for light bulb.
- Power cord.
- Frame for chandelier.
- Decor for decorations.
- Multicolored threads.
- Hot glue.
- 60 watt light bulb.
For a frame suitable what remains of your old, long-forgotten chandelier. Many famous designers They started their brilliant career, giving the gloss old things, reviving them and put up for sale.
Make measurements, decide on the cloth you will use. Stitching the cover of the desired size, wear on the frame. You can decorate lampshade as you like. It can be cut out flowers, animals, figures, beads and much more, which will play your imagination. Fresh cartridge, equipped with a low-power light bulb to the lamp and everything is ready. Shade made with her own hands, will raise you the mood every time you look at it.
Make a New Year's chandelier do it yourself
How to make a New Year's chandelier with your own hands to surprise your friends suddenly discovered talent?
For the manufacture of a chandelier, we take:
- Organic glass or thin wooden sheet.
- Rope from flax.
- Multicolored balls.
- Little stapler.
- Use glass parts remaining from the old chandelier.
Description of the principle of manufacture.
We begin with the fact that you cut a square from the plexigla, the dimensions of which 50:50 cm. On the entire area every 5 centimeters we make holes, as chaotic as possible. We take linen thread and make it a water hole and deposit into another, neighboring. The length of the bred ends should be two meters. We do this procedure until you fill all the holes in the square.
Hinder this composition instead of a chandelier on the ceiling and continue to decorate the chandelier as new Year tree. Take balls and tie to them capron Nights, of different lengths, and tie them to the design, concentrating them in the central part. Next, we do the same surgery with glass products, but hang them along the edges, the length of the thread should be less than on the balls. If you look at the design as a whole, it will be similar to an inverted pyramid.
Now you know how to make a New Year's chandelier with your own hands. Start your crafts right now and you will not stop on the chandelier.
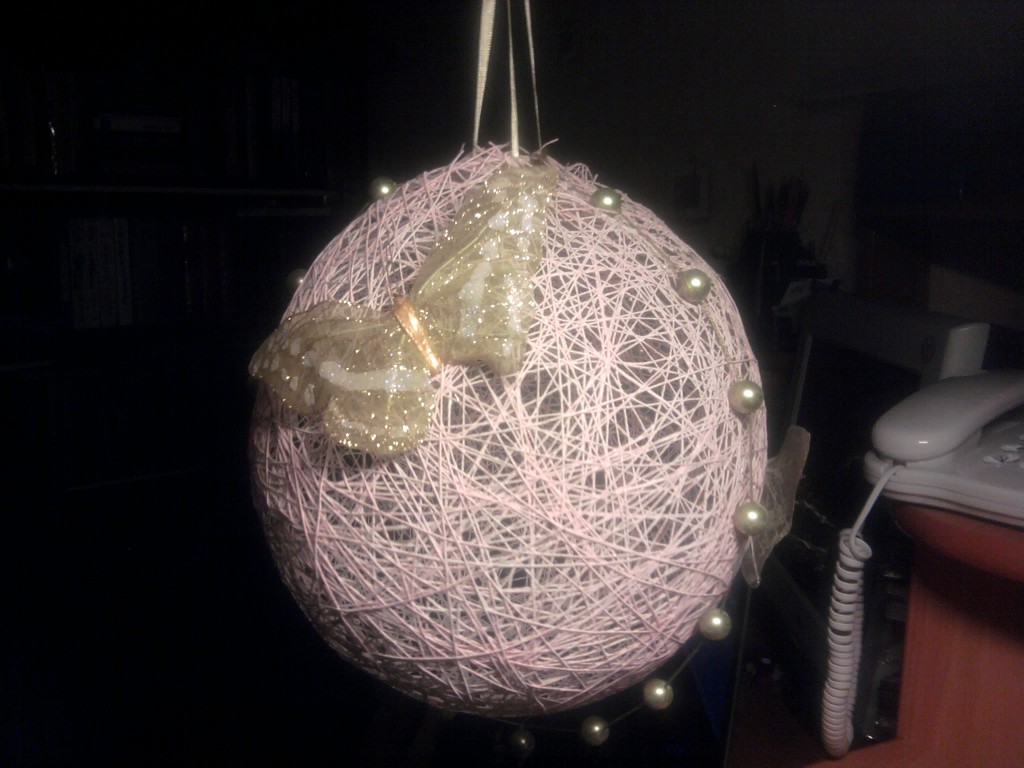
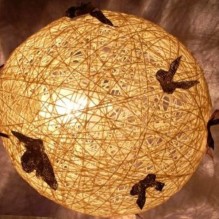
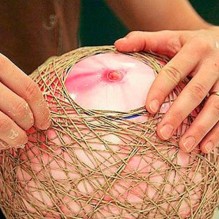
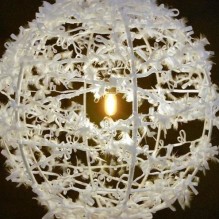
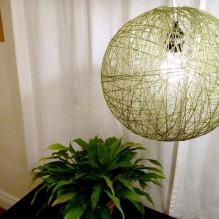
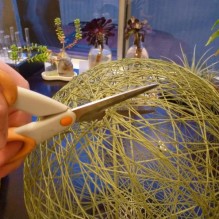
Recently, it has been very fashionable to decorate for chandeliers as the winding of the threads.
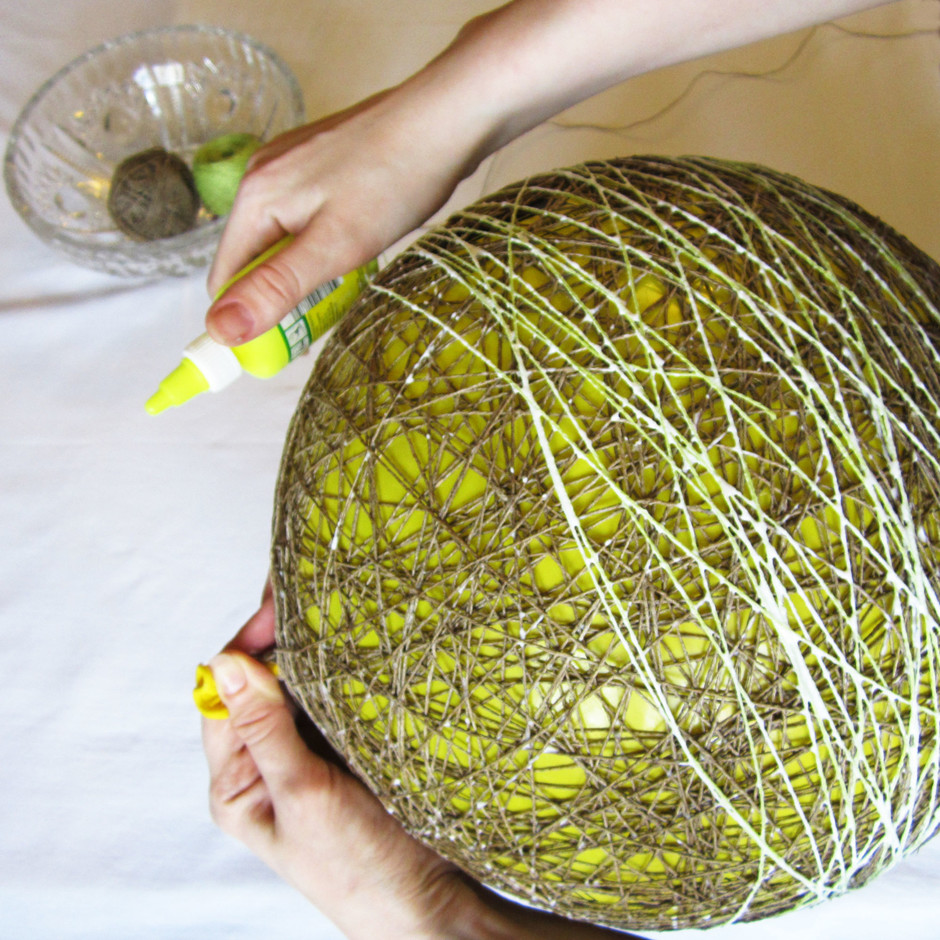
Description of the principle of manufacture.
We will need a lot of threads and plow glue, as well as an inflatable ball. Cotton threads for our venture are suitable as it is impossible, since the glue on them lies evenly and behaves obedient.

Do not rush to throw out empty glass and plastic bottles. Of these, you can make a lot of useful in household of things. We suggest you find out how to make a bottle lamp.
Simple table lamp
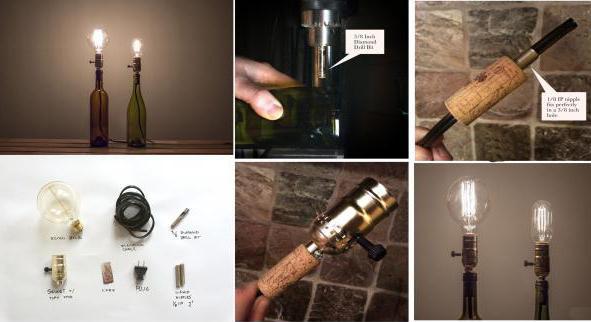
To make the original you need:
- suitable glass bottle from under wine, champagne, whiskey or brandy;
- a cartridge with an electric cord on which there is a socket and switch;
- ready-made lampshade;
- light bulb;
- rubber plug-stabilizer;
- screwdriver.
Order robots on the creation of a desk lamp lamp:
- Cut the rubber cork so that it is easy to fit in the neck of the bottle (picture 1).
- Skip the cartridge to the traffic jam and attach the wires (pictures 2 and 3).
- Make a fastening arc to which the lampshade will join and screw the light bulb (picture 4).
- Insert the plug into the socket and turn on the lamp (picture 5).
Lamp from the bottle is ready!
The principle is the same, but the design is different
Another option to create a desk lamp, but differing in execution and design.
Instruction: How to make lamps from bottles (photo below):
- Take the glass bottle and make a round hole at the bottom, closer to the bottom, with the drill on the glass.
- Make a hole in the plug and thread the electric cord into it, and on the one hand, screw the threads.
- Screw the decorative cartridge.
- Place the cord in the bottle and close the neck cork.
- Cord pull out from the hole in the bottle outside.
- Screw the light bulb.
The original bottle lamp is ready!
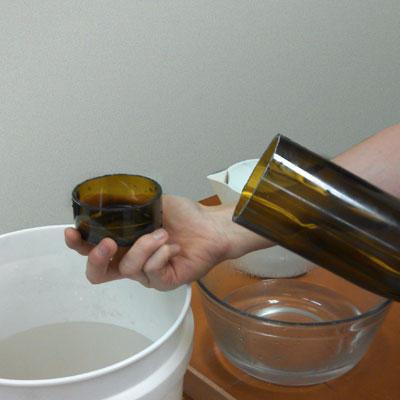
from bottles - disconnect the bottom
Such chandeliers perfectly fit into the interior of the kitchen, living room, bar, country house or cafe.
To make them, first you need to cut off the bottom of the bottom:
- Take a woolen thread, solvent, bottle, lighter, sandpaper, basin with ice water.
- Cut a long piece of threads and moisten it in a solvent.
- Around the bottle, on the place that you need to cut, take a few laps of a woolen thread.
- Take the bottle so that it is parallel to the earth and burn the thread.
- The bottle must be carefully scrolling around the axis a few minutes.
- When the fire goes out, instantly lower the bottle into the ice water.
- Gently disconnect the bottom.
- The edges of the bottle do with sandpaper.
Making Lusola
When the bottom is cut off, you can proceed to the assembly of the lamp:
- Take the cartridge or plug and insert into the neck.
- Attach the cord.
- Screw the light bulb.
- Slip the lamp from the bottle to the ceiling with the hook or make a special mount.
Thus, you can make lampshades instead of the usual chandelier. To do this, simply measure the diameter of the bottle neck and see if it is suitable for the size of the finished cartridge. If not, then cut the neck just as you get rid of the bottom of the bottle. Windfood hang to the place of old.
Possible design of lamps
It is not necessary to make a lamp from a conventional bottle. It can be used as the basis for the embodiment of interesting ideas and ideas.
Design options:
- Color bottle acrylic paint. You can draw some kind of picture or make a stained glass window. Very nice lamps are very beautiful, the same in shape, but painted in different colors.
- You can clean the bottle of thread or yarn.
- Cover the bottle make engraving.
- If you make a table lamp, you can pour coffee beans inside the bottle, multi-colored salt, seasonings, cereals, pasta, and so on. Such a lamp will not only be directly appointed, but also will serve as an excellent decor for the kitchen.
- You can do and much more.
- Ahuta there are big jars from under the perfume, they will also serve as excellent material for creating lamps.
- To make a suspended lamp, optionally a cartridge or a plug fix in the neck of the bottle. You can hang the cord completely into the container, and all other details are placed under a narrow tip. Such a bottle will be more like a lampshade. Only then you need to think about the fixation of the electric cord.
Lamps from garlands
Want garland to decorate the room all year round, and not just on New Year? You can do it very simple.
Master class on the creation of a luminous decor:
- Pick the desired glass bottle, new Year's garland, sandpaper and drill.
- Clean the bottle of all labels.
- Fix the bottle and drill a neatly small hole at the bottom. Through it should freely pass the cord from the garland. Work carefully, because it is very easy not only to hurt, but also break the bottle.
- With the help of sandpaper, graduate from the edges of the hole so that you are not covered in the future.
- Show inside the bottle through a drilled hole garland. You need to put the end where there is no fork and the switching remote control. Try to shove the garland so that it is spinning inside the bottle.
All is ready! If you wish, you can somehow re-establish a bottle. For example, draw a drawing, and to the neck to attach a ribbon or a bow.
Such a lamp is very safe, because from the garland exactly nothing melts.
Abazhur of plastic
Some will say that such a lamp of plastic bottles is unsafe and has an inesthetic appearance. In urban conditions, this is true. But it is ideal for a gazebo in the country.
Master class: how to make a lamp from plastic bottle do it yourself:
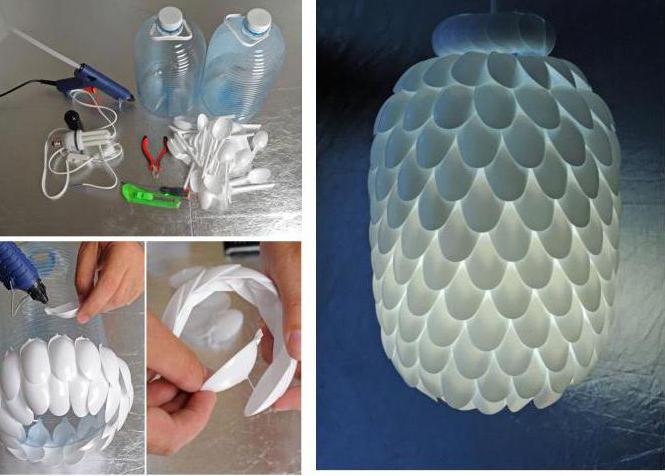
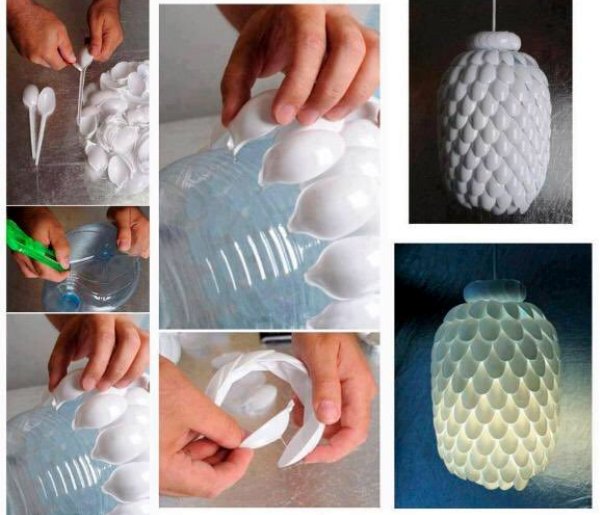
- Prepare a cartridge with an electric cord and switch, light bulb (need LED, housekeeper or ordinary, but low power), five-liter water backed, adhesive gun, pliers, plastic spoons, screwdriver, construction knife.
- Pliers bite off completely handle from a spoon so that one oval part remains.
- Cut from the bottom of the bottom with a building knife.
- Connect to the network.
- When it is ready, start gluing spoons. The first row is below, and all subsequent few are superimposed on the previous ones.
- Puck, thus all the babe.
- Place the spoons among themselves, folding them alone in one to get the ring.
- Secure the cartridge and cord in the bottle neck.
- Get the ring from spoons to the neck.
- Screw the light bulb.
A lamp lamp! If you wish, you can paint it. In order for the paint to lay evenly, it is better to paint each spoon separately, and then it is already caught by the Bucklage. It is preferred to use paint from the cans. So you get smoking less and the layer will evenly fall on the surface of spoons. In addition, it dries faster.
Some things that we consider used and simply throw out, perhaps have not yet contacted your life and can find a worthy application on a new field.
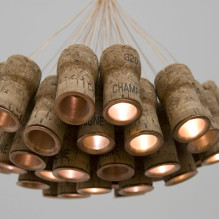
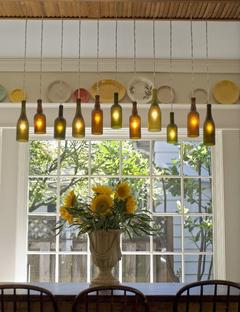
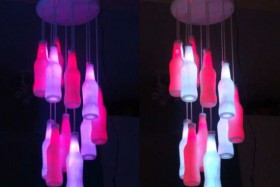
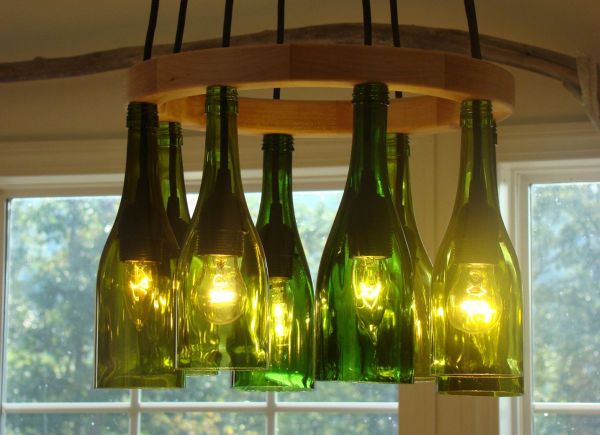
For example, bottles from beer, wine, vodka, brandy, milk, baby food, juice and all that you drink can serve as an excellent girlfriend material for chandelier, desktop lamp and other crafts. In addition, you will save on the disposal of glass waste.
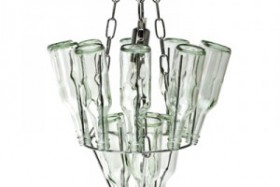
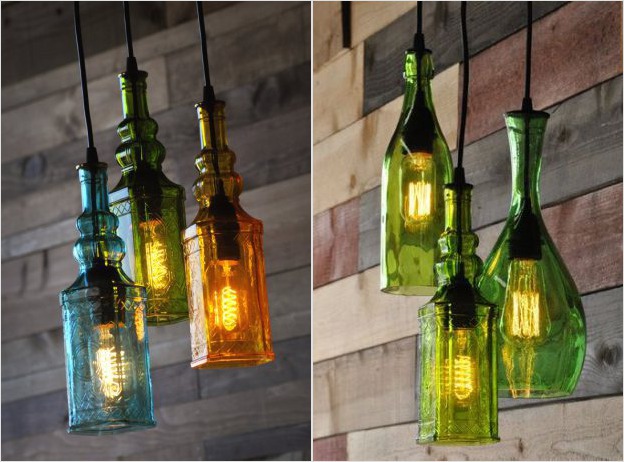
Close to making chandelier from glass bottles Designer Jerry Cott (Jerry Kott) approached. Grinding the surface of the bottle, it reaches its incredible transparency, so the artist's work look great. Such chandeliers fit perfectly into the kitchen interior, rooms, and the directional light creates the atmosphere of comfort.
Their design solutions Cott offers at a price of $ 190 to $ 310. The set in addition to the lamp includes multicolored lamps.
Among the designer works are kitchen chandeliers made from one or 3-5 wine bottles.
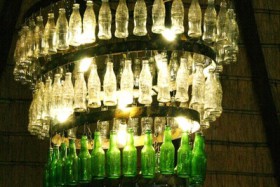
Of course, a chandelier of bottles can be made independently at home, while spending the manufacture of 1-2 days.
The simplest version of the homemade chandelier is the use of the frame of the old Soviet chandelier and wine or beer bottles. It turns out something like that:
![]()

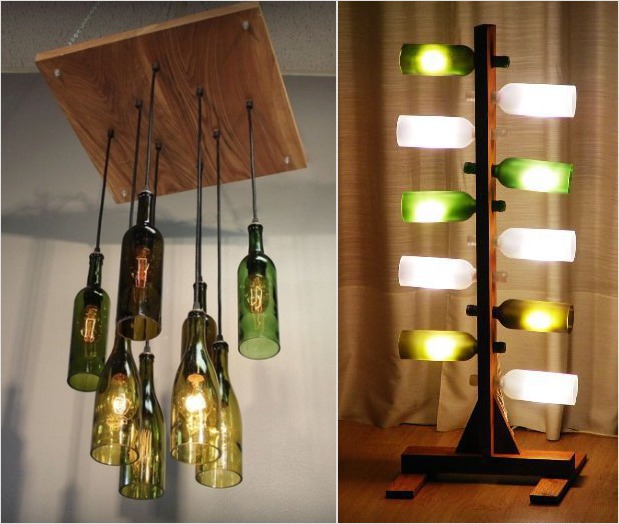
Perfectly will look and the chandelier on the chains with two or three rows of bottles.
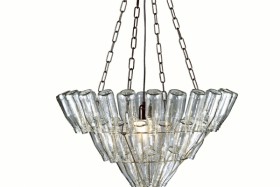
If you take a two-level framework frame on chains and several bottles of baby food or milk, then you get such a wonderful chandelier. And the drawing on the bottles will make the chandelier bright and unique. For example, images of state flags can be applied stained in paints.
It will be interesting and brightly looks like a chandelier, if the bottles are frosted, and the light bulbs are colored.
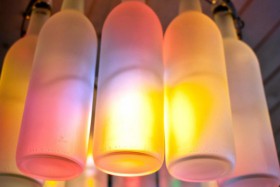
Bottle mattiness is one of the secrets of their charming. It is thanks to such a bottle chandeliers from glass bottles look no worse than their dear industrial conifers.
![]()
For large premises with high ceilings there were the following chandeliers with lots of bottles.


If you have the opportunity to withstand a glass bottle in a high-temperature oven and be able to carefully handle the cropped ends, then these original lamps can be made.
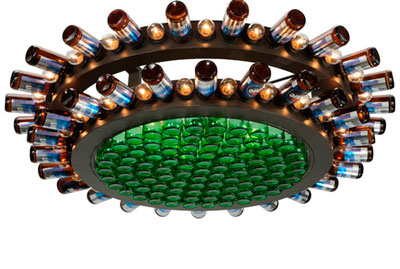
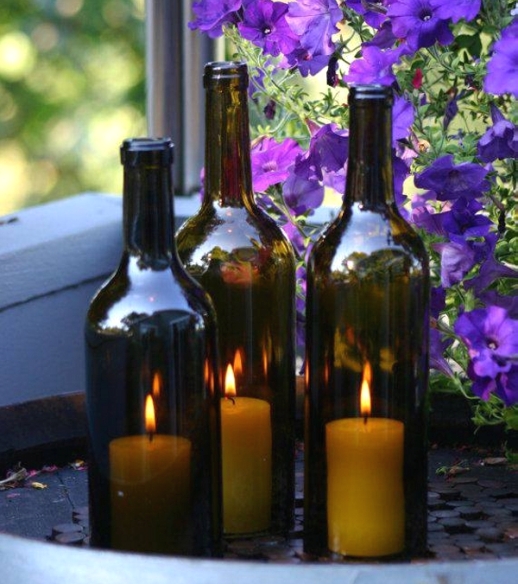
Also, instead of light bulbs, a chandelier is possible with burning lights in several glass bottles. This time will be stylized under the ancient chandelier with really burning lights, i.e. open flame.
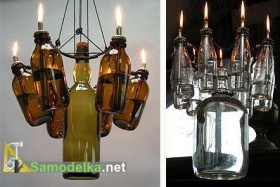

In the photo, everything is seen - the whole bottles are taken, they are fixed around the central bank or a bottle, and the lamp is ready. But not everything is so simple, the most interesting in the details. Bottles are selected multicolored, due to this, beauty is achieved. The central bottle can be used as a lamp, and maybe just decoration, the center of the composition.
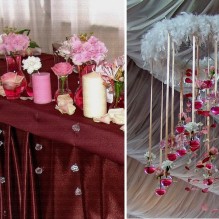
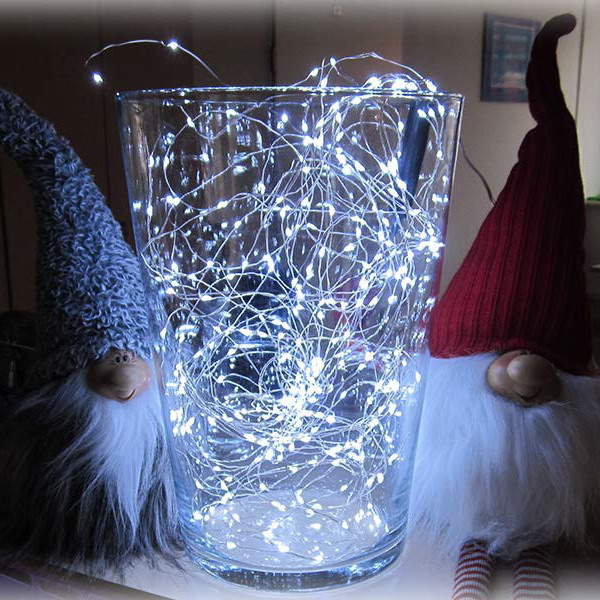
Remember how in childhood I caught fireflies? Even at a distance, these tiny creatures look magnificently, and if you still succeed in catching a couple of pieces in the bank ... Agree, there is something magical in miniature lights that bloom from the glass.
Now you are unlikely to have time for these cute children's fun. And the season, to put it mildly, does not have too much. But you can enjoy the magic light from behind the glass at any time. For this, it is not necessary to look for some kind of special lamp - it is easy to do it yourself.
Today you will learn how to make a beautiful New Year's lamp from garlands in a can, bottle, a vase or other glass container. We selected 46 photos of the most beautiful examples And let's tell you in detail how to do it.
You do not need to be a master Hend Made to create this beauty. The technology is quite simple so that even a beginner can master it. Materials will also need the simplest: glass container for your taste and New Year's garland.
Important comments:
1. It is better to give preference to the LED garland - it does not heat up, and, accordingly, is safer for a closed container.
2. Some options do not imply power cable output. Therefore, look for a short girland on batteries.
__________________________
1. Lamp from garlands in the bank
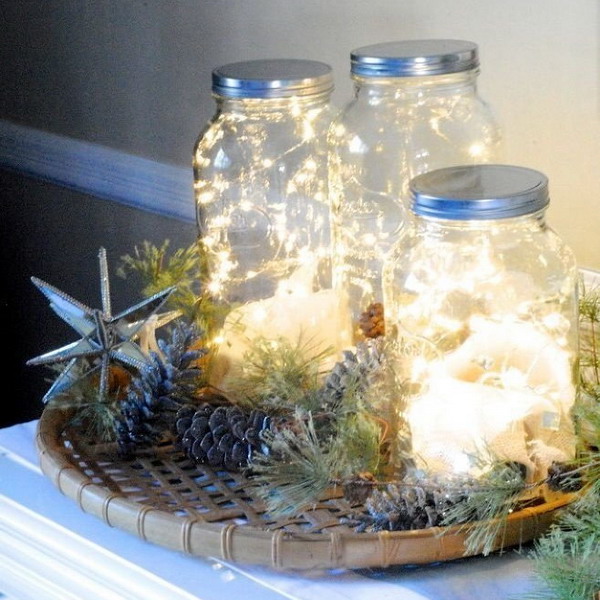
The most pleasant thing in this idea is that you probably have at least one needed item. The bank is not necessary to be beautiful in itself, although interesting models with embossed walls or from stained glass are only welcome. So disassemble the deposits canning cans In the storage room - New Year's magic begins!
Materials and tools:
the glass can with the neck is wide enough to the palm freely (better - with a slight margin), transparent glue on silicone base, short garland on batteries.
How to make a lamp in a jar with your own hands:
1. Wash the bank thoroughly, remove the labels. Dry.
2. Apply the garland to the outer wall to outline the intended circuit. When will be ready, apply glue on the necessary parts of the garland and lock it inside the can.
Ready! Now you have our own "trap for winter fireflies." Especially spectacular this lamp looks in the twilight.
Such lamps look great and by themselves - for example, in the middle of the table. But if you want to especially New Year's mood, place banks on a tray with another seasonal decor: cones, fir branches. Ideally complement the composition of artificial snow. Cover the edges of the cans or pour inside. - It turns out no worse than souvenir snowballs.
__________________________
2. Light garland under a serving cap

Their main difference is the ability to make a special significance of what is hidden under glass. Just imagine: the usual garland will look like a museum exhibit!
For this idea, the garland can simply put inside, turning the cap, or glue, as in the previous paragraph - in this case, the composition will look even more effectively.
The most exquisite option will work with miniature light bulbs in the form of flowers - if you manage to find such a garland, it will be just wonderful. The cap can not only be put on the table or chest, but also to embed it in new Year's compositionas in the photo.
__________________________
3. Decorative lamp from garlands and glass vase
Who said that vases are suitable for flowers only? Simple transparent vase without decor - excellent base for any composition. Especially New Year - the bright lights behind the glass will look simply magically.
This idea is especially good with its practicality: it does not require gluing and "refinement" of the vessel, and after the holidays you will again be able to use an appointment vase.
Here everything is extremely simple: find a suitable glass vase or porridge and beautify the garland inside. Garland can both fill the entire vase and hang beautifully on the edges, if the vase is high. The composition can be supplemented with any suitable filler: cones, fir branches, artificial snow ...
Want to be with us in touch every day? Welcome to our planet inspiration VKontakte! Look, scroll! Like? Join and get inspiration every day!
__________________________
4. Lanterns for shaped candles + garlands
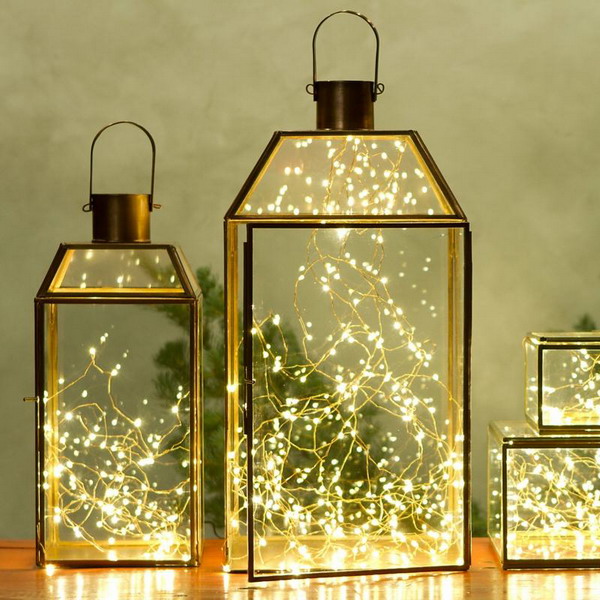
Lanterns occupy a special place in the winter decor. There is something fabulously romantic in his outlines - especially in our time, when many use pocket lanterns. But this is not a reason to throw such a wonderful subject to the chungy! Get out old garden lights from the depths of the storage room or buy them in Ikea to feel like a New Year's Fairy with magic light.
Make a flashlight Magic is not at all difficult: just putting a beautiful garland inside, as in the paragraph about the vase. Want a special grace? Enclose the garland to the walls so that it takes on an interesting form (see paragraph 1). The lantern itself can also be decorated with a bright bow or a Christmas wreath of needles.
__________________________
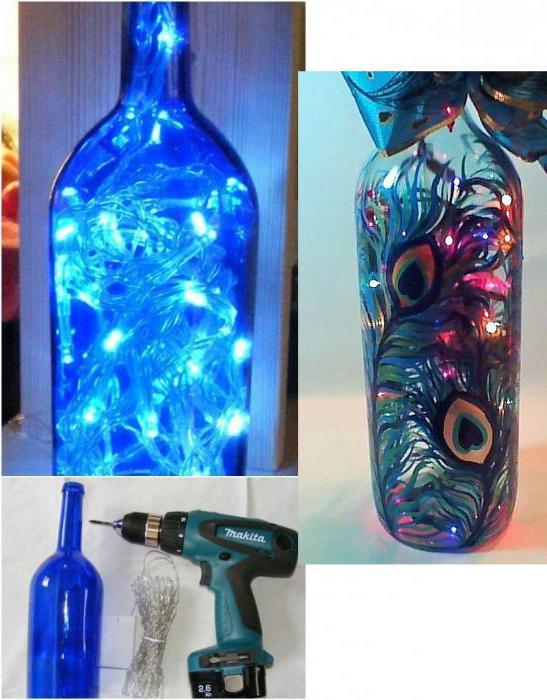
5. Decorative bottle lamp
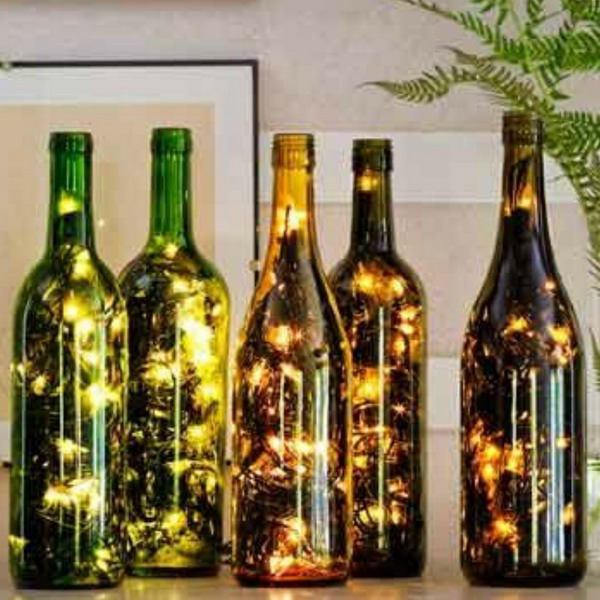
And this is probably the most interesting lamp from the garland: in a bottle. It is somewhat more complicated in manufacturing than previous options, but the impression with interest pays for all inconveniences. Just imagine: tiny lights, white or multicolored, shimmering through dark glass... It is best for wine bottles, but no less effectively watch brandy and liquery.
Materials and tools:
empty glass bottle, drill, drill for glass (~ 1.25 cm), tape, short garland (preferably - on batteries, and not with power supply).
Precautions: For security purposes, put on gloves and safety glasses in case the bottle cracks. For the same reason, keep some spare bottles at hand.
How to do decorative lamp From the bottle do it yourself:
1. Carefully wash the bottle, removing the label, and wipe dry.
2. Give the space for drilling (3-5 cm from the bottom edge of the bottle) with a tape. It is necessary that the drill does not slide in the process.
3. Secure the bottle (for example, between wooden struts) and start drilling. Avoid too strong push so as not to spoil the glass! The drilling of the opening occupies about half an hour.
4. Carefully slide the bottle so that there are no glass crumbs on the walls, and dry. In order to avoid injuries, cover the edges of the opening of the sealant.
5. Now place the garland. Gradually, immerse it into the bottle hole so that the switch (and the power cable, if any) remained outside.
Once the case is done, congratulations! You have an exquisite decoration for a table or interior living room.
You can use any bottles, both from the usual and out of the stained glass. Especially festively watched frosted glass and / or artificial snow covered. Such a lamp will look equally good in any color variations, but we recommend playing contrasts. Light glass + multicolored garland, dark glass + garland with yellow lights, composition of bottles of different sizes ...
For aesthetes, we offer this option: Bottles of stained glass, and inside - garland, large decorative filler and grape leaves. Incredibly exquisite!
Plastic and glass surround us everywhere and very often bottles of these materials accumulate in large numbers and litto the balconies, garages, sheds and verandas. You can simply bring everything into a landfill, but it is better to try to use them like a material for creative ideas.
Even inexperienced masters under the power to create original lamp do it yourself from plastic or glass bottles. It is enough to inspire the ideas presented and armed with our advice and recommendations.
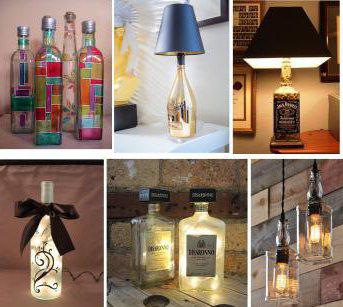
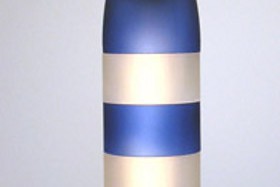
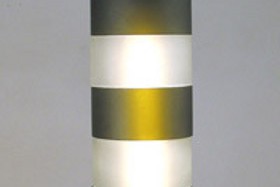
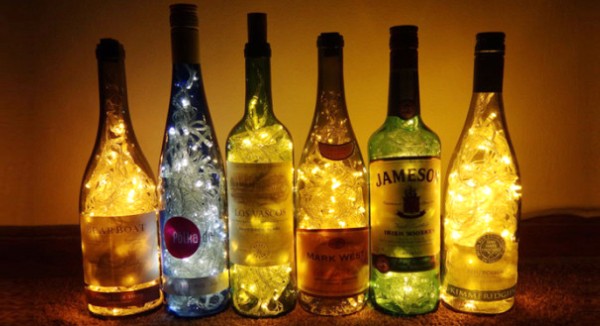
Wine Bottle Table Lamp
Beautiful and unusual night lights can be made of wine bottles that can have the most bizarre form. From the color of glass will depend on the features of lighting. Bottles lamps original decoration Perfect fit into the modern interior.

For the manufacture of a cozy night light, one bottle is needed, simple short garlands, greasy tape and drill with a special drill for tiles and glass. The color of the light bulb on the garland is better to pick up the color of the bottle glass. For example, a light bulb with yellow light (warm lighting) is suitable for tara from dark brown glass, and a dark blue bottle will be combined with blue or white light bulbs (cold lighting).
When all materials are prepared, you can proceed to work. We take a clean dry bottle and wind up its lower part and the bottom of the painting tape in several layers. Next, we plan on the wall or day the place of the hole for the wire and drill the wet drill on medium speed, holding the drill directly and hardly fixing. If you follow all the recommendations described, the glass will not split. When the hole is ready, it should be treated with sandpaper.
Next stage - designer decoration Bottle walls. The most accessible option is to draw patterns with translucent stained inks. For these purposes, you can use homemade stencils. With a sufficient skill and developed fantasy, you can depict something abstract. It should be noted that without additional decoration such a table lamp will look great.

The garlands light bulbs are lowered into a bottle through the hole, leaving the necessary part of the wire with a fork. The lamp is assumed to orient up the neck upright.
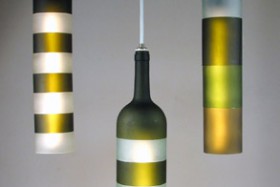
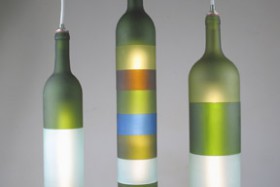
Glass Peresvet: interesting ideas of suspended lamps for apartments and cottages
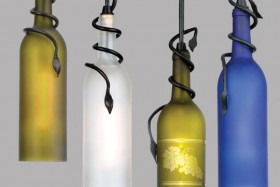
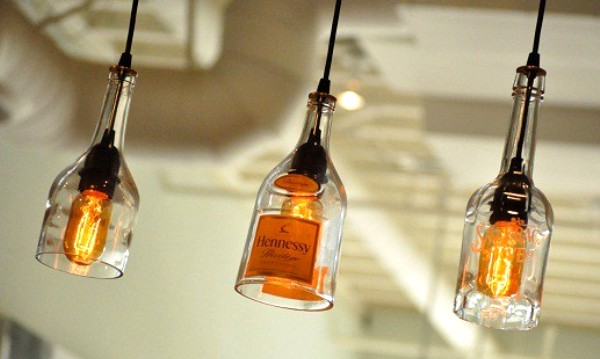
For the manufacture of the lamp, you can use not only wine bottles, but also curly cognac and liquor or miniature beer.
The composition of the plaffones of different sizes and forms will certainly impress guests. You can use the frame from the old chandelier, and you can fasten them like individual plaffones.

Glass is perfectly combined with a metal or wooden frame.
To carefully and safely remove the bottom of the bottle, you need to wind up a bottle along the "cut" line with a woolen thread in several layers, then tied the ends to remove the winding for wetting in acetone or vinegar and put on a bottle again. After that, the thread should be set fire and, turning the bottle, wait for it when it hurts to immediately omit the bottle into a pre-prepared basin or sink with cold water. The bottom with ease will disappear, leaving a smooth and smooth edge.
Another method requires tough fixation and glass cutter. First, with the help of glass cutters make a closed cut line. At the same time, the glass cutter is tightly pressed against the glass, and the bottle, groping between the bars, is slowly rotating. When the line is ready, the container is immersed in cold water somewhat higher than this line, and boiling water is poured through the funnel. Due to such actions, glass in the place of notch bursts, and fall off the bottom. It will only remain to handle edges with emery paper or bars. Perhaps the desired result will not be immediately, so it is for starters can be accessed on not the most beautiful bottles.
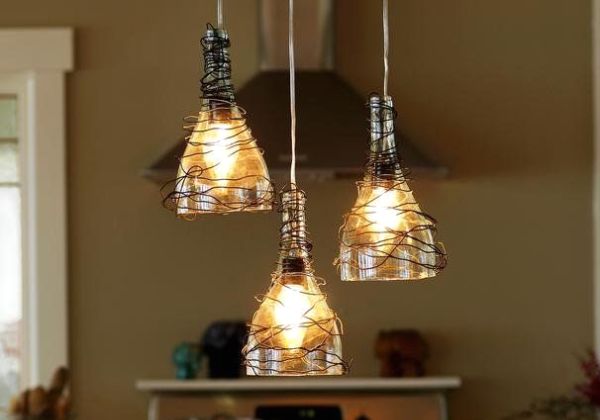
To embody the idea presented in the next photo, three identical containers made of light brown glass will be required. When the bottom is separated by the methods described above, you can start assembling and decorative design, which lies in the random winding of the copper wire.
The following version of the hanging luminaire is suitable for the kitchen and living room.
A comfortable and practical lamp for the illumination of a country porch or a gazebo for tea drinking can be made quite simply and quickly from the peeling beautiful bottles of noble alcohol. For efficiency, it is better to use energy-saving lamps.
Street lamp from bottles can be made based on lED lamps On solar panels or using wax candles. Such structures are indispensable in places where it is difficult to stretch the electrical wire. Glass perfectly withstands contact with open fire, so the use of candles is completely safe.
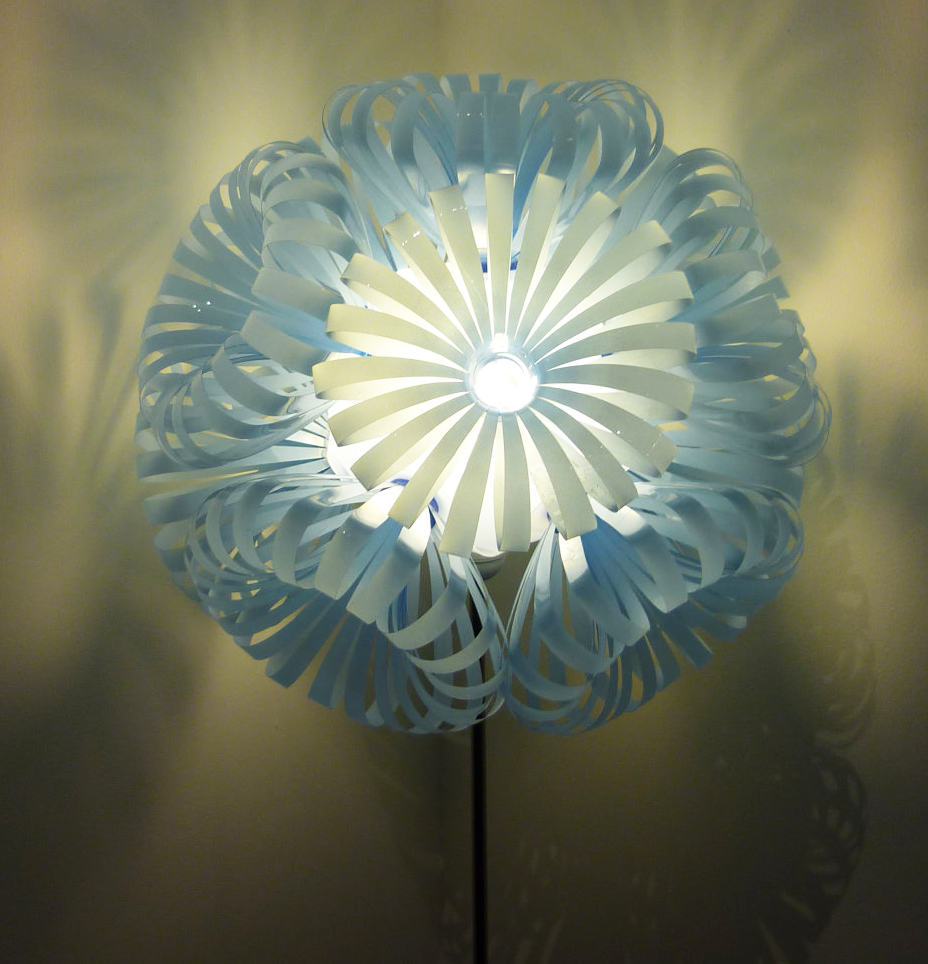
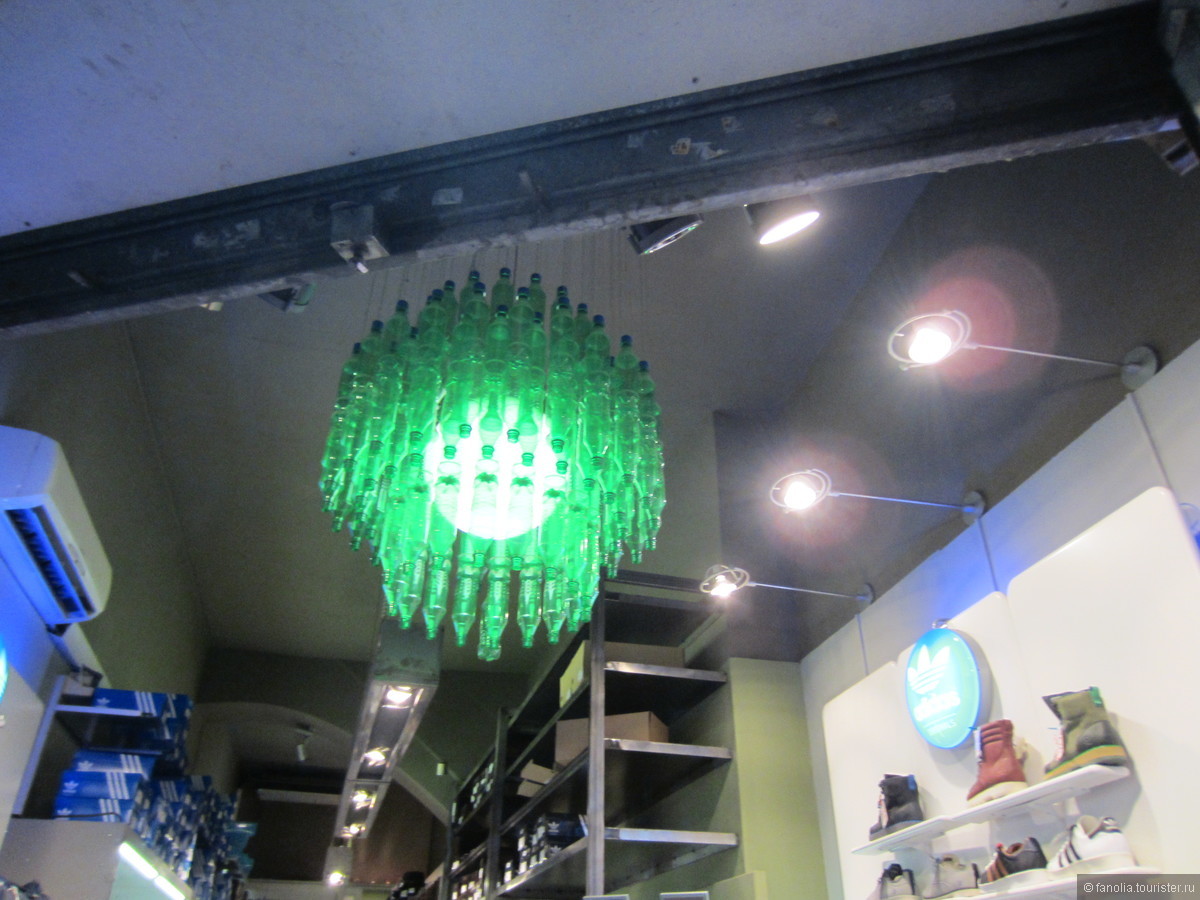
Suspended lamps and chandeliers from elements of plastic bottles
The suspended lamp of a plastic bottle will be vague and ease of attachment. Options, how to make a plastic masterpiece set, but start better from the simplest. Consider several basic manufacturers.
Plastic lamps are well missing light and reliable in operation. it excellent option For a kitchen of a private house or cottage.
For this option, use a 5-liter bottle and many disposable plastic spoons. The bottom of the tank must be cut off. In the spoogle cut off the handle and glue the thermoclaim to the surface of the bottle in a circle so that each subsequent row can go a little to the previous one. To close the neck, you need to make a "rim" from glued into the ring of spoons. Next, fix the cartridge and light bulb, as described above.
In the next embodiment, cut snacks that look like air 5-petal flowers appear as decor. You can use transparent bottles of different sizes, cutting only flat bottom. In this case, all the elements are connected by a rope or a caprony thread and fasten to the base in the form of a cut top of a large neck bottle. The collected chains can be of different lengths, which will give the product a more sophisticated look. The upper part of each chain should be glued to the base in such a way as to fully close its surface.