The most interesting crafts for the New Year 2018 with your own hands.
In anticipation New Year's holidays each of us is waiting for the fulfillment of desires, new hopes and New Year's gifts. It’s true that these days people radiate some special enchanting energy, and the spirit of magic is in the air.
According to the eastern calendar, the symbol of the coming 2018 will be Yellow Earth Dog. Characteristics This sign is devotion, morality, as well as honesty, firmness and justice.
In order for the entire New Year 2018 to be successful, you should not just sit and wait for a miracle; you need to carefully prepare for its arrival. That is why, according to an already established tradition, more and more adults and children are engaged in self-production DIY crafts, and not only for home decor, but also in kindergarten, and to school. This is not only great entertainment for little playful girls, but also an excellent reason to spend time with the whole family. And, of course, we shouldn’t forget about the upcoming New Year’s parties in kindergartens and schools, when parents will have to sew New Year’s costumes and their children will have to create handicrafts. New Year 2018.
In addition, making crafts with your own hands for kids is not only exciting, but also useful for development. With the youngest children, you can try to make such simple crafts for the New Year 2018 in kindergarten, such as:
- postcards;
- applications;
- snowflakes;
- figurines of the symbol of the New Year - dogs.
For this creative work you will need simple and easily accessible materials, namely:
- various cereals;
- plasticine of various colors;
- buttons;
- corrugated paper;
- pencils;
- markers;
- paints.
When creating crafts with your own hands with older children for school, you can safely use more intricate and extraordinary techniques. Schoolchildren will be able to create crafts such as:
- herringbone;
- Stuffed Toys;
- candlesticks;
- stars in vintage style;
- balls for the Christmas tree.
The most interesting thing is that here children will need the most ordinary household items, which will be enough for a flight of imagination, namely:
- various fabrics;
- threads;
- wooden parts;
- felt;
- plasticine;
- cardboard and plastic boxes of different sizes;
- old puzzles;
- cotton wool;
- old light bulbs;
- puff pastry;
- orange peels.
And, of course, don’t forget about paper crafts for room decor, and there are plenty of varieties:
- voluminous and flat snowflakes;
- Christmas trees;
- snowmen;
- various animals;
- Garlands;
- confiture;
- flashlights;
- Christmas tree decorations.
However, everyone can do all the crafts. The most important thing in this exciting business is a flight of imagination and skillful hands. If you have a little time and a desire to create unusual and original New Year's crafts for kindergarten, school, and for decorating paper products, then welcome to our master class! In this article you can not only learn a few interesting ideas, but also, together with the children, create step by step the most original crafts for the New Year 2018 with your own hands.
DIY crafts for the New Year 2018 for kindergarten.
From a very early age, children try to make things with their own hands. Therefore, creating crafts for the new year 2018 is not new for them. In kindergarten, mostly children make simple products from plasticine, paper, and even foil. Also, do not forget that the Dog is a symbol of the New Year 2018, so when making crafts with your own hands it is better to give preference to yellow, orange and golden shades.
Photo: DIY New Year's card “Yellow Dog” made of paper for kindergarten in stages.The most interesting thing is that all the crafts for the New Year 2018 in kindergarten will be quite easy and interesting for children to do with their own hands. To create a New Year's card they will need:
- ordinary White list paper;
- packaging of colored paper;
- PVA glue;
- scissors;
- pen.
Manufacturing:
- First, take a sheet of paper, fold it in half and cut it in the shape of a large circle, thereby creating the dog’s face. You can choose the color of the paper at your discretion.
- From paper black and white cut out 5 circles (one medium one for the dog’s nose; 2 medium ones from white paper and 2 small ones from black paper for the eyes).
- Then we cut out two multi-colored circles from paper, and of course, one circle from red paper to create a tongue.
- Then we take a sheet of paper and cut out two identical strips to create ears and bend them at the tips.
- Next, cut out strips of paper and fold them along the edges on four sides.
- Now on a large circle of paper - a muzzle, glue two middle circles - one in the eye area, and the second in the center.
- We grease white paper circles and attach them in the center of the muzzle, and glue black circles on top of them.
- On the circle in the center we glue a nose made of black paper and attach the tongue just below the circle.
- Then glue the ears at the top on the back side of the muzzle.
- Using a pen or pencil, draw on the dog’s eyebrows and smile.
- We take all the previously prepared strips and glue them together in the shape of an easel, and attach the muzzle itself to it. And now the “Yellow Dog” postcard for kindergarten is ready!
Application “Postcard - Christmas tree” made of paper with your own hands for kindergarten in stages.
For the next craft for the New Year 2018, children should prepare the following materials:
- a roll of bright embossed paper (for gift wrapping);
- thick colored paper with patterns;
- PVA glue;
- flat beads or shiny buttons;
- pen.
Manufacturing step by step:
Cut the embossed paper into pieces of different sizes from smallest to largest.
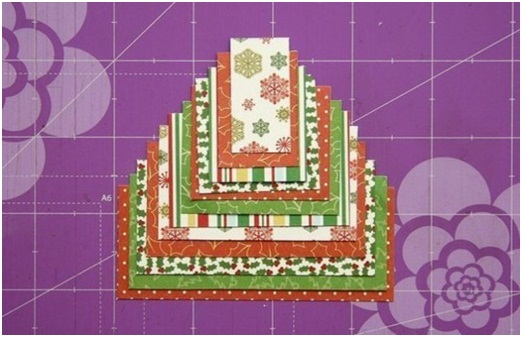


As you can see, everything is quite easy and simple, and most importantly – bright and festive. Kids will definitely love creating this craft with their own hands. Just what you can take to kindergarten and congratulate the teachers on the holiday.
In order to make this unusual decoration For the Christmas tree in kindergarten, your child should prepare the following materials:
- felt;
- scissors;
- ribbon.
Step-by-step making of crafts:
 Photo: “DIY felt Christmas tree toy” for kindergarten in stages.
 - We cut several strips of felt 10 cm wide.
- From edge to middle, we cut these strips on both sides into thin strips.
- We roll the cut felt into a roll and tie it with a ribbon in the middle.
- All stripes should be fluffed, giving the product a shape like a blanket on a hat. That's all the New Year's decorations for the kindergarten are ready.
Video.
Crafts for the New Year 2018: “Polar bears” with your own hands for kindergarten.
Even the most... Small child in a couple of hours. But the most interesting thing is that these funny bears are able to outshine all other toys with their beauty and cuteness. Don't believe me? Then make it and check it yourself.
In the meantime, prepare the following ingredients:
- plastic Christmas balls medium size;
- white cotton wool pompoms;
- ribbons;
- glue;
- black beads.
Making crafts step by step:
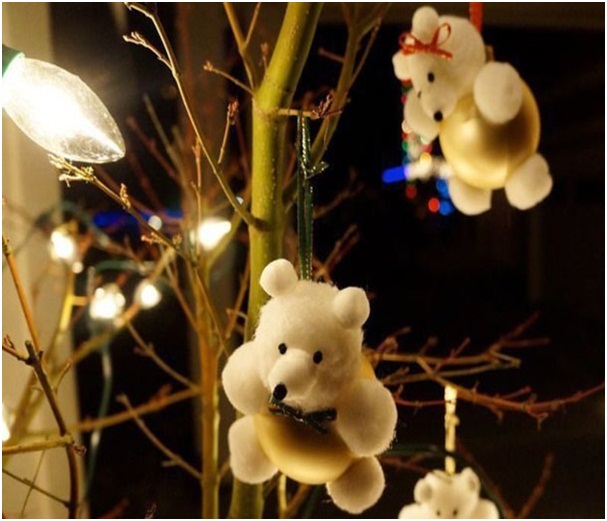 Photo: Beautiful craft for New Year 2018 DIY
 - We roll out one large pompom from cotton wool for the bear's head and two small ones for its ears.
- We glue two ears to the head and, of course, attach one pompom in the middle, which will be the face of the bear.
- We take beads and glue them in place of the eyes and nose.
- Now we make the paws for the bear, roll up four cotton wool pom-poms and attach them to the top and bottom of the Christmas ball.
- We attach the bear's head closer to the loop - the fastening of the ball.
- We tie a ribbon bow around the animal's neck. The toy is ready. Everything is quite easy and simple, and most importantly interesting.
Video.
Making lace Christmas trees for kindergarten with your own hands is quite simple. These crafts for the New Year 2018 will attract and delight the eyes of everyone around.
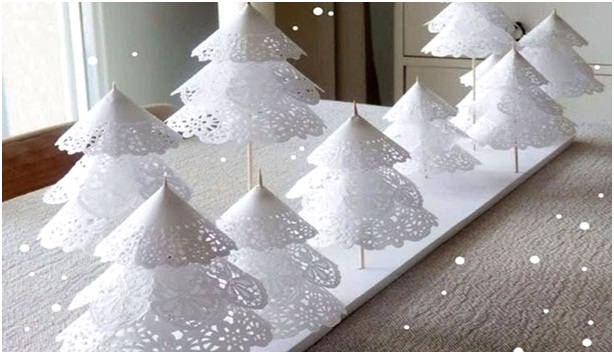 Photo: DIY “Lace Christmas tree” for kindergarten.
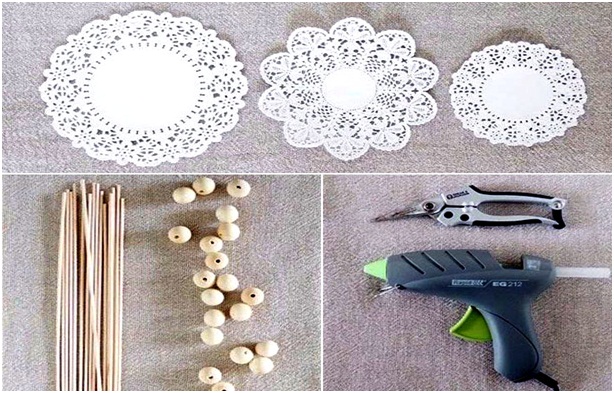
 Prepare the following ingredients and let's start creating:
- openwork napkins;
- skewers;
- beads;
- glue or glue gun.
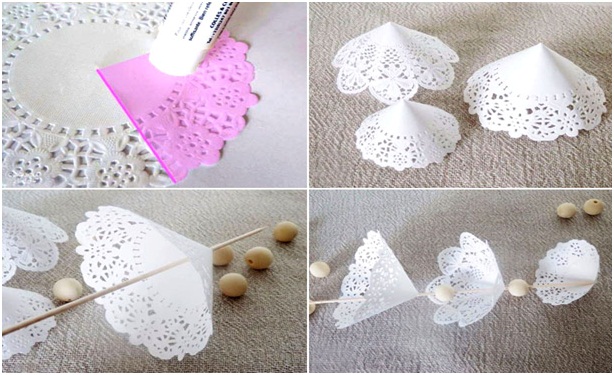
Making crafts:
- We take three napkins of different sizes and patterns.
- Fold them into a cone shape and glue the corners.
- We string the cones onto a skewer, inserting beads coated with glue between them.
- You can use foam and other materials for the stand.
That's all that remains is to decorate the Christmas tree with sparkling beads, pebbles or sequins.
Video.
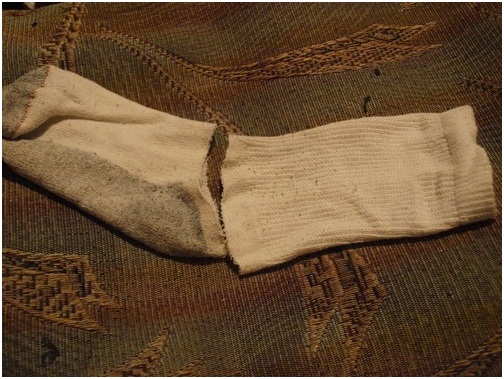
Crafts for the New Year 2018: DIY “Snowmen” for kindergarten in stages.
The most interesting things await you and your children, so prepare the following materials in advance:
- light or colored old socks;
- cereal packaging;
- elastic bands;
- threads;
- ribbons;
- small and large beads;
- lace;
- toothpick.
Manufacturing:


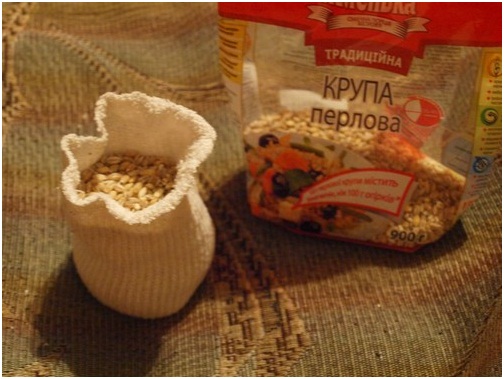


Sew small beads into place for the eye. We break off the ends of toothpicks and attach them instead of a spout. We decorate the snowmen with lace and beads.
These fun crafts for the New Year 2018 - snowmen will be a wonderful decoration for the New Year holiday. Your children will be able to safely go to kindergarten with them and please all their friends with this gift.
Video.
DIY crafts for the New Year 2018 for school step by step.
Undoubtedly, older children will be interested in more labor-intensive crafts for the New Year 2018 for school. But the most important thing is that they will be made with love and from the heart, which will be doubly pleasant.
Crafts for the New Year 2018: “Bells from disposable cups” with your own hands for school in stages.
In order to make these charming crafts for the New Year 2018 with your own hands for school, you should prepare the following materials:
- disposable paper cups;
- silver or gold paint or spray paint;
- wire;
- fluffy New Year's tinsel;
- jingling balls;
- ribbon;
- pencil.
 Photo: DIY crafts for New Year 2018
 - We take paper cups and paint them on top with paint.
- Using a pencil, make a hole in the bottom of two cups.
- We wrap the wire with fluffy tinsel.
- We form a loop at one end of the wire, leaving a long end.
- We stretch the wire into the hole at the bottom of the cup and attach a ringing ball to its end.
- We do the same with the second bell.
- We attach the loop of one bell to the loop of the second so that one is slightly higher than the other.
- Using a red ribbon, we connect the loops of the bells and tie a bow at the top. All, holiday crafts ready for school for the new year 2018. These beautiful bells will become the most magical decoration on the Christmas tree even in the coming Year of the Dog.
Video.
“Cold Porcelain Dog” step by step.
As you know, the patroness of the coming New Year 2018 will be the Dog, so we offer you and your children the most interesting thing, namely, making a wonderful, faithful friend - a dog from cold porcelain. To make this wonderful symbol of the New Year you will need:
- a piece of cold porcelain;
- toothpick;
- PVA glue;
- paints.

Making New Year's crafts
:DIY crafts for the New Year 2018 from buttons for school.
Each of us has a box in our household filled to the top with old and unnecessary buttons. The most interesting thing is that even from these small items you can make exquisite crafts with your own hands for the New Year 2018 for your school Christmas tree. Let's get started, but first prepare the following materials:
- buttons;
- thin wire;
- beads;
- threads;
- ribbons.
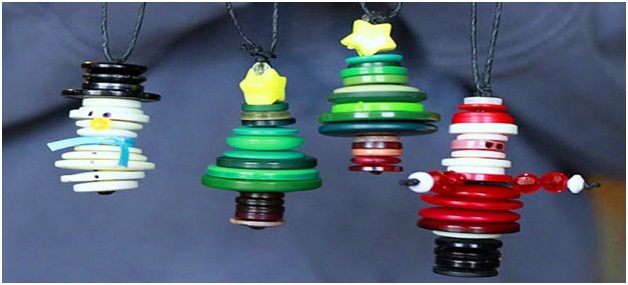

Making crafts:
- Before you get started, you'll need to sort your buttons by size, color, and shape.
- Then string the buttons onto thread or wire.
- We assemble the required figurine to taste and fix the structure so that the raw materials do not fall apart.
- We tie a thin ribbon to the product on top. Now you can safely decorate your Christmas tree with these simple crafts.
Video.
DIY crafts for the New Year 2018 from citrus peels for school.
On New Year's Eve, oranges and tangerines have become an integral delicacy in every home. Why not make brightly colorful and environmentally friendly crafts for the New Year 2018 from the peel with your own hands for the Christmas tree for school. The manufacturing technology is quite simple, and you will need components such as:
- oranges;
- metal figurines for baking cookies;
- awl;
- twine.
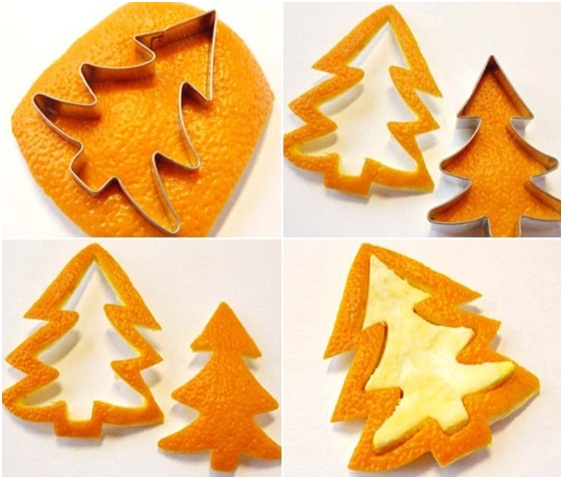
- We take the citrus and carefully peel the peel, so as not to damage the surface.
- Place the pieces of peel on the table.
- Press the workpiece on top cutting board to align them.
- Using a cookie cutter, press out various shapes.
- We use an awl to make holes in the upper part of the product and leave them to dry.
- We stretch the ropes through the holes in such a way as to form loops for hanging.
- We tie the decorations together or hang them individually on the branches of the tree.

We invite you to make another most interesting decoration with your own hands for school, which with its shimmer will outshine all kinds of crafts for the New Year 2018 - a sparkling Christmas tree toy made of sequins.
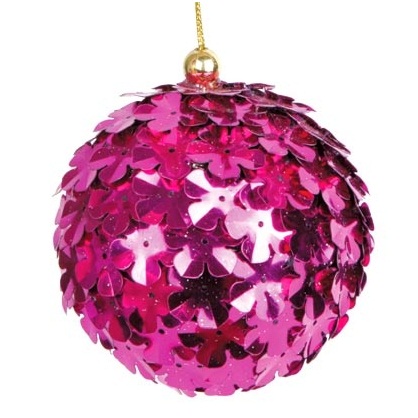 Photo: “DIY Christmas ball with sequins” for school in stages.
 To make this brightly colorful craft you will need:
- foam balls;
- stationery carnations;
- different colored sequins;
- ribbons or decorative cords;
- glue gun
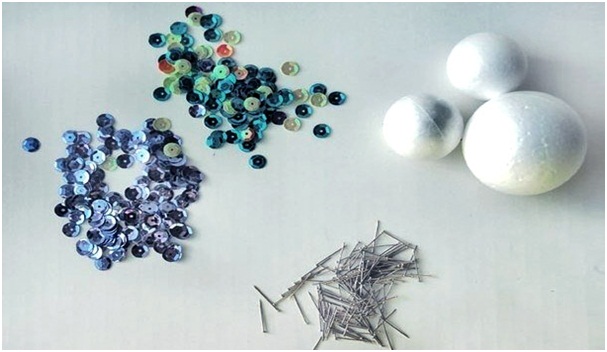

- We choose sequins of different colors.
- We take a foam ball and begin to attach sequins to its surface using nails.
- We fasten the material so that each subsequent sequin overlaps, in a word, creating the effect of fish scales.
- Then we make a bow with long tips from the ribbon.
- Using a glue gun, attach it to the top of the ball and you can hang it on the Christmas tree.
Undoubtedly, these unique disco balls will amaze everyone with their brilliance and beauty.
Video of making crafts.
Crafts for the New Year 2018 from paper.
On the eve of the New Year holidays, each of us tries to create an atmosphere of comfort, warmth and magic around us. Therefore, we invite you to consider and make unique crafts for the New Year 2018 from paper with your own hands, which will decorate and bring New Year’s joy and fun not only to your home, but also to kindergarten, school and even to the office.
Crafts for the New Year 2018 “Volume snowflakes” made of paper with your own hands step by step.
These voluminous, graceful snowflakes will create a snowy atmosphere in any room, without you even having to let the cold winter inside.
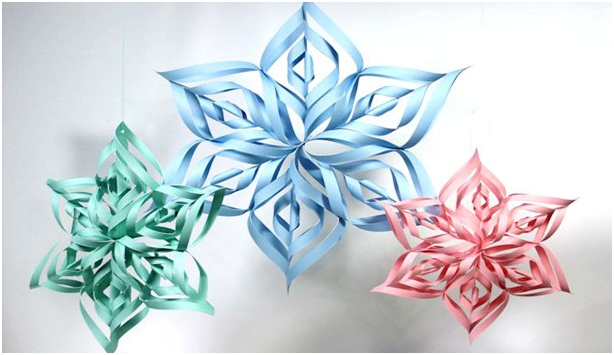
For this New Year 2018 craft you will need the following components:
- different colored paper;
- threads;
- scissors;
- glue.
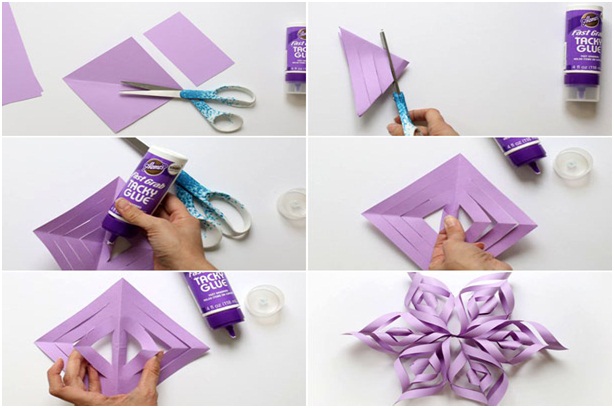
- We cut the paper into squares.
- We fold these squares diagonally and make 1 centimeter cuts.
- Align the squares.
- Now we glue all the cut strips, bending them from the center of the square to its edges.
- In order for the snowflakes to be voluminous, it is necessary to alternate the directions of the bends when gluing the strips.
- Thus, we form six parts of the snowflake.
- Then we glue all the internal parts and secure the lower ends of each petal.
- We thread a thread through one of the petals and you can hang it on the tree.
Video.
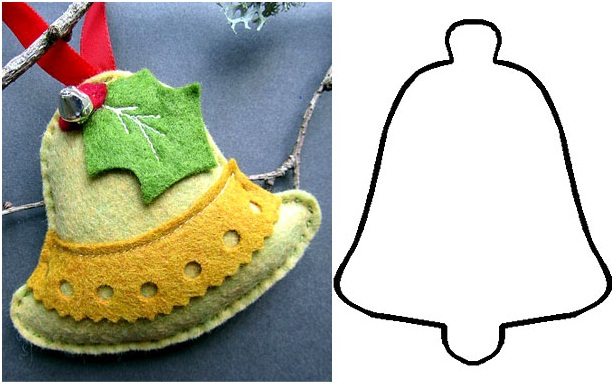
DIY “felt bells” step by step.
With voluminous felt bells you can elegantly decorate not only the Christmas tree, but also the room, turning everything around into a fairy tale. The main thing is to prepare felt in bright colors in advance.
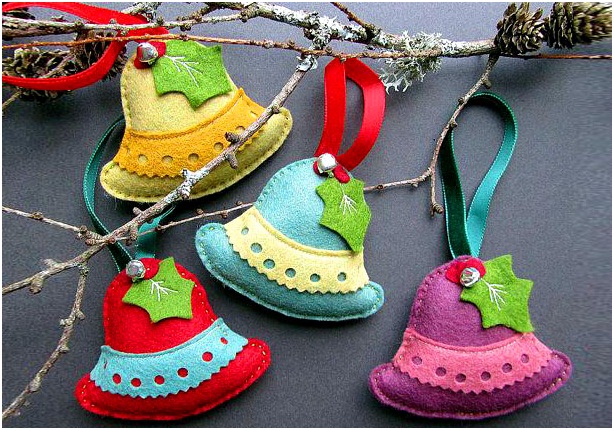
To create bells you will need Making bells:
- multi-colored felt;
- paper;
- cotton threads to match the fabric;
- needles;
- scissors;
- padding polyester;
- a simple pencil;
- glue;
- ribbons;
- beads;
- rhinestones.
Step-by-step making of crafts:
- Draw a bell-shaped blank on paper.
- Cut out and transfer to felt fabric. Thus, we make two sides of the bell.
- We sew them together, leaving room for stuffing and loops.
- We fill the blank with padding polyester.
- We make a loop from the ribbon and insert it into the upper part of the bell and sew it up.
- To give the bell additional volume, we sew on it various figures from pieces of felt.
- We take rhinestones and beads and begin to sew them on, thereby giving the product a festive look.
That's all, the crafts for the New Year 2018 are ready, you can start decorating the Christmas tree.
Video.
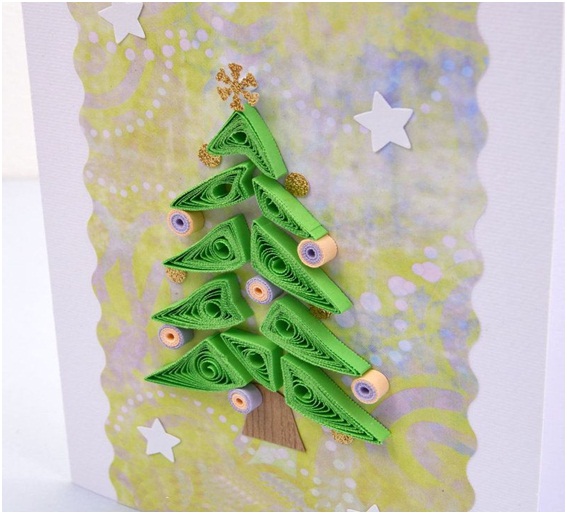
“Twisted Christmas tree made from strips of paper” with your own hands.
We are glad to present you the most interesting things, namely creative crafts for the New Year 2018 using quilling technology. This technique involves creating decorations from strips of paper by twisting and folding them. For this case you will need the following materials:
- cardboard for the base;
- stripes of different shades;
- PVA glue;
- pencil.
Making crafts in stages:
- Take the strips and twist them with a pencil.
- We give the blanks the appearance of a sharp droplet.
- Using a pencil, we collect “Christmas balls” into a tight circle.
- Cut out of paper various shapes and the size of a star, tree trunk, snowflake.
- We glue all the products to the cardboard. The amazingly beautiful Christmas tree is complete.
Crafts for the New Year 2018: “Stars”.
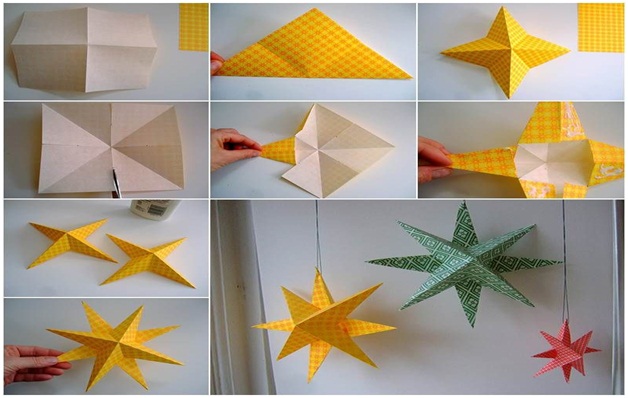
Anyone can master the art of appliqué, even a child. So, if you want to create a chic decor with your own hands, then let’s get started. To make this craft you will need:
- decor;
- multi-colored paper;
- threads;
- compass;
- scissors;
- glue.
Manufacturing:
- Take a sheet of paper and divide it into four parts.
- Fold it in half, forming a triangle, the corners of which are folded.
- We make small cuts along all sides of the sheet where the bends have formed.
- We fold all four parts of the figure into triangles, gluing their ends with glue.
- We turn the figure over and stick the same one on the back side only with the front side.
- Now these stars can be decorated with sparkles, stones, beads or sequins.
- We stretch the thread through one tip of the star and you can start decorating.
DIY “Cardboard Dog” step by step.

Patroness of the New Year 2018 - The dog can be made from any material. We present to your attention an original craft “Dog made of cardboard”. To make this model, prepare the following components:
- colored cardboard;
- markers;
- disk;
- scissors;
- glue.
Making crafts:
- Draw a dog's head on a piece of cardboard.
- Next, draw the front legs, the tail, and draw the hind legs in the shape of two circles.
- We cut out all the blanks.
- Take a felt-tip pen and draw the dog’s face (eyes, eyebrows, nose, smile).
- We make a cut in the lower part of the disk through which we insert the dog's front paws.
- The tail is attached to the back of the hind legs.
- Glue the dog's head to the top of the disk. That's all! This cute dog, made with love and from the heart, can be safely presented as a New Year's gift.
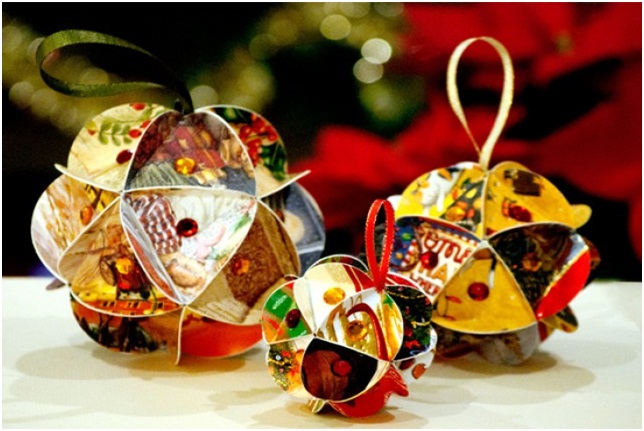
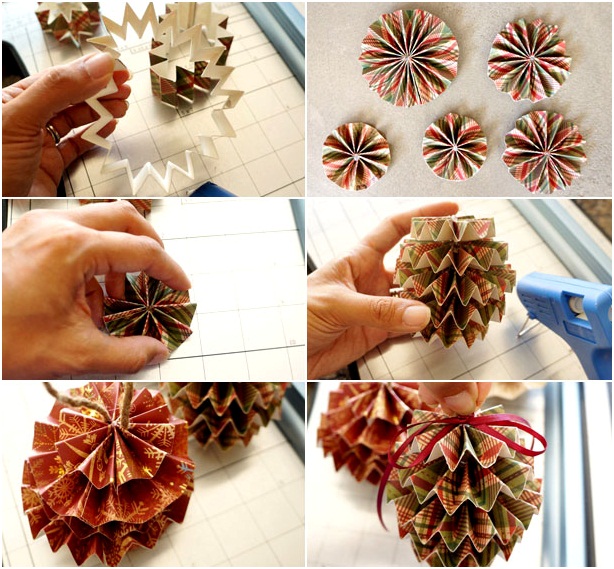
DIY paper Christmas tree balls.
These colorful balls - toys for the Christmas tree will definitely delight your children, and making them will certainly seem like a fun and exciting activity to them. Therefore, prepare the necessary materials in advance:
- colored paper;
- bright ribbons;
- pencil;
- compass;
- glue;
- scissors.
Manufacturing:
- On colored double-sided paper, draw two circles of the same size.
- Draw the third circle on cardboard.
- We cut out all the circles with scissors.
- We fold two circles of paper in half and glue these halves to the cardboard.
- We tie the ribbons into a bow and attach them to the top of the ball.
- The toy can be decorated with beads or pebbles.
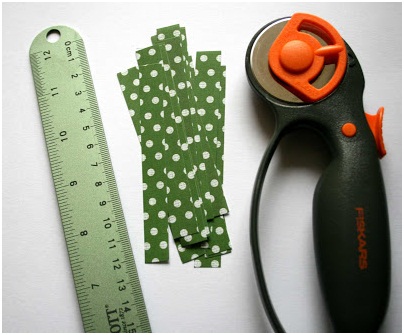
“Motley cones made of paper” with your own hands.
These amazing, lush cones will add charm to any Christmas tree. Before you start crafting, prepare the necessary components, namely:
- multi-colored, thick paper;
- ruler;
- scissors;
- glue;
- twine;
- ribbon.
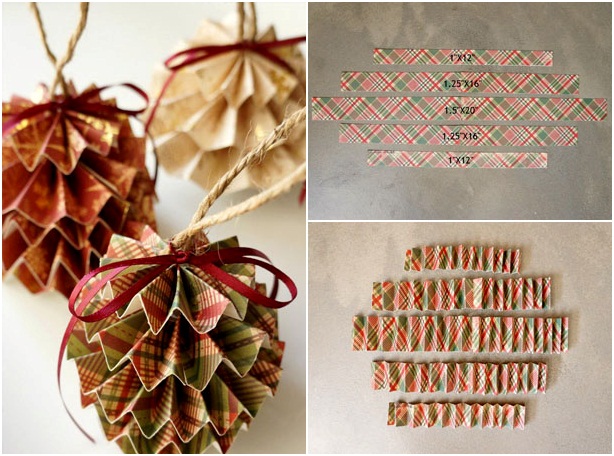
Manufacturing:
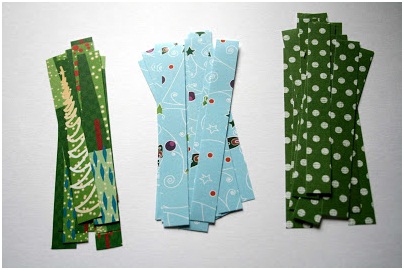
- We cut strips of paper of different sizes: 1 cm wide and 10 cm long.
- We also cut one strip measuring 20 cm, and the remaining two – 16 cm.
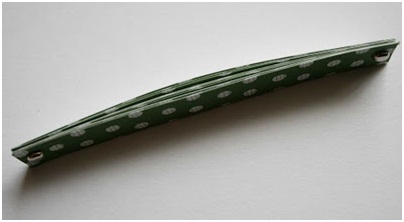
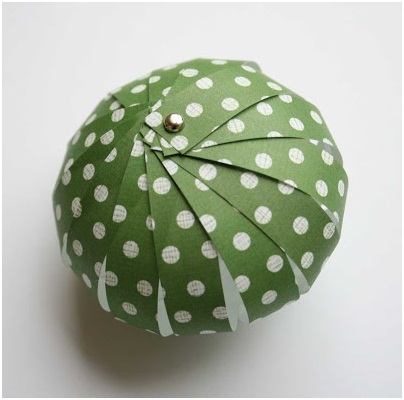
- We fold all the strips like an accordion and glue the ends together.
- We assemble the parts along the fold lines.
- We glue in the following order: small, medium, large, medium, small.
- We make a loop from the twine and attach it to the top of the pine cone.
- And, tie a bow. Now you can hang crafts for the New Year 2018 on the green beauty.
“Garland of Stars” made of paper.
Twinkling stars in the twilight will create a truly romantic mood. Components:
- thick colored paper;
- saucer;
- pencil;
- ruler;
- scissors;
- glue;
- electric Christmas lights.
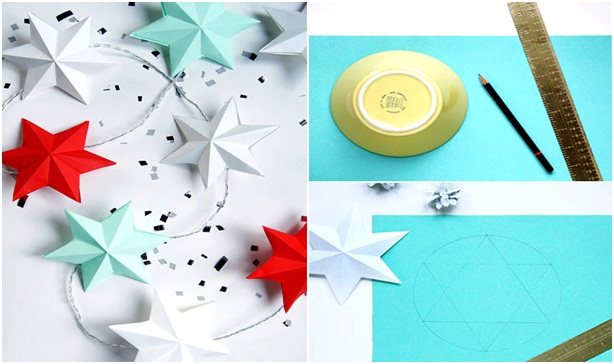

- Place the saucer upside down on the paper and trace its outline.
- In a circle we draw two triangles of the same size, so that they intersect with each other.
- In the same way, we draw the second side of the stars, adding small allowances to the triangles.
- We take scissors and start cutting out the blanks.
- To give the stars volume, fold two stars in different directions.
- We bend the allowances and glue the two stars, leaving small holes.
- We stretch the garland through the stars and the craft is ready.
This shining garland will certainly become original decoration on the Christmas tree and will fill the room with warmth and light on a cold winter evening.
Charming paper lanterns.
Light and colorful paper lanterns will immerse you in the atmosphere ancient China. And, of course, they will bring it to your holiday decor holiday and a sense of mental balance and peace. After all, all you need to make these crafts for the New Year 2018 is colored paper and a stapler.

- Take colored, thick paper and cut 15 strips measuring 1 cm by 10 cm.
- We put the strips in a stack and secure them at one end with a stapler.
- We also secure them at the other end.
- We unfold the strips one by one.
![]()
That's all, decorate your house with lanterns and enjoy the beautiful view.
“New Year’s composition” made of paper with your own hands.
New Year's decorations are not only garlands, lanterns and snowflakes, but also extraordinary compositions that will decorate any interior. In addition, you can present such crafts for the New Year 2018 as a gift to your family, friends, and relatives. They will definitely appreciate these holiday products, and every time they decorate their home with them, they will always remember you with a smile and warmth. In order to make this composition you will need:
- plywood sheet;
- acrylic paint in gold and green shades;
- stained glass paint for painting on glass;
- jigsaw;
- sandpaper;
- pencil;
- Christmas ball;
- glue;
- sponge.

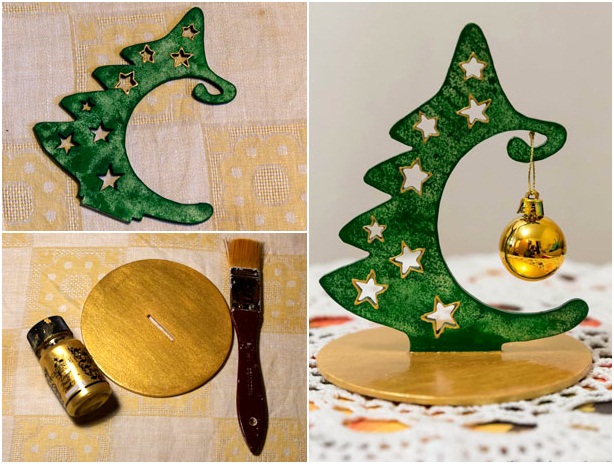
Manufacturing:
- From a piece of plywood we cut out a circle - a stand.
- We make a small hole in the center of this circle.
- On a sheet of plywood we draw a Christmas tree, marking places for cutting in the shape of stars.
- We cut out the workpiece, simultaneously cutting stars into it.
- Clean the surface of the Christmas tree with sandpaper.
- Using a sponge, paint the figure green.
- We paint the stand in golden color.
- We trace the outline of the star.
- We fix the tree on the stand, coating the joints with glue.
- Decorate the Christmas tree with a New Year's ball. Now the gift is ready!
Crafts for the New Year 2018 using paper origami technology.
Not long ago, the Chinese art of origami began to enjoy enormous popularity among both adults and children. And this is not surprising! Mastering the skill of folding paper figures is quite easy, especially if you follow the instructions. So let's make a symbol of the New Year 2018 - a dog using origami technology. To make this craft, you will only need to prepare two sheets of colored paper and a pencil.
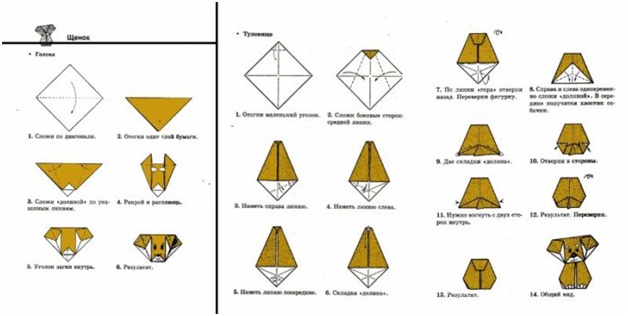
Manufacturing in stages:
- Take a sheet of paper and fold it diagonally.
- Fold back one layer of paper.
- Fold the muzzle along the indicated lines.
- Level and flatten.
- We bend the corners inward.
- We draw eyes, eyebrows, nose and smile.
- Now we assemble the body from the second sheet of paper.
- We bend a small corner.
- Fold the sides to the line located in the center.
- Draw a line on the right side of the sheet.
- On the left side of the sheet we also draw a line.
- Along the “hough” line, we turn the end of the sheet back and turn the figure over.
- We make two “valley” folds.
- Turn it to the sides.
- We bend the ends inward on both sides.
- We turn the figure over.
The origami dog is ready.
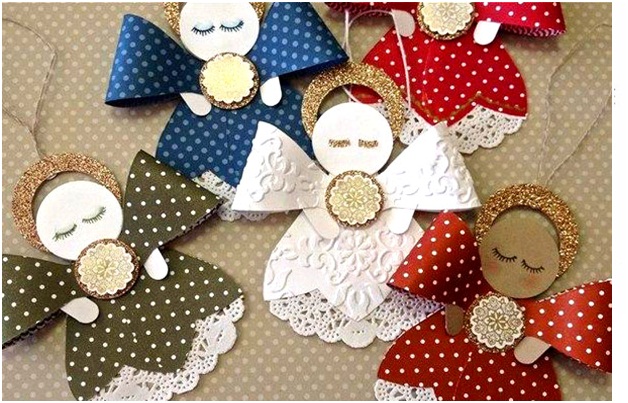
Crafts for the New Year 2018 “Paper angels.”
An angel is the most beautiful creation on earth and in heaven. This messenger with snow-white wings is not only a symbol of Christmas, but also the embodiment of purity, kindness and peace of mind. Making an angel with your own hands and decorating everything around with these delicate figures is truly true grace and magic. In order to make paper angels, you will need to prepare the following components:
- thick paper with a pattern;
- white or brown paper;
- a piece of shiny paper;
- openwork napkin;
- decorative buttons;
- layout mat;
- pencil;
- scissors;
- glue;
- Double-sided tape;
- a thread.
![]()
Manufacturing:
- From thick paper we cut out two parts of the same type and size to create an outfit.
- Cut out two strips that will be used as wings.
- We glue double-sided tape to the ends of each piece.
- Now we connect the prepared strips in the shape of a bow.
- We cut out the head of an angel from white paper, and a halo from shiny paper.
- We glue them together with glue.
- We draw rosy cheeks for the angel and glue eyelashes in the eye area.
- We make a loop from the thread and attach it to the back of the head.
- Now we collect and fasten all the pieces together.
- Glue a button to the place where the wings are located.
An angel of divine beauty is ready to soar on the branches of a green beauty and give everyone joy and a wonderful New Year's mood.
In conclusion, I would like to add the following - giving gifts to your family and friends, friends or just acquaintances is always much more pleasant than receiving them. After all, at the moment of presenting a surprise, each of us gives the person our warmth, attention and love. Especially in cases where the gift was made with your own hands or by the hands of a child. Such gifts will delight and evoke only the purest and brightest memories, not only on a holiday, but throughout your entire life. After all, it is the DIY crafts for the New Year 2018 that will charge you with positivity and positive energy.
New Year is a wonderful time when wishes come true, children's hearts rejoice, people's eyes shine with some special light and the real spirit of the holiday is in the air. And so that the time remaining before the main holiday does not drag on painfully long, you can entertain yourself with a wonderful activity - create DIY crafts for New Year 2017.
This is a great way to keep your child busy on New Year's Eve. In addition, time spent with mom or dad doing something useful is invaluable. Very young children can be encouraged to make simple crafts with their own hands using cereals or multi-colored plasticine. In addition, such an activity perfectly develops the baby’s tactile sensations. The resulting craft can be placed on a shelf so that it pleases the eye throughout the New Year and Christmas holidays.
Every grandmother will undoubtedly be very happy to receive from her beloved grandson or granddaughter original gift for the New Year, made by caring little hands.
Receiving gifts is certainly nice. However, giving gifts is much more pleasant. And if the gift is made with your own hands, then a fountain of emotions from the recipient is guaranteed! After all, a gift made with your own hands, even if it is a small craft, is many times more valuable than a purchased one.
In our section you will find many examples and ideas for wonderful New Year's crafts: both simple ones that a child can do, and more complex crafts that can serve as an extraordinary gift for a friend, relative or colleague for the New Year.
Despite the fact that on the Internet you can find many different ideas for creating original New Year's decorations and souvenirs, needlewomen are constantly in search, wanting to find new crafts for New Year 2017. The main goal of hand-made is to create unique souvenirs that have no analogues in the world, and for this you can use our ideas. Remember that in the article we only offer an option on how to design the craft and give tips on how to complete it, and you can change it at your discretion, change the decor, colors.
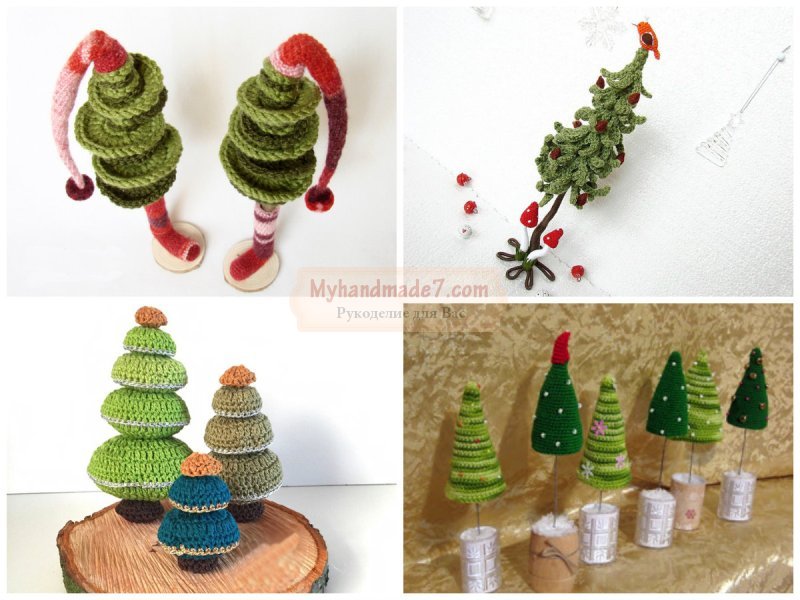
New crafts for the New Year 2017
Can be crocheted, exactly knitted toys and souvenirs will fill your home with warmth and comfort and help create a unique atmosphere. You can link different Christmas decorations- balls, bells, snowflakes, caramels and hearts. If you decorate your Christmas tree with such toys, it will truly become unique.
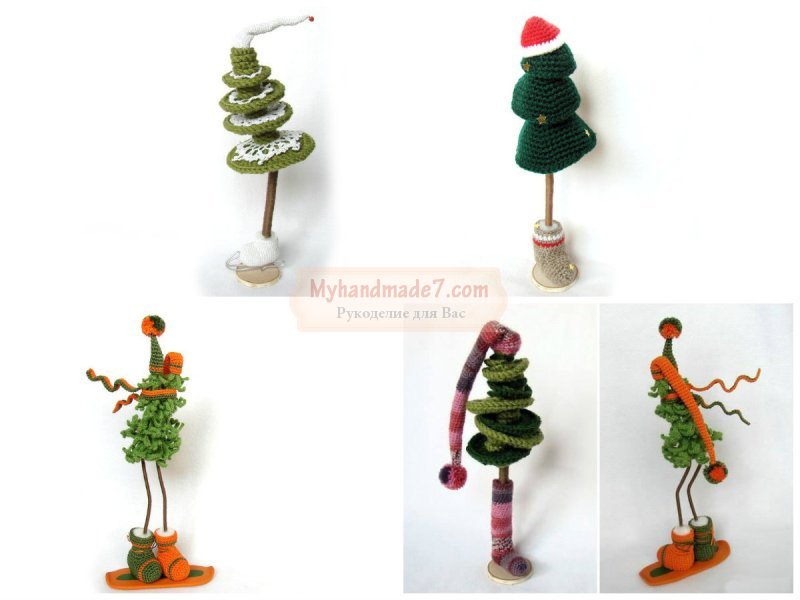
They can also be a wonderful holiday gift for a friend, work colleagues or teacher at school, especially if you approach them creatively. A miniature fluffy Christmas tree on a stand is a beautiful souvenir that looks truly festive. Today you will learn how to make such a unique craft. You can choose any color scheme, and decorate the finished Christmas tree with decorative elements.
To make the base for the Christmas tree you will need cork, thick cardboard and a wooden skewer. If you only have thin wooden skewers on hand, then three pieces should be fastened together to make the barrel strong enough. To form the bottom of the boot you will need a small piece of padding polyester or cotton wool; to decorate the “leg” we will use jute cord. During the process you will also need PVA glue or hot glue.
At the first stage, you need to make a hole in the plug, into which you can then attach the barrel. To make a hole, it is not at all necessary to use a drill, since the cork material is quite soft, a hole of a suitable size can be made with an ordinary self-tapping screw or even an awl.
A wooden skewer should be inserted into the resulting hole, securing it with glue for reliability. Next, the cork must be glued to a piece of thick cardboard. This cardboard will be used to form the boot: you need to draw the outline of the sole on the cardboard and cut it along the line. The back of the boot is our cork, and we will make the front part using a thick ball of cotton wool or padding polyester. The ball must be rolled so that it is dense, and then glued to the cardboard base and to the side wall of the cork, as shown in the picture.
Crochet crafts for New Year 2017
When the base is ready for the future New Year's beauty, you can choose threads and a hook to start knitting. The boot is also crocheted, but there is another decoration option using felt and braid. The wooden trunk near the boot must be wrapped with jute rope - the turns must be neat; for additional fixation, the wooden skewer can be coated with a thin layer of glue. It is necessary to wrap the rope only on that part of the trunk that will remain “free” after the Christmas tree is secured on top.
You can use thick aluminum wire rather than a wooden skewer, so that you can then bend the barrel a little.
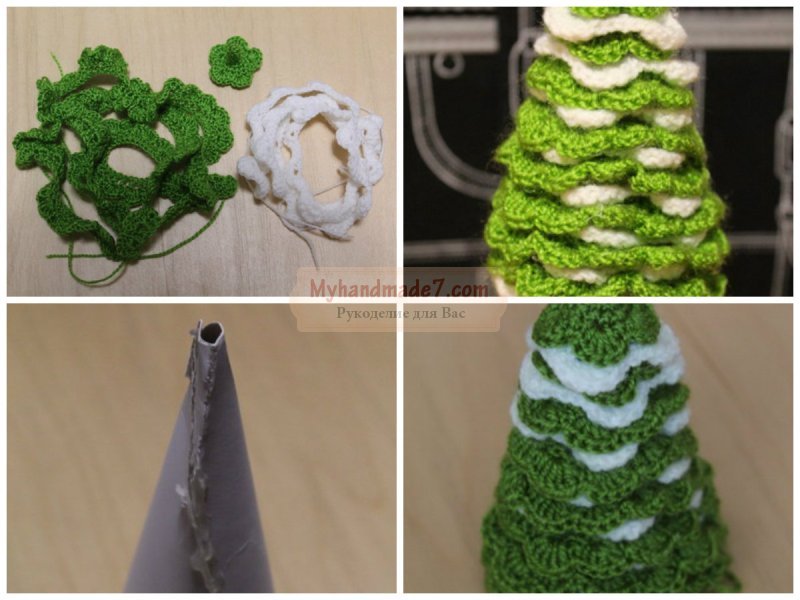
All that remains is to find out the main secret of this unique one: how to knit a fluffy Christmas tree. It is advisable to choose thin cotton yarn, for example, regular Kirov Iris or “Lacy” Pekhorka will do. Having chosen the yarn, select a hook of the appropriate size, after which you can begin knitting in accordance with the pattern:
The first step is to cast on a chain of chain stitches - for a small Christmas tree there are only 75 stitches. Their number depends on the size of your craft. Of course, if you are knitting it for the first time, it will be difficult to calculate the required number of stitches for the desired size of the tree. This knowledge will come to you with experience, so be sure to remember how many loops you cast, and then measure what size the craft turned out to be, because we are sure that once you try to make crocheted crafts for New Year 2017, you won’t stop at just one souvenir, but make them for all your friends.

Crochet crafts for the New Year 2017
When you have cast a chain of the required number of chain stitches, you need to knit the first row - it is a row of single crochets. In the second row we will knit fluffy branches; for this, first five single crochets are knitted, then five chain loops are knitted, on which four stitches are knitted, and one single crochet in a row. Thus, we have the first branch. You need to repeat these steps 10 more times to get 10 branches, with a gap of five loops between them.
Since the length of the “branches” increases towards the bottom, it is necessary to make increases when knitting. For the next 10 branches you need to add one air loop, i.e. Now we will knit five air loops and five stitches on them to make the branches longer. The next 10 branches are knitted in this way, after which the length increases by another air loop.
When you have a long knitted strip with fringe, you can begin to form the Christmas tree. One edge, where the branches were the shortest, must be secured to the top of our trunk - from wire or wood, and then wrapped around the base in a spiral, making sure to secure each turn so that the Christmas tree turns out beautiful and does not lose its shape.
The top of the Christmas tree can be decorated with a miniature knitted hat and scarf. You can attach small colorful beads to the branches.
To make the Christmas tree stable, you need to make a stand: for example, glue a ready-made souvenir to a wooden circle stand, you can make a bag with heavy filling at the bottom instead of a boot.
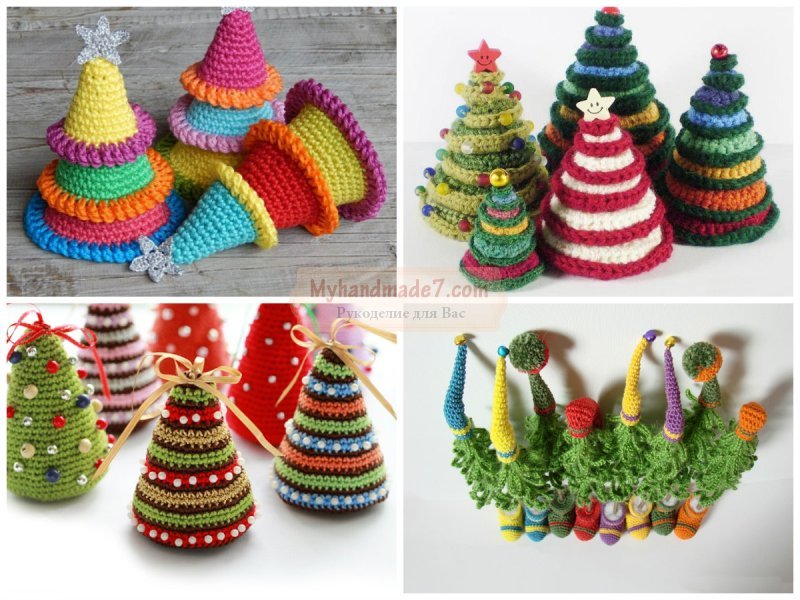
On such a stand you can design it in different ways. DIY crafts for the New Year 2017, for example, form a Christmas tree from knitted circles of thick yarn or from knitted bells. We have selected the brightest ideas for you in the master class. Please note that one simple basic guide will help you make 10 different Christmas tree designs that will make great Christmas gifts for your friends.
In addition to threads, there is another material that allows you to create warm and homely ones - we are talking, of course, about felt - the favorite material of many needlewomen. The variety of felt toys really amazes the imagination; this material allows you to bring even the most complex idea to life. The toy can be of any size and shape, even if it contains small elements, they can be easily glued or sewn.
The main advantage of felt is that the edges of the material do not need to be processed. And the stores offer felt in all the necessary colors and shades. You can decorate felt toys with beads and sequins; even ordinary hand stitches look great on felt and serve as decorative elements.
Unlike textile toys, you do not need a sewing machine to sew felt figures; all parts can be sewn by hand.
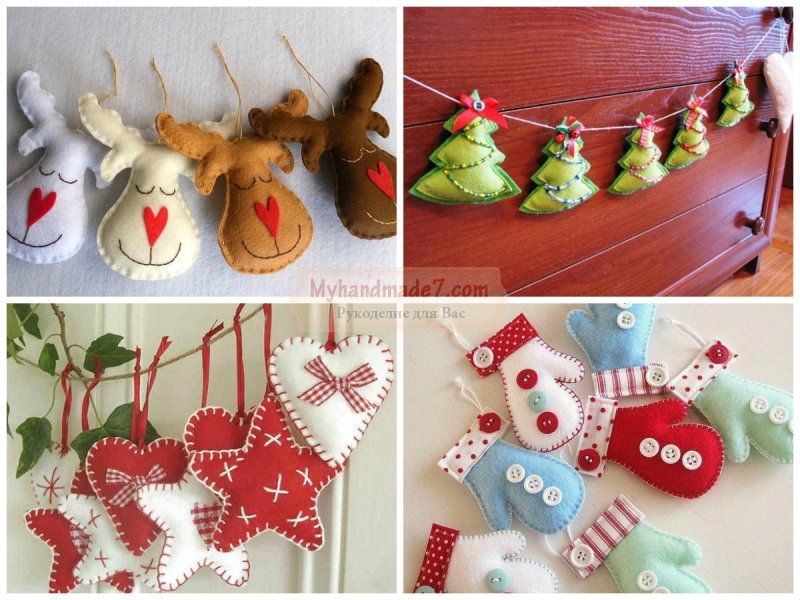
Felt is so simple and available material that it can be offered for creativity even to children, they can make it in the form of an applique, where all the parts are cut out of felt.
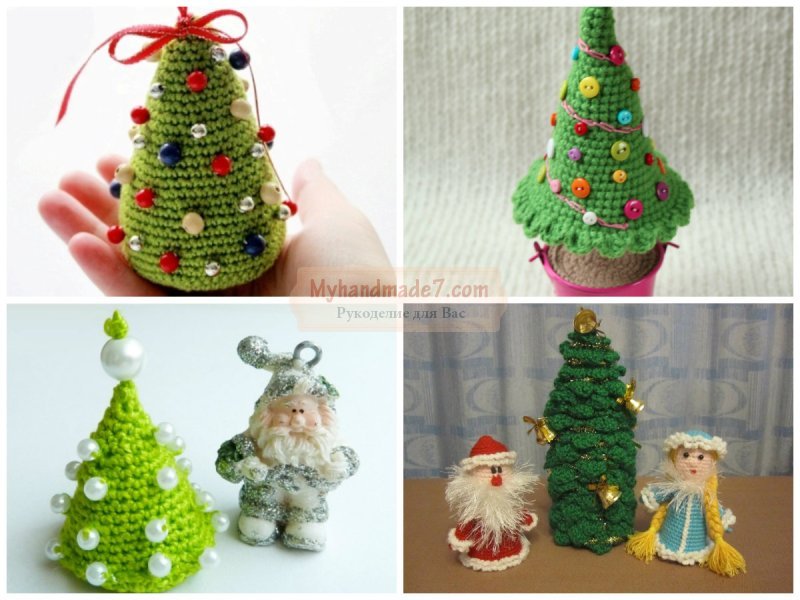
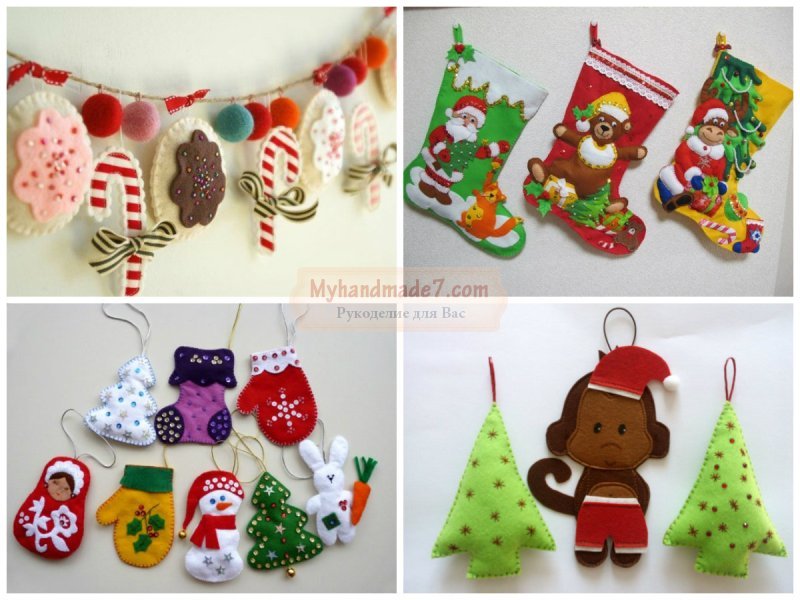
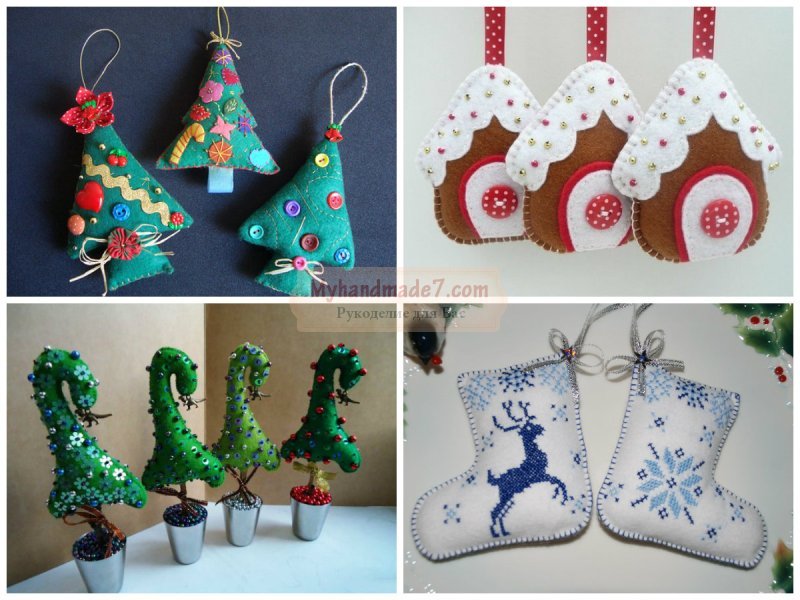
Felt crafts for the New Year 2017 usually stuffed with padding polyester or cotton wool to give them volume. You can choose any of the proposed ideas: make Christmas balls decorated with beads and ribbon, gingerbread houses, stars and Christmas boots. By attaching a loop on top, you can hang such a toy on your Christmas tree. You can decorate a Christmas wreath with miniature figures and use them as an element New Year's garland and even as a decorative element festive table.
There are very simple ideas to decorate your home on the eve of the holidays: you need to cut a lot of multi-colored felt circles (they can be of different sizes), and then sew them on sewing machine in a long garland.
2017 - Year of the Rooster: crafts for the New Year
You already know that 2017 - Year of the Rooster, crafts for the New Year will also be dedicated to the main symbol. Some original ideas You can find information on creating festive cockerels; please note that the brightest cockerel crafts are also made using felt. And children can make a New Year themed applique using the quilling technique.
The next idea will appeal to those who, for a number of reasons, cannot install a large live Christmas tree, which would become the main decoration of the holiday. As a rule, in small apartments there is simply no room for such a tree, but this does not mean at all that you will not need Christmas decorations, because you can mount them on the wall, using various toys and decorative elements to create such an impromptu New Year’s beauty.
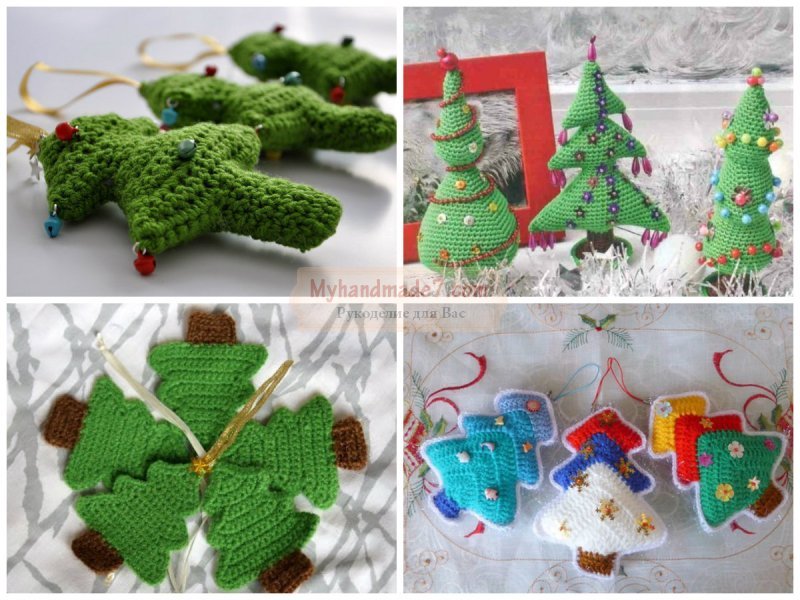
On the wall in the children's room you can place a triangle Christmas tree, which is formed from small textile triangles. You need to sew a certain number of triangles using multi-colored cotton fabric, then stuff the triangles with padding polyester and attach them to the wall, forming one large triangle.
An impromptu Christmas tree on the wall can be created if you use only paper elements, for example, cut out circles of different sizes from thick paper and use them to lay out the outline of the Christmas tree on the wall.
Yarn can again come to the rescue: first, nails are driven in along the contour, and then threads are pulled between them to make the contour more pronounced; you can make several turns. You can decorate the finished Christmas tree with toys that can be easily hung on strings.

Be sure to get creative with your children on New Year's Eve; for example, you can make New Year's cards for your close relatives. To design postcards, you can use not only paper or cardboard, but also various small details - buttons and beads, beautiful cards obtained by using threads and yarn.
Lacy ball for Christmas tree in vintage style
New Years is soon! (Lena Rogozina)
Hello dear friends!!! I bring to your attention my master class on making a New Year's ball in the Vintage style. Since I’ve only been at the crafts fair for a month, and this is my first master class, I ask you not to judge too harshly). So, let’s begin! For work we will need: a foam ball; hot glue; strong thread; floss thread; acrylic paint with mother of pearl; brush;stretch guipure; vintage lace; satin ribbons of different widths and colors, a silk ribbon I sewed, beads and one half-bead. 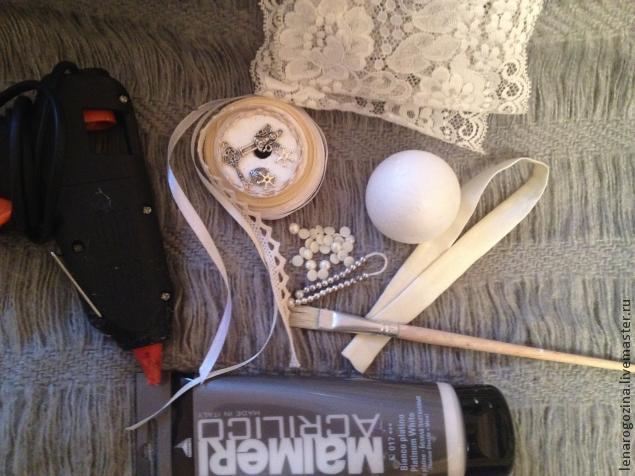 1. We paint our workpiece with a thin layer acrylic paint, wait for it to dry. 2. Then we take the guipure and wrap it around our workpiece.
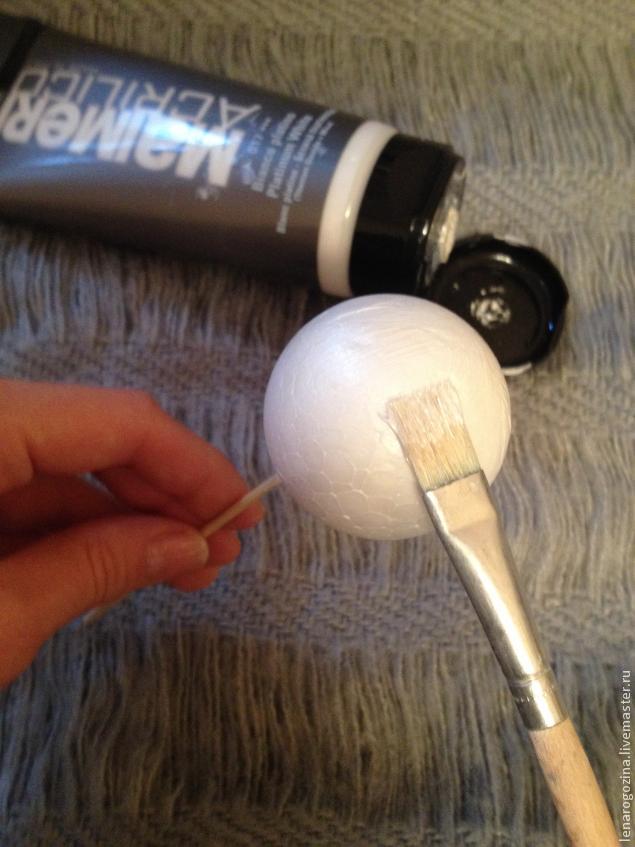
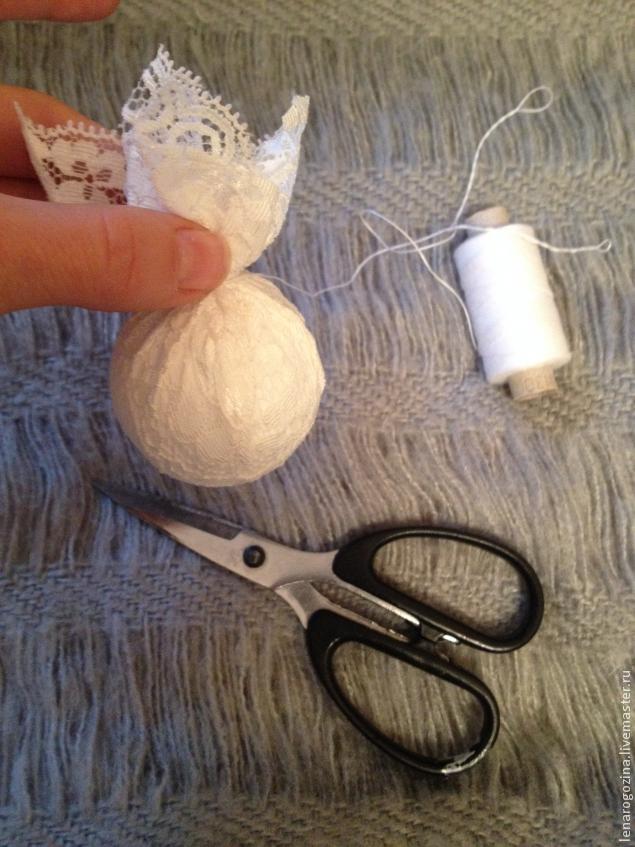

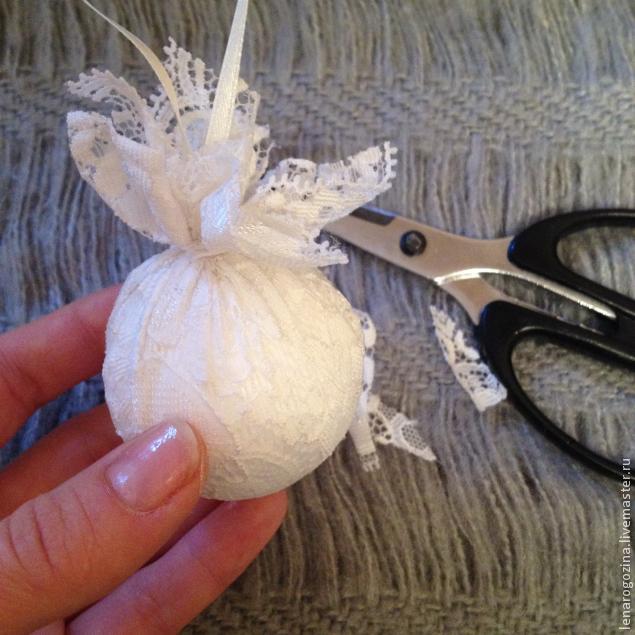 3. Cut off pieces of guipure that are too long; then we push the ribbon fastener between the “petals” and fix it with hot glue. 4. And now - the most interesting part!!! Let's start decorating our New Year's ball! To do this, we make bows from ribbons, string beads onto a thread, and also attach a pendant.4. We take the prepared bows and also attach them with hot glue around the ball. By decorating in this way, our ball becomes very elegant!!!
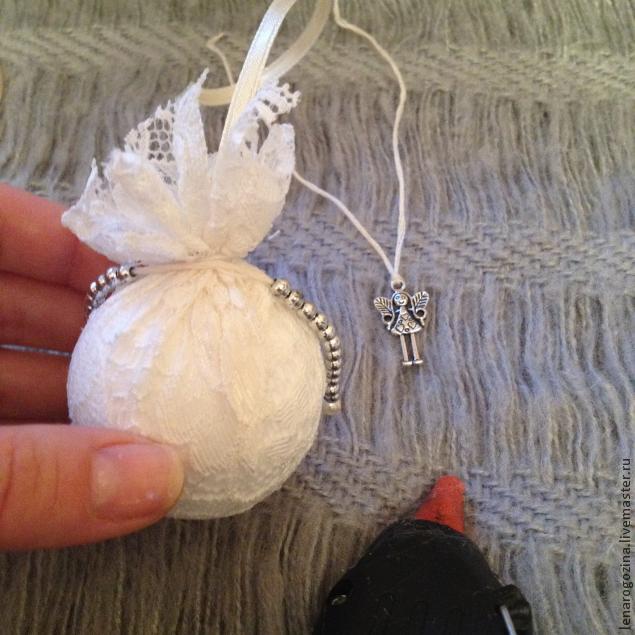
 The final touch is to glue the half bead onto the main silk bow, and.... Our vintage ball is ready!!!
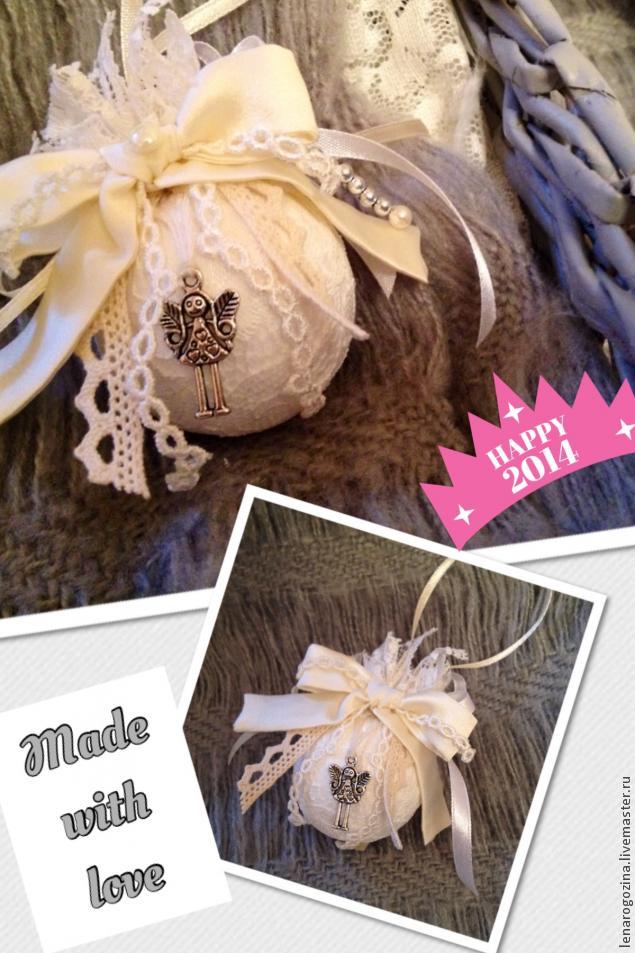 I hope you liked my master class, I will be glad if one of you, my friends, has such a wok toy on the Christmas tree. P.S. I apologize for the scattered text - I haven’t fully figured out how and what)))
We invite you to familiarize yourself with an interesting selection of ideas, the main theme of which will be the most famous winter holiday - New Year 2017.
Today we’ll talk about minor, but very pleasant little things, gifts and just little things designed to decorate a room with your own hands.

A great idea for symbolically congratulating friends, relatives and colleagues on winter holidays. The present candy will appeal to the tastes of both big and small. Everyone loves sweets, right?
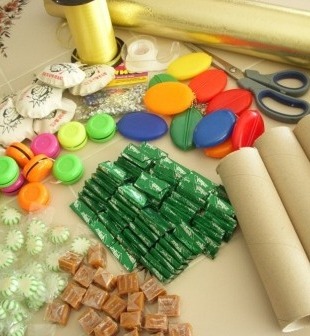
So, what do you need to create a sweet candy gift for your friends and relatives:
- Sweets. The main thing is that they are small and have individual packaging. Small candies - pops, lollipops or chewing gum - are perfect. Do not use quickly perishable sweets.
- Cardboard cylinder. You can use a bay from toilet paper or paper towels.
Or you can build a cylinder yourself from not very thick cardboard.
- Scissors.
- PVA glue and/or tape.
- Variegated paper. You can take a wrapper or print it out on a printer.
- Ribbon for decoration. In this situation, cellophane-based gift wrapping tape is a good choice.
Let's get started, master class of gifts for New Year's Eve
Let's start by measuring how much paper we took to wrap the cylinders and leaving an allowance of about 5 centimeters at the ends of the cylinder.
Advice: if you haven’t found a suitable cylinder and decide to make them from cardboard, then don’t take thick cardboard. Cardboard from a cereal box will work just fine. And don't make your top hats too long. 15-20 centimeters will be enough.
Now you need to wrap the cylinders in paper. Measure the same distance at the seam allowances and secure the paper on one side, leaving an impromptu skirt. Secure the paper with tape.
Then you need to decorate the place of fastening with gift ribbon. To enhance the effect, the ends of the wrapping tape can be separated and curls can be made using scissors.
Now fill the cylinder with sweets. If desired, you can put miniature additional gifts in the form of souvenirs between the sweets. The cylinder must be filled to the brim with sweets, not forgetting that the paper allowance is not a continuation of the cylinder. If you don’t put enough candy filling, then after you close the other end of the gift, will the candies even rustle and make noise? perhaps the souvenir inside is deformed.

After filling the candy present with sweets, you need to carefully close the second end of the present and decorate it with a ribbon in the same way as the first end. Now you can give or hang fun sweet decorations on the Christmas tree.
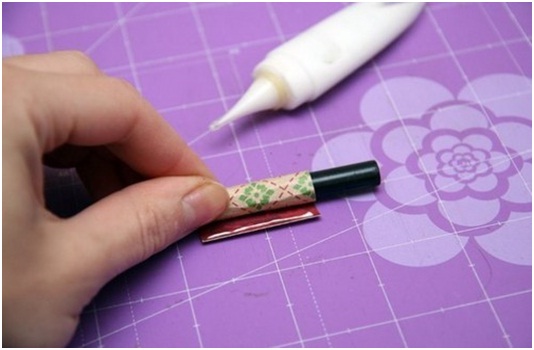
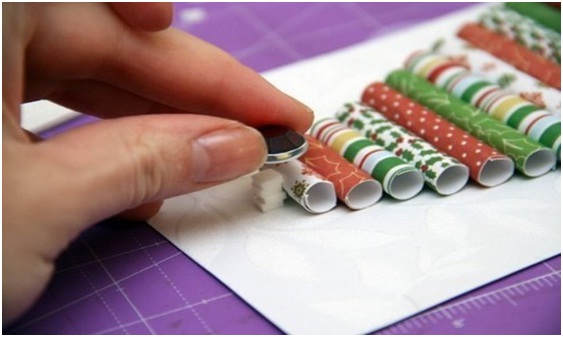
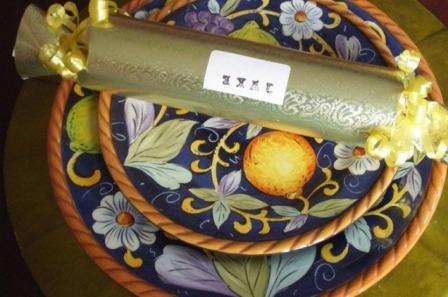
Creative idea #2. Christmas tree decoration “Gift List”
Everyone loves to receive gifts, both big and small. On New Year's Eve, there is so much to remember and so many to buy and then give, that you can easily confuse who wanted what. To avoid such an opportunity, adopt the idea of a list of gifts that will perfectly find its place on your Christmas tree and no one will be forgotten and everyone will receive their own gift.

So, what do you need to create an original decoration:
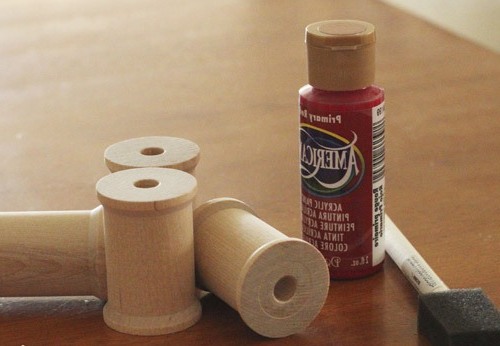
- Several wooden spools of thread. One per family member.
- The paper is thicker.
- Glue.
- Dye. Choose any one. The main thing is bright.
- Thread or thin ribbon.
- Pencil.
Let's start implementing the gift idea
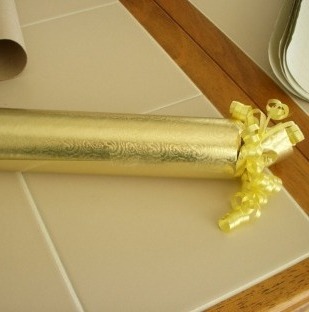
Let's start by preparing the coils. They should be painted in the color you have chosen. Now you need to cut out strips of paper from thick paper. The width should be slightly less than the width of the coil itself, and the length should be approximately 20-25 centimeters.
Next, you need to connect the spool and a strip of paper. This must be done with glue. When the gluing area is completely dry, the strip should be wound on a reel. Moreover, she will constantly strive to unwind back. You can additionally secure it with a beautiful ribbon. Or a thin eraser for papers.

Afterwards, you need to make a loop for hanging. Thread the thread or string you prepared into the hole in the spool.
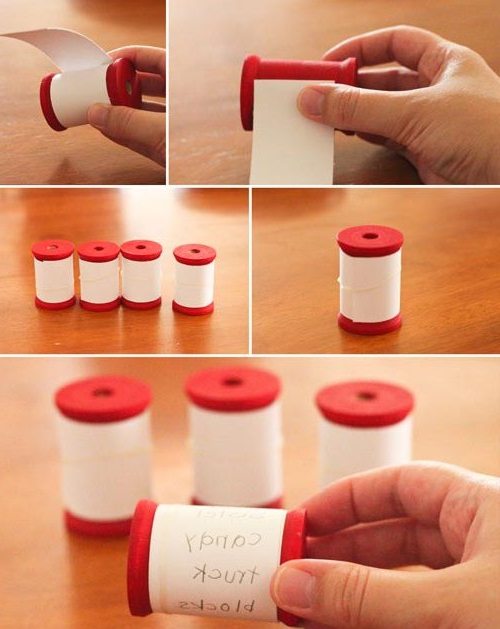
Now let every family man write down what he wants to receive for the New Year and hang his list on the Christmas tree. By the way, this is a very resourceful way for parents to find out what their child wants to receive as a gift.
Unusual gift idea No. 3. New Year's topiary
This is the selection of ideas we came up with. We will be immensely glad if you find something useful among the ideas presented. Congratulate your family and friends on the winter holidays. Happy New Year 2017!