There are a large number of shower cubicles on sale today, but the high cost or other criteria make such an acquisition impossible. Therefore, many strive to make a shower stall on their own, purchasing only a shower tray. Finished products are offered in various options, thanks to which it is possible to choose optimal size, suitable shape and material. Installation shower tray is carried out depending on the last characteristic. After installation, all that remains is to install the curtain mounts and pull the curtains, getting an original and comfortable bathing space.
Showers in bathrooms are often preferred over baths. There are practical and financial reasons for this. The benefits of a shower are clear and the range of models available on the market is constantly growing. But which shower is right for the bathroom and for what? In a head-to-head comparison between shower trays and floor showers, both options show their strengths and weaknesses.
Shower trays: advantages and disadvantages in comparison
The classic shower design is the use of a shower tray. It is enclosed with mirror tiles and is usually integrated into the corner. These shower trays are available in different sizes and depths and differ in material, shape and color. An important advantage is the separation of water from the surrounding bathroom. It is going into the shower bath and from here straight into the sewer. This prevents water from falling onto the bathroom floor. Compared to other models, this classic shower form is usually more favorable. However, the assembly involves a lot of effort and usually needs to be done by a wizard.
Possible design options
The shower tray can be purchased with a square, triangular, rectangular or U-shaped base. In the case of a triangular shape, the outer corner is rounded or beveled. As for the material, the following options are present:
- Steel shower tray. In terms of durability, such models take second place. it is characterized by a good margin of safety, lightness and affordable cost, but when a jet of water hits the bottom, a strong noise is created, which brings some discomfort;
- A cast iron shower tray is quite expensive, but the high cost is justified due to the durability and strength of the model. Thanks to their heavy weight, these shower bases are extremely stable. True, in the case of cast iron, one should not count on a variety of shapes;
- for a shower are characterized by lightness, an abundance of forms and modifications. The appearance of small scratches does not affect the appearance and does not cause structural disturbances. A negative quality is the sagging of a standard acrylic product under the body's weight, but this moment can be eliminated by using additional fasteners. When buying a model with intermediate reinforcement, such actions are not necessary;
- Ceramic shower trays. They are one of the most expensive solutions, but the price is justified by durability, beautiful appearance... Among the negative qualities are the coldness of the material and susceptibility to mechanical damage;
- Marble models are the most expensive, but practical, in contrast to ceramics. Chips practically do not appear on them.
Also for the shower. Bathing in this type will not create a decorative picture, but it will be a good alternative if you have a limited amount of money. Plastic pallets are especially relevant if you plan to install them in a bath. This is due to the fact that the plastic is not subject to excessive heating and is not afraid of temperature extremes.
Floor showers: advantages and disadvantages in checking
Also getting into the shower bath can be difficult for illness or old age. Floor-level shower provides very easy access. This is especially beneficial for children, the elderly, and for physical disabilities. With or without a suitable shower enclosure, it can be easily made without barriers. The required connections are identical to those for the shower tray. However, installation is usually easier. This requires less work. Cleaning the floor shower is easier because it can usually be done with a glass cleaner.
Considering an acrylic or ceramic pallet as a possible purchase, you need to correlate all the pros and cons, because the answer to the question of which product is better depends on specific conditions.
The pallets are different, it depends on the shower stall you wantInstallation features
Installing a shower tray with your own hands is considered the most time consuming part of creating a bathing cabin. The complexity of assembly is due to the limited space for maneuver with the overall design, especially in small rooms. Immediately provide for a slight slope towards the drain hole. A similar slope is formed when collecting drain pipes.
The disadvantage of this shower solution is the often higher price. It is worth comparing different models. However, in the case of a floor-to-ceiling shower, the separation from the bathroom has great importance... Otherwise, water will spread throughout the room when landscaping. For this purpose, there are partitions that are firmly installed on the floor or in a flat shower.
Anyone who is already thinking about age, or who is very important for comfort, is advised with a floor-standing shower. Perhaps the higher purchase price is offset by greater comfort. Even homeowners with a high demand for design and aesthetics benefit from such a shower solution.
Another nuance concerns, which, due to lack of space under the base of the pallet, is combined into a single whole with a drain hole, as a result of which a siphon sewer hole is formed, the exit of which is provided vertically or horizontally. The choice of the type of exit depends on the characteristics of the sewer outlet in a particular case.
If the shower tray and shower tray fit differently, they still have some common features. Although it seems obvious, the shower tray and both are part of the shower and are therefore installed in the shower. both of which must be equipped with a drainage system consisting of a drain and a siphon for good water drainage and of course must be connected to the existing network. Both are available in a wide variety of materials to suit individual tastes. So you can find the shower tray and shower tray in enamelled ceramics, teak, resin or acrylic, for a personalized aesthetic and easy cleaning.
The installation option is determined based on the characteristics of the car base material. The most common are acrylic and ceramic pallets, so they should be discussed in more detail.
Installing acrylic construction
The pallet is easy to install, since it is available on sale assembled. During the installation process, increased attention is paid to leveling the horizon of the structure and sealing the connection between the pallet and the sewer pipe. Installation can be carried out without special tools. It is enough to have a hammer, screwdriver, adjustable wrench, pliers and a jigsaw on hand. The work is carried out in the following sequence:
The shower tray is easy to install and easy to install, making it the cheapest solution for most people. In most cases, the shower tray has a recognizable appearance. The main advantage of the shower tray is its installation mode, which is the simplest of the two as it is simply a matter of placing the shower tray on the ground: there is no compulsory work required, the shower tray must be raised so that an effective evacuation system can be installed that avoids the risk of damage bathroom.
- The installation of the shower tray begins with which the acrylic models are completed. After installation, the legs must be adjusted using an adjustable wrench.
- At the same time, the drain is fixed and connected to a siphon. Doing so helps to protect against odors from entering the sewer.
- The siphon is connected to the drainage pipe of the sewage system.
- Install decorative panels that mask the drain and an acrylic structure from the sides along the perimeter. For maximum tightness, the joints with the adjoining walls, as well as the part in contact with the floor and panels, are coated with a silicone-based sealant. For such purposes, a putty is chosen, in which additives are present against the growth of mold, which grows rapidly in conditions of high humidity.
You can assess the correctness of installation by standing on the structure. The appearance of sharp crackling and sagging indicates that the assembly technology was not followed. Such phenomena can also be observed with a high-quality installation of Chinese-made models. Therefore, it is better at the installation stage to provide for the reinforcement of the pallet by blowing out the space between the bottom and the floor. polyurethane foam, laying bricks or ordinary boards.
The main disadvantage of the shower tray is its average durability. Since it is not embedded in the floor, but simply installed on it, the shower tray is more susceptible to water time and cracks. A water leak station that can damage your bathroom or your neighbors' ceiling!
More complex to customize, but also more durable, the shower tray is the perfect solution for private owners who want to invest in a bathroom that matches their image. Slightly more expensive than an installed shower tray, it is most often distinguished by the clean aesthetics of its stainless steel tank. Key benefits of a built-in shower tray. Its aesthetics and practicality, which make it an ally of excellence for lovers of fine things, as well as people with limited mobility and large families.
with minimal knowledge in construction, you can install a pallet with your own handsPolyurethane foam is ideal option, if, in addition to amplification, it is necessary to provide noise isolation.
How is the ceramic option mounted
Ceramic shower trays are characterized by the lack of free space between the bottom and the floor, therefore, it is easier to install a shower tray with your own hands than an acrylic version, since there is no need for additional reinforcement. The product is placed on the floor, but this feature significantly complicates the connection of the pallet to the drain pipe due to limited access.
How is the ceramic option mounted
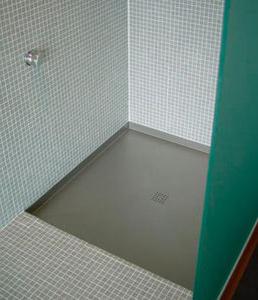
Unlike the shower tray, which is only suitable for standard showers, the hidden shower tray is perfectly integrated into the Italian shower. The main disadvantage of this type of shower tray is that it takes some work to install, which means more time and more budget than a standard hopper.
That is why it is best to recommend choosing the most suitable elements for your shower. The main equipment is a sink, wall or faucet and shower head. Here we present various patterns and range levels. More comfortable and more aesthetic, the recessed receiver is flush with the floor. The floor must be excavated to accommodate the receiver and water intakes. This equipment is being refurbished to replace the existing recessed receiver. Otherwise, it is associated with the important work of masonry, the implementation of which is not always possible.
The instructions for installing a shower tray involve performing a number of steps to solve this problem:
- The structure is placed, combining to the maximum the sewer hole and the supplied drain pipe;
- To install a shower tray without legs, outline its boundaries, outlining the contour with a marker, and put a mark at the place of the planned drain;
- Using an electric jigsaw, cut out a floor element at the location of the siphon;
- Outside the structure, next to the first cutout, another recess is made in the floor. A siphon and pipes will be laid here;
- At the next stage, assembling the shower tray with your own hands consists in forming from the cut out part floor covering viewing panel. For this, slats are attached to the edges.
- The place intended for the shower tray is greased with PVA glue, slightly diluted with water. After the first layer has dried, the adhesive is reapplied;
- Now you can mount the siphon, connecting it to the drain hole, and install the pallet on the glue solution, giving it a horizontal position;
- After 24 hours, the pipe and siphon are connected through the inspection panel. In places where ceramics are in contact with the floor and walls, an even layer of silicone sealant is applied.
If the ceramic structure is installed in a bath or wooden house, it is required to make the insulation of the adjoining walls using roofing material and plastic wrap.
Recipients take various forms for your bathroom. Rectangular or rectangular trays allow you to have a more spacious shower. Enamelled sandstone is a strong, durable, but rather heavy and impact-sensitive material. The acrylic receiver is lighter, non-slip and allows for the most different shapes and colors. However, acrylic is sensitive to scratches and deformation.
Steel or cast iron with enamel coating
Mixer: hot and cold water controls are separate. Mixer: only one regulator for hot water and cold water regulates temperature and flow. Dosage is faster and more accurate. Thermostatic mixer: has two separate controls, one for flow regulation, the other for temperature, for greater comfort and safety. The production of hot stored water is essential for the correct functioning of the thermostatic valves.
We make the base for the shower stall ourselves
Do-it-yourself shower trays are made if you want to get a unique design or save on a finished product. Having properly prepared for work, it is possible to make a shower tray of any shape with finishing with various facing materials, the most popular of which is tiles. This requires preliminary work:
Mixer level range
The range level is determined by certain technical characteristics or ends. The number of shower cabins, one or two, depends on the location of the shower tray: from 1 wall, from 2 walls or from 3 walls. Therefore, the shower can accept one or more swing doors or with frontal or corner access, for showers installed on one or two walls.
An example of a quantitative online assessment on a website for a shower installation
Material and finish define the range of shower wall levels. Synthetic walls are lighter, economical and easy to maintain, but have limited strength.
Advice from a professional site partner
When purchasing your mixer, you will surely notice significant differences in product price. But the mistake is to consider the appearance of the two products a priori, similar in quality. It is highly recommended to opt for slightly more expensive products because this higher price is justified by the strength and quality of the mixer.- The preparation of the base consists in the implementation of a concrete screed. Also, a shower tray is being installed on bricks;
- Choosing the cladding material, you can make some effort and make a mosaic tray for the shower, laying it out in the prescribed sequence color combinations, forming original patterns, or making a solid base;
- You can assemble a shower stall with a finished pallet using the translucent panels available on the market. With limited funds, classic shower curtains become an alternative.
You don't have to worry about choosing a specific accessory, everything is already there. Complete shower enclosures in different sizes and price ranges. Some showers are equipped with massage heads, spotlights, or even a built-in music player. You can also choose more basic package... You will find in-line shower grates of various types, as well as rings to hang your curtain. Find the shower tray that works best for your bathroom and order it directly online.
There are many different shapes, sizes and sizes of shower trays. Packed shower or personalized shower? You can also customize your shower and choose one at a time. Don't forget that your swing door is handy if you don't want to flood your bathroom. Shower curtains are also available for smaller budgets. In this case, you will need a shower stall. The hand shower or shower mixer is important choice as the power and jet type will differ from one model to the next.
WATCH THE VIDEO
DIY shower trays are assembled in the following order:
- First, a drain pipe is laid and the neck of the sewer is mounted. When choosing plastic elements, installation is straightforward, and the service life is significantly increased.
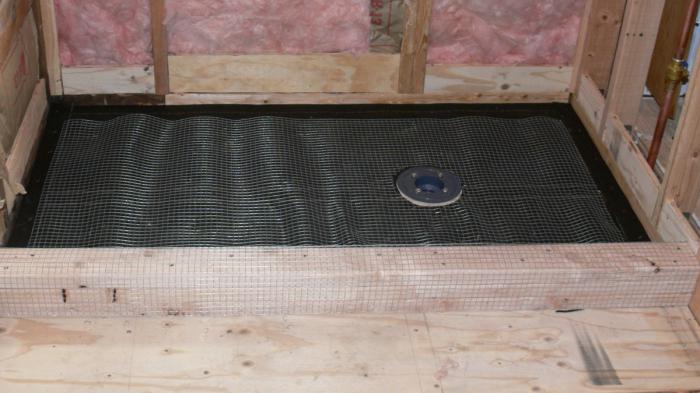
- The shower stall provides for natural water leaving, therefore, it becomes necessary to create a slight inclination of the base towards the drain.
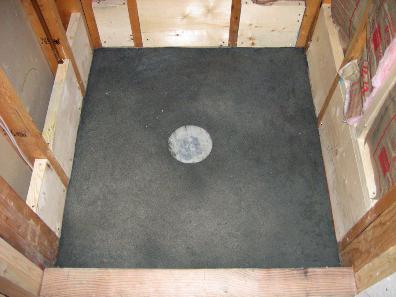
- The slope is made at the stage of creating a concrete screed. The work is performed by pouring concrete over the entire shower room or by concreting only the area where the bathing cabin is planned to be installed. After the end of the screed and its drying, priming work is performed and waterproofing is done.
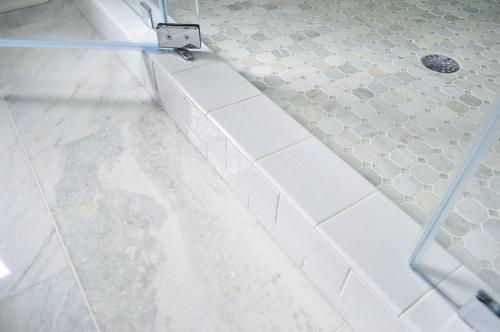
- Installing bumpers to prevent water from spreading throughout the bathroom. The function of the sides is performed by pouring from concrete mortar or brickwork made with the help of formwork, which is then plastered and revetted with a suitable material. with a tile pallet is the most practical solution, especially when choosing a budget material.
Thus, the choice of a shower tray depends on personal preferences, the characteristics of the bathroom and financial possibilities. The main thing is to correctly approach the issue of creating a drain, choosing a water supply scheme. As for the arrangement of the booth, there is where to roam, because in addition to the original sliding doors or curtains, over time, you can install a hydromassage block, creating a kind of spa area at home for relaxation after an eventful busy day.
Don't forget the shower tray, there are many different models; rectangular, square, triangular and rounded. What steps should be taken to install a shower cabinet? Installing a shower stall has practically become the norm for a bathroom remodeling project. Its comfort and aesthetics have made the shower stall the star of the bathrooms. Rare bathroom remodeling projects that do not include the installation of a shower stall.
Shower cabin installation
On the other hand, it will be necessary to refer to the correct project to enable its own resources and site configuration. We will also discuss prices for the purchase and installation of a shower stall. When you embark on an Italian shower project, there are some project points that need to be given Special attention... To be successful in an Italian shower installation project, you need to provide.
IN modern interior bathroom every year more and more shower cabins are used. This is due not only to their low cost and practicality, but also to their convenience.
Today, you can purchase both complete sets of shower equipment, and each of its components separately. In the latter case, you can save a lot, especially if you try to make a shower tray with your own hands.
- Good waterproofing of the shower and walls.
- Wastewater disposal without problems.
- Suitable water flow.
Installation - Replacement Repair - Maintenance... Owner Tenant Owner of real estate lease Other. House Apartment Office rooms Other. Immediate Up to one month Less than 3 months 3 to 6 months More than 6 months. Your personal data is protected and is never published on the Internet.
Types of shower trays
The shower tray can be made of almost any material. It all depends on your preferences and funds. They all differ not only in design, color scheme but also practicality. Let's take a look at each separately before making a do-it-yourself shower tray.
Acrylic pallets are durable, do not absorb dirt, do not change color over time. The only drawback is the possibility of their deformation. To avoid this, the acrylic pallet must either be installed on a sturdy frame, which usually comes with it, or use a support system.
Before embarking on customizing your italian shower project, make sure your bathroom configuration is suitable for installation shower shower, especially if the first floor is enough to accommodate a shower. If the payment required to install a shower enclosure is not possible, you can opt out of installing an ultra-flat shower tray that sits close to the shower enclosure.
The advantage of this type of receiver is that it can land easily regardless of configuration. On the other hand, it will not be on the same level. You will need to calculate the height of 4 to 6 cm of difference in relation to the ground. In terms of installation, installing an ultra flat receiver is much easier than installing a shower enclosure.
The reconstituted marble shower tray is the ideal solution for practical people. Such products are strong, keep warm well and do not rattle under running water. But not everyone can do this with their own hands. This requires special material and skills to work with it.
Steel and cast iron pallets are relics of the past. They take a long time to heat up, very "noisy", but durable. It is for the first two reasons that they are not in great demand today.
A ceramic tile tray is one of the most common types. It is durable, easy to clean and easy to install.

Buy ready-made or make a pallet yourself?
Very often, during the repair of a bathroom, in a given situation, certain parameters of the shower tray are required. In order to find the one that is right for you, it will take a lot of effort and, possibly, more than one month. Therefore, if you have at least minimal experience in the field of repair, then you can easily make a shower tray with your own hands.
In this situation, you will not only make a shower of the required size and shape, but also significantly save money. The latter is explained by the fact that making and installing a shower tray with your own hands is the same thing. In addition, the material will cost you much less than the finished product.
What do you need to know before building a shower tray in your bathroom?
Usually during the construction or masonry of the room, the floors are filled with concrete. Based on this, we can conclude that the best material for a pallet that you want to make yourself is tile.
The modern choice of this material is so great that you can easily choose the one that will ideally match your interior in color, size and texture. In addition, this tile is also used for wall decoration in the shower room. And if you make the walls of the pallet higher, then it can also serve you as a full-fledged bathroom.
A great opportunity to translate your ideas and desires into reality is to create shower trays with your own hands. You can see a photo of some of the options in the article. It should be noted that not every manufacturer can please you with the required dimensions, shape and configuration of the product.
Shower tray in a wooden bath
If you want to make a shower tray in a Russian bath, then it is done according to the same principle as in the bathroom. The only thing you need to know is that the walls are separated from the concrete screed with roofing material and plastic wrap.
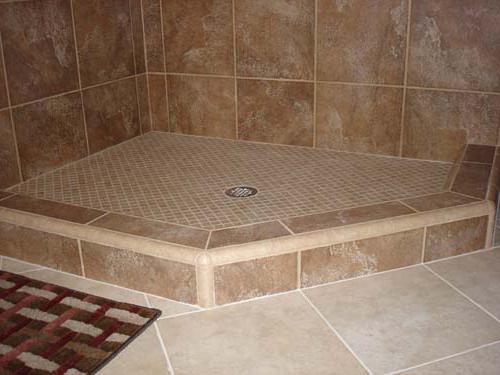
In general, a shower tray is a concrete floor lined with tiles, along the perimeter of which a wall of the desired height is laid. A drain hole is usually made in one of the corners of the sump, and a drain pipe already runs under it. It is worth noting that a slight slope of the surface is made towards the drain hole.
Instead of tiles, some lay smooth decorative rock on the walls and base of the shower tray. But many consider this impractical, since dirt quickly clogs into an insufficiently smooth surface, and it is very difficult to wash it out.
Water drain system
Have you decided to install your own shower tray? The water drain system is the first thing to start with. If your floor is already tiled, then this covering must be removed.
Before planning the location of the drain hole, you need to take into account the fact that the sewer drain pipe must be laid at an angle so that the water is drained off by gravity. Otherwise, she will not go away.
As a rule, do-it-yourself installation of a shower tray should be done on a hill. It may be necessary to slightly raise the structure. As a result, the pallet will be slightly similar to the pedestal.
Pallet arrangement
During the installation of the shower drain and the drain pipe, it is advisable to use wooden supports of different heights. They will provide the correct drainage slope. Plastic pipes replaced iron pipes. This should not be neglected while making your own shower tray. They are easily attached to the plastic ladder, in addition, they will serve you for a long time.
After you have fastened everything you need to drain, screed the floor. You can fill with concrete either the entire bathroom, or only a part of it, the place under the future shower.
Walls around the perimeter of the pallet
The enclosing walls are driven out immediately after the screed dries. This can be done using formwork or bricks. The first option is that two vertical partitions parallel to each other are made from flat boards or special shields, and a solution is poured between them. In the second case, the enclosing walls are laid out of bricks, which are then plastered. It is worth noting that the wall made with the formwork does not need to be additionally plastering to lay tiles on it. Therefore, here you will save not only time, but also effort. But everyone does as he pleases.
After the walls along the perimeter of the pallet are ready, it is imperative to make an additional bottom screed with a slope to drain. After a few hours, when the concrete dries, prime and treat it with a waterproofing compound.
Tiling the shower tray
Do-it-yourself shower tray installation will be completed only after lining it ceramic tiles... Here it is worth considering that this material should be laid exclusively on special moisture-resistant glue. Otherwise, the tile will not hold for a long time.
So, when buying an adhesive mixture, consult the seller. He will recommend a manufacturer to you. In addition, do not forget to clarify for what specific purpose you need the glue.
You will find information on how to prepare this solution on its packaging. Be sure to stick to all proportions exactly. Mix the glue mixture thoroughly with water using a construction mixer.
Start laying tiles from the corner. This is the only way you can correct all irregularities and errors. The mortar is applied with a special notched trowel directly to the tile, which is placed on the screed and pressed down a little.
In order to make the seams even, insert special crosses between the joints of the tiles during the laying process. After the glue dries, you need to remove the crosses, and put a special water-repellent mixture on the seams.
Finally, wipe the tile with a damp cloth, then dry.
As you can see, making a shower tray with your own hands is not so difficult. But still, in this case, it is necessary to adhere to the sequence of work and take into account some of the nuances.
Experts advise against installing a massive pallet, as it will heavily load the floor slabs. If in doubt about your calculations, it is better to consult a professional in this matter.
If you want to install or repair a shower tray with your own hands in an apartment on the ground floor, or country house, then in this case it is better to insulate both the floor and its part under the pallet. To do this, use modern high-quality materials. It can be either mineral wool or foam glass. It is not recommended to install an electric floor under the shower tray.
Only the pallet, which was designed according to all the rules and from high-quality materials, will serve you for a long time and will bring pleasure during its use. Other than that, you will surely be proud to have made it yourself.