Made from plastic bottles, stones, old tires and other seemingly unnecessary items can be made a huge number of things.
DIY crafts can be used for home or garden decorations, and also to give as a gift to a loved one.
Kids will love it too participate in the making of colorful and original crafts, especially if they are crafts for themselves.
Children's crafts from plastic bottles
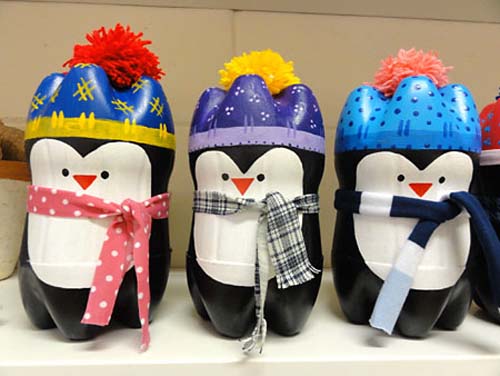
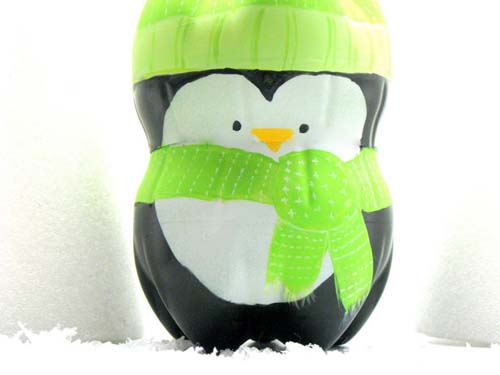
Whether it's summer or winter, cute toy animals will always delight children.
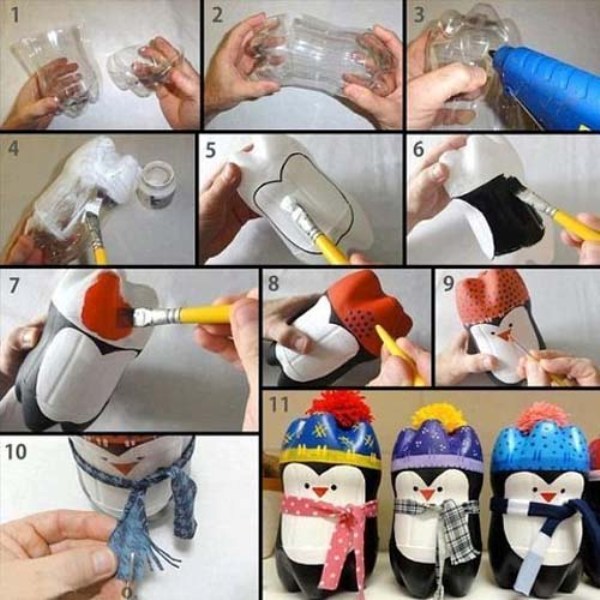
In this master class you can learn how to make penguin crafts using plastic bottles.
You will need:
Clean plastic bottles (any size)
Acrylic paints
Scissors.
Below is a diagram to follow to make penguins:
Kindergarten DIY crafts. Living stones.
It can get very creative and useful decor any garden or vegetable garden. You just need to find a few simple stones and, with the help of paint and imagination, get started.
![]()
It will be easier if you use smooth stones. But at the end of the day, it all depends on the design and pattern you are going to apply.
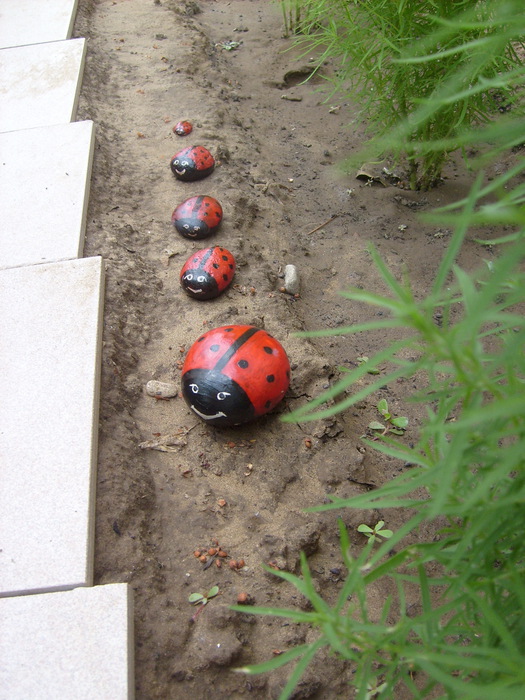
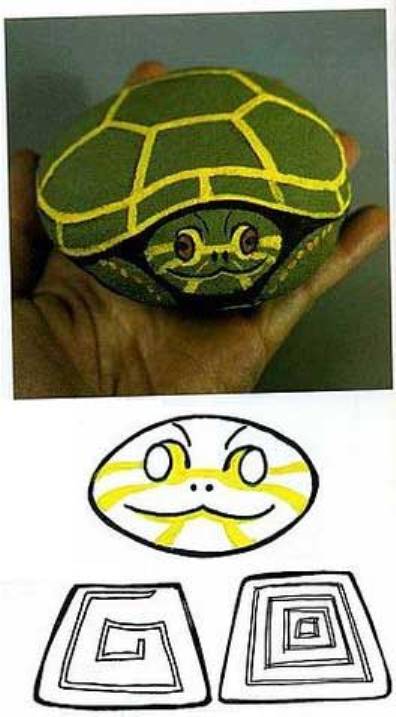
Here are some simple examples - little animals, bugs, fish.
Children will not only find it interesting to color, but also to play with such pebbles in the garden.
In addition, such painted stones can be used to decorate the interior and exterior.
You will need:
Pebble
Acrylic paints
Clear varnish
Simple pencil
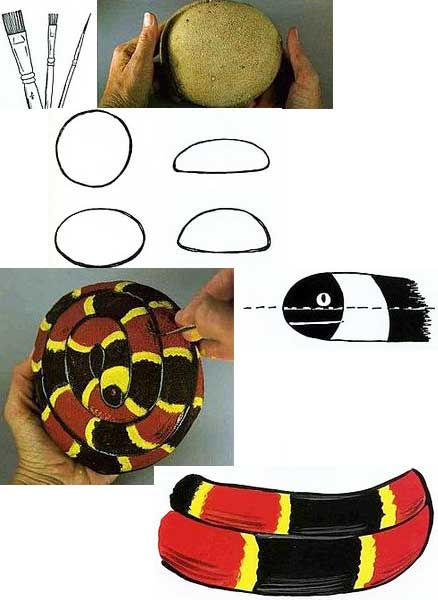
1. Prepare the stone, wash it and let it dry.
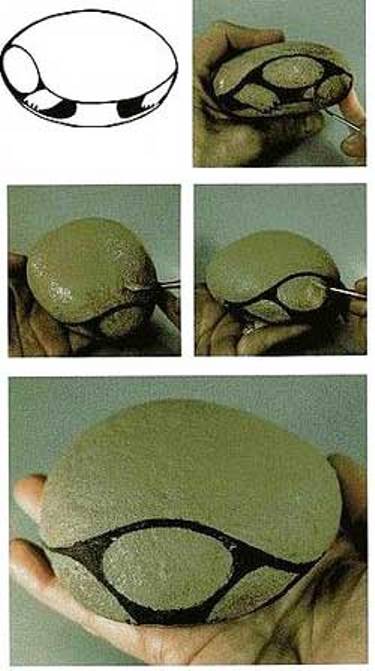
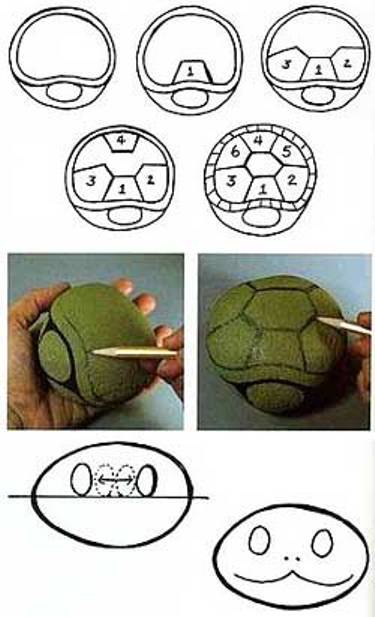
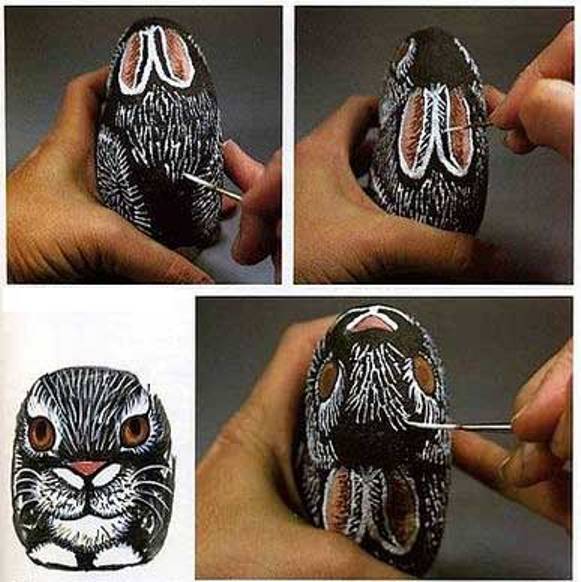
2. Using a pencil, draw the desired design on the stone.
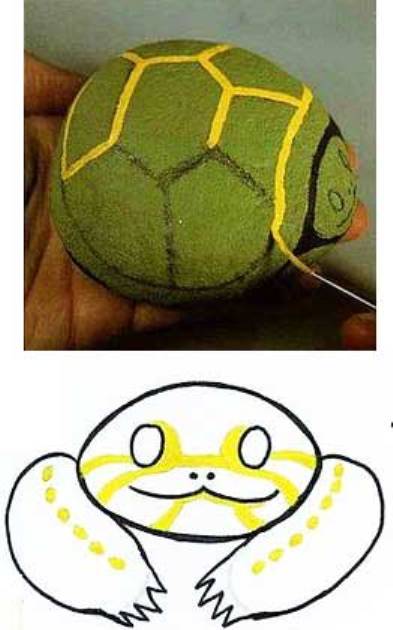
3. Start coloring with gouache.
* It’s good if the color of the stone matches your drawing. Drawings with a black outline turn out very well.

* When the paint dries, you need to coat the stone with colorless varnish, thereby the paint will not be erased.
You can make something more complicated, for example a snake and a turtle.
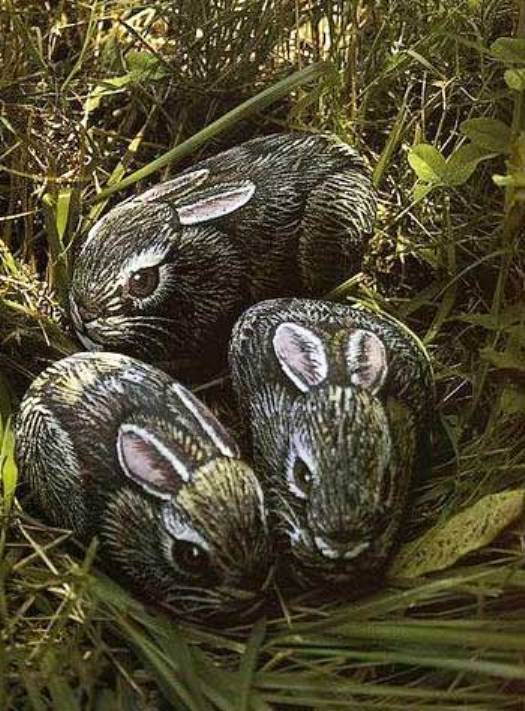
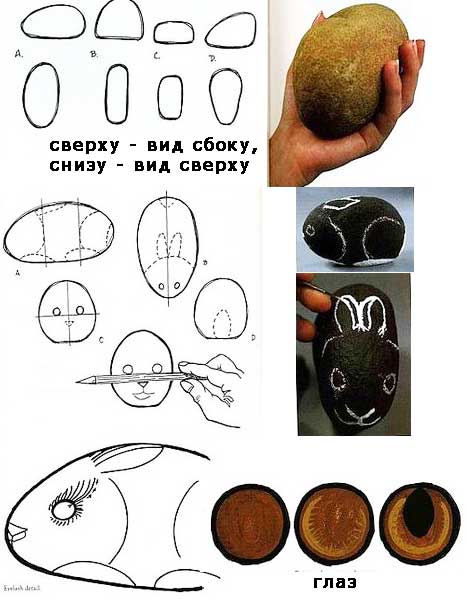
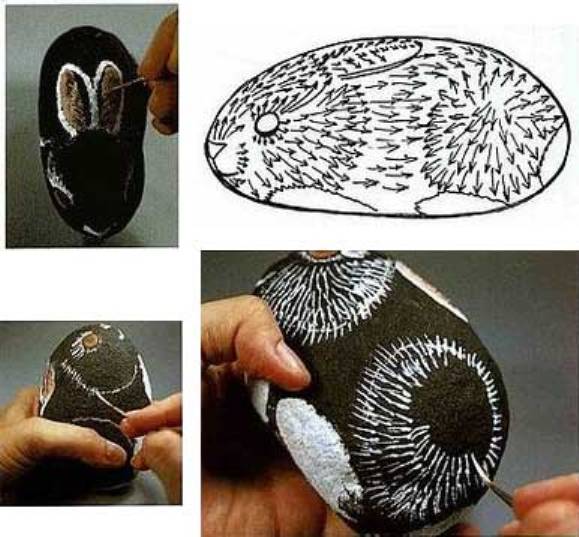
An even more complex option is the image of a rabbit.
Children's paper crafts. A whole paper platform.

This kind of craft is very easy to make.
You will need:
Colored paper
Scissors
Glue (glue stick)
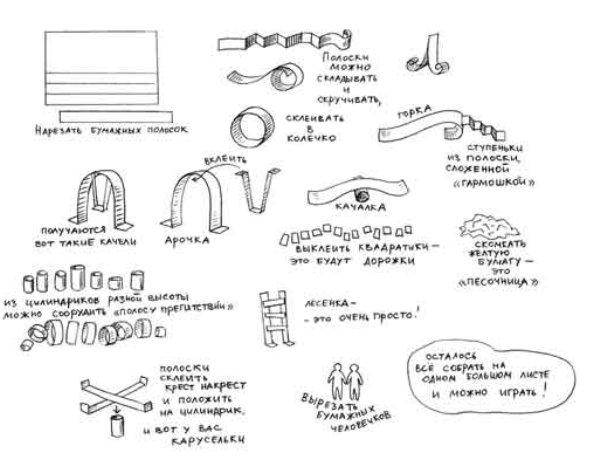
You need to cut out strips, squares, etc. from colored paper. and make swings, slides, ladders, tables, paths and much more.

Everything is limited by your imagination - create what you want and build the site you dream about.
Crafts for the playground. Giraffe made from a tire and a log.
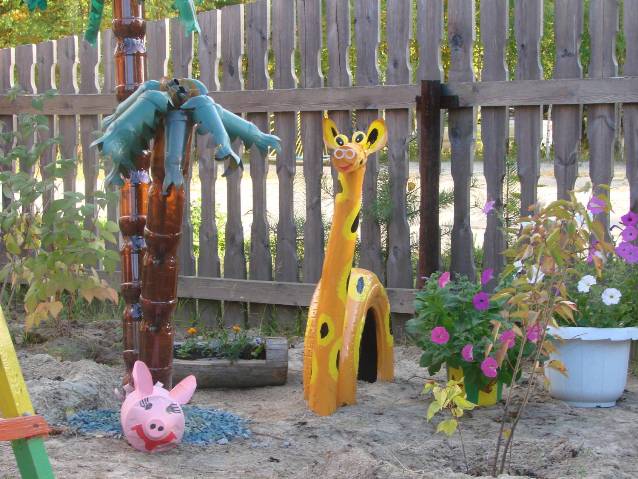
A very cute giraffe can be made for a playground or kindergarten.
You will need:
Old tire
2 logs (short and long)
Plastic bottle.
Eyes from an old toy
Watering can (for tail)
1. Bury the tire halfway.
2. Make a muzzle from a short log and connect it in the shape of the letter L with a long log using nails. The body of the giraffe in the image is about 1 meter long, and the head is 25-30 cm.
3. Dig in a long log next to the tire (see picture).
4. Prepare a plastic bottle and use it to make ears for the giraffe. Next, attach these ears with glue or nails to the muzzle.
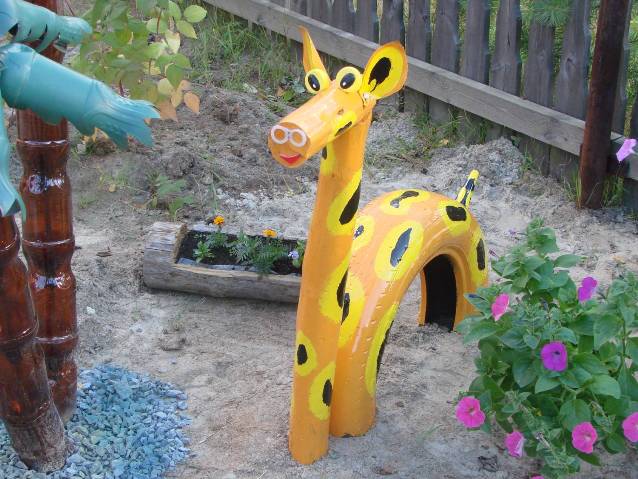
5. Animal eyes can be made from plastic bottle caps. Glue eyes from an old toy onto each lid (or you can draw them with a marker).
6. You will need the spout of a watering can to make a giraffe's tail.
7. All that remains is to paint the craft so that it looks like a giraffe.
Crafts for kindergarten. Zebra made of tires and logs.
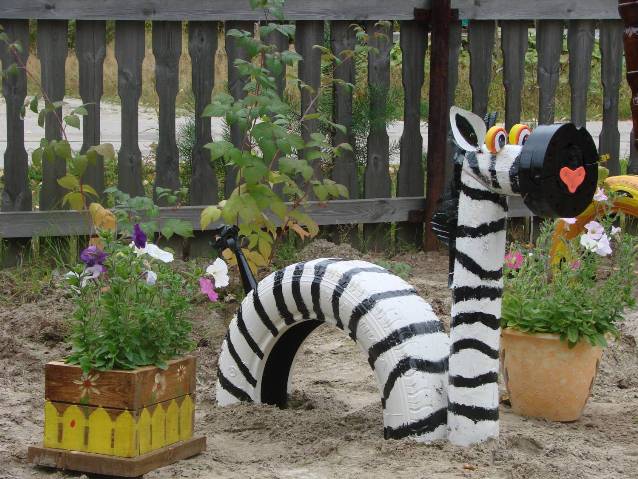
Just like a giraffe, you can make a zebra, and the African savannah will be filled with another animal.
You will need:
1 tire
2 logs
Eyes from an old toy
Plastic bottle
1. First dig the tire in halfway.
2. Make a muzzle and neck from logs. The body of the craft in the image is about 70 cm long, and the head is 25-30 cm.
3. Dig in a log next to the tire.
4. Make ears from a plastic bottle and attach them to the face.
![]()
5. You can make eyes from plastic bottle caps or use parts from an old toy.
6. Make a tail from the spout of the watering can, and insert a brush made from an old tire inside.
7. The nose can be made using thick rubber.
8. All that remains is to color the craft.
Children's craft from a plastic bottle

Using plastic bottles you can make many beautiful and sometimes even useful crafts.
Take, for example, this outlet for every little thing. It’s not difficult to make, but it will be useful for a little fashionista who can store jewelry, brushes and pencils in it.
This craft can also be used as a flower vase.
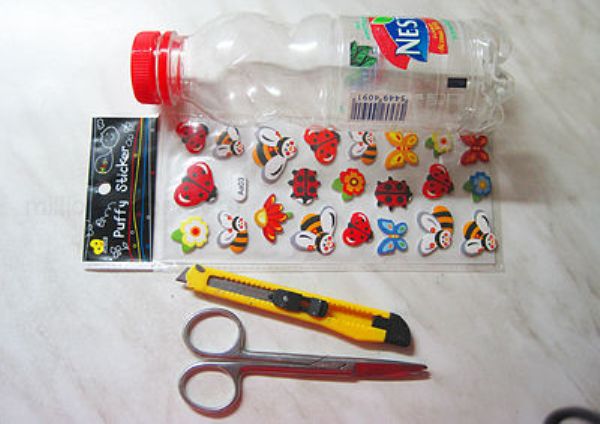
1. Prepare a bottle and use a utility knife to cut off its top part.
2. Using scissors, cut thin strips of the same width on the bottle (to the middle).
3. Now the strips need to be folded. Do this so that they are perpendicular to the bottle.
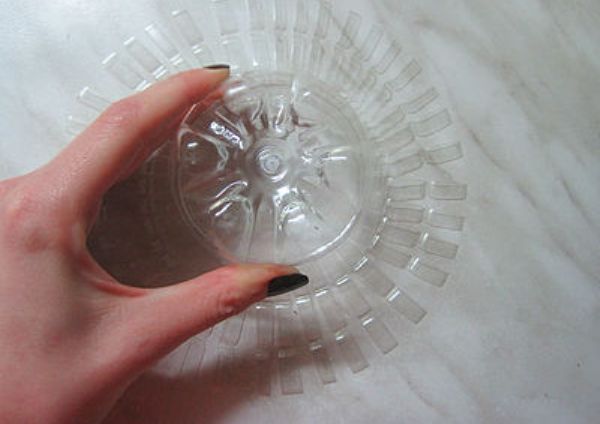

5. All that remains is to design the outlet.
Children's crafts from bottles

So many interesting crafts for home, garden and vegetable garden can be found in our articles.
Many parents try to improve their child’s play area so that his childhood is fun and interesting. A children's playground is not only a place for games; if it is properly designed, such an area will contribute to the harmonious physical and spiritual development of children.
To prevent your children from getting bored during the warmer months, find out how to decorate children's playgrounds for the benefit of kids. This process will require a little of your imagination, time and money. When you decide to decorate the playground, involve the children themselves in this useful activity.
How to design a play area?
There are many options for how to decorate playgrounds; all you need to do is show desire and a little imagination. The most simple idea– place store-bought figurines of gnomes, animals and favorite fairy-tale characters on the playing area. But creative people themselves will figure out how to decorate the playground with their own hands.
It is known that all children love to play natural materials that are found right on the street. That is why, when deciding to decorate the site, you should not forget about wooden crafts. For these purposes, you can use logs, stumps, boards, bars. This material can be used to make tables and chairs for children, use it as a fence, or build sports complexes.
Children, regardless of their age, benefit from walking on a log, so you can make a path to a slide or swing from sawn logs. The kids will also love the playground where a wooden bridge will be installed between the two banks. Such a game will not only occupy your baby’s time, but will also contribute to the development of his creative thinking and imagination.
DIY toys
Parents often suggest decorating the playground in the kindergarten. homemade toys. To do this, you can use old tires or plastic bottles, which will make original toys. So, you can make a rattle toy, a palm tree or flowers from plastic.
The easiest way to transform a play area in a kindergarten is to make a small flower bed with flowers. For this composition you will need a green bottle and colored cardboard.
Follow these step-by-step instructions:
- Cut off the top of the bottle, cut the middle into thin strips;
- Place flowers pre-cut from colored cardboard onto the stripes;
- Beads or beads can be glued onto some petals.
This composition will look beautiful and original on the playground in a kindergarten. In the summer, games and activities with children in kindergarten take place outside. To decorate a pavilion or gazebo, you can make funny pencil holders.
Palm

If you make a palm tree with your own hands and place it in a kindergarten, the playground will be beautiful and cozy. It is not difficult to make, it will take a little time, 2-liter plastic bottles of green and Brown and scissors.
Palm trunk. To make the trunk, you will need brown bottles with the necks cut off. One bottle should be left with its neck, it will be the top of the palm tree. Calculate the number of bottles based on the final height of the future tree.
Palm leaves. The optimal number of leaves is 8 pieces. For them you will need green bottles, the bottom of which needs to be cut off. We cut the bottle in half, maybe even a little more, so that the leaves of the palm tree do not curl. I cut out the leaves, take the brown bottle that was set aside for the top, and make small holes in it. You need to insert green leaves into them.
We collect a palm tree. Brown bottles we string one on top of the other; as a support, you can use a thick wire or a wooden stick, which is inserted into the trunk of a palm tree. The palm tree for the site is ready!
Crafts from car tires
In kindergarten, the playground is also decorated with car tires, from which various animals are made. Car tires are made of rubber, and it can be cut, bent, turned out, painted in bright colors, creating original compositions on the territory of the preschool institution.
We decorate flower beds in the garden with old tires:
- Take several tires, depending on the size of the flower bed;
- Paint them in different bright colors;
- Once the paint is dry, place them around the flower bed.
You can also make a flowerbed from one tire, filling it with soil and planting flowering plants there.
If you ask how to beautifully decorate playgrounds, you can find many ideas, among which a tire snail deserves our attention.
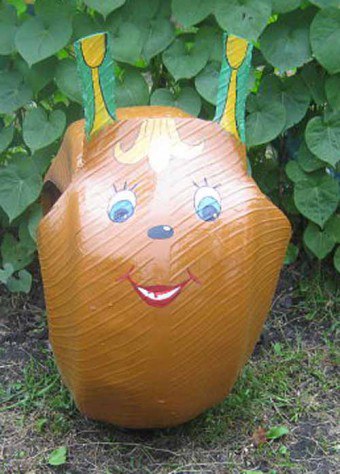
To make such a figurine, you will need the following materials:
- old tire;
- dry driftwood;
- Bulgarian;
- nail, hammer;
- paints, brushes.
We make a “house” for our snail from a small-diameter tire. Using a grinder, you need to saw the tire and cut out the snail horns from it. Using wooden blocks, nails and a hammer, you need to fix the tire on a dry piece of driftwood and place it on the playground.
We draw the snail's eyes, nose and mouth, paint it in bright colors, and the area is decorated! From these materials you can also make various animals in play areas in kindergarten, near the house or in the country.
By showing your imagination, you can create pleasant and comfortable conditions for your children for their comprehensive development both at home and in kindergarten. Creative ideas and fun crafts for you!
Master Class. Decorating the territory of the kindergarten with figures and mosaics made from waste material.
Karpova Galina Nikolaevna, teacher of MBDOU MO Krasnodar "Center - kindergarten №231"Description: The master class describes how you can decorate the territory of a kindergarten with figures made from waste material, using a mosaic made from plastic bottle caps.

With such figures you can decorate both the school site and the dacha. Children can also be involved in creativity school age, for example, in a summer camp.
Initially, the idea of two art projects arose. The first is near the main entrance to the kindergarten, with the code name “Magic Garden”, the second - “Sea Kingdom” - at the entrance to the nursery. Later, when our “magic garden” began to slowly take shape, it turned out that we also needed to do something with the terrace wall. This is how our third art project appeared - “Tales of A.S. Pushkin”. We tinkered with it longer than we thought, because as we worked, more and more new ideas arose, and in fact, even now everything is not finished. Therefore, our “Sea Kingdom” remains in sketches for now.
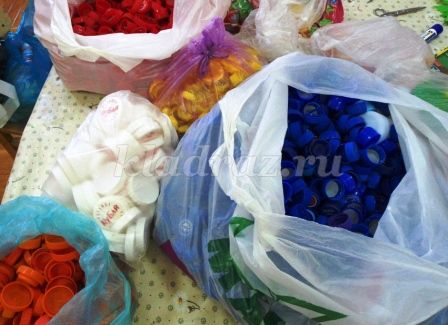
What did we need to bring our ideas to life? Of course, the caps themselves, and a lot of them. Therefore, we began our work on projects by posting an announcement at the entrance to the kindergarten for parents, in which they asked to bring plastic lids of any color and size to the garden. And they, of course, actively supported us, and soon the workshop was filled with mountains of caps that had to be washed and sorted by size, color and shade.
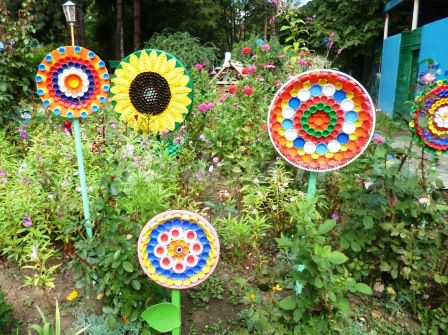
While the washed lids were drying, the base and stands were prepared. As a basis for the magic flowers, we used discarded lids from large pots, fan grilles, and lids from plastic paint buckets. And the base for the sunflower was the top of a plastic table. The stands - the "stems" - are discarded broken mops. All of the above “wealth” was provided to us by our caretaker Irina Nikolaevna, for which we thank her very much. All covers and grilles were washed, cleaned and painted. The racks were also painted green color. Then we glued the caps with titanium glue. The finished figures were dug into the site.


Later, birds were added to the flowers. Our carpenter cut the plywood base according to my drawing. After sanding the edges with sandpaper, I painted the bird blanks on both sides.

I attached two stands to the resulting figures to make them look like paws.
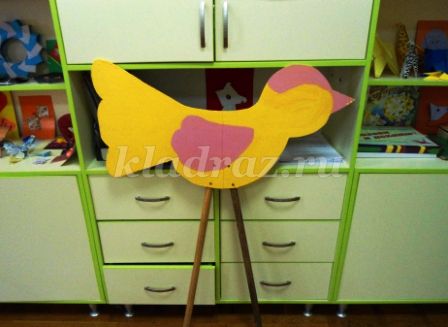
Then I started gluing the lids on.
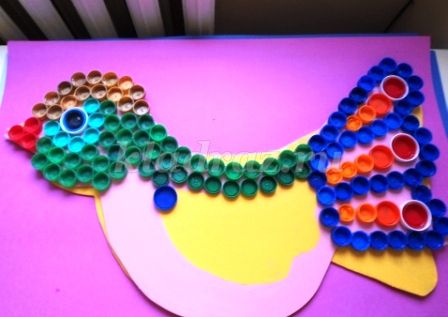
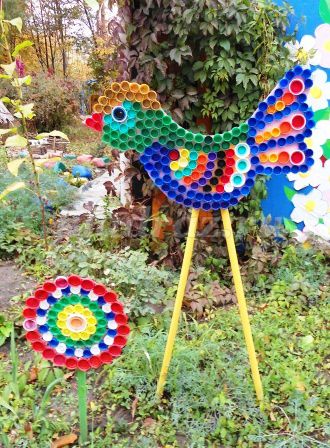
These are the fairy-tale birds for the magical garden.
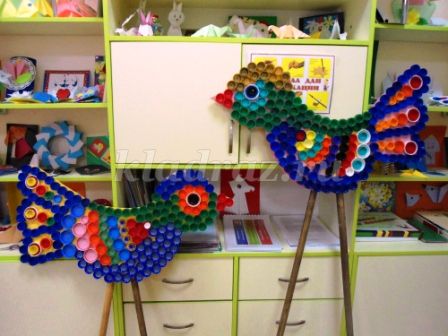
Now one has already flown up to the flower at the chosen place.
I also started working on the art project “Pushkin’s Tales” by drawing sketches. Having drawn the outline of the Swan Princess in chalk, I made the underpainting white acrylic paint. When the paint was dry, I glued the caps on.
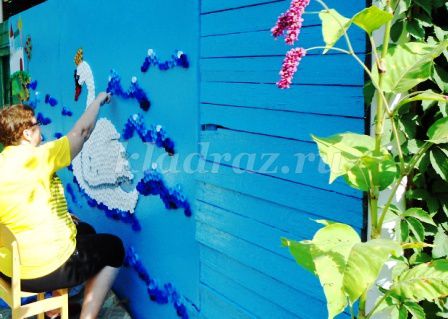
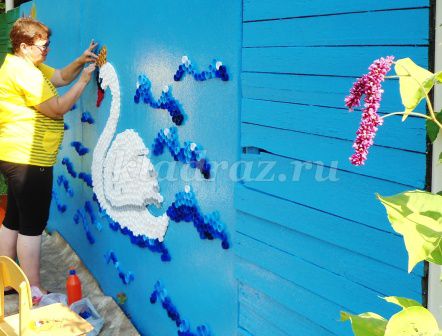
I made Buyan Island and the boat in the same way.
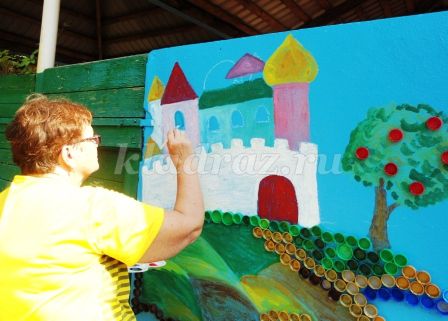
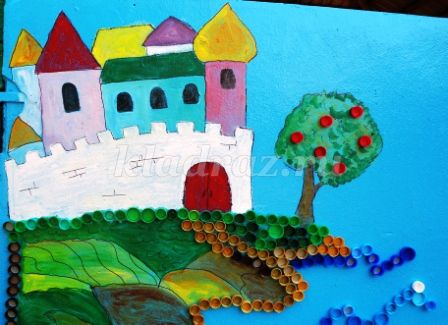
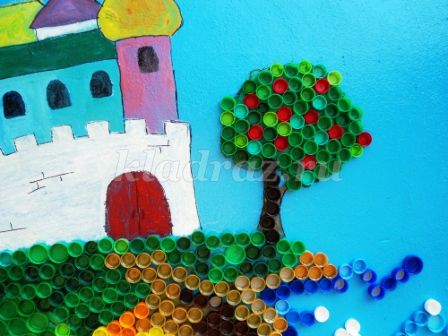
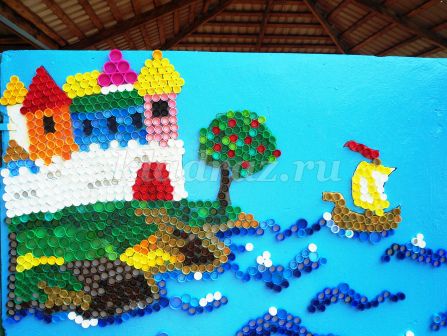
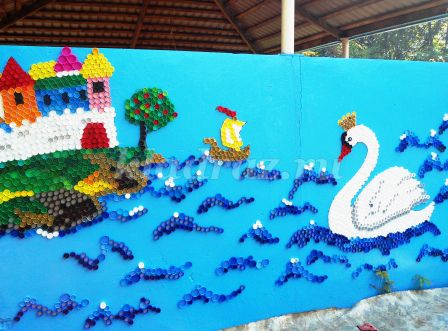
The oak tree with the golden chain and the learned cat is almost ready. And the plans include a squirrel with a crystal house, a gold fish, and many more interesting ideas. For example, I wanted to add insects to the “Magic Garden”: butterflies, ladybugs. There is an idea to lay out the emblem of our garden with such a mosaic. So there is still a lot of work ahead.
Parents always think about how to decorate a kindergarten with your own hands, after all, it’s not uncommon to see a situation where teachers receive a group room in “pristine condition.” Of course, in such a room there will be wallpaper, there will be cribs in the bedroom, etc., but at the same time, both parents and teachers need to work hard to create the proper comfort.
How to decorate a kindergarten group with your own hands
Fine Arts Corner
Each kindergarten has a corner of fine arts, which will only become more beautiful with the help of “homemade crafts”. In order to create wall decor in the form of pencils, you will need to stock up on colored cardboard. Multi-colored pencils will look very cute, and you can make either a couple of pencils or a whole lot - it all depends on the amount of free space on the wall. The finished craft looks quite colorful and will certainly attract the attention of preschoolers.
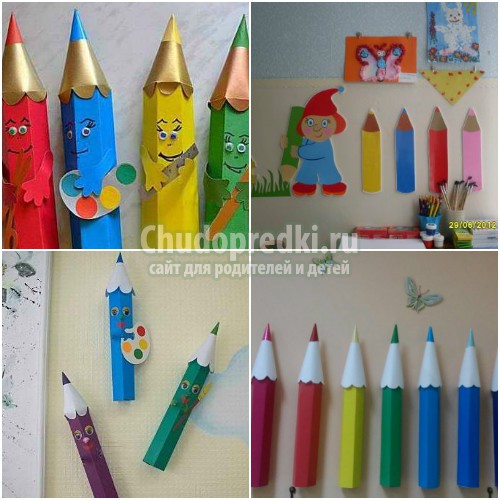
The finished pencils will be equal in width to a cardboard sheet. Pick up suitable color and draw 3 cm stripes across the entire width. You should have 6 stripes in total. Along the drawn lines, bend the cardboard from the inside out and glue the resulting base using Titan glue.
Take a sheet of cardboard with a metallic sheen and cut out a pencil tip. Glue the blank with “Titanium” and stick a paper cone on top of the same color as the pencil itself. The cone on the tip will act as a stylus. Using the same adhesive composition, connect the cardboard base and the metallized tip together.
To decorate the finished craft, cut out cardboard eyes, legs and arms, and glue them to the “body”. Also, an additional detail will be a brush or palette; let the pencil hold them in your hands.
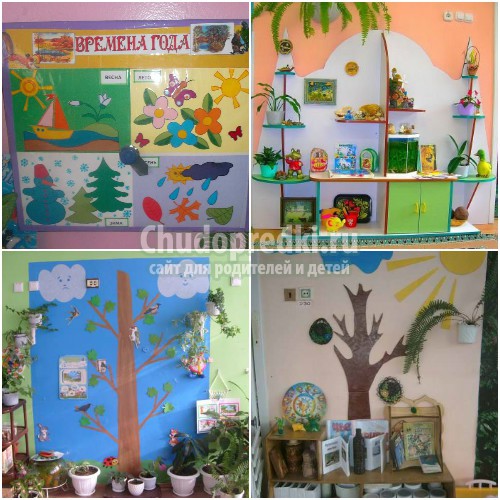
Corner of nature
Naturally, it is necessary to take care of the proper design of the corner of nature, because here children will learn to respect animals and plants. Also here, teachers will store teaching materials that will allow preschoolers to learn the time of day and the change of seasons. That's why we recommend that you make a toy house that will turn learning into fun game. The house itself can be made of chipboard or cardboard, and then covered with fabric. A picture should be installed in the window of the house that will clearly demonstrate to children the change of seasons. By the way, an excellent pedagogical technique would be to hide this picture behind a curtain, because curious children will certainly want to look behind it and find out what is hidden there.
Sports section
The process of designing a sports corner is a very creative process. So, for example, you can decorate the shelves on which the inventory is placed using colorful stickers, you can also decorate them using paints. Sports equipment is usually placed in plastic buckets, which can also be decorated. An excellent choice would be colored paper with a sticky layer - you can cut out a wide variety of details, for example, leaves or flowers, and then simply glue them in the right places on the outer surface of the bucket. You can also use corrugated paper.

It’s very good if parents can sew orthopedic rugs that will only bring health to their children’s feet. Such tracks are very easy to sew - certain fillers are placed inside, for example, chestnuts, buttons or rounded pebbles. It will be very useful to run on such a rug after a night's sleep - it will be a real hardening process.
To make such a rug, you should make several fabric squares; the more there are, the longer the path will be. On one side, the squares should be left unsewn - this way they can be filled with the necessary items, and then sewn together. In order to create not only a useful device, but also a decoration for the group, you need to take fabric of different colors.
How to decorate a kindergarten with your own hands - photo
Naturally, we cannot ignore decorating the group for some holiday. For example, you can decorate a group with New Year, and by May 9, together with the children, you can build a thematic composition.
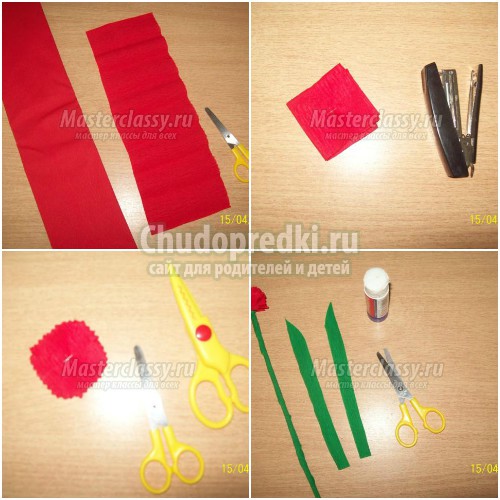
To create carnations, you need to take corrugated paper, cut a rectangular piece from it, fold it into a square and staple it in the center. Cut out a circle - it is best to use curly scissors for this purpose. Make cuts to the center of the round blank from different sides and straighten the bud. Cut a strip of green corrugated paper and wrap it around a stick to make a stem. Glue the flower to the stem, and attach paper leaves. You can make the required number of such carnations.
To make a vase, you will need colored paper - cut out a rectangular piece of black 12 cm wide, as well as orange stripes, the width of which will be 2 cm. Glue the parts to a toilet paper tube.
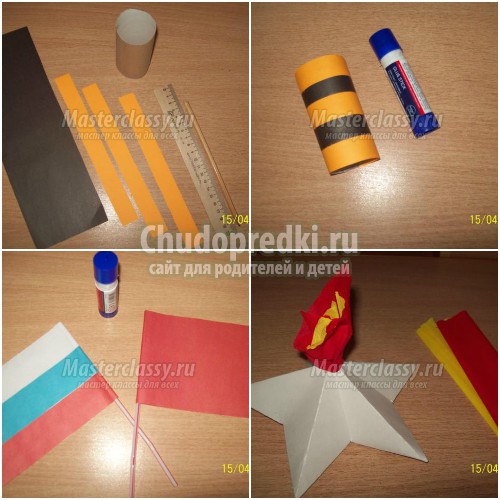
To make flags, you need to cut out a red rectangle (12 cm wide) for the first flag, a rectangle of the same color 4 cm wide - this will be the second flag, you will also need blue and white elements, respectively 12 and 4 cm. Glue red and white elements onto the white element. blue stripe. Glue the finished flags to cocktail straws.
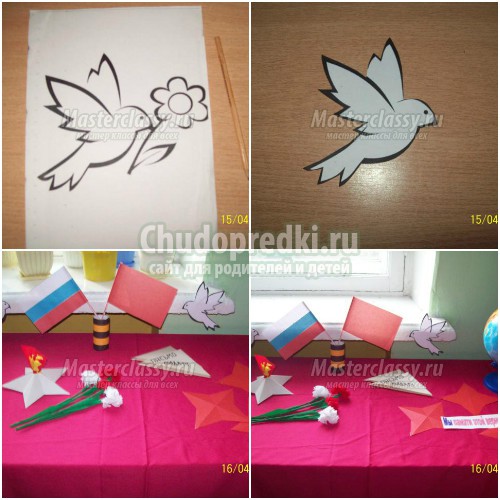
To make a star, make a circle on a cardboard sheet and make the necessary markings, then cut out the circle and make cuts. Fold the star along the lines and glue it together, insert the “fire” into the very center (use corrugated paper for it). Now all that remains is to draw a dove on a piece of paper, cut out a bird of peace and create a festive composition.
And you will find best options crafts for the New Year, be sure to make “homemade crafts” with your children on the eve of the holiday.
How to decorate a kindergarten veranda with your own hands
Of course, not only while they are indoors, children should enjoy bright colors and interesting artistic solutions. So, you can decorate the veranda with a cute garland of flags and then every day the children will be in a festive mood.

The first step is to print a triangle on a piece of paper; its size should be exactly equal to the size of the flag in full size. Cut out this triangular template.
Prepare a lot of scraps of fabric for work; the more colorful they are, the better and more fun. Attach the template to the fabric and trace it with chalk, then cut out the resulting flag. Do similar manipulations with all the other scraps.
Prepare brown yarn, as well as a needle and white thread. Hem the flags with white thread so that one edge is picked up and the flags are held on with brown yarn. Sew the elements one by one to create a beautiful garland, now all that remains is to stretch it out on the veranda.
How to decorate the kindergarten yard with your own hands
During a walk, children also want to see interesting and fairy-tale characters - we recommend that you use waste materials, because there are many original ideas on their use. decorated, will attract maximum attention. How to decorate a kindergarten, areas with your own hands This is exactly what our publication will tell you.

So, for example, you can make a cute ladybug - for it you should prepare a pile of sand, into which you stick the bottoms of plastic bottles. The final stage will be painting it red and black so that the craft looks like a real one. ladybug. By the way, plastic bottles will be the optimal material for creativity, because there are many of them in every home, they are very easy to process, giving the desired shape. You can use our ideas, or you can dream up your own “makeshift”.
You can make a cute caterpillar using an old hose from a vacuum cleaner (agree, it’s enough creative solution), aluminum wire and ball.
If you fence a small area with the help of identical bottles, and put mown grass and a couple of cute pigs inside, you will get a barn. By the way, the pigs are made from the same plastic bottles, only in a larger capacity, and then painted with pink paint.
You can attach a cute little sun to any tree or porch support. The basis for it will be a plastic box lid (for example, from a cake). Of course, it’s not enough to just cut out identical rays; you also need to draw a cheerful face.
How to decorate a kindergarten playground with your own hands
Another “ladybug” can be made from old tires - such a bright flowerbed will serve as an excellent decor for a kindergarten.
![]()
To do this, take an old tire and paint it red, wait until the piece dries.
On a regular A4 sheet, draw a pair of identical circles with a diameter of 15 cm, then cut them out - these will be the templates. Using a piece of foam rubber, black paint and slits in the sheet (templates), stamp black circles on the surface of the tire, like a real bug. Wait until it dries again.

Take two springs, open two Kinder Surprise containers and put the parts on the springs, make a loop for fixing on the end of the wire, and then put on the remaining parts of the containers to make ladybug horns. Paint the horns with black paint and wait until dry.
Drill a couple of holes in an old bucket without a handle and insert the horns into them. Make a loop at the end of the spring and secure it with a rivet to create a head with horns. Draw a mouth and cheeks on the bucket, glue on the eyes and nose using hot glue. Using two self-tapping screws, carefully attach the head of the bug to the tire.
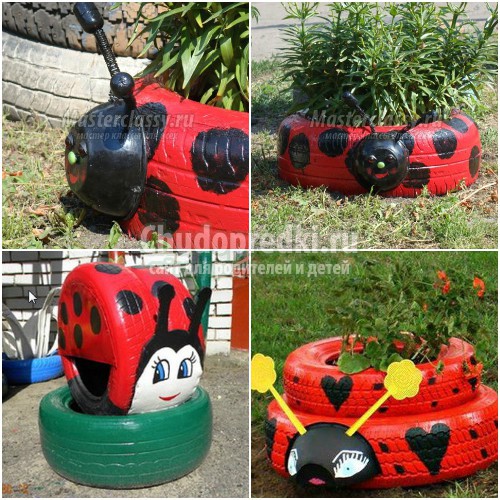
Now all that remains is to fill the soil inside the tire, installing it in a permanent place, and plant flowers that will delight you with bright colors throughout the summer. And in the cold season, use original ones to decorate the site. For example, you can make a strawberry out of snow, and then paint it with dyes in suitable colors.
Now you know, how to decorate the territory of a kindergarten with your own hands, we haven’t forgotten about decorating the group - let your kindergarten always be bright and colorful thanks to skillful hands and an inquisitive mind!
If you liked our site, express your "thank you"
by clicking on the buttons below.