Recently, modern shower cabins without trays have become increasingly popular. The drainage of water into the sewer is ensured by a device built into the floor, which is called a “shower drain in the floor under the tiles”. You will understand which one is better after reading this article. In addition, you will learn about the main features and types of such systems.
Installation of drainage gutters
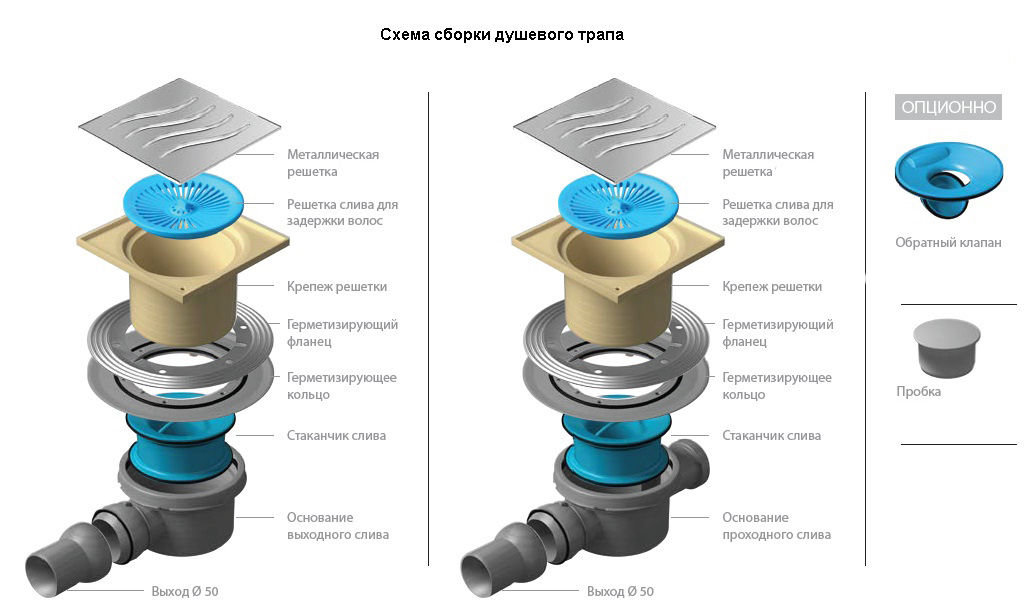
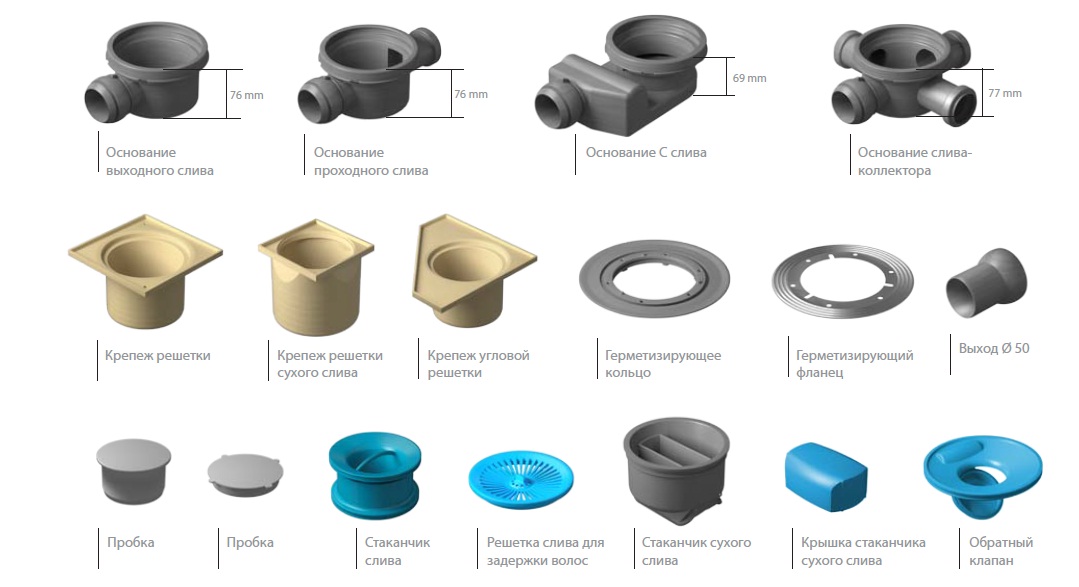
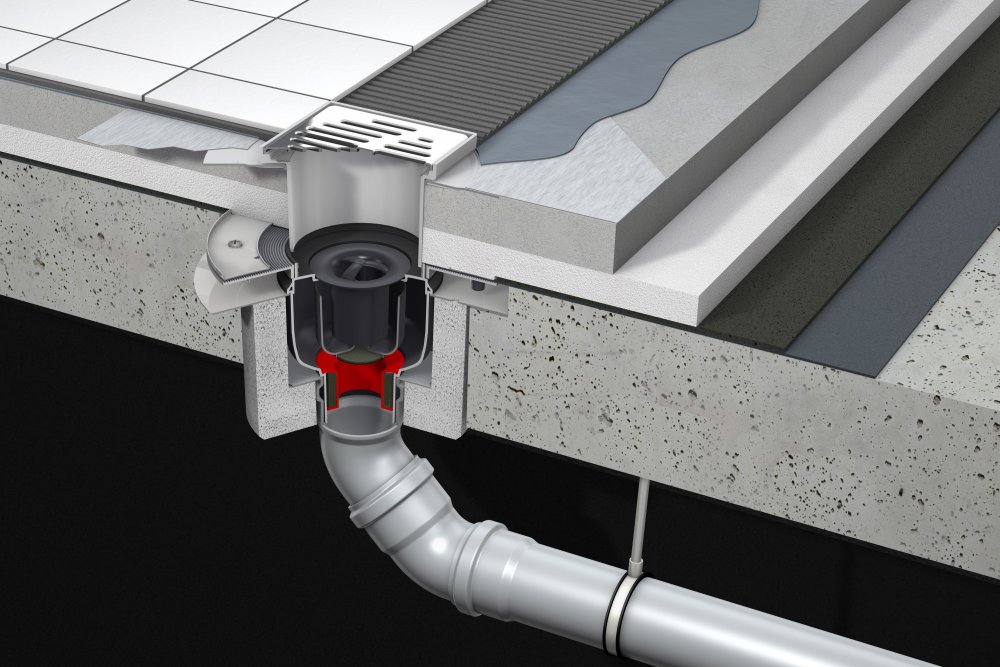
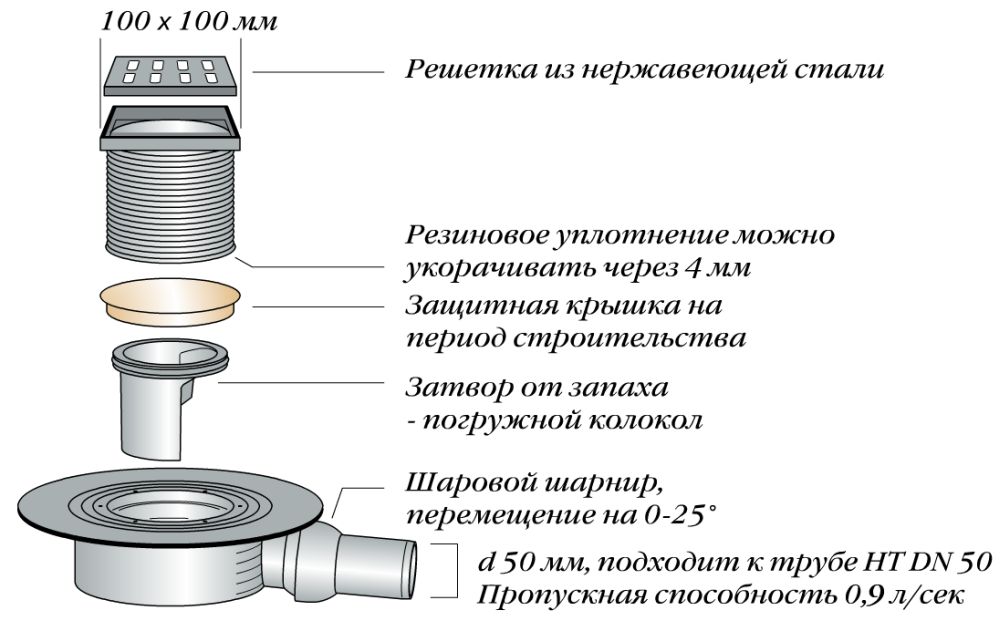
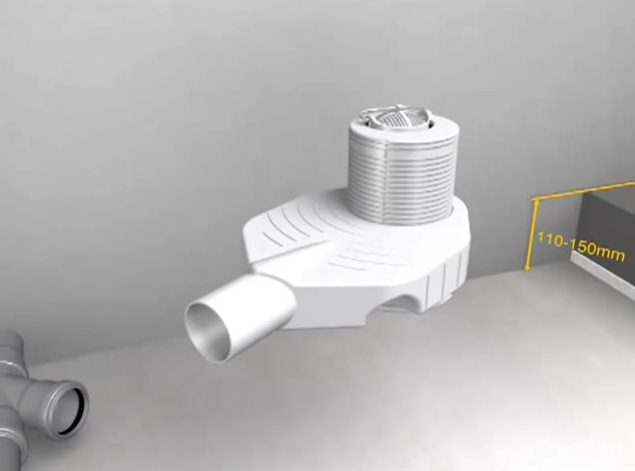
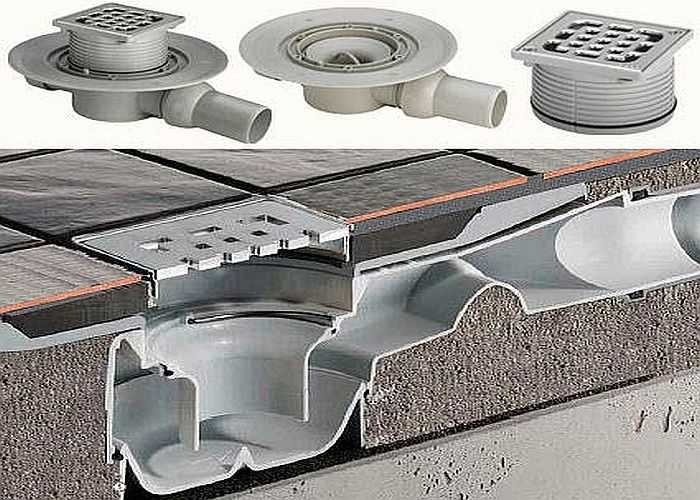
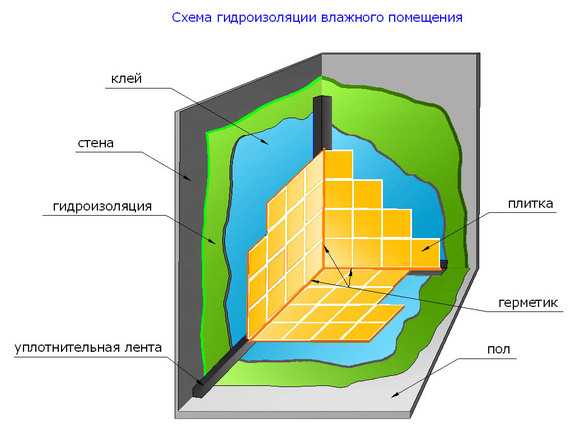
The shower drain in the floor under the tiles is a rather complex plumbing device. It is located in a special floor hole and is attached directly to the pipe. This design consists of the following elements:
- bends with couplings connecting to the sewer drain;
- removable grille to prevent clogging of the drain;
- a flange that hermetically fixes the waterproofing membrane;
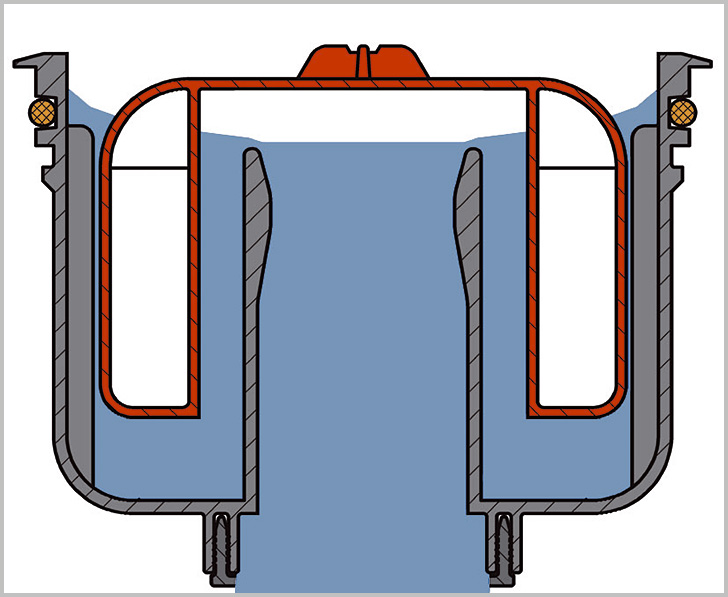
- siphon creating a water seal;
- water inlet funnel.
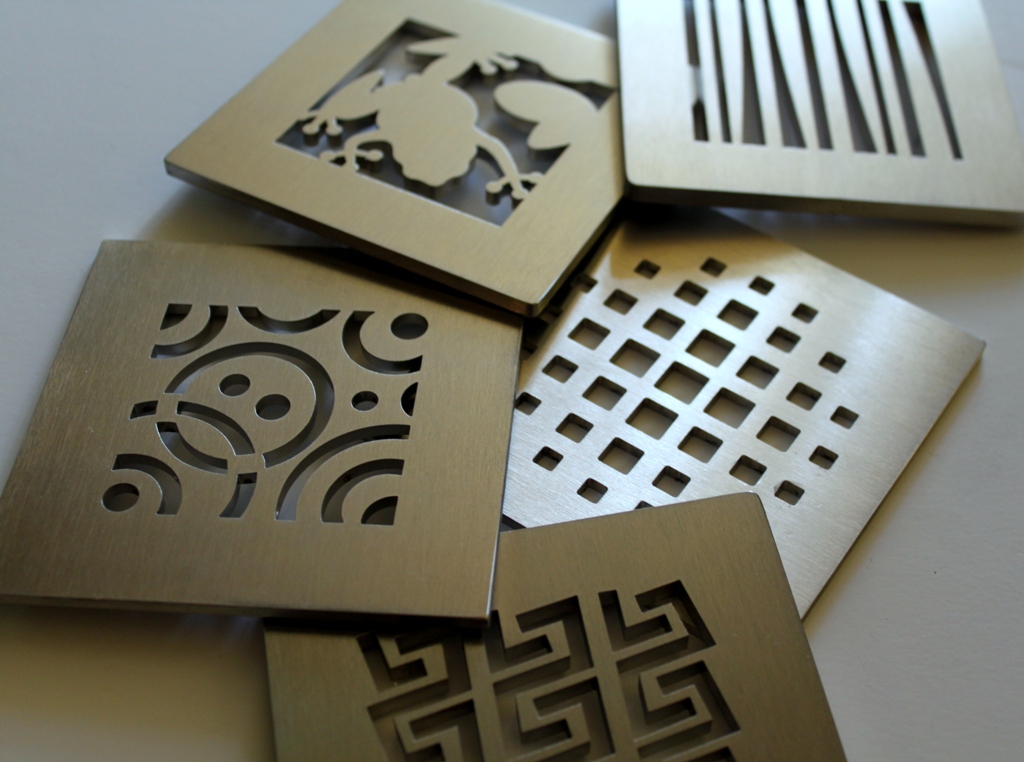
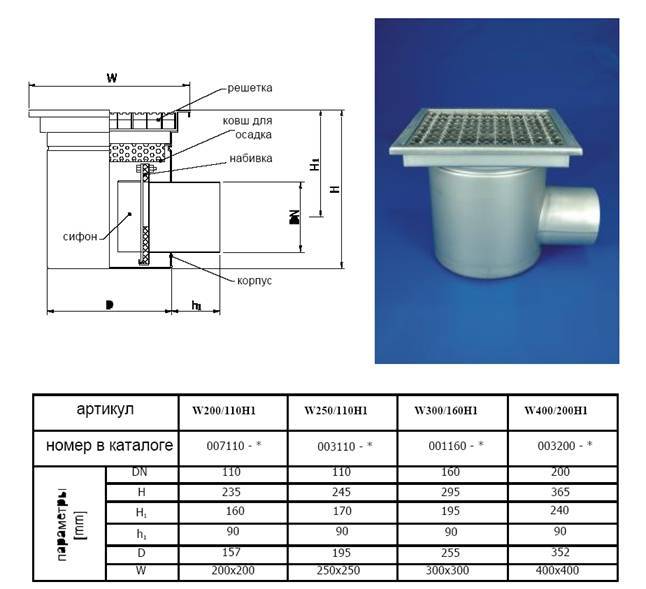
For the manufacture of such drain structures, stainless steel is used. This durable and economical material is characterized by increased reliability. The removable grille can be made not only of steel, but also of chrome, brass and even ceramics. They can be round or square.
Main functions of a drain
This seemingly simple device performs several important tasks. The shower drain in the floor under the tiles allows you to drain the water flow directly into the sewer riser. In addition, it is thanks to the presence of this design that the joints with the floor are sealed. Installing a water seal allows you to avoid the appearance of unpleasant odors emanating from the sewer.
Types of drains
Today, several types of such devices are produced. Each of them has its own advantages and disadvantages.
The simplest is considered to be a shower drain in the floor under tiles with a water seal. In this case, the function of a plug preventing the penetration of sewer stench is performed by water. Therefore, one of the most significant disadvantages of using of this device can be considered constant dampness. To avoid the development of pathogenic bacteria around it, it is necessary to carry out regular disinfection. The advantages of such structures include relatively low cost.
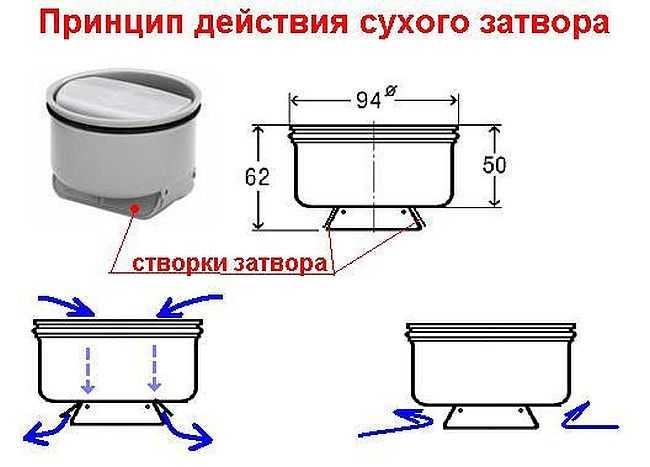
The next, more expensive and modern version is the shower drain in the floor under the tiles with a dry seal. It should be noted right away that it does not create dampness, leading to the appearance of mold and mildew. This is due to the fact that all the water is instantly drained into the sewer system. The operation of the dry shutter is ensured by the presence of a special valve, which is a ball placed in a funnel. As the ladder fills with water, this ball gradually begins to float, opening the drain. After the water is removed, it returns to its place, blocking the access of air from the sewer system. The only significant drawback of such drains is that over time the valve becomes overgrown with debris, as a result of which its operation is disrupted. To avoid such failures, it is recommended to clean it regularly.

What should you pay attention to when buying a floor shower drain under tiles?
Which one to choose, you need to decide for yourself, based on your own capabilities and needs. However, in order not to make a mistake, it is necessary to take into account several important nuances. First of all, you should pay attention to the cost of the device. There is no need to save money, because too cheap models are of very low quality. One of the best options is a shower drain in the floor under Viega tiles. The products of this company are of high quality and reliability compared to other analogues.
Do not forget that it is the correctly selected drain that will best ensure cleanliness, dryness and absence of dampness in the bathroom. Before purchasing, you need to decide on the height of the mounting system. In addition, you will need to at least roughly calculate your water consumption. It is important that the selected model has time to cope with the disposal of used wastewater.
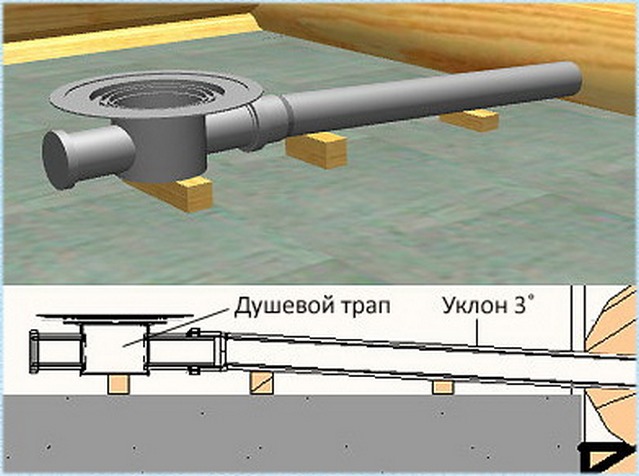
Installation features
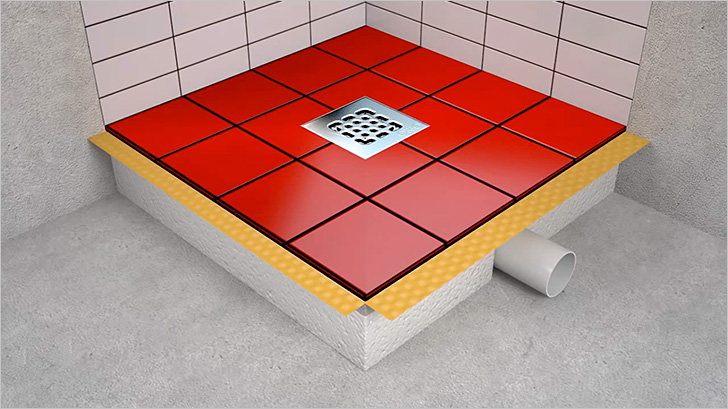
To install a shower drain in the floor under the tiles, you need to slightly raise the floor level and create a slope in it directed towards the drain. During installation, it is necessary to ensure that the grille does not protrude above the floor level. At the first stage, you need to create a five-centimeter thermal insulation layer. You can use polystyrene foam for this. On top of it, it is recommended to create a four-centimeter rough concrete screed, on the surface of which the necessary screed will subsequently be placed to ensure the tightness of the floor.
The fourth layer should be a clean concrete screed, providing a slope for draining water. On top of it you can lay moisture-resistant ceramic tiles or other suitable finishing material.
Variety of design solutions
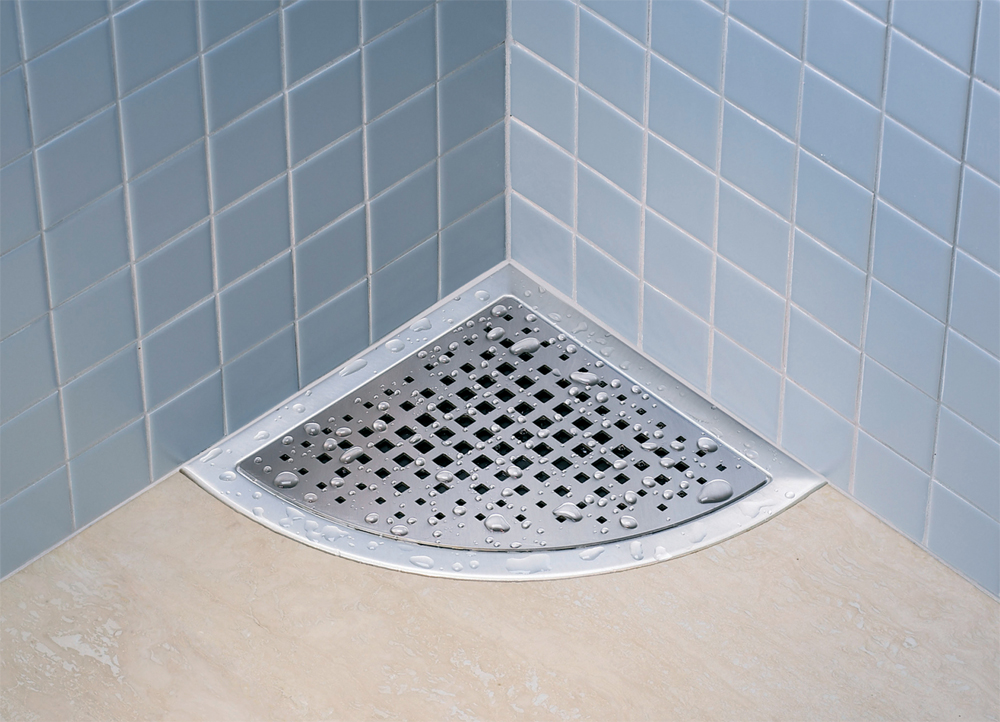
Today, corner, round and rectangular drains are produced. The first option is usually installed in the corner of the room, so it is almost invisible against the general background. Rectangular and round devices can be installed in any part of the bathroom. Recently, plastic, metal and combined models have become especially popular.
Removable decorative grilles are especially varied, the slots of which can have different sizes and patterns. The ladders with LED lighting look very original. A point drain decorated in this way will create a unique atmosphere in the bathroom. Only round and rectangular models are equipped with such lighting. It should be noted that the cost of products with LED backlighting will be slightly higher than the price of standard drains.
The range of shower drains is so wide that anyone can easily select the most suitable one. best option. The main thing is that when choosing a device, pay attention not only to the aesthetic side of the issue, but also to the constructive and technological features one model or another.
Drainladder
(direct drain)
Color black. Capacity 100 l/min
Material: body, grille and top working surface– polypropylene
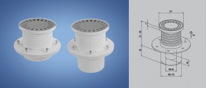
Drainladder
(direct drain)
Color: black. Capacity 100 l/min
Sewersiphon
KVB DN 110 C KVB DN 110 N
Color black, stainless steel. Capacity 100 l/min
Material: polypropylene
Adjustable height
Drainladder
Forrainwater
Color black. Capacity 400 l/min
Material: polypropylene
Design: check valve, additional strainer
Drainladder
Forrainwater
Color black. Capacity 500 l/min
Material: polypropylene
Design: check valve, additional strainer
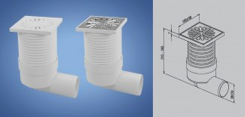 |
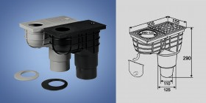
Drain ladder (side drain) PVB 100x100/DN 50 B PVB 100x100/DN 50 N Color B - white, N - stainless steel Material: body - polypropylene, grid and upper working surface - stainless steel Height adjustable |
|
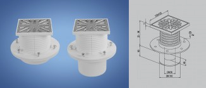 |
Drainladder (direct drain) PVB 100x100 PR/DN 50 B PVB 100x100 PR/DN 50 N Color: B – white. N – stainless steel Capacity 50-55l/min Material: body - polypropylene, grid and upper working surface - stainless steel Height adjustable |
|
| |
Drainladder(direct drain) PVS 122х 122PR/DN 50N PVS 122х 122PR/DN 110N Material: body - polypropylene, grid and upper working surface - stainless steel Height adjustable |
|
 |
Drain drain (direct drain) PVS 110 DN 110 N DISCOUNT! -thirty% 1069.00 RUR - 700.00 rub. Color: white. Capacity 50-55 l/min Material: body - polypropylene, grid and upper working surface - stainless steel Height adjustable |
|
 |
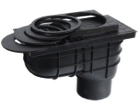
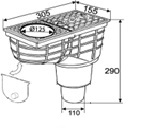
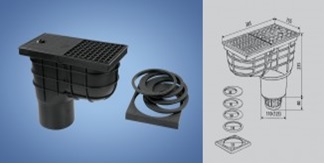
Drainladder (universal) Forrainwater (outdoor) LSVU DN 125 /110C Color: black only. Capacity 400l/min Material: polypropylene. |
|
|
|
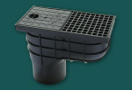
Drainladder Forrainwater (outdoor) Color: black only. Capacity 400l/min Material: polypropylene. Equipment: grille, lid, garbage bin, garbage bin compartment cover, check valve |
 |
|
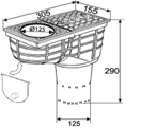
Drainladder Forrainwater (outdoor) Color: black only. Capacity 400l/min Material: polypropylene. Equipment: grille, lid, garbage bin, garbage bin compartment cover, check valve |
 |

A shower drain or gutter drainage system is a universal design designed for effective removal non-aggressive liquids, including water, from the floor surface in special rooms.
Structural characteristics and purpose
The shower drain belongs to the category of complex plumbing devices, and is fixed directly to the pipeline through a special floor hole. This design includes:
- funnel-shaped water inlet or housing;
- siphon, responsible for creating an effective hydraulic seal;
- a flange through which the waterproofing membrane part is sealed;
- a grate that prevents clogging and failure of the sewer system;
- outlet coupling part connected to the drain part of the sewer system.
During operation of the drain ladder, the entire device must be securely fixed, and the removable part is represented only by a lattice cover. Most shower drain devices are installed in the floor, but some models are built directly into the wall.
Despite their apparent simplicity, drainage structures have a wide range of functionality:
- transport the water flow to the sewer riser;
- provide optimal tightness of the joint with the floor;
- carry out primary filtration of wastewater and prevent sewer clogging.
The built-in hydraulic seal prevents all unpleasant sewer odors from entering the room.
Types of structures
Depending on the specific application and purpose, drains may vary in several respects, including the material used for manufacturing, as well as the method of installation work.
Differences in material
Domestic and foreign manufacturers produce plumbing structures made from traditional and modern materials:
In private households and apartments, it is recommended to give preference to lightweight but reliable, quickly installed products suitable for self-installation.
Differences in installation and size
Vertical elements have greater throughput, but require special installation conditions.

Horizontal drains can be used in any type of premises, regardless of the number of floors, therefore they belong to the category of the most popular and frequently used plumbing products. The dimensions and height of a significant part of the drain models vary between 7.5-18.0 cm. The upper grille or front panel can be round, square or rectangular.

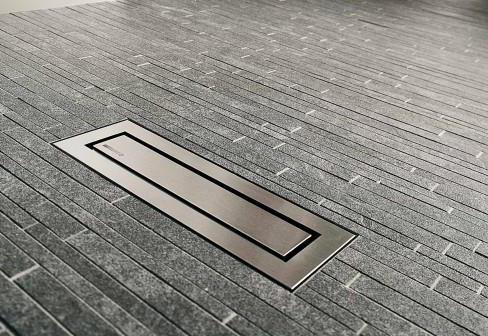
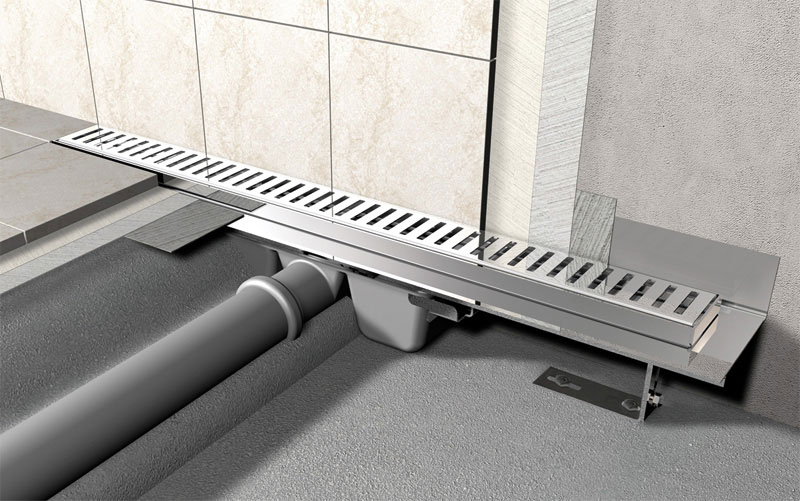
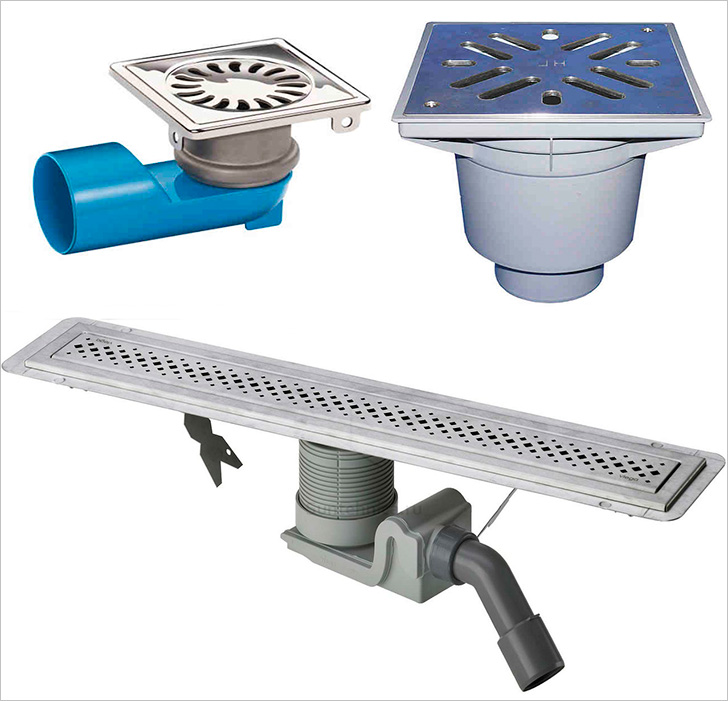
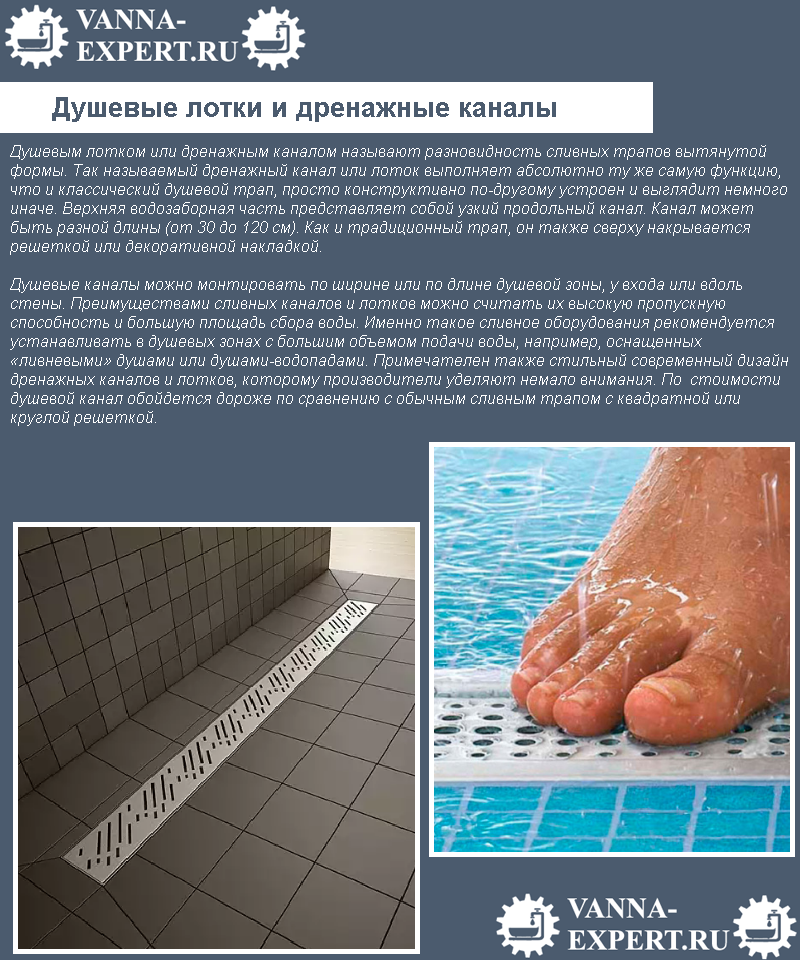
Channels with drainage properties
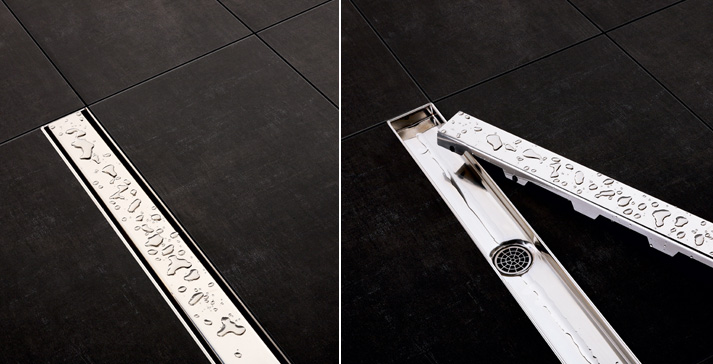
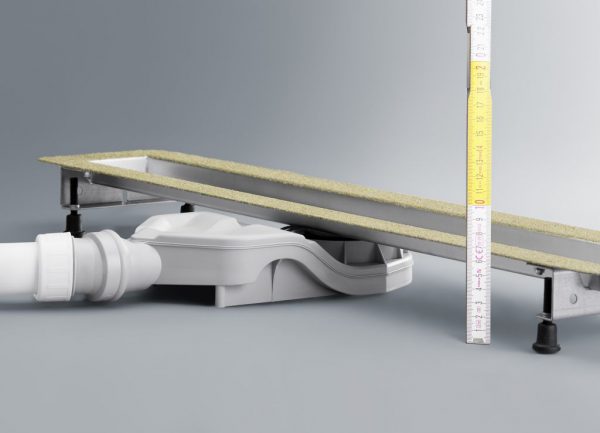
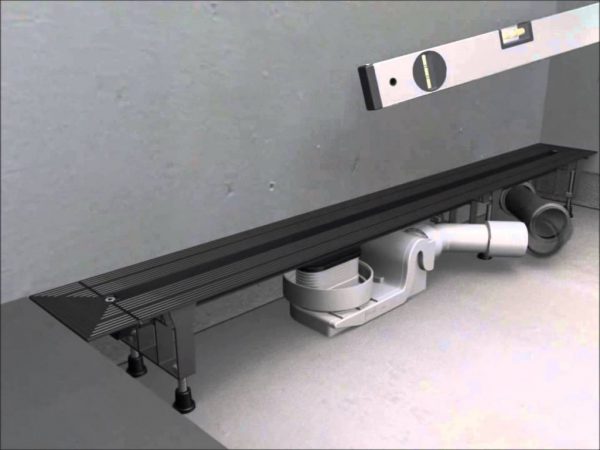
Drainage-type shower trays-channels are a variation of the traditional drain ladder and, while maintaining all functionality, are distinguished by a special, elongated shape. Narrow and longitudinal water intakes are located in the upper part of the drain, and are covered with decorative lattice-type overlays.
![]()
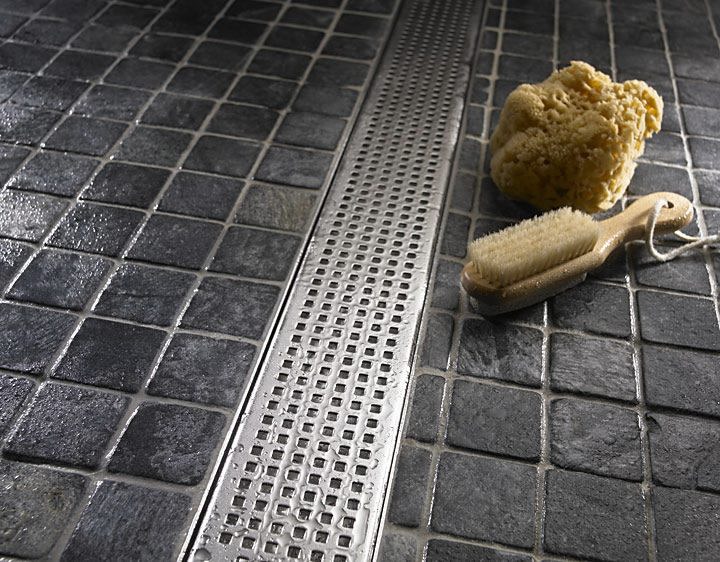
Such a channel can be installed both in the shower area and in any other part of the room. High throughput is complemented by a large catchment area, which allows for complete drainage with a significant volume of water supply. Preference for this design is given to “rain showers” and “waterfall” showers.
Valve options
Regardless of the type, the design is equipped with a special siphon configuration or a shutter that prevents sewer odor from entering the room:
The optimal option, characterized by a high degree of reliability, is the use of universal shutter systems with two levels of protection, successfully combining dry and wet odor control. Such equipment has an optimal ratio of quality characteristics and cost.
When choosing special element plumbing communications intended for drainage of wastewater into the sewer system, you must first of all pay attention to such a very important parameter, as indicators of throughput, indicating the amount of water that the ladder is able to consistently discharge per unit of time. As a rule, the standard calculation of the required throughput is based on the following data:
- with a diameter of the upper shower head of 300 mm, the average water supply per hour varies between 30-90 l;
- using a cascade shower requires water consumption in the range of 1500-1800 liters per hour.
When choosing throughput, it is advisable to take into account a small margin of 5-10%, which will prevent emergency situations and flooding.
If it is necessary to perform independent installation and there is no experience in carrying out plumbing work, it is not advisable to purchase round models. It will be quite problematic to perform a perfectly smooth and beautiful installation of the floor covering when installing such a ladder with your own hands.
Self-installation
High-quality modern drains can withstand the maximum load of wastewater for a long time, so their installation must be correct, ensuring the tightness of the seam joints and observing all sanitary and hygienic standards. Proper installation will ensure that the drainage device has a long service life while maintaining its visual appeal.
Preparatory work
The preliminary stage requires a clear determination of the dimensions of all layers of the floor covering in the area of installation work.
Step 1. Determination of changes in ladder height. The drainage system should be positioned level, without protrusions above the floor covering. The recommended tilt angle of the system is one and a half centimeters for every meter of surface.

Step 2. Determining the location of the structure. The distance from the wall should be determined by the dimensions of the floor tiles and the joint. Compliance with this rule allows you to minimize the number of adjustments and cutting of finishing slab material.
Step 3. Finish markings. Determining the direction of the drainage system and the place of insertion into the sewer riser.
The preparatory work includes the purchase of consumables, the quantity of which is calculated in accordance with the size of the shower room:
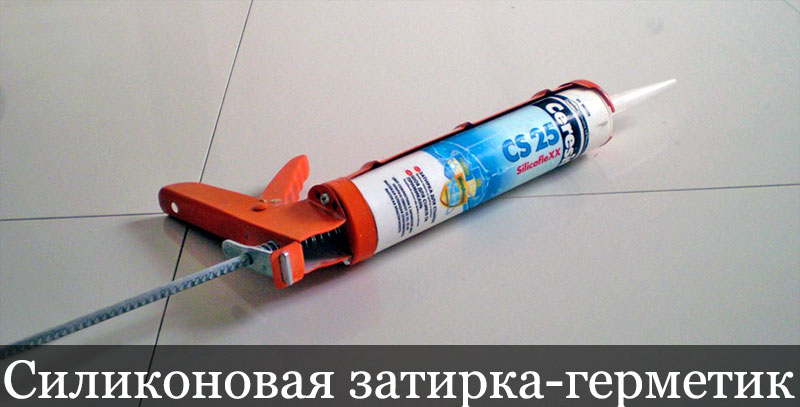
For finishing as a floor covering, it is advisable to use ceramic or porcelain tiles with a non-slip surface, as well as grout and standard plumbing sealant.

| Image | Manufacturer/description |
|---|---|
 | Silicone sealant white 300 ml. UNIPAK |
 | Silicone sanitary sealant Ceresit CS 15 (white, transparent) 280 ml |
 | Adhesive-Sealant KWIK SEAL plumbing white 162 ml |
 | Plumbing sealant Quickseal Medium - medium fixation |
 | Henkel sealant "Moment Germent" sanitary silicone colorless, 85ml |
Installation in showers located in old buildings may require removal of the old covering and installation of a new one with built-in drainage communications. Dismantling will require the use of a hammer drill, chisel and hammer, after which all construction debris will be carefully removed. The shower room prepared for installation must have a clean, usually concrete base, as well as a sewer system at the exit from plumbing fixtures. It is advisable to replace old cast iron pipelines with new ones plastic pipes, which are more convenient for inserting a pipe from a shower drain.
Installation technology
A properly selected shower drain is resistant to corrosive changes, and is also characterized by reliability and durability. If necessary, this structure can be disassembled and cleaned independently.
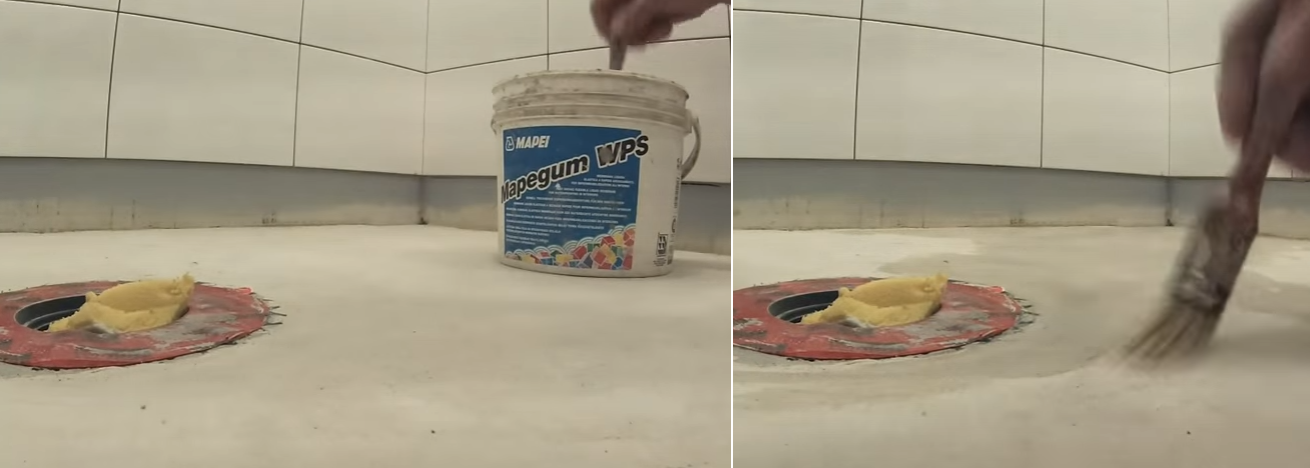
Step 1. The areas of all joints of the floor and walls, as well as corners, are carefully treated with mastic, which prevents the ingress of moisture, as well as the formation of mold and foci of fungal infection.
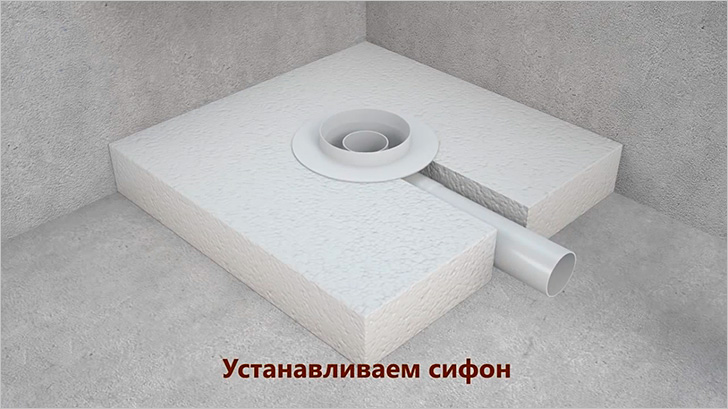
Step 2. Assembly and subsequent installation drain system, which should be located on a straight line between the section of the tie-in into the sewerage system and the junction of the floor tile elements.
Step 3. Inserting into the sewer and processing the connection using silicone plumbing sealant. If it is necessary to connect drain pipes from large quantity plumbing fixtures, a standard multi-output adapter is used.
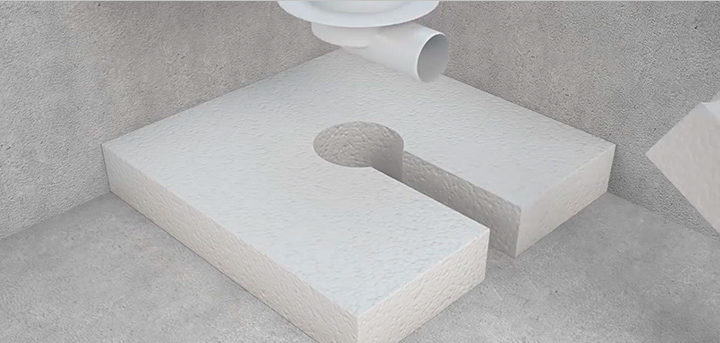
Step 4. Additional thermal insulation of the concrete base using granulated or extruded polystyrene foam sheets. The contours of the installed elements of the drainage system are carefully cut out using a construction knife.
At this stage, it is possible to replace heat-insulating materials with a cement-sand screed.
Step 5. Laying plastic deformation borders or damping self-adhesive tape along all walls.
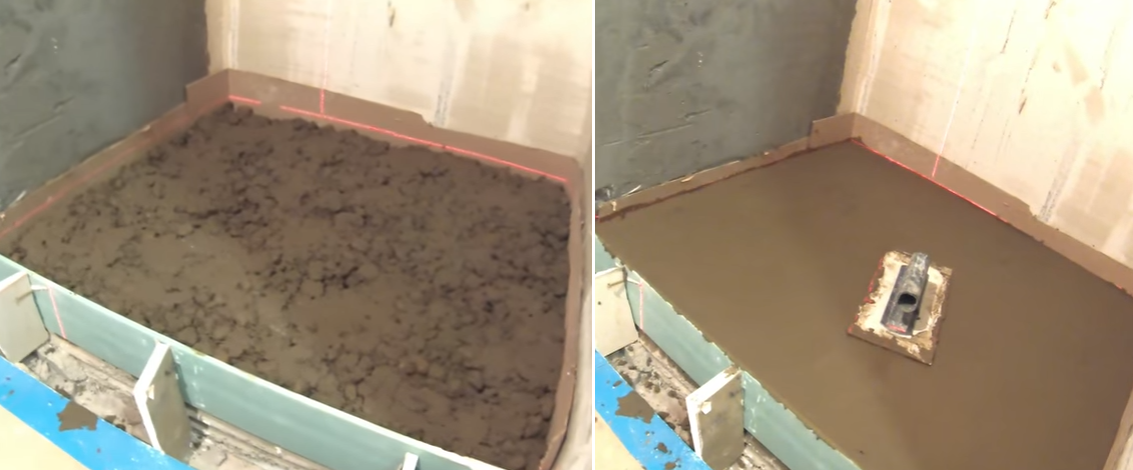
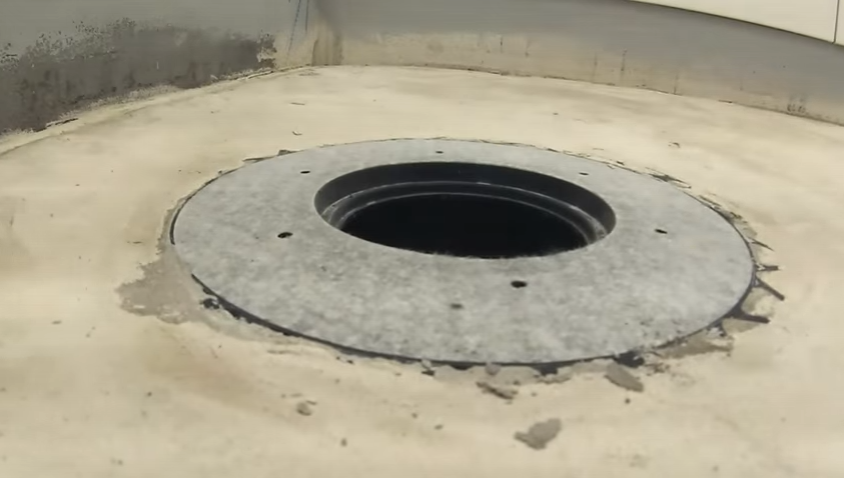
Step 6. Mixing the cement mortar and applying it to the polystyrene foam surface in a layer of 3.5-4.0 cm. The mixture to be laid should completely hide the installed drain without a flange. Leveling the cement mixture is carried out according to construction rules.

Further work should be carried out approximately three to four days after the concrete screed has hardened well and gained full strength.
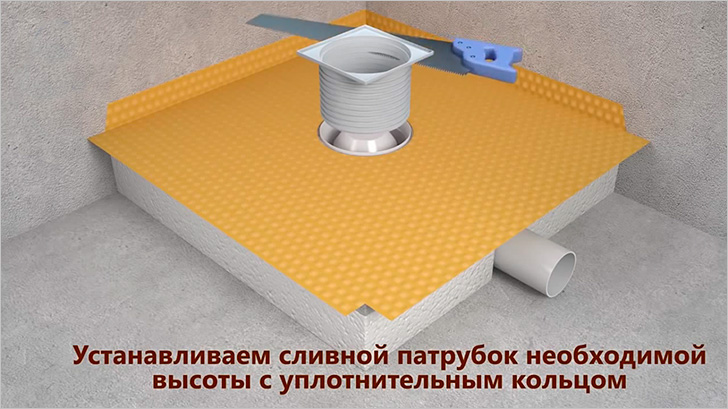
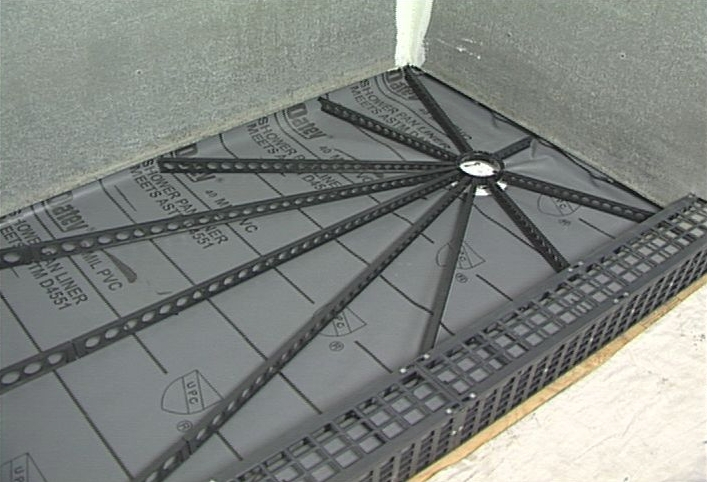
Step 7 Prepare a gasket with a diameter of 15-20 cm from an isoplastic membrane with a hole in the central part, and then fix it with a screw around the flange.
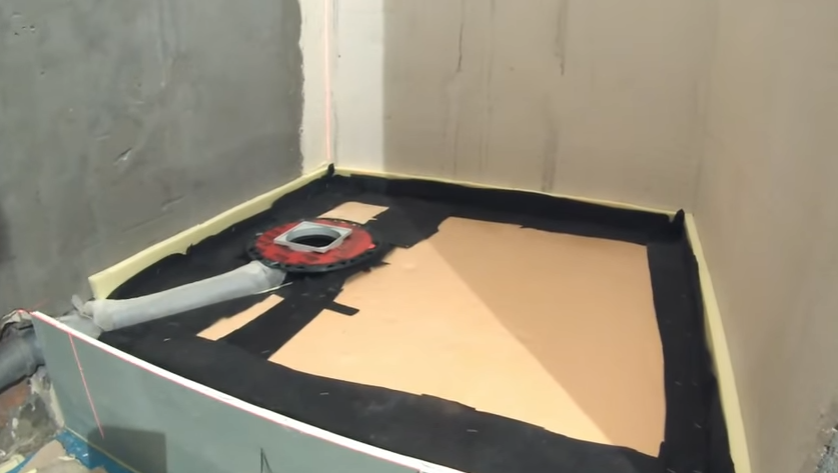
Step 8 An additional layer of waterproofing should also be provided in corners, at joints and along the entire surface under the shower stall. After treatment with the primer, a layer of coating mastic is applied.
Step 9 Connection of a siphon and a lattice lining with a gasket in the form of a rubber sealing ring.
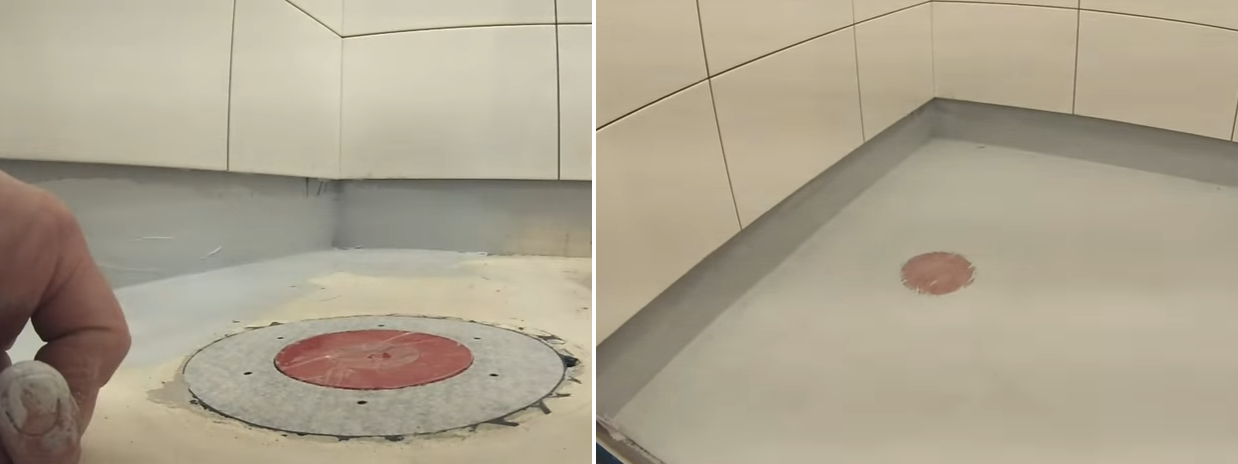
At correct installation, the decorative grille can be easily dismantled, making the inside of the drain accessible for work. The cover must be covered with polyethylene, which will prevent cement mortar from getting into the drain system.
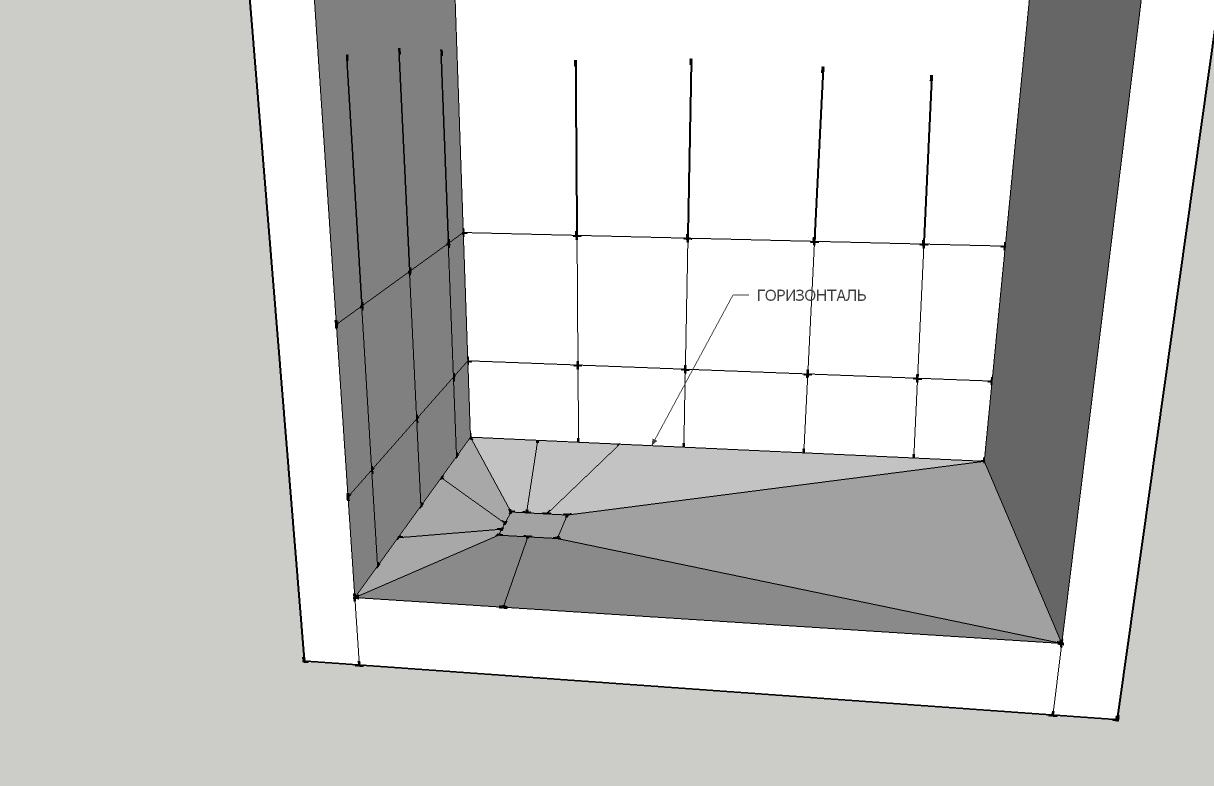
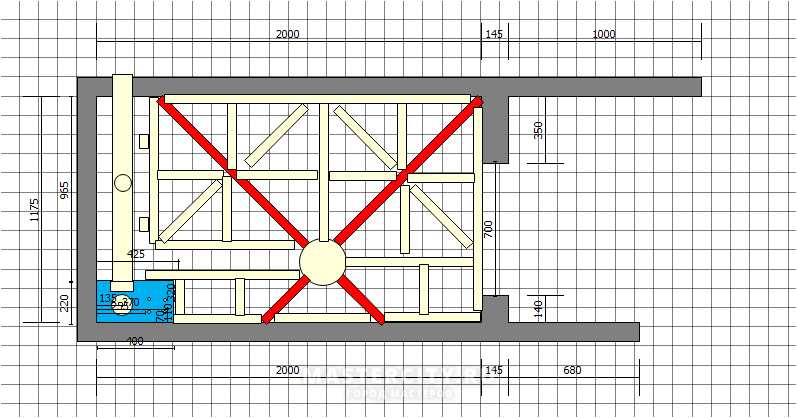
Step 10 Applying another layer of cement screed. When the drain hole is located in the central part of the shower room, guides are installed in a diagonal direction, the lower corner of which should converge at the drain. The resulting triangle is also filled with the mixture.

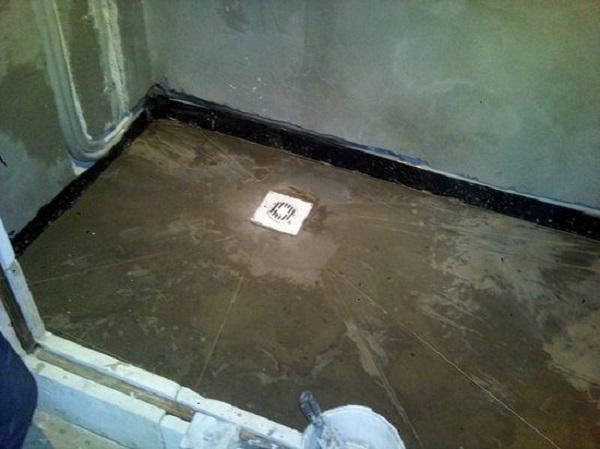
The hardening cement mixture must be periodically moistened and thoroughly leveled. On final stage the guides are removed, and the freed space is filled with cement mixture.
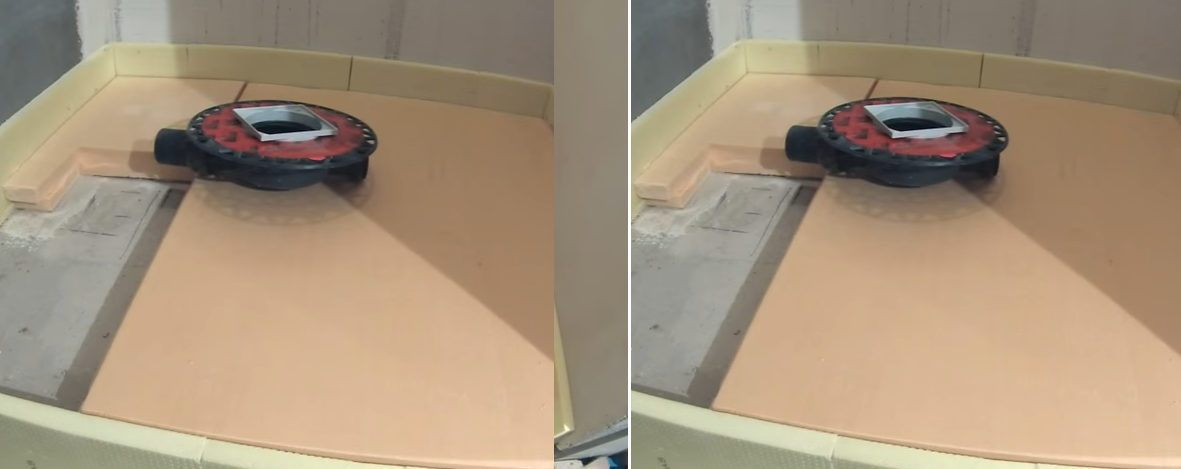
The most convenient, from the point of view self-installation, reliability and durability, is the acquisition and installation of the most modern, ready-made type-setting structures, represented by perforated metal-plastic. It is recommended to apply red lead to the mounted surface of steel structures.
Ceramic used in the construction of the drain ladder flooring, must necessarily meet increased requirements. The surface of the tile should not be slippery or absorb significant amounts of moisture. The moisture absorption level should be 1.5% or less of the weight of the tile itself.
Video - Laying tiles with a slope under the drain in the shower, part 1
Video - Laying tiles with a slope under the drain in the shower, part 2
Video - Laying tiles on the floor, with a slope to drain water, part 3
Surface roughness increases operational safety and prevents slipping when water enters. Installation is carried out using special adhesive contact compounds. All seam joints between the elements of the tile covering are sealed exclusively with waterproof grout, which can be the same color as the main coating or have a contrasting color.

Video - Installation of shower drains
Video - Shower drain in the floor under Alcaplast tiles
Video - Installation of a compact shower drain
A modern range of plumbing fixtures allows homeowners to design their bathrooms the way they like. This applies to both the functional content of the bathroom and the appearance of the room. However, there are only 3 most practical and common options for arranging a wash station in the bathroom standard apartment: installation of a traditional bathtub, installation of a shower stall or shower with a floor drain.
The latter option is now becoming increasingly popular, as it allows you to significantly save free space indoors. If the water during washing is not collected using a tray, but flows directly onto the floor, then you must install a special device called a drain, which is necessary to collect and direct flows into the sewer.
What is a ladder and what is it for?
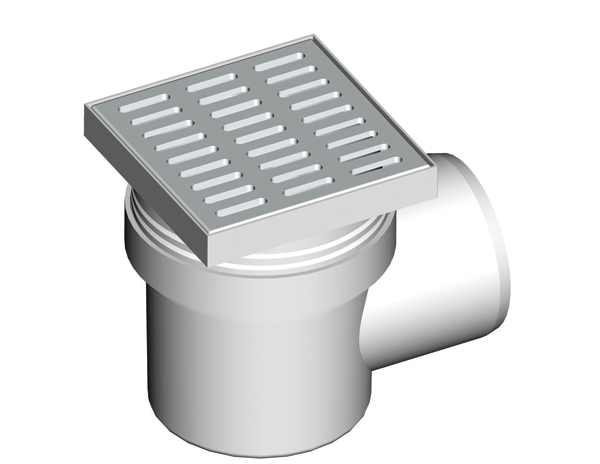
A drain is a special device that is installed in the bathroom if the water in the shower is drained not using a tray, but directly to the floor. It is used for arranging open-type showers. Drains can be made of metal, plastic or a combination of these materials; they are a flattened siphon mounted directly into the floor. This useful device performs the following functions:
Please note that drains are used not only for arranging bathrooms in private apartments, but also in public showers, for example, swimming pools, gyms or baths. In addition to its main purpose, this device can serve as an additional drain hole.
Device
Many homeowners would like to avoid installing a standard enclosed shower stall, but simply do not know how to make an in-floor shower drain aesthetically pleasing and functional. In fact, thanks to the existence of modern and functional drains, this is quite easy to do. Structurally, this device resembles a conventional drain installed for bathtubs and consists of the following components:
Note! As you can see, the bathroom drain has a simple design, it is easy to install and trouble-free in operation. The main thing is to know how to make a floor, prepare its surface for installing this device, so that water drains away well and does not linger on the surface.
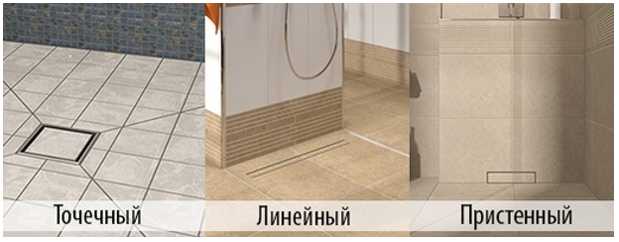
Types of shower drains by shape
Shower drains are so varied in design, appearance and material, so that they can be easily matched to any finishing material. A floor drain correctly selected in color and shape blends harmoniously with finishing material, from which the floor is made, and does not stand out. Therefore, the installation of a drain does not destroy the uniform appearance of the room, but is organically and delicately integrated into it. There are the following main types of floor drains:

Please note! To ensure that the floor drain does not fall out of the unified architectural appearance of the room, it is important to choose the right shape and type of drain. If square tiles are used for floor cladding, then preference should be given to models in the form of a compact square. Right choice The shape and size of the device makes its installation more accurate and simpler.
Types of shutter
Drains installed in the bathroom floor to organize drainage, in addition to shape and size, also differ in internal design. Mostly we are talking about installing a shutter that prevents odors from the sewer from penetrating into the bathroom. The most common varieties read:
Important! Based on the connection method, drains with vertical and horizontal connections to the sewer system are distinguished. But the most important factor that is taken into account when choosing a model is the height of the device. This parameter determines how much the bathroom floor will need to be raised. If the height is small, then a thinner screed will be required. However, higher models have greater capacity.
Installation technology
Many homeowners don't know how to build a bathroom drain without the help of a professional. Indeed, this task is difficult, since installation errors usually lead to water stagnating on the floor rather than leaving through the drain. The approximate installation diagram for the ladder is as follows:
Important! To prevent water from stagnating on the floor surface, but flowing through the drain, it is necessary to give it a slope of at least 1 mm per meter in the direction of the drain hole.
Video instruction
In recent decades, the concept of " good repair" is changing very quickly. For example, some time ago they were very popular. Nowadays, built-in showers without a tray are gaining popularity. Their arrangement requires a floor with a drain, and its organization requires the installation of a ladder - a special device for collecting water from the floor.
Types of drains
Most often, to make a floor with a drain, point drains are used, much less often - linear ones. Installation of wall drains is generally quite a rare occurrence, since installation is possible only at the stage overhaul, not only the floor, but also the walls. In addition, such devices are much more expensive.
Valve types
In addition to different design solutions, the water drain to the floor (point or linear) has different types of valves. A seal is a device that prevents sewer odors from entering a room.
The simplest seal is a water seal. In these devices, there is a bend in the outlet pipe in which water remains. It blocks odors. The disadvantage of such a system is the possibility of drying out. This happens if the water has not been drained for a long time. Drying out can also be caused by incorrect installation (the slope is chosen incorrectly) or the presence of floor heating - a warm floor in the bathroom “dries out” the water in the water seal.
Dry gates for ladders are more reliable in this regard. There are several types:
Dry drains are made mainly of plastic, gratings are made of stainless steel or also plastic. There are models with a built-in check valve. It prevents water from rising when the drainage pit overflows. When installing a floor with a drain in an unheated bathhouse, look for models that can be used in cold weather (there are some).
How to raise the bathroom floor to install a drain
The smallest floor-mounted drain ladder has a height of 6-7 cm. At the same time, in order for water to flow normally into it, it is necessary to ensure a slope towards the drain hole of at least 1 cm per meter. This means that when making a floor with a drain, the height of the floor towards the walls is increased. The zero point in this case is the upper part of the installed ladder. How accurately the floor rises depends on the size of the shower stall or the entire bathtub, if you plan to collect water from the entire area of the bathroom.
There are several ways to raise your bathroom or shower floor. When choosing a method, it is necessary to take into account the load-bearing capacity of the floor, otherwise you can cause damage to the entire structure.
Screed of different types
The most obvious way to make a floor drain slope in the floor is to pour a screed. But the option is not always the best. Firstly, an ordinary cement-sand mixture has a lot of weight, and secondly, it “matures” for a long time. But there are several good options.
The most common way to create a floor with a drain is using a screed. It’s just that the screed can be different, especially since the thickness of the “pie” is usually significant - rarely less than 12 cm - which makes it possible to make it a combination. This allows you to provide the required reliability, but reduce weight. Most often, the floor with a drain is insulated. But the maximum thickness of the insulation and screed is 10 cm, which is clearly not enough to install most drains. The remaining centimeters are “gained” by laying a rough screed, but it makes sense to make it from lightweight concrete to reduce the load on the floor.
On the logs
In order not to overload the floors, you can make a podium in the shower or bathtub on joists. The option is controversial, since high humidity and wood do not go well together, but sometimes this is the only option. When choosing such a floor drain device, you must use well-dried wood. Before use, it is treated with protective compounds (according to the instructions, but at least twice). It is advisable to choose from those impregnations that are intended for outdoor use or for direct contact with the ground - they have a higher degree of protection. After the composition has dried, you can begin to work.
The advantages of these methods are minimal weight, the disadvantages are the complexity of execution, since attention to detail and high quality waterproofing are required.
As you can see, a floor with a drain in a bathtub or shower can be done in different ways. Choose the option that best suits your conditions.
Criterias of choice
In addition to choosing the design of the shutter, it is advisable to select the size of the mesh so that it is convenient to lay the tiles on the floor: it is desirable that the size of the drain be a multiple of the size of the tile (including mosaics). Pay attention to the material of the case. For a shower stall in an apartment or house, plastic is quite suitable. These are the most affordable options. Floor drains made of polypropylene are more expensive, and stainless steel is even more expensive.
It is also worth choosing the height of the ladder. The minimum value is about 6-7 cm, the maximum is up to 20 cm. From technical characteristics This equipment has only a maximum throughput - how many liters it can discharge per minute. Select depending on the maximum pressure that your shower can produce: the throughput of the drain ladder should not be less than the maximum amount of water dispensed. Both parameters are measured in liters per minute (L/min), so there shouldn't be any problems.
Floor with drain: work procedure
Although the designs of drains are different, all floor-mounted models are installed according to the same principle - the sequence of work is the same.
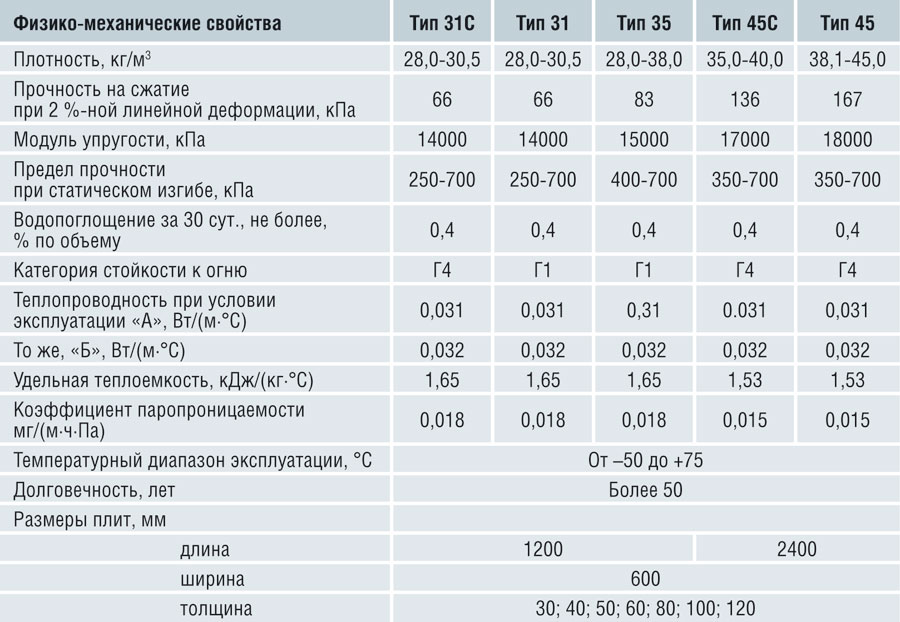
It is much more pleasant to stand on a warm floor in the shower, which is why a floor with a drain is most often made with a layer of thermal insulation. The best thermal insulation material for this is high-density extruded polystyrene foam. It does not absorb water, does not rot, has excellent thermal insulation characteristics, and can withstand loads normally (it will withstand the weight of the screed and tiles without problems).
It is more convenient to work with a level (laser level) that has a plane builder function. It will make the work much easier.
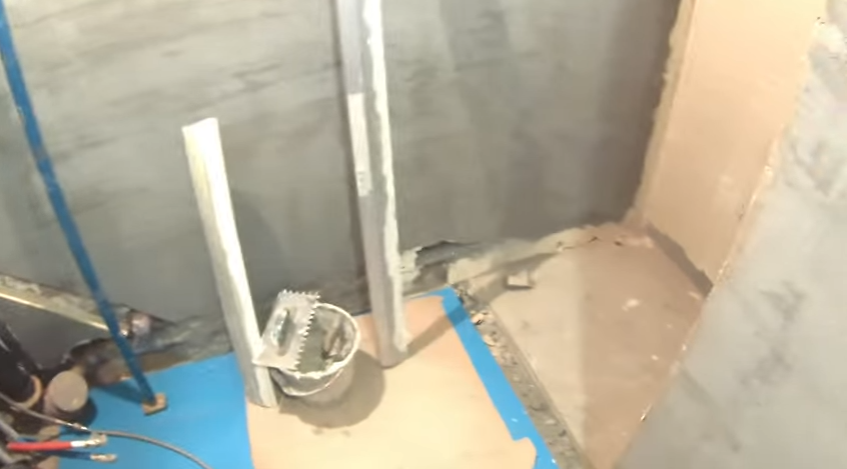
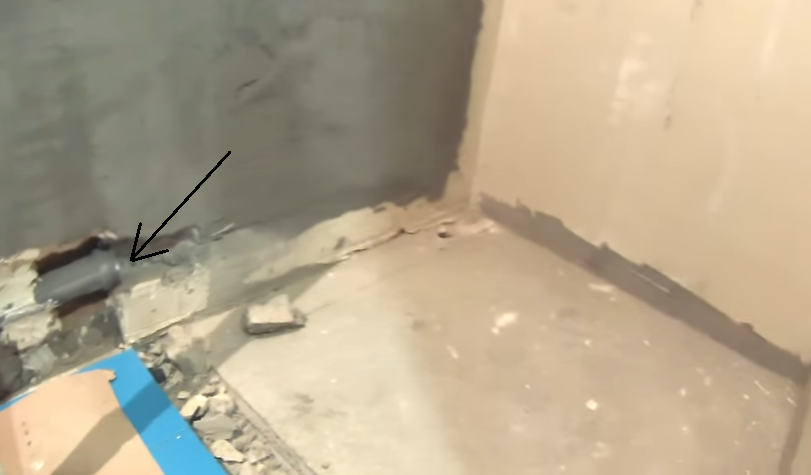
Preparatory work
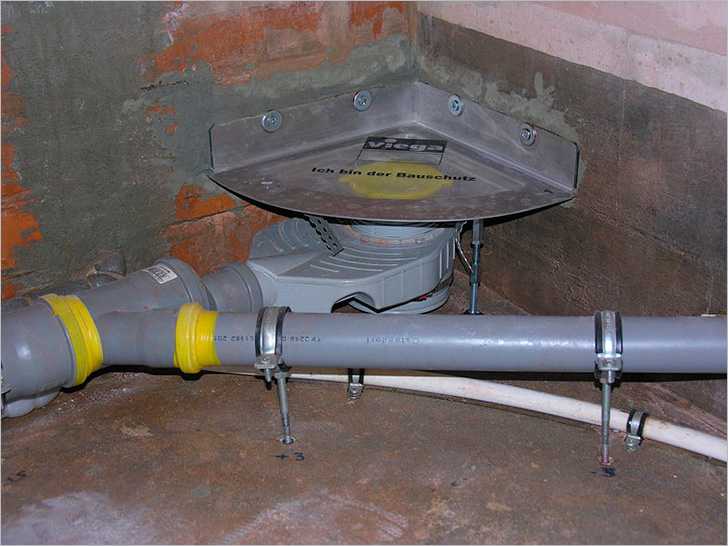
The first step is to remove a branch from the sewer riser where the water will flow. sewer pipe laid with the required slope (2 cm by 1 meter), the socket is placed at the intended connection point for the drain. After the sewer outlet is installed, take a drain and make preliminary markings - you need to mark the height of the screed on the walls of the shower stall:
Now you can measure the height to which you will need to raise the floor in the shower stall. It largely depends on the parameters of the ladder (its height). Based on the obtained figure, it will be necessary to plan the layers of screed and their thickness.
Determining the thickness of screed layers
Usually it is assumed that polystyrene foam 5 cm thick is placed in the screed. The minimum thickness of the screed is 3 cm (more is possible, less is not). This is in the center near the drain; towards the edges it becomes thicker (the required slope is created). From the existing screed height line, we put the resulting figure down (add the thickness of the polystyrene foam and the screed). It will be necessary to bring the rough screed to this level.
To reduce the load, the rough screed is made of lightweight concrete. It can be foam concrete or expanded clay concrete. Wet work can be minimized. To do this, you can lay foam blocks at the missing height and fasten them with reinforcing mesh. You can pour a 3 cm layer of DSP on top.
When installing such a base, a damper tape is needed along the walls. Since in the presence of polystyrene foam or any other insulation, the floor may sag a little, it must be made incoherent with the walls. This is why you need a damper tape. It is placed around the perimeter of the base. In height it should be 1-2 cm above all layers.
You can use a special damper tape, or thin foam plastic (1 cm thick or less). Even corrugated cardboard will do. The remaining tape is then cut flush with the screed. She did her job - we got a floating slab.
The poured screed must stand for at least a week - the concrete must gain at least 50% strength. After this, you can continue working.
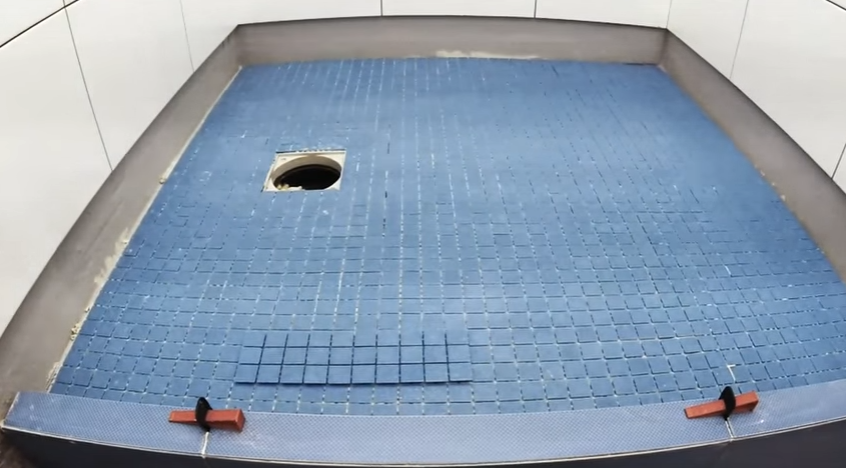
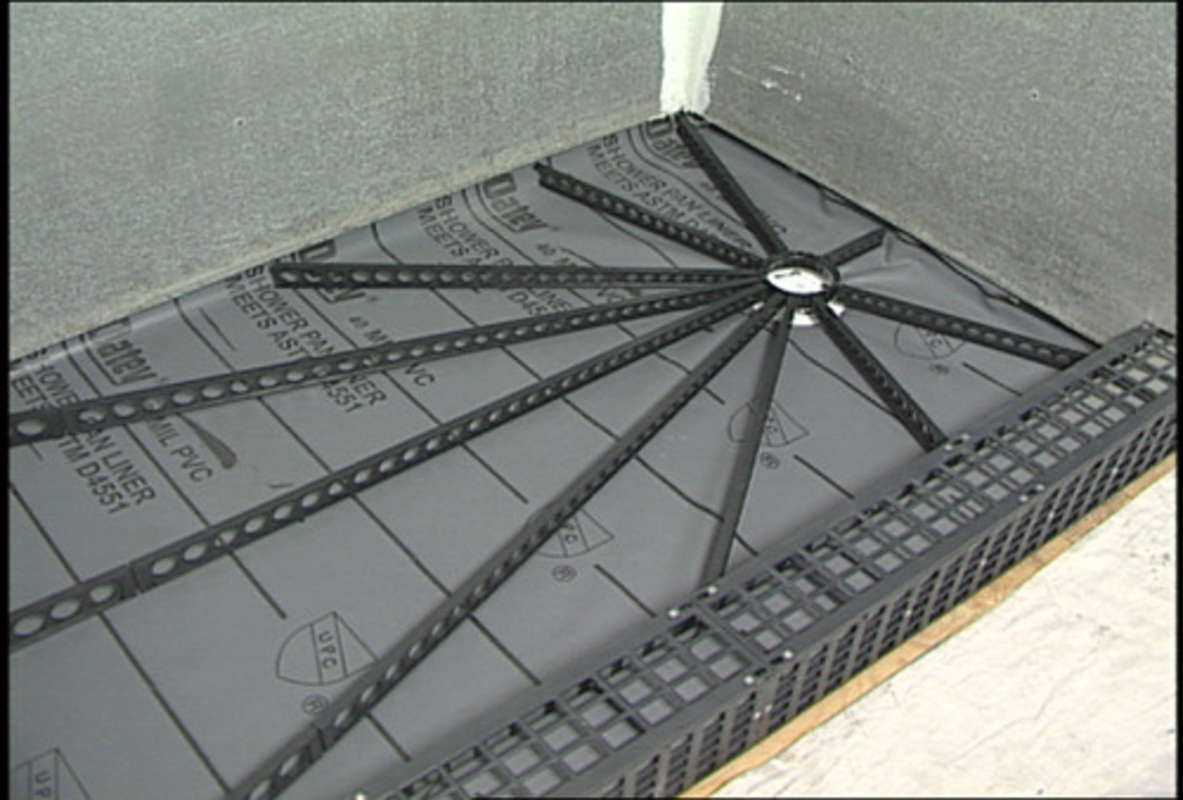
Waterproofing
To prevent the drain floor from leaking, the shower stall needs good waterproofing. It is better to make it multi-layered. One of the layers can be done at this stage.
Coating waterproofing is usually used. This could be bitumen mastic or special waterproofing for swimming pools. It is applied with a brush in several layers, extending onto the walls at least 30 cm. These mastics form an elastic, waterproof film on the surface without seams or joints. This type of waterproofing is highly reliable.
Particular attention should be paid to the processing of corners. They can even be glued with a strip of rolled waterproofing (such as Gidroizol, etc.). First layer coating waterproofing Apply to the walls, then glue the joint between the wall and the floor with roll waterproofing (set on the same compound), and apply another layer on top.
For those who like to do everything with a margin of safety, the first layer of waterproofing can be laid even under the first corrective screed. All rules remain the same as described above.
Instead of coating waterproofing, you can use roll waterproofing. But you will still have to lay it on bitumen mastic, lubricating it well and pressing the seams. The approach to the walls is approximately the same - about 30 cm. If the width of one roll is not enough, the panels are laid with an overlap of 15 cm, they are well coated with mastic.
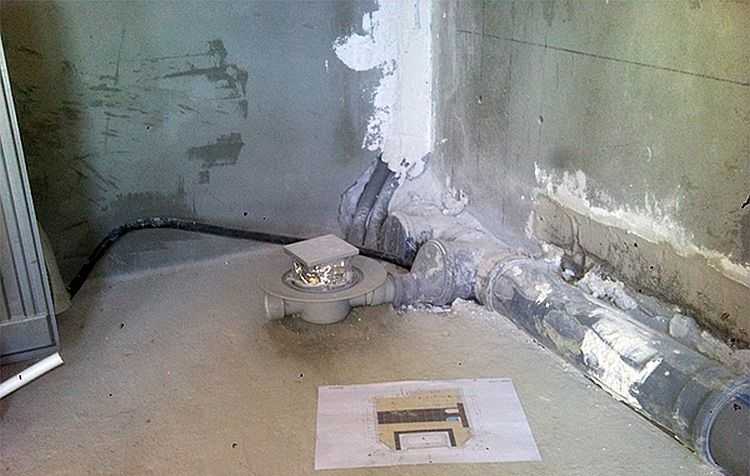
Choosing a place to install a drain ladder
To ensure that the tiles on the floor of the shower stall look at least normal, it is better to position the drain grate symmetrically relative to the tiles. Therefore, first, dry, lay out the tiles on the floor (taking into account the seams). When laying out, remember to step back a little from the walls - by the thickness of the tiles and glue.
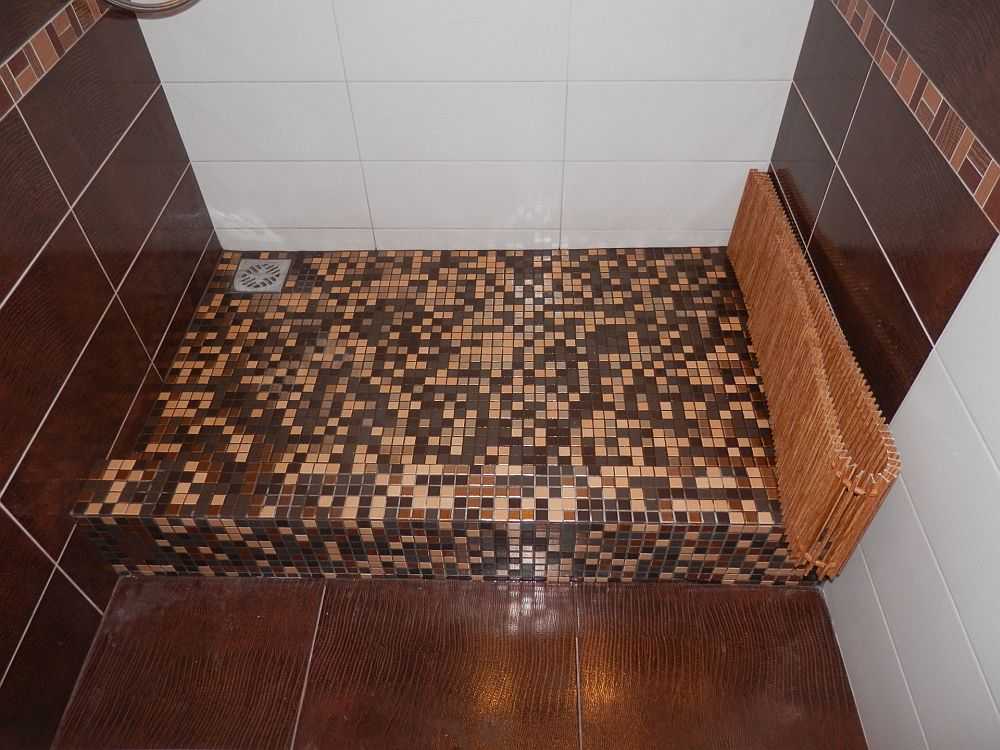
It is not at all necessary to make the drain in the center - it can easily be moved to any wall. In this case, the far wall from the entrance was chosen to reduce the possibility of water spilling out of the booth
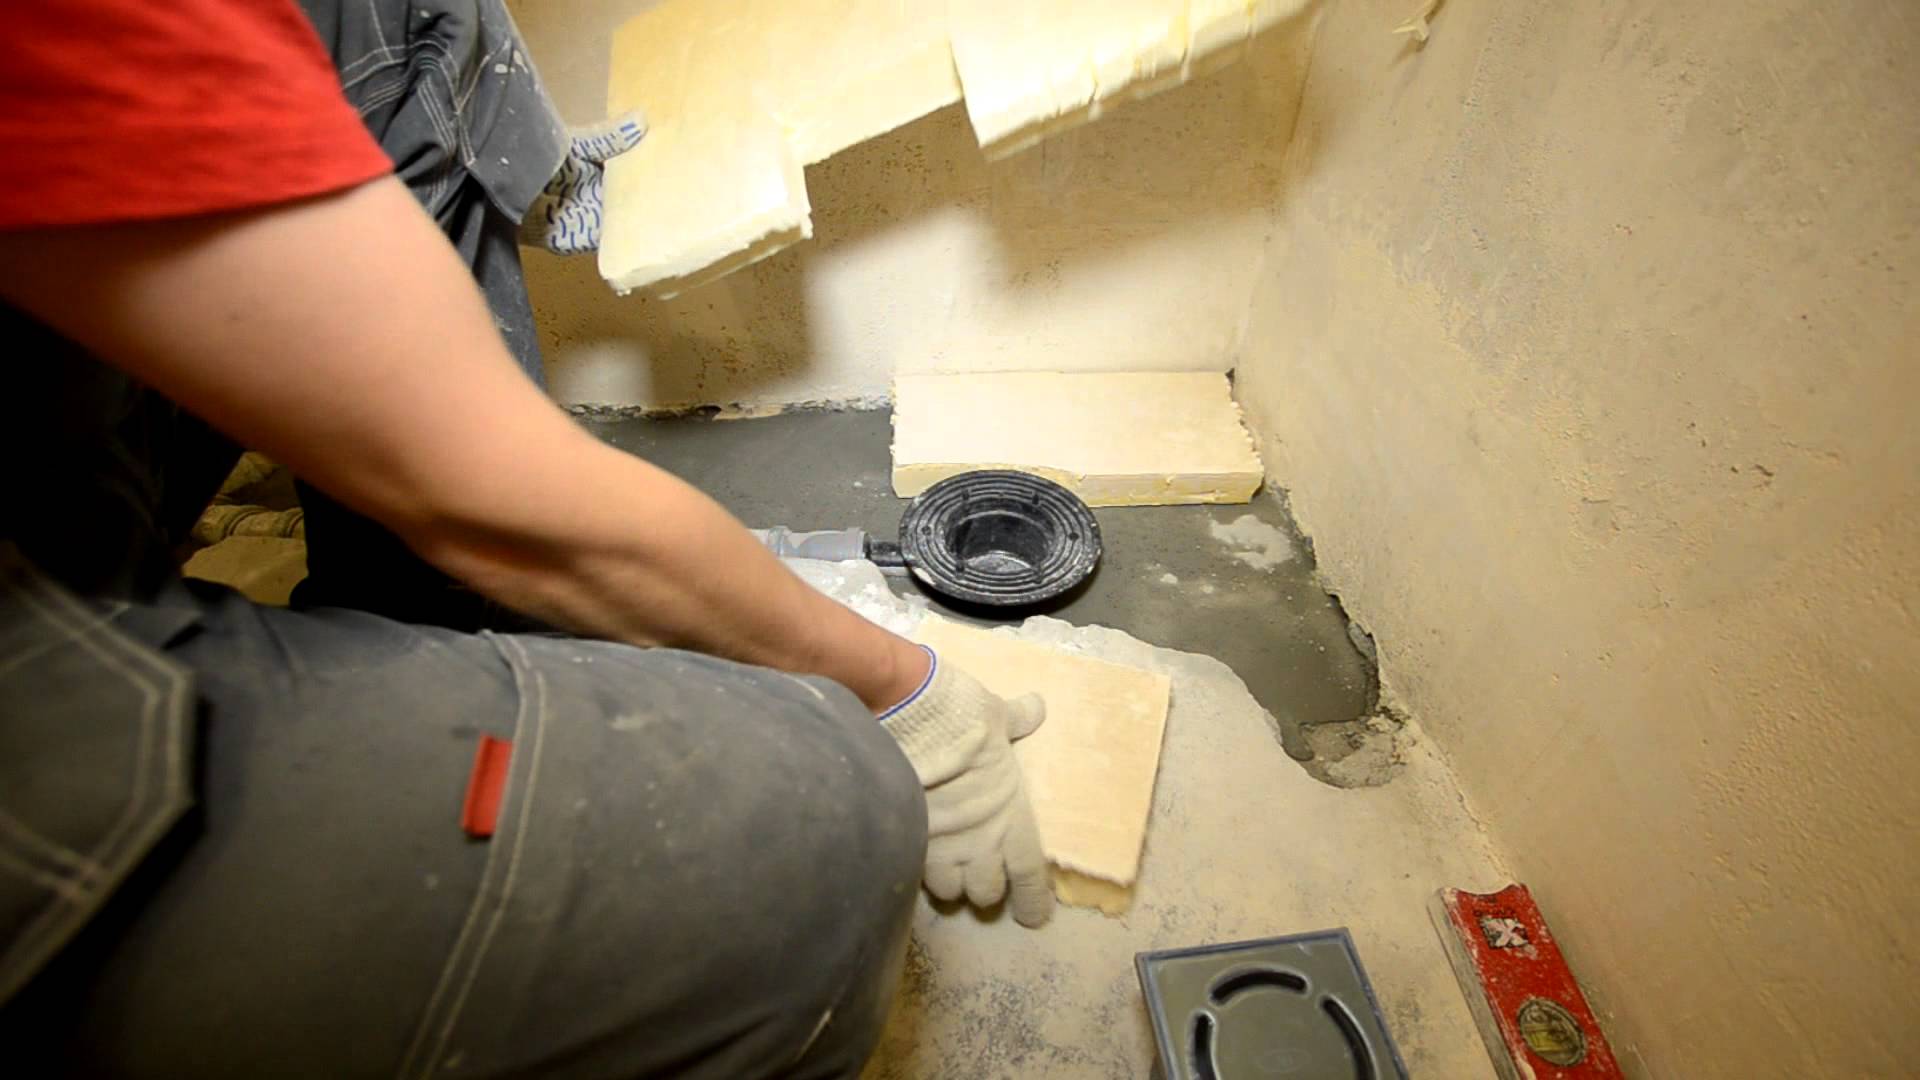
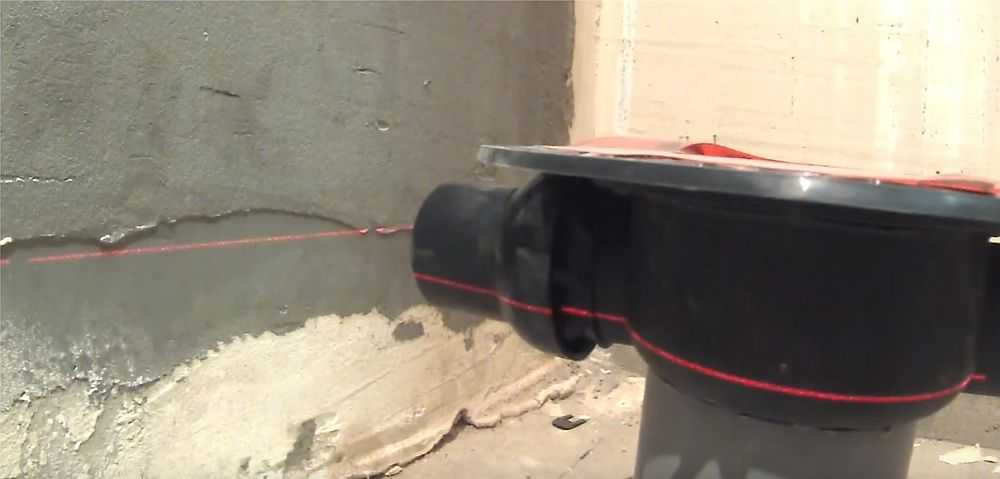
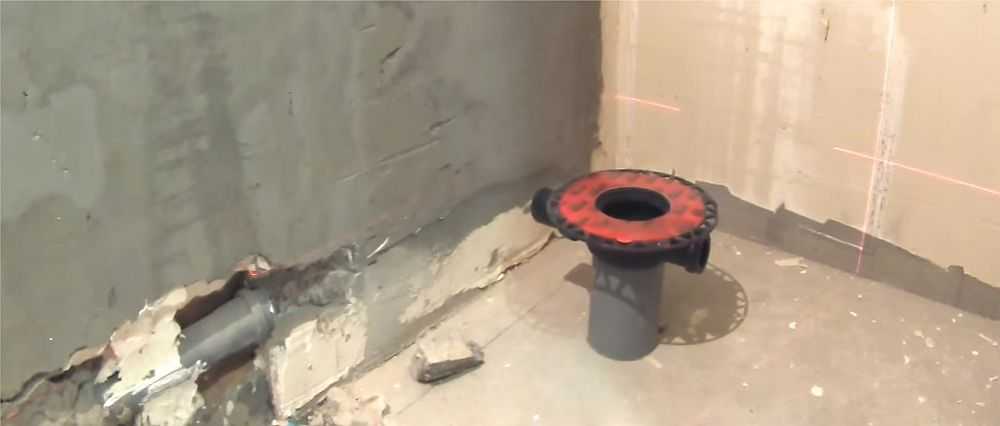
Installation of drain and insulation
The next stage is installing the drain and laying thermal insulation. A drain is placed at the selected location, it is connected by a pipe to the sewer outlet (during installation, do not forget about the slope). After this, insulation boards are laid. It is cut so that the installed ladder can be covered. A damper tape is also required around the perimeter. This time it is better to make it also from polystyrene foam, but taking a thickness less than -2-3 cm is enough. At this level, polystyrene foam will still prevent heat loss into the walls.
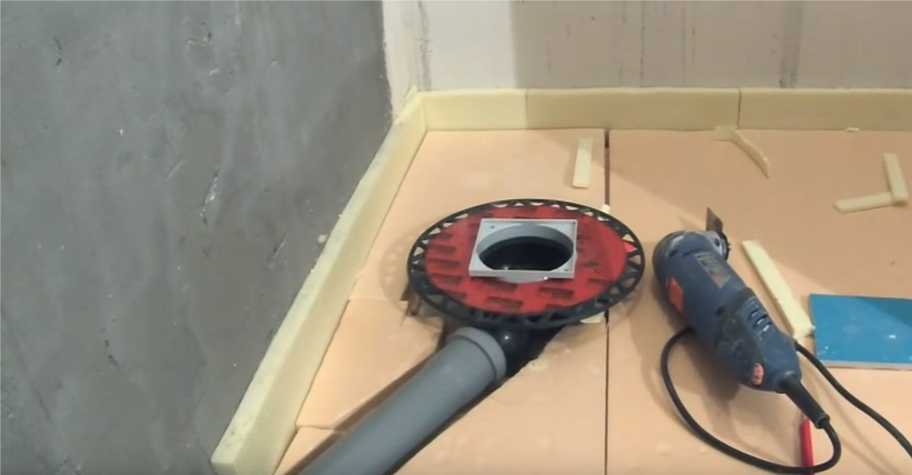
The joints of polystyrene foam are glued with tape (so that moisture does not leak out of the concrete). If there are large gaps, they can be tightly packed with scraps and then sealed.
Filling the screed
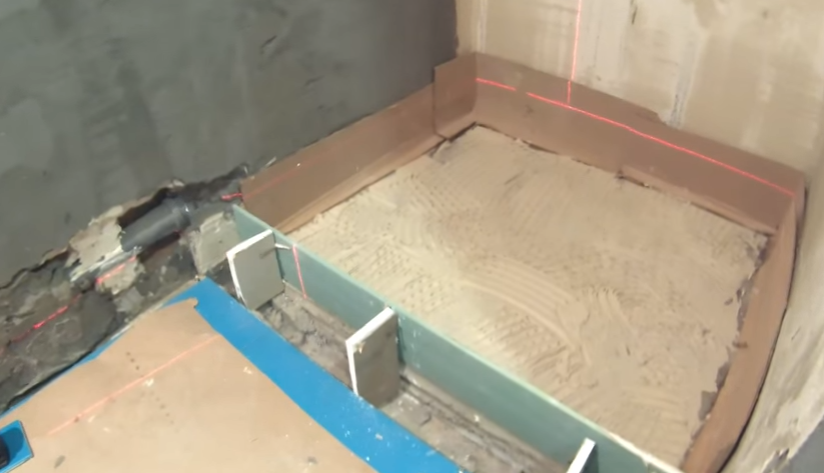
A reinforcing metal mesh is placed on the laid insulation. A ready-made mesh of steel wire with a diameter of 3 mm and a pitch of 10 cm is sufficient. It is cut to size and laid on polystyrene foam. Next, they begin to install beacons.
The floor with the drain must be sloping towards the drain. To do this, you need to set up beacon strips. You can use standard beacons (from a hardware store) or wooden planks. They are installed so that their surface sets the required slope.
When the preparatory work is completed, the ladder bowl is oriented along the walls. This can be done using a square. At the same time, you need to align the measurements as you determined during fitting.
Fill the floor with a drain and an installed drain with ordinary cement-sand mortar (for 1 part of cement of a grade not lower than M400), 3-4 parts of coarse sand. To give the coating water-repellent properties, you can add appropriate additives.
The poured solution is left to “ripen”. This usually takes 28 days. At the same time, you need to take care of the screed: maintain stable humidity, avoid low temperatures (optimally around +20°C), or direct contact with sun rays. The easiest way is to cover the piece with matting (an old bag) and/or film. For the first 4-5 days, the surface must be moistened daily. It is more convenient to do this on matting - there are no traces of drops left. After 28 days, you can complete the finishing - laying the tiles.