Butterflies are wonderful and very beautiful creatures of our planet. They appear every summer and are pleasing to the eye. Today we will learn how to draw a butterfly with a pencil, and then we will color it. This lesson is suitable for children, adults, novice artists and, of course, experienced artists :)
Drawing this beautiful creature is no big deal. The only difficulty you may face is the symmetry of the wings. But it doesn't matter, the more you practice, the faster you will learn how to draw them correctly.
How to draw a butterfly in stages
Finally, it's time to draw our insect, draw our butterfly with a pencil!
Stage 1
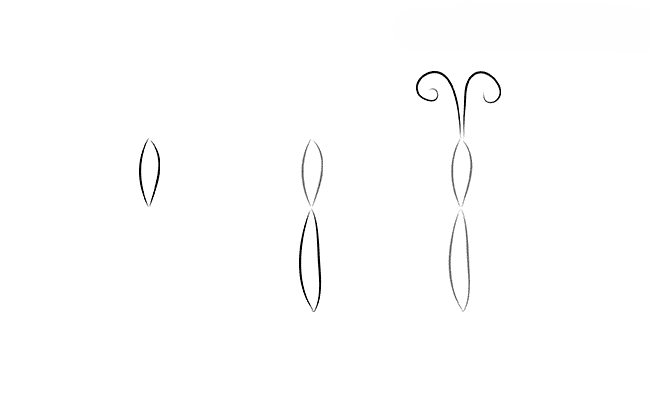
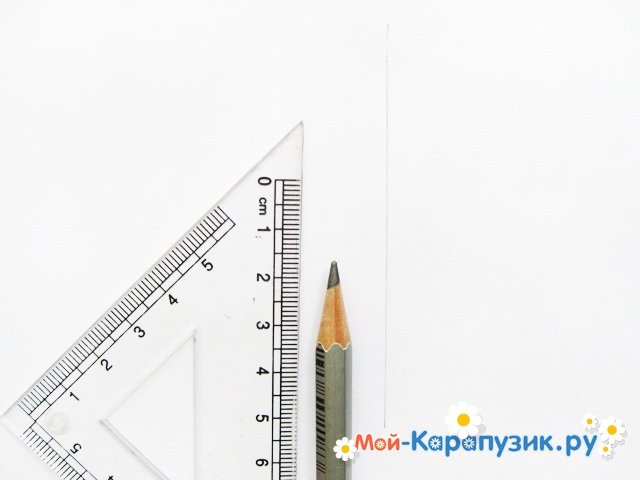
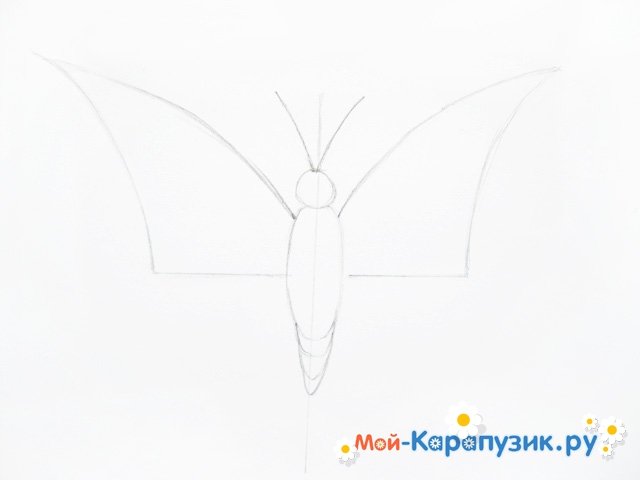
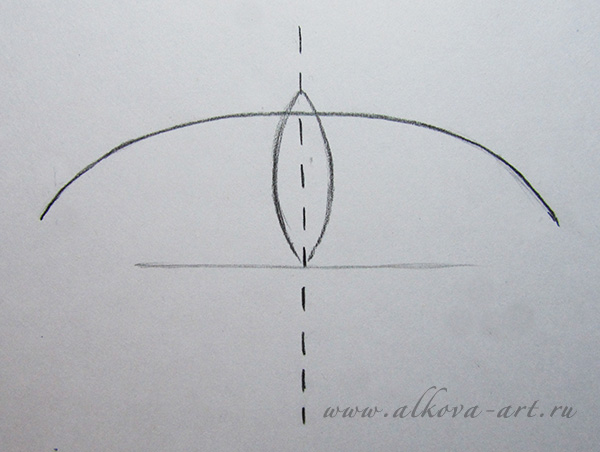
The first step is the easiest step. We draw a straight line, the line must be straight. This is an auxiliary line and it marks the length of the torso and divides it in half.
Stage 2
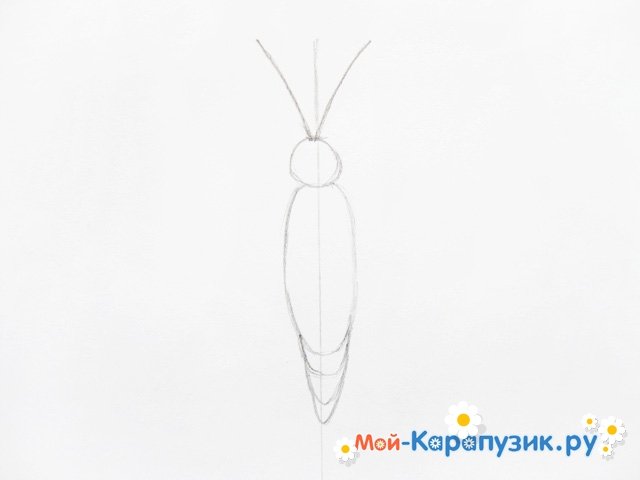
The second step is a little more difficult than the first, but we are sure that you can handle it anyway. Draw a torso divided into two parts. At the same time, the lower part of the body is slightly larger than the upper one.
Also at this step we make a circle, which will be the head of our butterfly, and draw long antennae. 
Stage 3
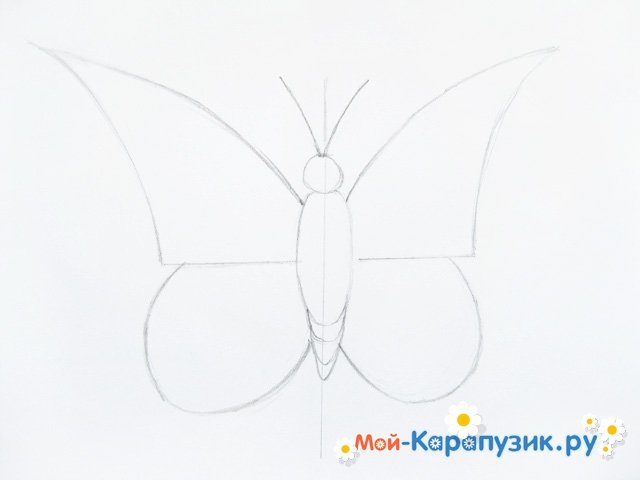
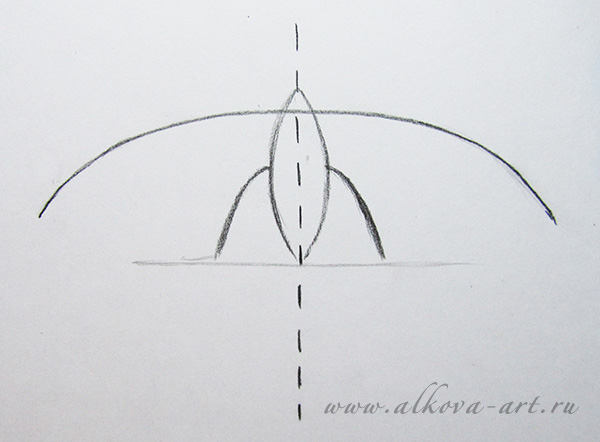
It's time for the wings. We will draw them in stages, first the upper part, and in the next step the lower one.
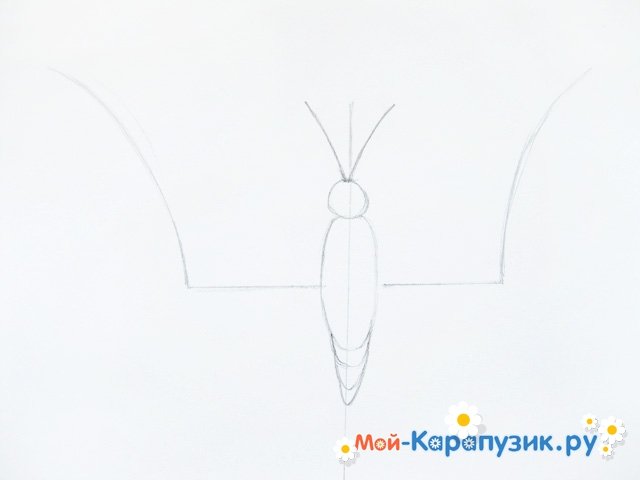
So, usually in butterflies, the upper wings are much larger than the lower ones and they grow, respectively, from the upper body. In our case, they have a triangular shape and are almost the same size as the lower ones. If you don't like the triangular shape, then you can easily draw any other shape. 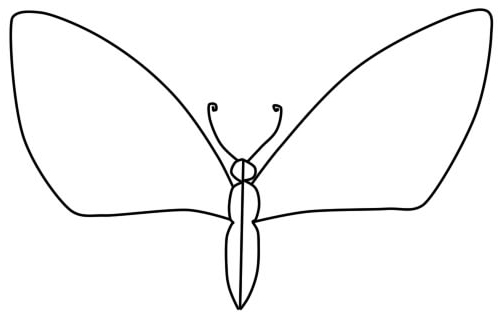
Stage 4
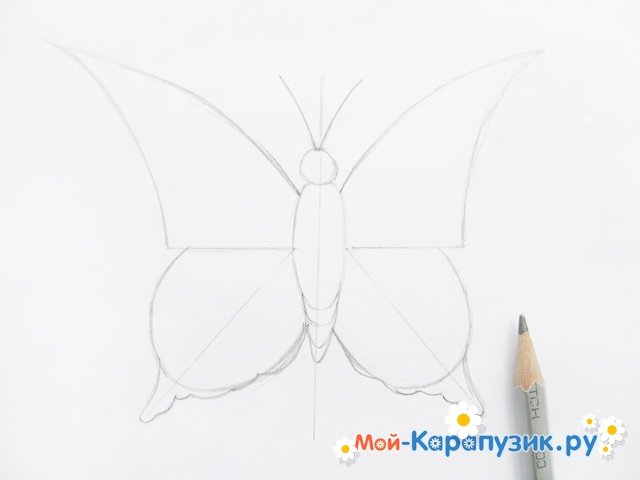
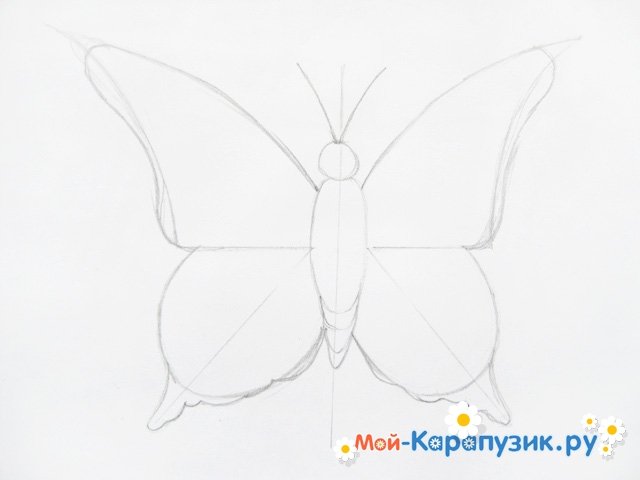
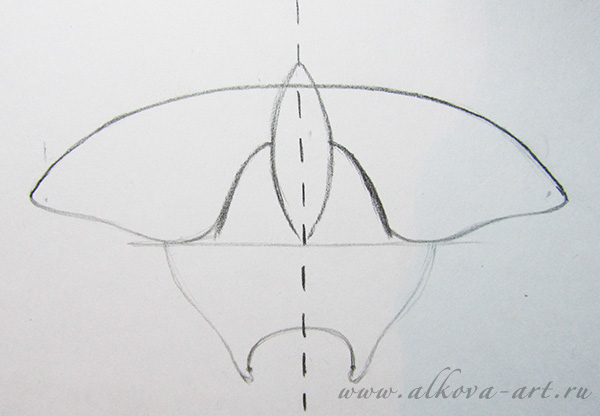
Now we are working on the lower wings. They are rounded, large and far beyond the body line that we drew in the first step. If you haven't noticed, then the upper wings should also extend beyond this line.
The most difficult thing in drawing a butterfly is to make symmetrical wings, of course, if you work on a computer, then it will not be difficult for you to achieve symmetry, but if you draw a butterfly with a pencil on paper, then you may have problems. Therefore, please be patient and use an eraser :) 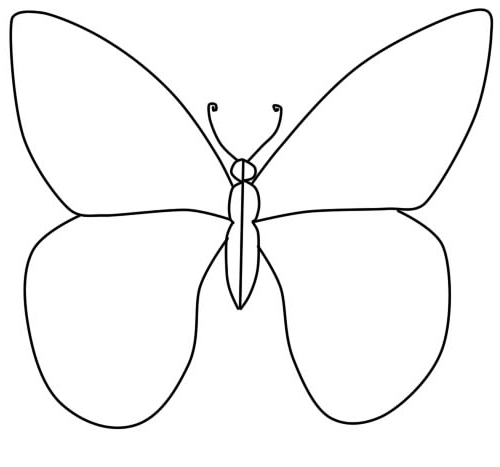
Stage 5
Now comes the most enjoyable stage in drawing a butterfly. We are working on the patterns on the wings! Patterns can be very diverse, namely round, linear, monochromatic, multi-colored, etc.
So, we make the symmetry of the patterns on the right and left. 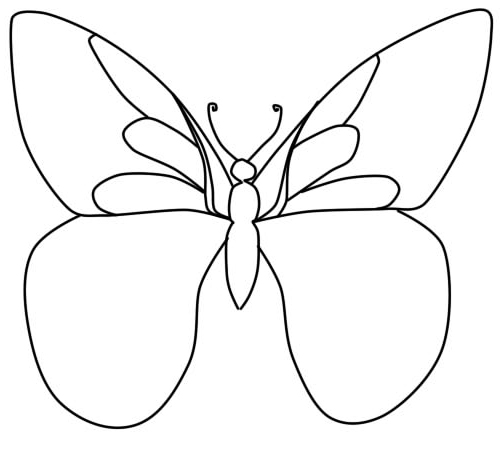
6 stage
Patterns are not wings, they can be symmetrical or not symmetrical at all. Even if you want to draw a butterfly with completely different patterns on different wings, then this is quite normal. 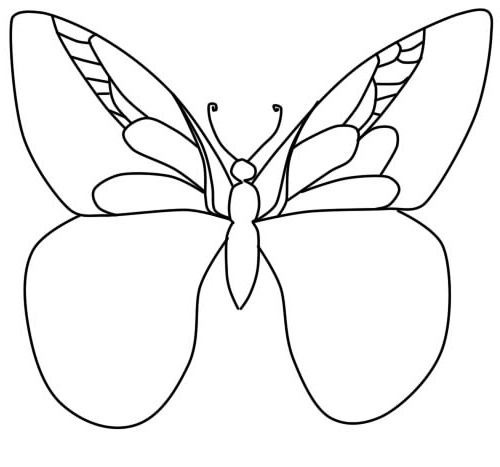
7 stage
Finish the patterns on the upper wings. 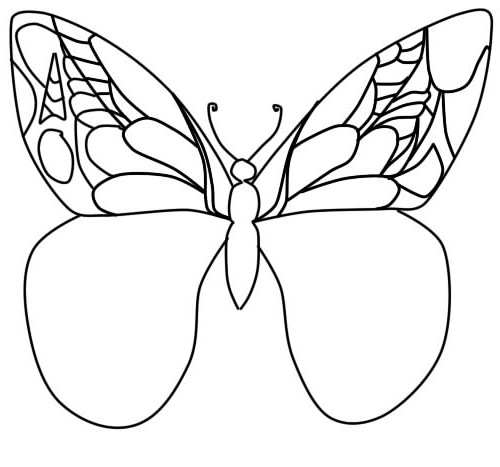
8 stage
You already know a lot about the pattern, so try to come up with a pattern of your own for the lower wings. 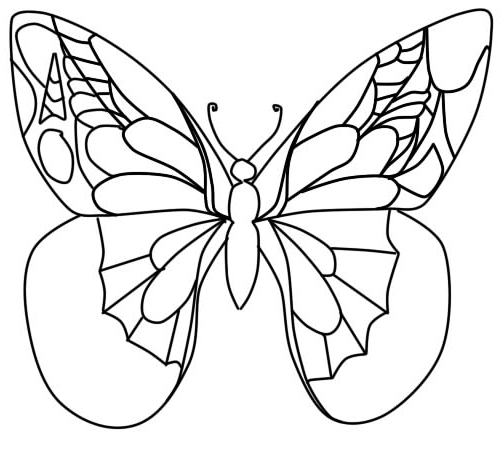
9 stage
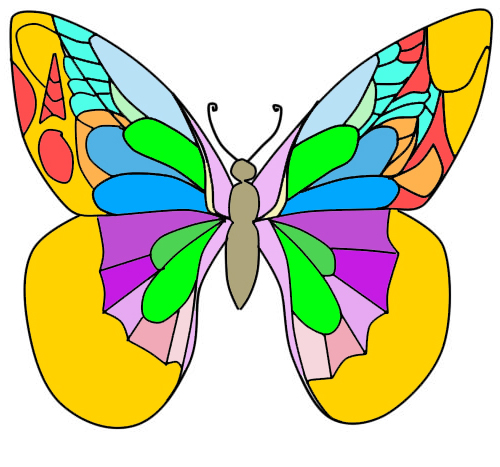
At the last stage, we color our butterfly and it is ready.
There are endless variations of butterfly drawing. Experiment with colors, shapes, patterns, sizes and you will have wonderful creations.
Another option for drawing a butterfly
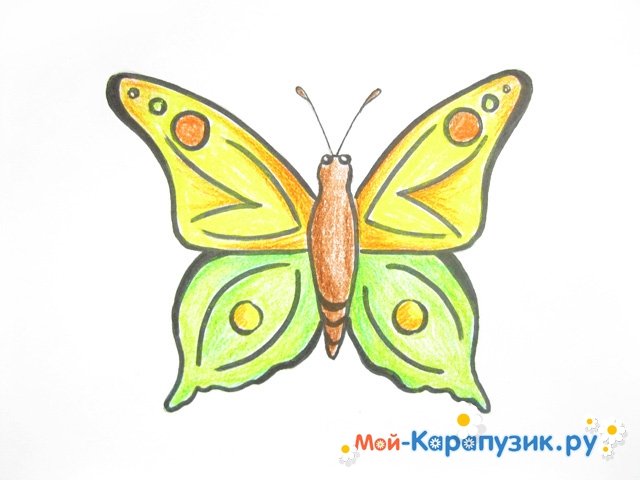
Drawing a butterfly with colored pencils begins with simple lines and geometric shapes. Then everything is corrected and transformed into beautiful butterfly!
Necessary materials:
- colored pencils of yellow, brown, orange, green;
- simple pencil;
- marker;
- ruler;
- eraser.
Drawing steps:
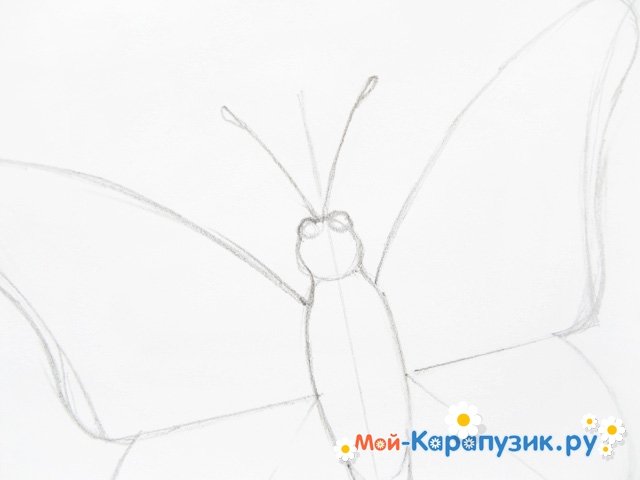
1. First, draw a vertical line on a piece of paper.
3. Now draw a horizontal line in the middle of the body. With the help of it we will draw the wings of the butterfly.

4. Draw one arc from the horizontal line on the sides.
5. Draw one more arc to it. The upper wings have already been drawn.
6. Now let's draw the bottom wings in the form of circles.
7. Through each lower wing, draw a line that will slightly go beyond the circumference.
![]()
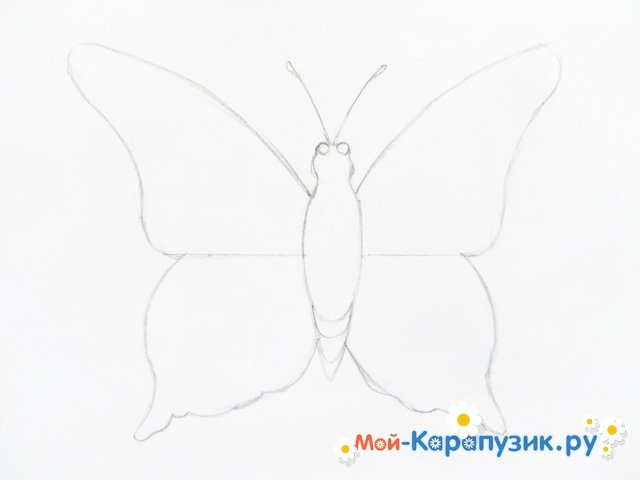
8. Draw the tips of the wings below. We make the bottom part wavy.
9. The upper wings are reshaped. We make them necessarily symmetrical and without sharp corners... Everything should look gentle and beautiful!
10. We detail the body of the butterfly: draw the eyes in the form of tiny circles, the ends on the antennae, smooth the shape.
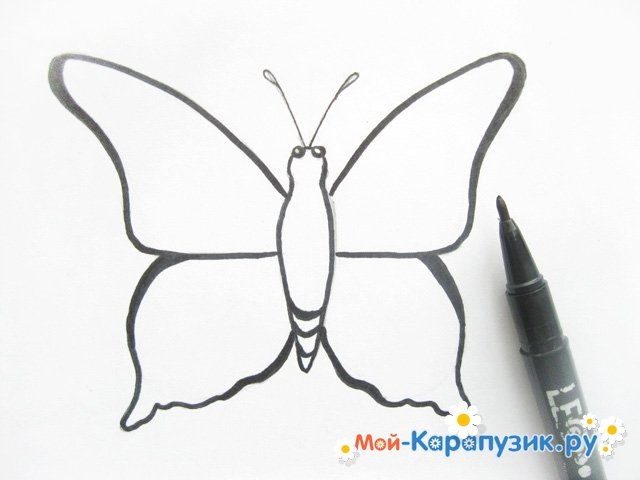
11. At this stage, you should remove all unnecessary auxiliary lines and bring the step-by-step drawing of the butterfly to the contour and color.
12. With a marker, we begin to trace each wing and antennae, and also do not forget about the body, where the head with the eyes is located. In some places, you can make a nice thickening of the line. This is very easy to do: just slide the marker on this area not once, but two or three times.
13. Then, in the middle of each wing, we will draw patterns at our discretion and desire. You can also leave them unaffected and simply decorate with bright colored pencils.
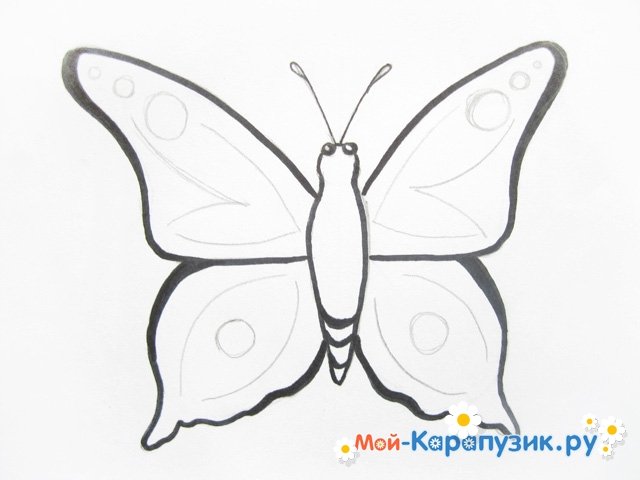
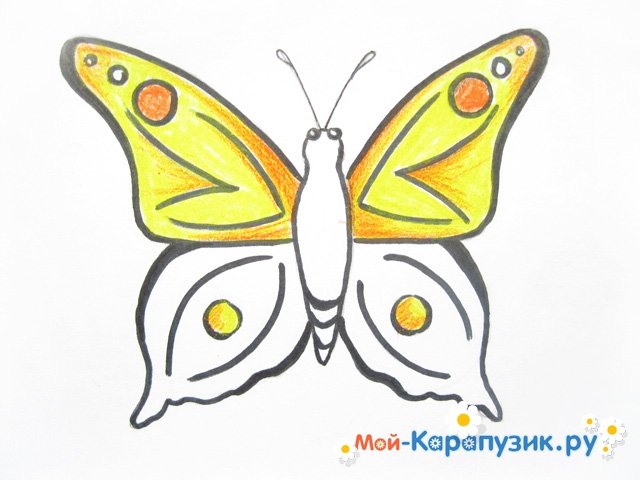
14. If you prefer patterns, then they should be outlined with a marker or felt-tip pen in black.

15. Start painting the upper wings yellow.

16. Add bright orange accents.
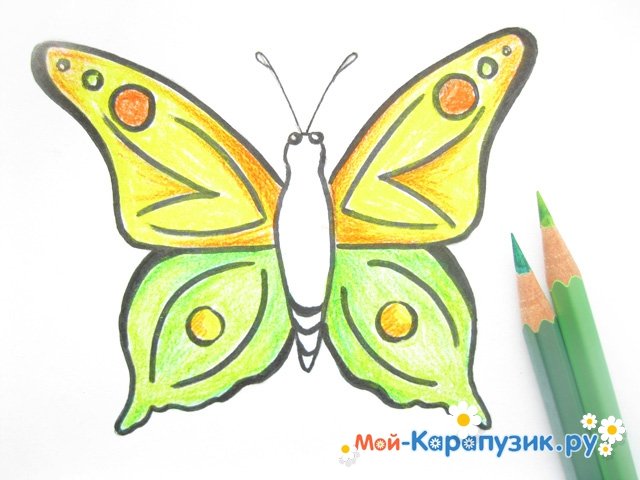
17. Draw the lower wings with green pencils.
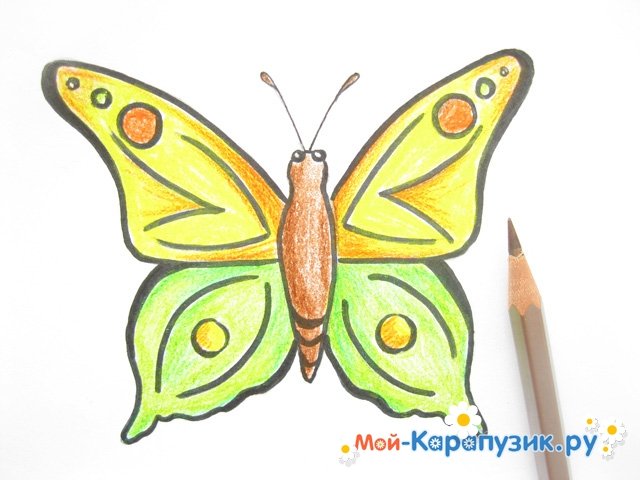
18. Draw the torso and head with a brown pencil.
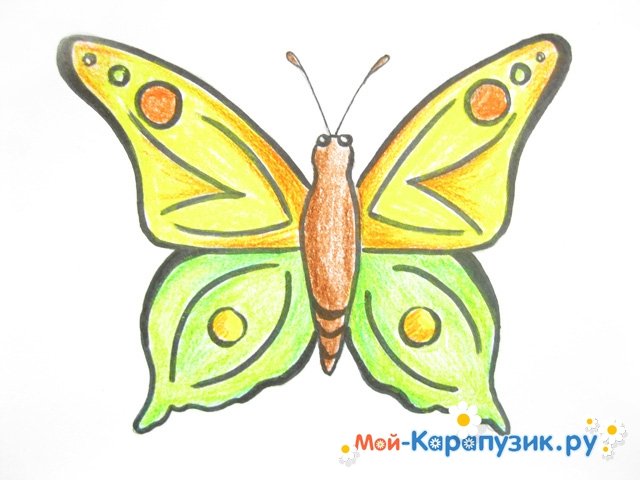
Here is a beautiful drawing! You can add painted flowers or greenery to it.


If you find an error, please select a piece of text and press Ctrl + Enter.
You don't have to be an artist to understand how to draw a beautiful butterfly with a pencil step by step. When making a drawing, you do not want to flutter a thick caterpillar with wings in a circle? Then this article will be useful to you. In front of the surprised child, the lines on the paper will gradually turn into a beautiful butterfly.
Step by step drawing of a butterfly with a pencil
Like fresh flowers, moths fly in summer over green lawns and city flower beds. The child looks at the beauties with admiration, and when he comes home, he tries to draw them on paper with a pencil on his own. After several unsuccessful attempts, the baby asks for your help. How to draw a beautiful butterfly? It seems to be very easy to do, but drawing that is far from the original will not satisfy your inquisitive preschooler. He himself will draw a caterpillar with two circles instead of wings. The child looks at you with hope, and is waiting for a miracle. Try to follow a simple step by step instructions to feel like a real artist. Below is a description of how to draw a butterfly with a pencil step by step:Step 1. First, mark up the sheet. Draw a thin vertical line with a simple pencil. Draw the body of a butterfly so that the line passes exactly in the middle of the image: at the top of the head, then the chest and abdomen.
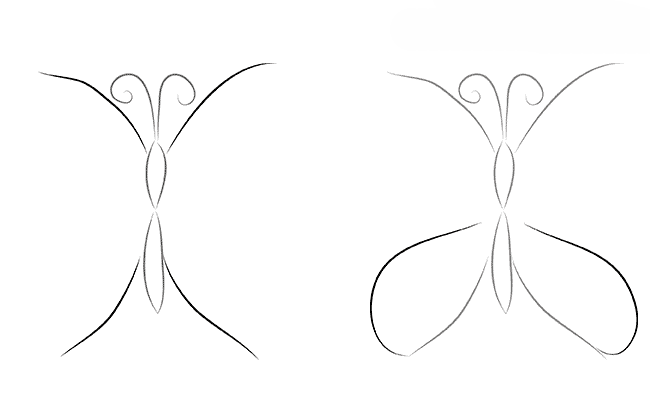
 Step 2. For the wings, draw with a pencil two symmetrical lines extending from the bottom of the butterfly's chest horizontally in both directions. Arcs are drawn across the abdomen, making it striped. Soon the butterfly will have wings, and it will become just like a real one.
  Step 3. Next, draw with a pencil symmetrical semicircles of the lower wings of the butterfly. For the upper wings, two rays going up are drawn from the main horizontal lines. Small dashes are drawn on the head of the butterflies - these will be antennae.
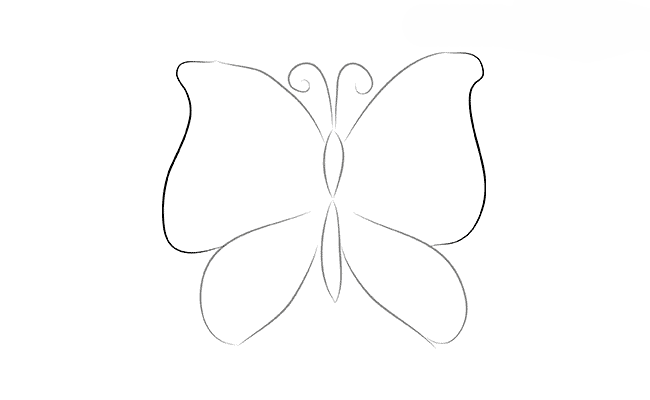
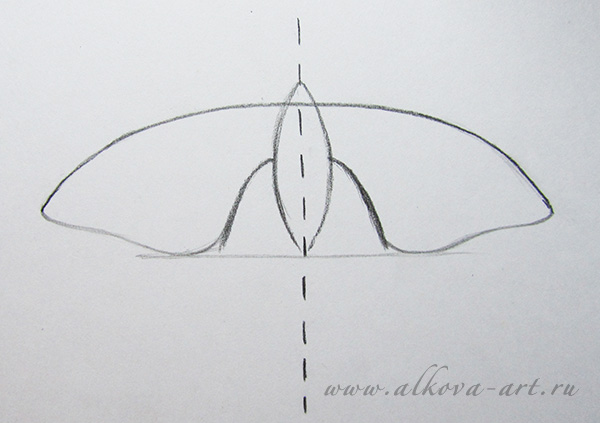
  Step 4. Now you can completely draw the upper wings, connecting the upper points of the rays with arcs to the base of the head. To check how symmetrically the lower wings were drawn, two rays are drawn on both sides of the butterfly's body, going down at the same angle. All irregularities in the drawing are corrected with an eraser and a pencil.
 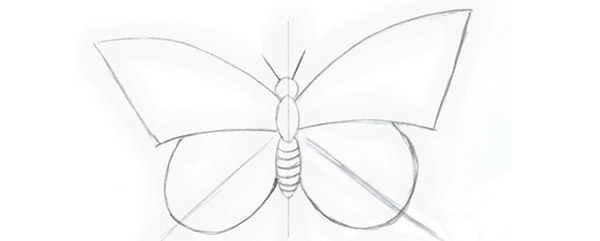 Step 5. Finish drawing in stages, decorating the moth as they wish. Erase excess markings on the torso that helped create a symmetrical pattern. The edges of the wings are made more rounded and embossed. Draw large eyes and curved antennae with a pencil.
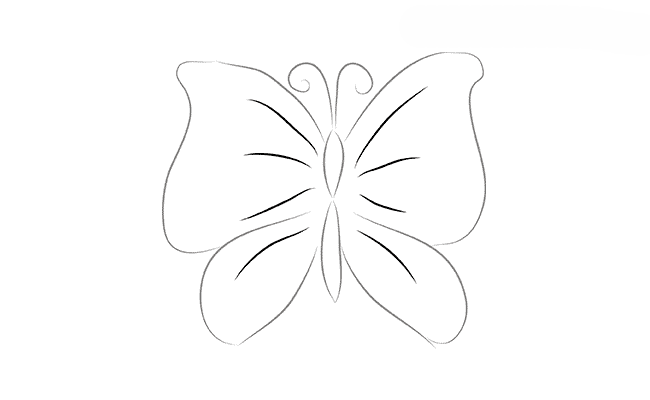
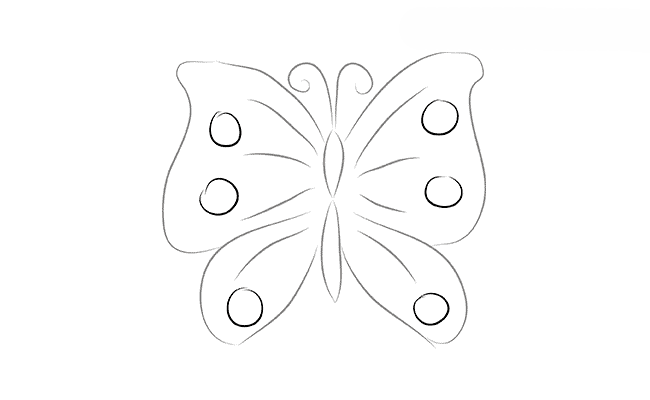
 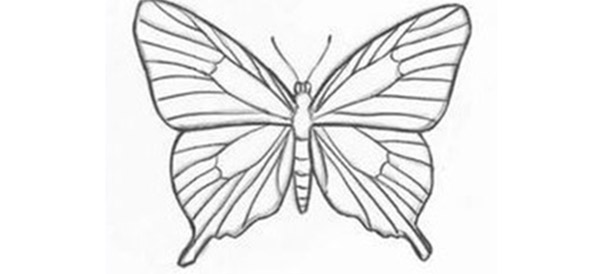 You can spy on a beautiful pattern on the wings of a moth in nature or draw it yourself.
 On a note! It is important to make sure that the pattern is symmetrical on the right and left wings.Scientists believe that 100 thousand described species of Lepidoptera are only half of those existing on Earth. The other half of the beautiful moths, unknown to man, may well resemble the butterfly that you want to draw. The most interesting thing about drawing a butterfly with a pencil step by step is a wide variety of options. Beautiful moths differ not only in patterns on the wings, but also in shape - in moths, cabbage and swallowtail, they are different in shape and size. Butterfly can fly, sit on beautiful flower or flutter on a piece of paper in a multi-colored round dance. This drawing is a great exercise for developing children's imagination. You have done a miracle - you helped the kid draw a butterfly in stages with a pencil, and now do not interfere with his further creativity.
Video for children how to draw a beautiful butterfly
One more interesting idea on how to draw a real butterfly in stages, without using the sheet layout. If it doesn't work the first time, don't worry. With some experience in drawing, you can see all the proportions by eye, create a drawing quickly and easily, as in this video.Learn to draw a butterfly with paints and pencils.
Little artists love to paint this airy, graceful, light and graceful butterfly. The simple lessons offered in this article will help you learn such a difficult creativity.
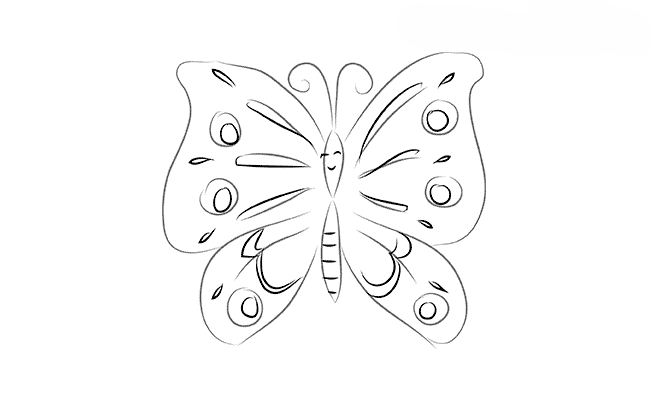
How to draw a beautiful butterfly with a pencil in stages for beginners and children?
- Start drawing by sketching the contours of the figure details
- In the upper part of the sheet we make a circle, under which we draw an irregular oval - this will be the basis for the face. Stepping back a little down, and to the right, from these figures, draw a large circle to form the body of the butterfly.
- We connect the first two figures with an oval, in the shape of an elongated egg, leaving a little room for the future eye
- Attach a round base to the resulting face
- We got the face and body of a butterfly
- Now draw 2 wings on the left side.
- Next, duplicate the wings on the right side. Please note that these wings have a slightly different shape compared to the left ones.
- Spread the body of the insect with cheerful stripes
- Add large, globular eyes
- Let's paint horns on the head, in the form of two cherries
- Let's liven up our face with a cheerful smile
- Now let's decorate the upper wings by adding some ovals inside.
- We make similar ovals on the lower wings.
- Add some circles between the ovals on the upper wings.
- Next, erase all the auxiliary lines, clearly outline all the main lines.
- We paint with saturated colorful flowers of our cheerful moth
 Coloring the flying darling
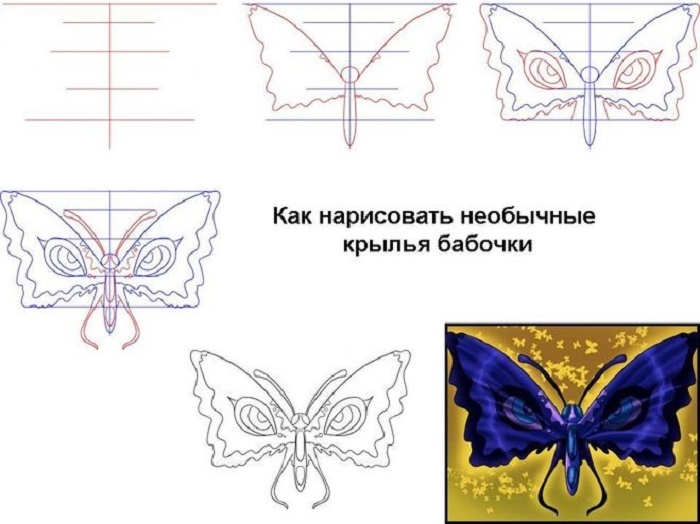
 How to draw butterfly wings?
Most often, the main problem with depicting wings is the synchronicity of the pattern.
- To make the same wings, line the sheet as shown in the figure.
- Allocate a specific place for each part of the wing
- Then, focusing on the made mesh, draw one wing, then completely copy the second
- Continue to form the chosen wing pattern, strictly observing the established dimensions
- Place the emitted eyes between the second and third line
- Duplicate the wings with an inner wavy line, add a body, antennae and legs.
- The butterfly remains to be painted at your discretion
 The main stages of the image of wings
 How can you easily draw a simple butterfly in the cells?
- Drawing with cells is not only interesting, but also very useful.
- During such a creative process, the child develops spatial thinking, attention, perseverance.
- For adults, this skill is useful for volumetric drawings and decorating handicrafts.
- You can repeat any of the patterns for drawing a butterfly in the cells below, using a sheet of paper lined with cells and a printed ready-made scheme
- To make it easier to draw, number the horizontal and vertical lines on the original and on the checkered sheet
- Work using a coordinate system
Choose from the below suggested schemes a scheme that is more suitable and interesting for you:
 Simple outline for beginner cartoon heroine
  Not complex pattern lemongrass butterflies
 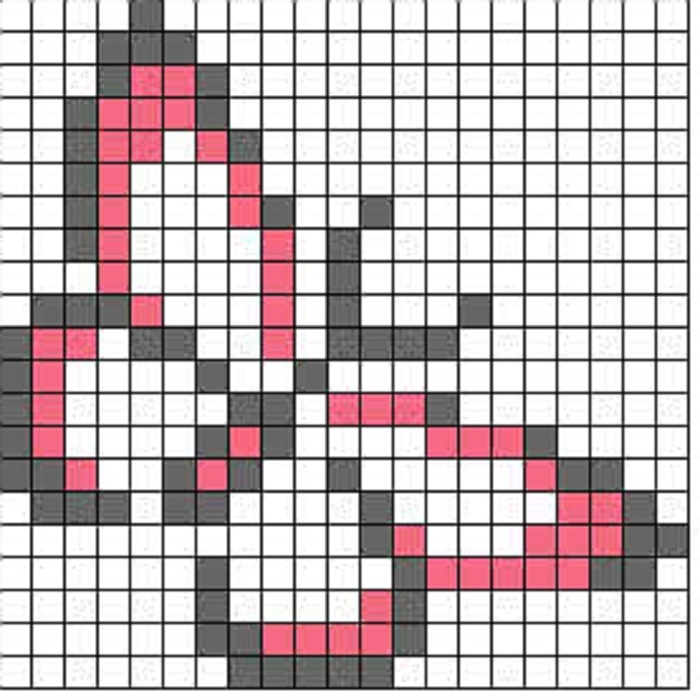 A beautiful and simple flying insect
 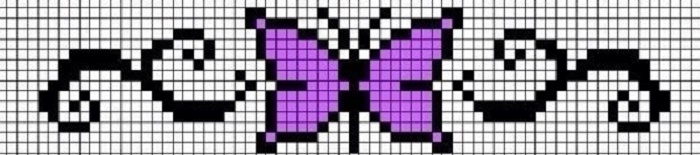 Drawing complemented by ornament
  A graceful creature in flight
  Very simple circuit monochromatic pattern
 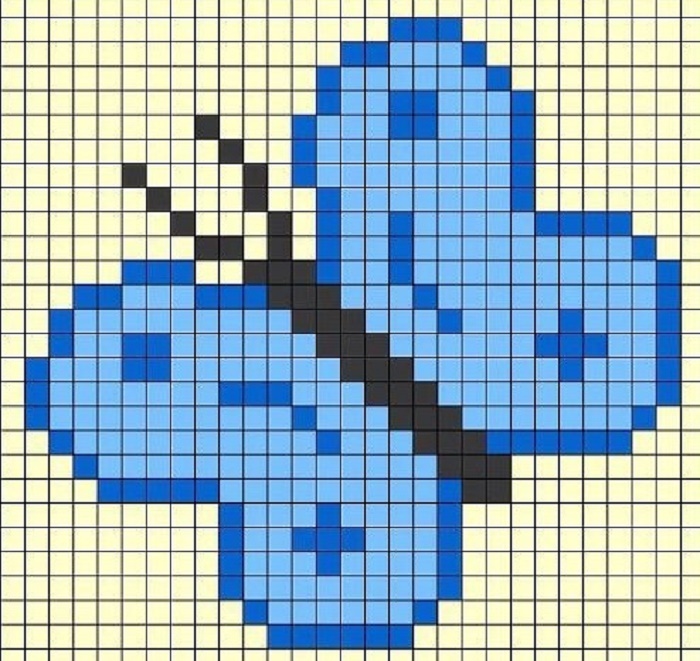 Another version of the bright butterfly pattern
 Video: Cell Drawing: Butterfly
How to draw a butterfly with paints and watercolors?
Let's paint a colorful moth with acrylic paints.
- First of all, we sketch the butterfly using a simple pencil. To do this, we select any available method from the ones described above.
In our example, the butterfly looks like this:
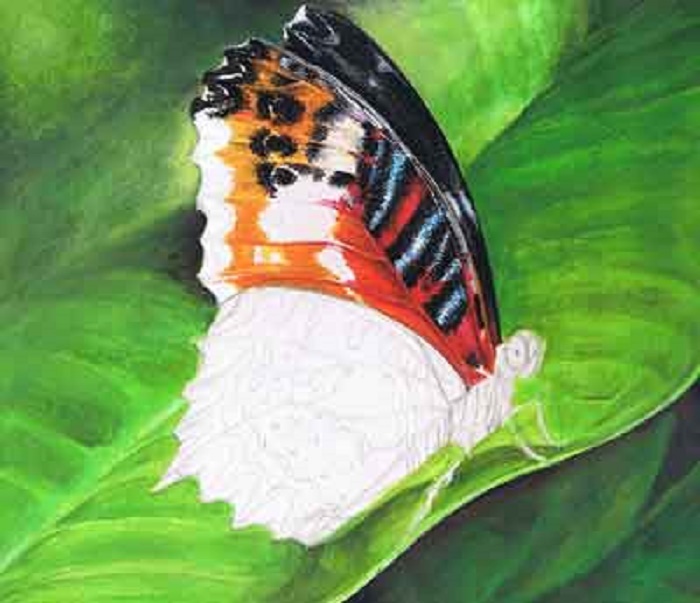
 Step 1
 - Getting Started with Background Design
- Apply the first layer with yellow, dark green, blue, black colors
 Step 2
 - We detail the drawing, overlaying thick watercolor in places, and where necessary we dilute the paint with water
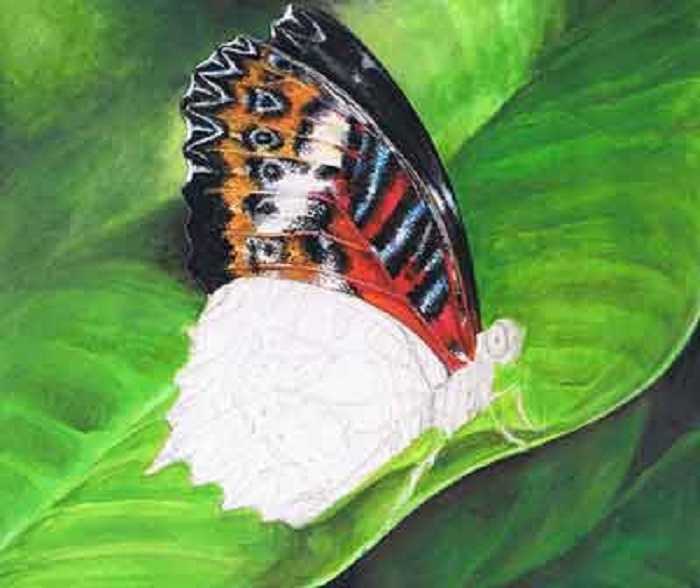
 Step 3
 - Moving on to the butterfly image
- Using colors:
- Red
- yellow
- White
- blue
- black
- The missing tones are obtained by mixing the existing colors.
- Gently apply a thin white layer to the wings
- Add specks with the selected colors, while we do not detail anything
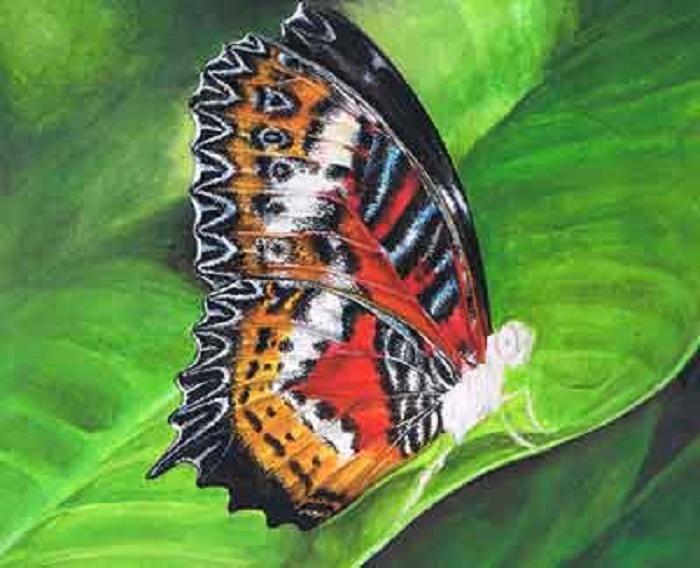
 Step 4
 - Draw the outlined details with a thin brush.
- Do not forget to paint with dots, not strokes
 Step 5
 - Adding vibrant, saturated contrasts
- Having finished with one wing, move on to the second.
- Detailing with point strokes
 Step 6
 - Acrylic paint dries instantly, so you can immediately apply the white pattern to the existing black
 Step 7
 - Having colored the upper wing, move on to the lower
- We work in the same way as with the first
- We detail the threads of the veins with a thin brush, using black, diluted to transparency
- We distribute it to the darker parts of the wings
 Step 7
 - Having finished with the wings, we proceed to the body
- We make it striped, alternating black and white colors.
- We imitate a hairy abdomen with bursting strokes
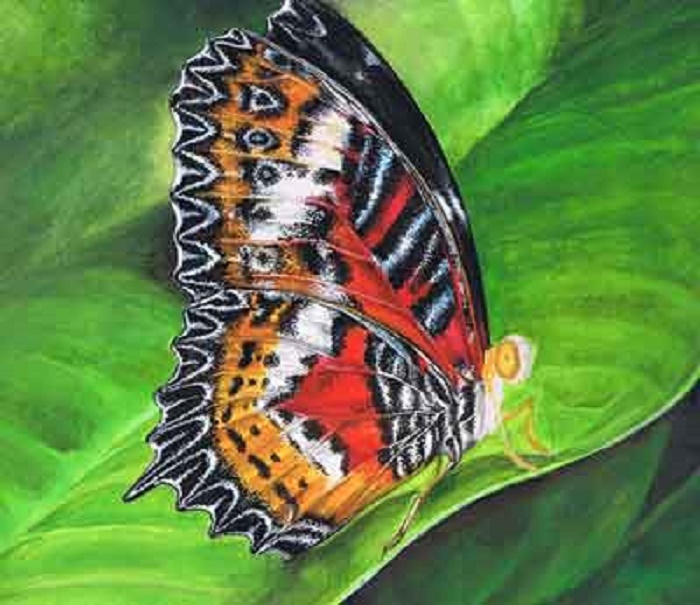 Step 8
 - If you are unsure, sketch first with diluted colors and then detail with saturated colors.
- We revive the insect by painting on a bright yellow eye on the head
- Darken the eye around the edges with transparent black, put a white spot in the center
- Add black tendrils
- Admiring the created drawing
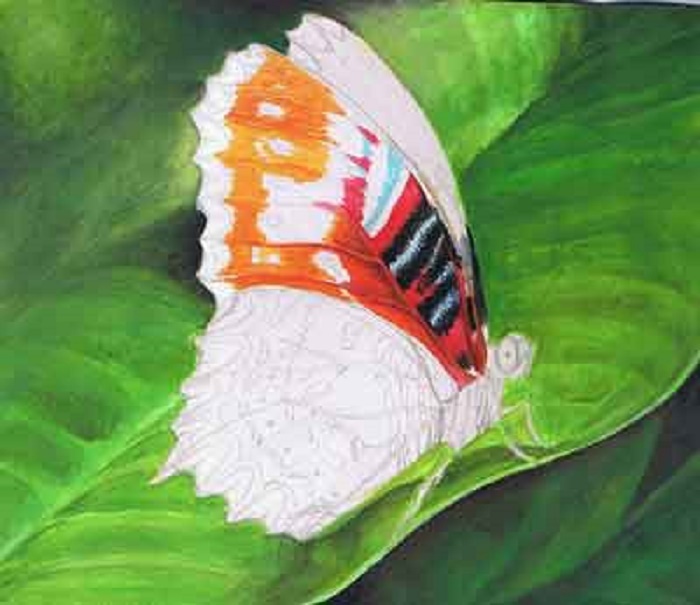
 Ready-made creative composition
 How to draw a small butterfly on a flower with a pencil and paints?
Sketching the head and body as shown in the picture
 Stage 1
 - Add the mustache and paws
- Paint on the eyes
- We decorate the body with stripes and elongated circles
 Stage 2
 - How to draw the contours of the wings
- Adding a nice edging to the wings
 Stage 4
 - Draw graceful streaks
 Stage 5
 - We seat the butterfly in the center of a flower with large petals
- The flower is not difficult to draw
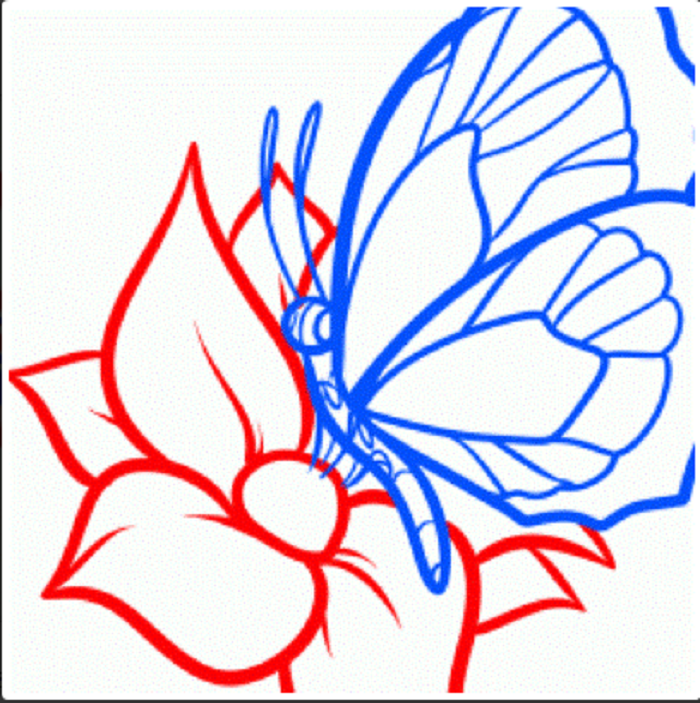 Stage 6
 - Erasing construction lines
- We draw clearly the contours of the picture
- We paint the butterfly with pencils or paints at our discretion
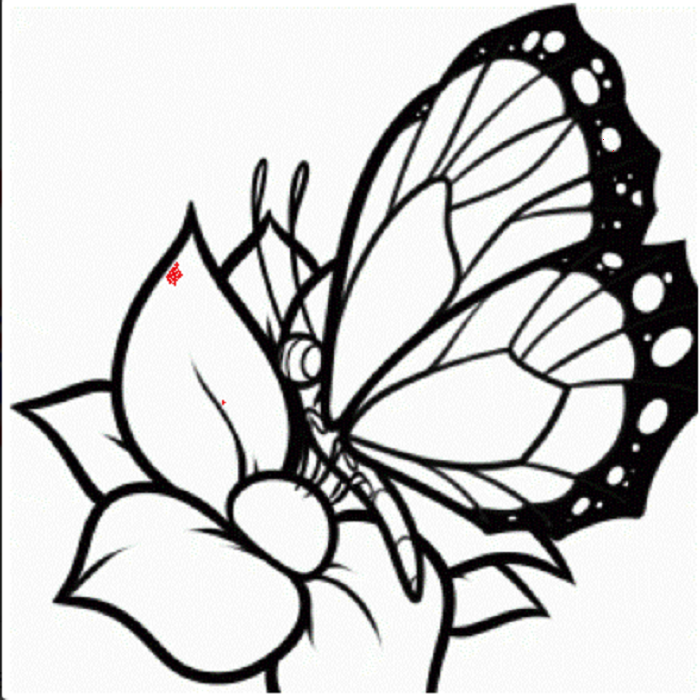 Graceful creature on a flower
 Different ways of drawing require a certain amount of experience. Start with a simpler option, gradually progressing to a complex one. Don't be discouraged if you don't get the perfect butterfly image the first time. Enjoy the creative process itself, not the result.
Happy creative process!
How to draw a butterfly? It is about butterflies that will be discussed in this lesson.
Butterflies are one of the most amazing creatures on our planet. They are incredibly beautiful, vibrant and diverse. The flight of a butterfly is simply mesmerizing. And, therefore, it is not at all surprising that we want to draw these little creatures. I always want to capture everything beautiful not only in memory or in photographs, but also in. Even as a child, when I saw an unusual sunset, animals, people's faces, I unrestrainedly wanted to depict it all on paper. But I didn’t know how, and it upset me very much ... I, as before, do not know everything. No wonder they say - live and learn. But I still managed to learn something and, with pleasure, I will share my knowledge with you. In this tutorial, I will show you how to draw different kinds butterflies.
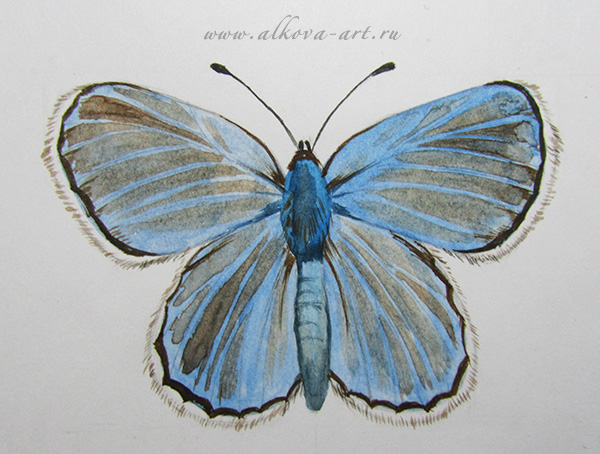
I suggest you draw a blueberry butterfly. Its wings have a fairly simple shape and the colors of these insects are also not the most complicated. Bluebirds can be not only blue, but also gray, brown, orange. We are going to draw a butterfly of the genus cupido. She was named after the ancient Roman god of love. This little butterfly is easy enough to draw. Let's start drawing with a pencil and then color the drawing with watercolors.
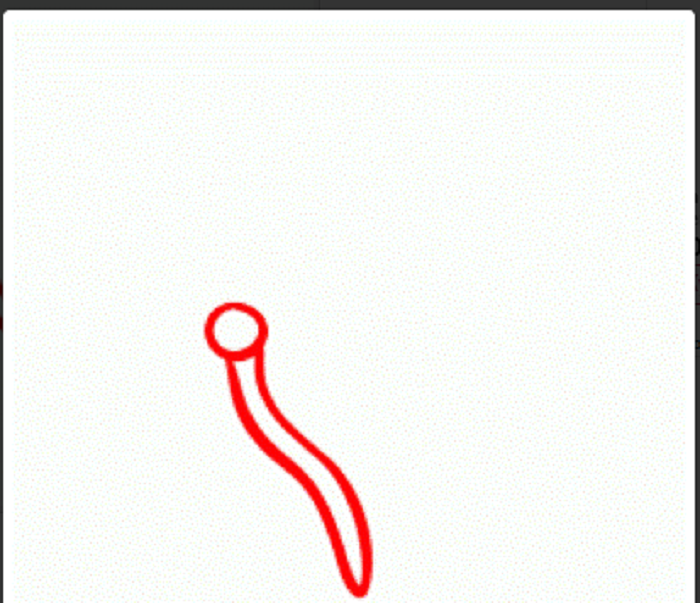
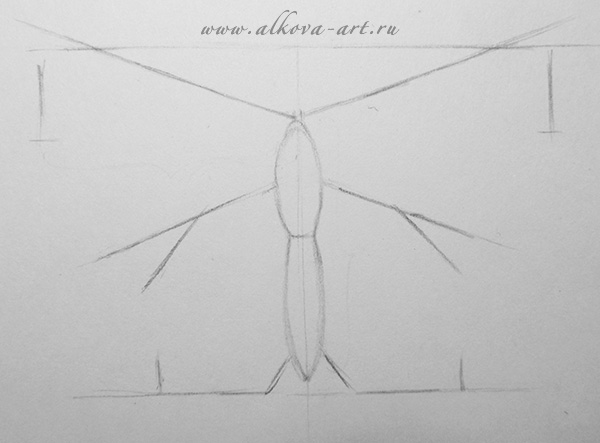
Draw the midline of the body. Butterflies' wings are absolutely symmetrical. Then we draw two horizontal lines - the upper and lower border of the wings. The upper wing at its widest point is equal to the length of the butterfly's body. I showed this with red brackets (you don't need to draw brackets). The width of the lower wing is almost 2 times narrower.

Draw straight lines from the head and body of the butterfly.
![]()
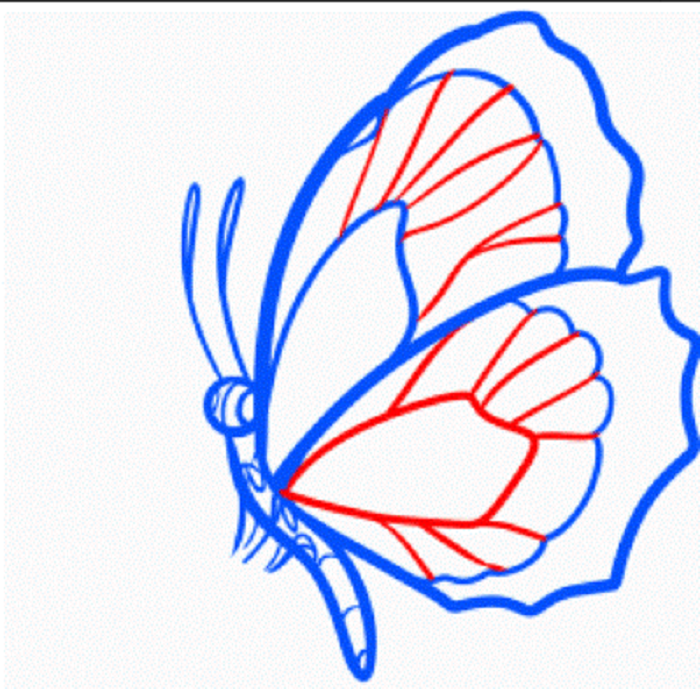
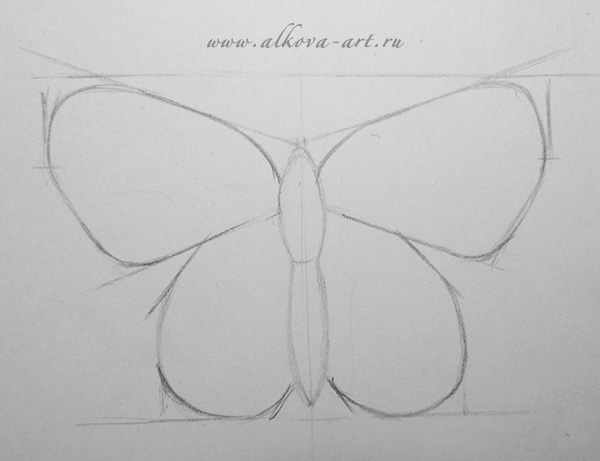
Now mark the lower wings.
Finally, round the corners. Now the blueberry butterfly is becoming quite recognizable.
Next step: erase construction lines. We won't need them anymore. And draw veins on the wings. They are found on the wings of butterflies, as well as on the leaves of plants.

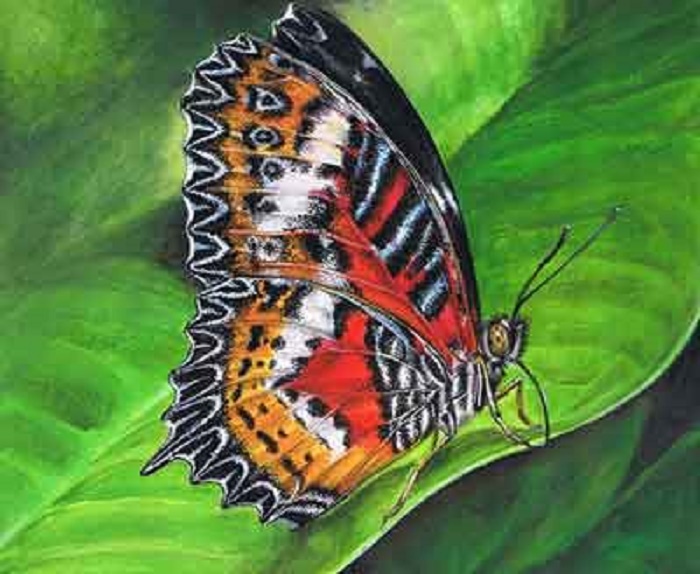
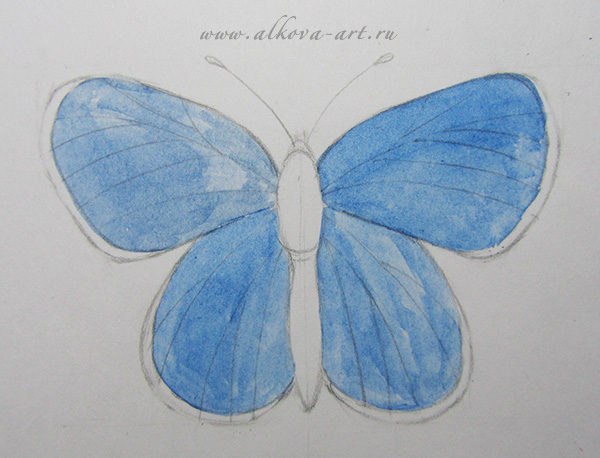
We draw a butterfly in watercolor. This will require a good brush. I used a # 3 round synthetic brush. Generally, good materials for drawing play a very important role. Even the most talented artist will not be able to create a beautiful drawing if he uses old disheveled brushes and bad paper. This activity will be more annoying than enjoyable. First, fill in the wings in blue... Leave only the outer edges white. The wings of all butterflies are covered with the smallest chitinous scales. The scales on the edges of the wings of the bluebill are white.
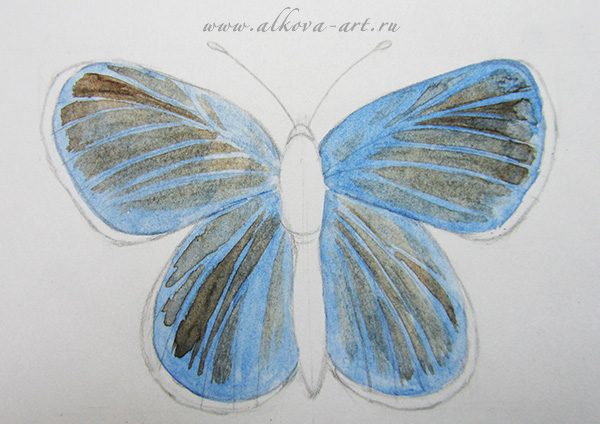
Now let's use a brown watercolor. It should be well diluted with water so that through Brown color in places blue shone through. With a thin brush, cover small areas of the wings, leaving the veins intact.

We get the following picture:
Now we begin to draw the details. Fill the body of the butterfly with shades of blue and brown.

Darken the head and the edges of the wings.
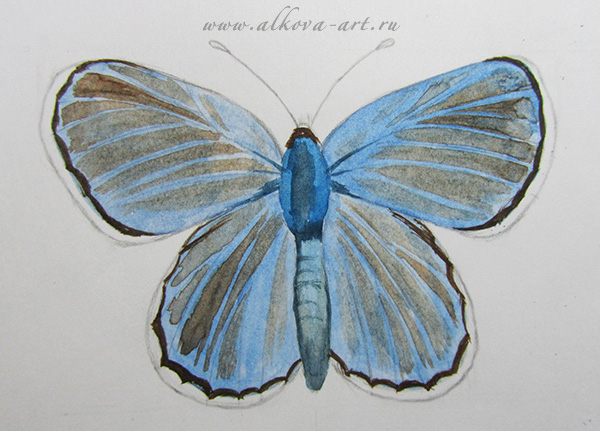
The last steps: draw the antennae and draw out the outlines of the white edges. To do this, take a translucent shade of brown and draw butterfly wings along the contour with thin strokes. Also dense brown darken the wings of the butterfly's body - literally a few thin strokes.
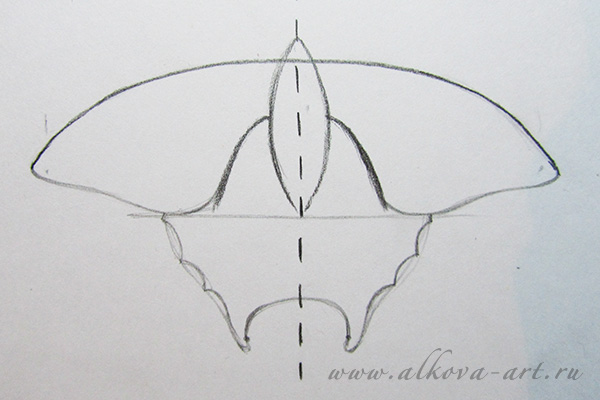
This is how you can draw a beautiful butterfly. I must say that butterflies are created in nature not only for beauty. Since they all feed on nectar, they transfer pollen from flower to flower, pollinating the plants. If the flowers stop pollinating, they will simply die out. Of course, butterflies are not the only insects that pollinate, but it is their proboscis that are so long that they can even crawl into orchids with deep cups. Neither bees, nor bumblebees, nor beetles are able to pollinate such flowers. How to draw a swallowtail butterfly? Machaon is an amazing handsome man! This is one of the most unusual butterflies in the world. There are several subspecies of swallowtail - orientis, ussuriensis, hippocrates and many others. The Indian swallowtail has a black velvet color, the wings of the Swallowtail Maak are emerald in color. We will draw the swallowtail sailboat, which is common in Russia. The wings of this insect are yellow with splashes of blue, red and black. In fact, the contrasting black stripes make this swallowtail subspecies so effective. How to draw a swallowtail? We will draw it with a pencil and then use watercolors to depict the bright colors of the butterfly. But, I'll make a reservation right away, if you are just starting to learn to draw, then the swallowtail butterfly is not the best object for learning. This beautiful insect is quite difficult to draw. Start learning to draw butterflies with more simple species... First, try to draw a blue butterfly correctly. We begin to draw the butterfly in stages. To begin with, we draw the middle line of the butterfly's body and draw the body itself, or rather thoracic region... The abdomen is not visible under the wings. Then draw the leading edges of the wings. They have a completely different bend than that of the pygmy butterfly.
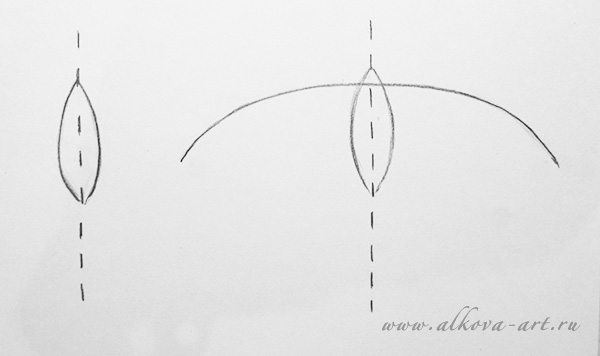
Now draw a straight line at the level of the butterfly's body. This mark is the bottom edge of the upper wings.
We draw the bend of the wings.
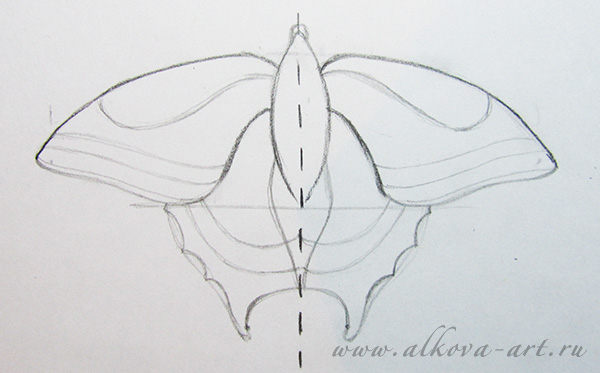
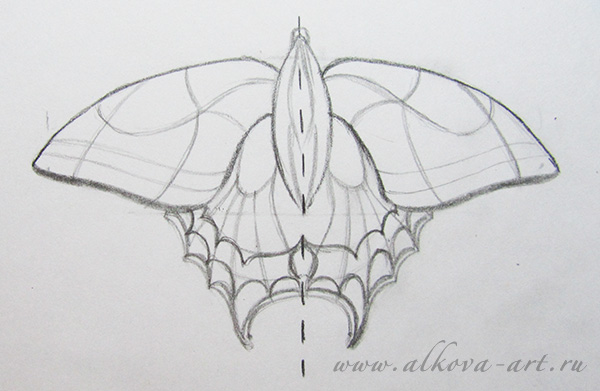
And completely draw the outlines of the upper wings of the butterfly.
Now step back down and draw a curved horseshoe line.

The next step is to paint the lower wings.
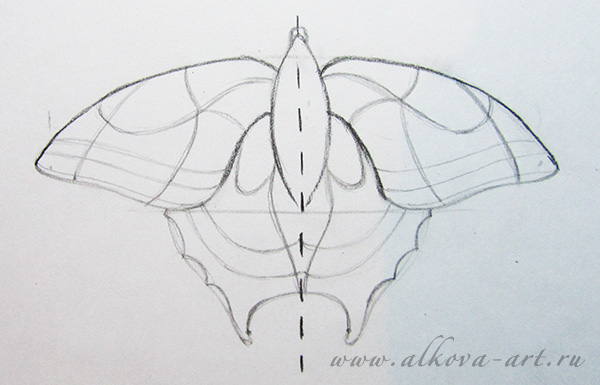
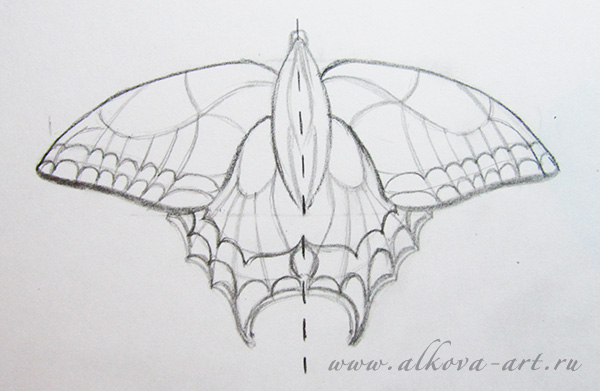
On the lower wings of the swallowtail there are peculiar "notches". We draw them.
Now draw the bend on the upper wings (let's say the shoulders of the butterfly) and start drawing the patterns.

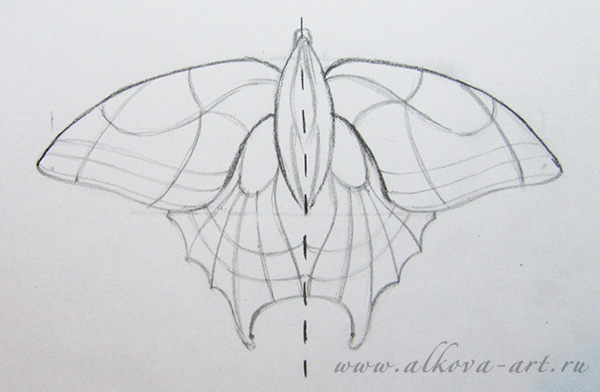
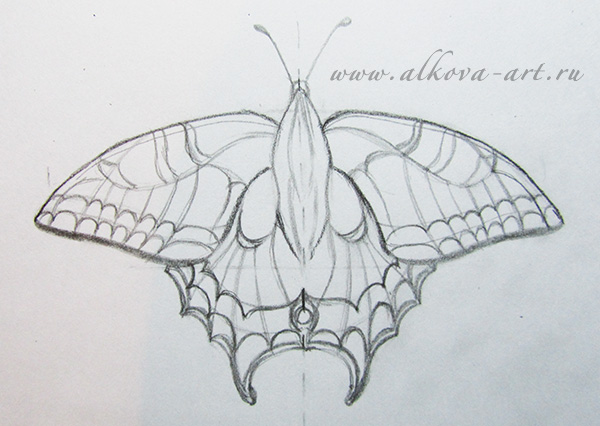
Erase the pencil lines before painting the butterfly with watercolors. Of course, not completely, but so that they become as less noticeable as possible. Watercolors are transparent watery paints, they cannot hide the pencil. This will not have a very good impact on the bottom line. It is very useful to have not only erasers on the farm, but also a nag. It is a very soft eraser that does not damage the paper, but gently absorbs the graphite. Just roll the nag over the pattern with a little pressure. This is how the eraser-nag and the drawing of a butterfly looks like after my manipulations:

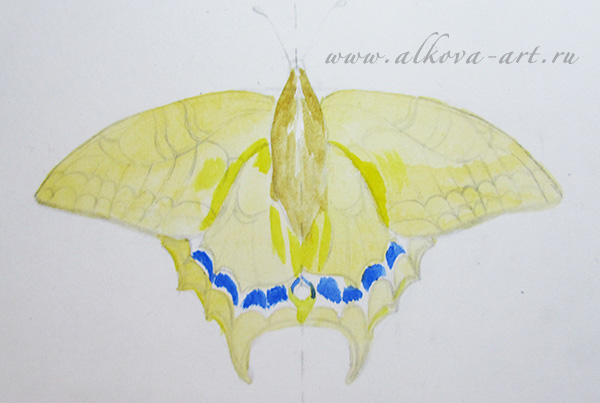
Take yellow watercolor and paint over the entire surface of the wings, except for the wide stripe at the bottom. It is a fairly transparent, pastel shade of yellow.
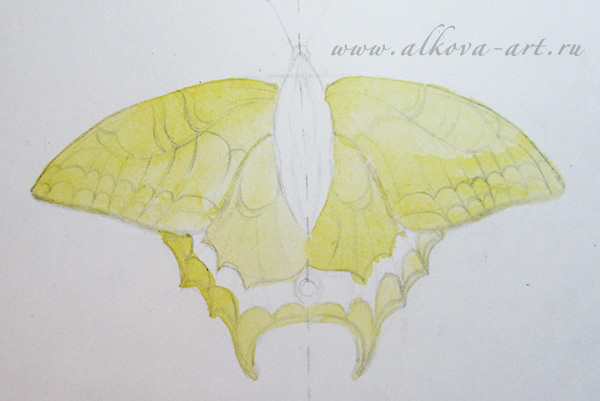
In some places on the wings, we add brighter yellow accents. The body of the butterfly has a darker shade - yellow with the addition of ocher (light brown).

Draw spots in blue on the lower wings of the swallowtail.
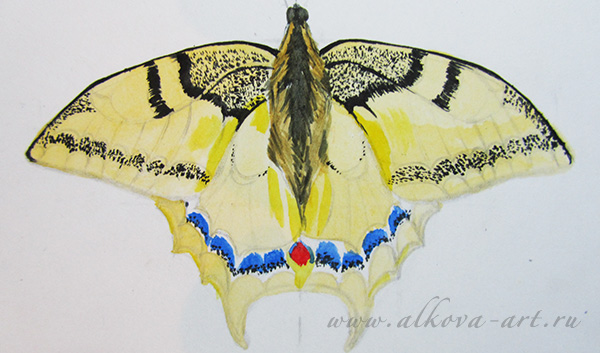
Draw the body of the butterfly. It is covered with dense hairs of yellow and black. Therefore, you can mix the watercolor by adding a little black to the yellow. Draw the villi with the sharp end of the brush. We also depict a small red speck on the lower wings.

It's time to draw the black stripes on the wings. If you look closely at the photographs of swallows, you will see that these stripes are far from being painted in dense black everywhere. Many areas combine black and yellow color... Therefore, first we will deal with just such sections of the wings. If you don't have a good brush, take a black gel or capillary pen and paint with it.


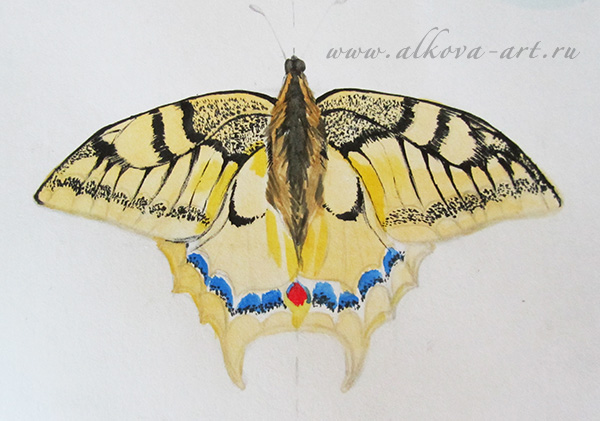
Now we start to draw stripes of dense black color. Step by step.
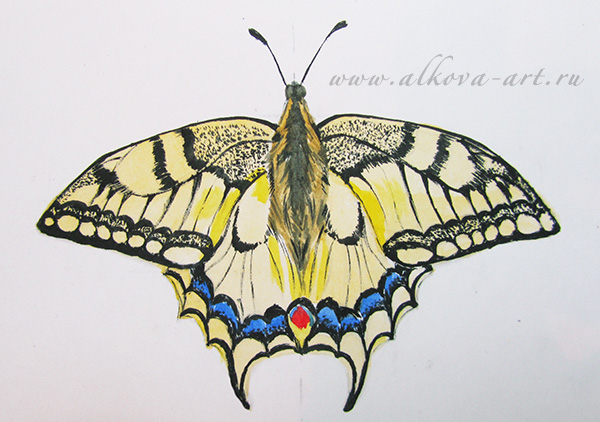
We drew a handsome swallowtail - a butterfly, which is listed in the Red Data Books of Ukraine and some regions of Russia. Unfortunately, in many places these butterflies disappear. By the way, caterpillars of large (and, as a rule, rare) butterflies are quite large. They can be up to 10 cm long! These caterpillars are very colorful and unusual, but not always cute. Some can even be called ugly. But, if you are lucky enough to meet such a caterpillar in nature, do not harm it. Soon it will pupate, and in 3 weeks an amazing butterfly will emerge from the pupa!

How to draw a butterfly (for beginners)? And finally, I will show you how easy it is to draw a butterfly. This is a very easy lesson that even the smallest children can learn. So, we draw a butterfly with a pencil in stages. And you don't need to think about how the patterns on the wings of a real butterfly are located. Unleash your imagination! Draw a butterfly that does not exist in nature, and give it a name in honor of the discoverer (that is, yourself) 🙂

In this tutorial, you learned how to draw a butterfly with a pencil or watercolor.