To make this New Year's decoration you will need colored paper, thin wire, a stapler, and glue. The ball you see in the photo above was made from paper of three different colors (pink, blue and cyan).
Work plan:
1. Take a small glass or glass (wine glass) and trace it on paper with a simple pencil 12 times. You should have 12 circles (4 circles of each color). Cut out the circles with scissors.
2. Fold each circle in half and stack them together as shown in the picture below. When making this Christmas ball we use three colors of paper (A,B and C). Place the mugs in a stack in the following sequence - ABBCCAABBCCA. If, when making a New Year's ball, you used paper of two colors (A and B), then in this case you would have to fold the circles in the following sequence - ABBAABBAABBA.
3. Fasten the paper circles together using thin wire, wrapping it around them along the fold line. Twist the ends of the wire together. If you don't have wire, you can fasten the circles together using a regular stapler.
4. Spread the circles and glue adjacent halves of the circles together. Each half must be connected to one adjacent at the top, and to the other at the bottom.
2. DIY Christmas balls (option 2)
Cut out three circles of the same size from colored cardboard or thick paper, but different color. In the first of them, cut a cross (Fig. a), in the second circle, make a horizontal cut in the middle and two cuts perpendicular to it in the direction from the circle to the center of the circle (Fig. b), and in the third - four cuts in the form of a cross, also along direction from the circle to the center (Fig. c). Pass circle “c” into circle “b”. In circle “a”, bend the corners formed as a result of its cut; you will get a square hole. Thread circles “b” and “c” into it, having previously folded them. Then bend the corners again (Fig. d). Attach a thread to the resulting ball.
3. Christmas balls made of paper (option 3)
You can make these cute ones from old postcards or colored paper Christmas decorations- New Year's balls.
It is not at all necessary to make a large, complex ball; you can make a small Christmas ball from fewer parts.
4. Making a New Year's ball (option 4)
A very easy to make New Year's paper ball. To make it, you will need colored paper and glue.
Work plan:
1. Cut out eight identical circles from paper of different colors. Although, in fact, the number of circles can be any, but not less than three.
2. Fold each circle in half, right side inward.
3. Glue the halves of the circles together as shown in the photo below. Glue is applied to the underside of the circle halves.
4. Before finally sealing the New Year's ball, thread a thick thread or ribbon through it. You can also make a wonderful Christmas garland from large quantity paper balls.
Note: this Christmas decoration can be made not only in the shape of a ball, but also in any other shape.
5. DIY New Year's ball (option 5)
To make these wonderful New Year's lanterns you will need to cut colored paper into strips of equal length and width. The length and width of the strips depends on the size of the lantern you want to make. To make one paper lantern you will need an average of 14-16 strips of paper.
When making New Year's balls, you can use strips of paper of different colors and beads to decorate New Year's toys with your own hands.
If you bend the strips of paper in the middle, you will get this New Year's decoration.
6. How to make a New Year's ball (option 6)
So cute and easy to make New Year's craft We suggest you make one from old postcards together with your child.
1. Using a small glass or wine glass, draw and cut out eight identical circles.
2. Using another object with a round base but a smaller diameter, draw and cut out two small circles.
3. Fold each large circle in half, and then in half again. See photo below.
4. Glue four folded large circles onto one small circle, and the remaining four onto the other. As a result, you will have two halves of your future Christmas ball.
It is very IMPORTANT to correctly place the quarters of the large circles on the small circle. Try to carefully straighten the “pockets” of the folded circles and, before gluing, estimate the correctness of their location. In this case, focus on the very first photo, which shows a ready-made ball.
5. Now all you have to do is glue the two finished halves together and, when the glue dries, straighten all the pockets. The New Year's ball is ready!
7. Paper balls do it yourself (option 7)
8. DIY thread ball (spider web balls)
Balls made from threads look very attractive and do not require any special skills or money. Many did them at school during labor lessons. And the use of these web balls is limitless: simply as a decorative element, as a lampshade, and as a New Year's toys. From several of these balls of thread you can make all kinds of toys: snowmen, birds, fish. In general, everything that is enough for your imagination. How to make a snowman from threads, see the link >>>>
Making balls from threads:
1. You will need: scissors, balloons, rich cream (vaseline), any yarn, PVA glue, bowl.
2. Dilute PVA glue with water, approximately 3:1.
3. Inflate the balloon to the desired size, give it a round shape, and tie it with thread.
4. Having unwinded the required amount of yarn, put it in a bowl and leave for 5 minutes.
5. Spread the ball with rich cream and wrap it with yarn, first leaving a large distance between the thread.
6. Gradually reduce the distance between the threads until the entire ball is wrapped in yarn and resembles a cocoon.
7. Cut the thread and glue it to the ball. Leave it to dry (at least for a day).
8. Gradually untying balloon, carefully deflate it, and then remove it from the thread cocoon; We tie a rope to the top of the ball of thread for fastening.
9. The ball is ready!
When making a ball, you can use yarn (threads) of any color or paint it with any paint or glitter (spray). Especially for the New Year, you can decorate this thread ball with tinsel and stars. Hang small balls on the Christmas tree, decorate the room with large ones. Fantasize boldly!
If you are unable to wind glue-soaked thread onto a ball, you can wind dry thread and then thoroughly soak it in glue using a brush or sponge.
Instead of glue, you can use sugar syrup or starch paste. To prepare the paste, take 3 teaspoons of starch per glass cold water, mix thoroughly and bring to a boil. Instead of thread, you can take thin copper wire and wind it around the ball in the same way.
9. DIY New Year's Eve. New Year decoration
Old Christmas balls You can update them by wrapping each one in a piece of pretty fabric and tying it with a ribbon.
Some are preparing for the New Year by decorating the Christmas tree with expensive designer decorations, while others are decorating it with cheerful colorful ones. electric garlands and glass balls from the store.
Such Christmas tree decorations will undoubtedly make the New Year's beauty stylish and beautiful, but, unfortunately, they cannot compare with homemade toys. After all, the process of creating them not only increases the anticipation of the holiday, but also gives priceless minutes of communication to all family members.
There are a lot of options on how to make Christmas tree decorations with your own hands for the new coming year, but the most affordable and do not require special skill in making are New Year's toys made of paper. All you need is available materials that can be found in any home, a little patience and creative imagination.
Balloons
The most common and versatile toys on New Year- these are Christmas tree balls. You can make them yourself from any thick paper: colored cardboard, colorful postcards or old magazine covers. Plain colored balls will give a uniform style to the room, while multi-colored ones will give an atmosphere of fun and fairy-tale magic.
So, before you start making these paper toys, you need to prepare the following:
- thick paper with a design you like;
- scissors;
- PVA glue;
- a compass or any object that, when outlined, can be used to reproduce a circle (jars, lids, glasses, etc.).
1. Draw 21 identical circles on paper and cut them out with scissors.

2. Prepare the mugs as follows:
- bend the circle in half twice (this is necessary to determine the center);
- straighten the circle and bend one side so that the edge of the circle is exactly in the center;
- bend two more sides of the circle to form a triangle with equal sides;
- cut out the resulting triangle, which will act as a pattern for the remaining parts;
- Place the triangle on the remaining circles, trace with a pencil and bend the edges outward along the lines.
3. Glue 10 circles together on both sides so that you get a strip: 5 circles on top, and 5 on the bottom. The strip must be glued into a ring. This will be the base for the ball.
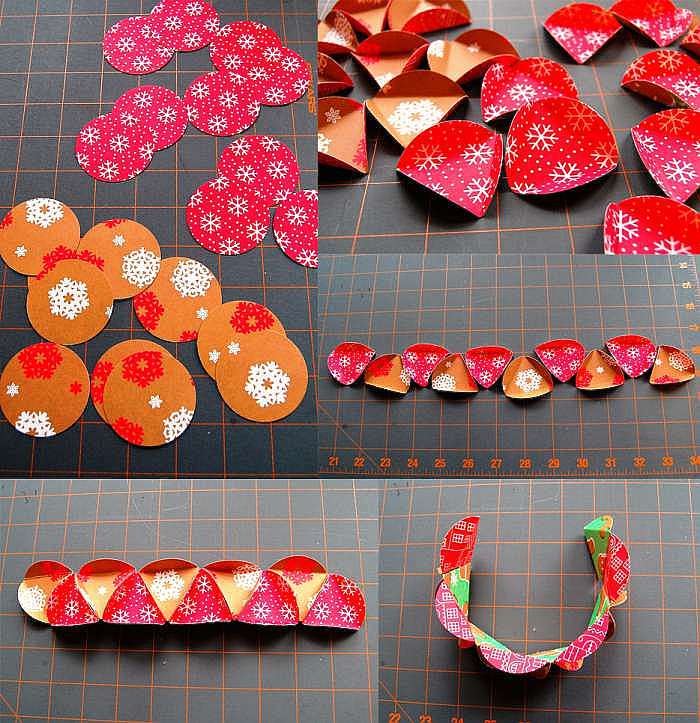
4. Divide the 10 remaining parts into 5 pieces, which are glued into a circle. The result was two “lids”.

5. Glue the upper and lower “lid” sequentially to the base.
6. The loop by which the ball is suspended can be made from a thread threaded through the top of the toy with a needle, or from a beautiful ribbon. The ribbon loop is secured with a knot and threaded through the top of the ball “lid” before gluing it to the base. The knot remains inside the toy, and the loop remains outside.
An original do-it-yourself paper toy for the new coming year is ready!
Volumetric snowflake
Another indispensable attribute of the New Year is snowflakes. They can be the simplest, cut out of a sheet of paper in a random design, or they can be voluminous using the origami technique. We suggest making the latest version of the New Year's snowflake with your own hands.
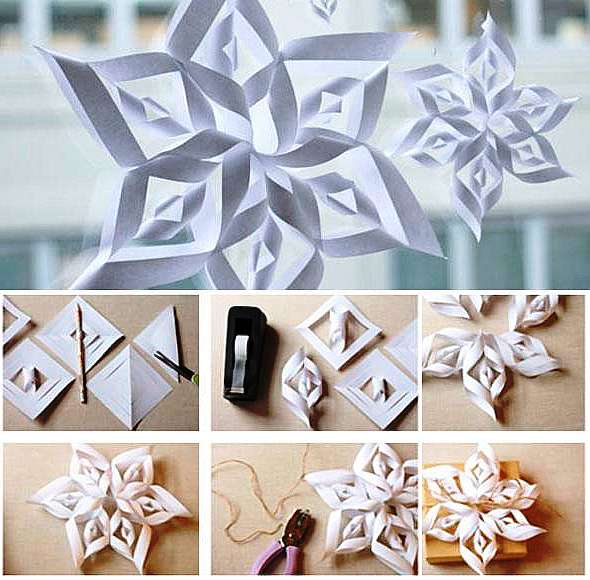
To do this, you need to cut out six squares of the same size, fold each of them diagonally, and then in half. Parallel cuts are made along the fold. The square unfolds, the inner tabs are wrapped and fastened together.
The outer petals are connected to the same petals of the remaining squares. You can attach them using either glue or a regular stapler.
Such a voluminous snowflake can be sprinkled with sparkles, sequins and decorated like a Christmas tree itself, a wall, or assembled as a whole garland.
Cubes with photos
Original and memorable toys for New Year's holiday will be made from paper cubes with photographs of family members or events of the past year.
Moreover, you can make such Christmas tree decorations with your own hands every year by pasting in a current photograph.
Thus, in a few years you will have a whole Christmas tree photo album.

To form such a cube, you need to cut out six identical circles from paper or squares. The edges of each element are bent so that a square is formed at the base. Then the folded edges are glued between the remaining parts into a box. Favorite photos from the past year are glued to the sides of the toy and a loop is threaded.
Magic garland
On the eve of the New Year, you can make an original magic lamp from a simple LED garland. To do this, you just need to cut out ordinary paper snowflakes with your own hands.
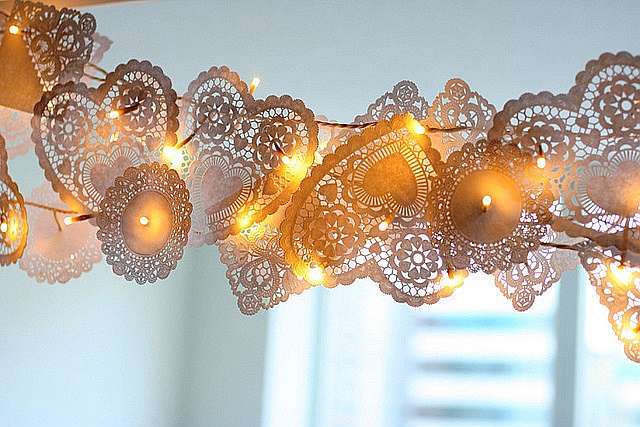
If you don’t have the time or desire to do this, you can buy lace paper napkins at the store and use them as snowflakes.
All that remains is to thread the lights of the garland through the finished snowflakes and hang it on the tree, wall or window. The flickering of colorful lights through intricate patterns will create a truly fabulous atmosphere new Year.
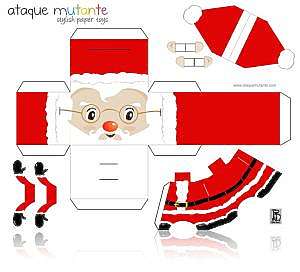
Cardboard Santa Claus
Funny paper Christmas tree decorations are made using a small piece of cardboard, glue and a felt-tip pen. You can make any fairy-tale character for the New Year, but the most relevant of them is Santa Claus.

(Click to enlarge image).
A red cardboard square is rolled up into a tube and fixed with glue. The top of the toy is bent in the shape of a triangle-cap, the bottom is crushed into a semicircle in the form of legs. A white beard triangle is glued to the cap, and a face is drawn with a black felt-tip pen. All that remains is to secure the loop.
In a similar way, you can perform a whole New Year's landing of Santa Clauses and decorate the entire Christmas tree with them.
Such unusual DIY toys for the new coming year will remain in the memory of all household members for a long time, especially the little ones.
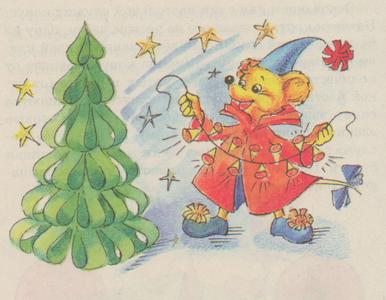
If there are children in the house, christmas tree need to dress up with them. It's even better if there are several Christmas tree decorations will be made by the hands of a child. Devote a couple of New Year's Eve evenings to joint creativity with your child. This will bring a lot of benefits:
- firstly, you will have an interesting time together, which will bring you even closer;
- secondly, the child will learn something new;
- thirdly, work on creating toys will contribute to the development of creative thinking and fine motor skills in a child, as well as the formation of manual skills;
- fourthly, your Christmas tree will be decorated with interesting, unique decorations;
- fifthly, creating toys for the Christmas tree already creates a festive atmosphere in the house, which will positively affect the mood and emotional state of the household.
In a word, the reason to start making Christmas tree decorations together is more than compelling!
Start with something simple - for example, Christmas tree candies.
Christmas candies
Find some cylindrical objects in the house. Thick curlers will also work. Cut multi-colored foil with an ornament into equal rectangles and wrap it around the cylinders like candy. If the wrapper unrolls, tie it with thread. Make a loop of thread. That's it - the Christmas tree decorations and candies are ready! In half an hour you can make 10 large candies.
Corrugated
Fold various paper figures into a fan - you get blanks for many interesting crafts. If you bend a triangle like a fan, and then drag it with a shiny stripe in the middle, and then straighten the edges, you will get a butterfly with corrugated wings. Using corrugation you can make the following paper crafts:
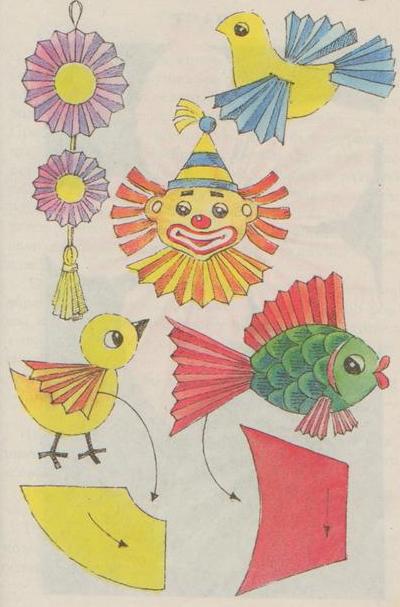
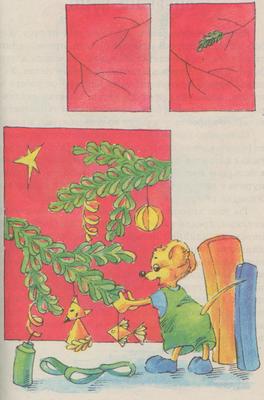
Small Christmas trees
The base for the Christmas tree is a cone made of thick green paper.
How to make a cone: Cut out a circle of any diameter (try 10 cm to start with). Divide the blank circle into four equal parts - with a pencil and a ruler or using a fold. One of these parts needs to be cut off, and then rolled into a cone and secured with glue. You will get a trunk for a thick Christmas tree.
If you want a slimmer Christmas tree, you need to cut the blank circle in half and roll each half into a cone - you will get two slender coniferous trees.

Now you can thread a thick silk thread through the top of the cone, not forgetting to make a knot, and tie it in a loop so that the product can be hung on the Christmas tree.
Making branches for the Christmas tree. We cut thin soft green paper into strips 0.5-1 cm wide and 6-8 cm long. The ends of the strips need to be connected with glue - you will get loops. You need a lot of them for a Christmas tree.
The loops are attached to the cone with paper glue. You need to start from the bottom, creating the first row of branches. Above it is the second row and so on. Accordingly, the lower rows will require more branches-loops than the upper ones. You will get this Christmas tree that can be hung on live Christmas tree. By the way, finished paper Christmas trees can be carefully coated with glue using a thin brush and carefully sprinkled with dry glitter or crushed foam (imitation snow).
New Year's panel. By the way, using the same loop technology, you can make a New Year's panel with fir branches. Make a frame, decorate the branches with rain and tinsel - it will turn out wonderful homemade decoration for the wall. True, for the panel you need to make larger loops - you will need strips 1.5-2 cm wide and 12-14 cm long. First you need to make a background, then draw a sketch of the branches and attach green loops to them with glue. The hinges must be attached tightly to one another. You can lay two, or better yet, three rows of loops on one line - then the branches will be more magnificent!
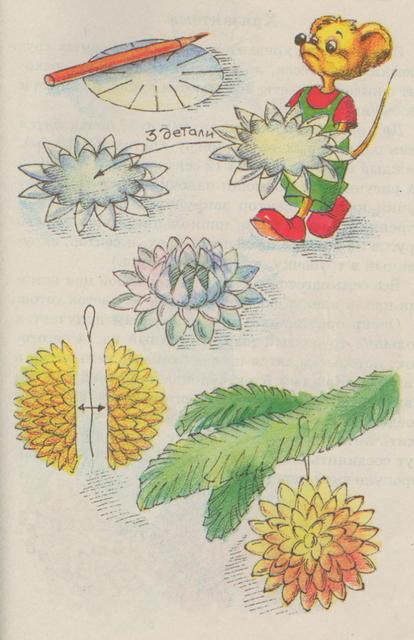
Snowballs
In order to make fluffy balls, you need thin soft paper such as papyrus. Tracing paper or thin soft napkins are also suitable. You can try making a ball out of cellophane paper.
Technology: cut out 10 identical circles (the larger their diameter, the larger the ball will be). The circles need to be stacked and connected (by carefully applying a drop of glue to the center of the circles or simply sewing the entire stack together with thread).
Make a mark on the top circle exactly in the center. Then make cuts across the entire stack from the edge to the center. Fluff the paper with your hands to make a fluffy snowball. You just need to fluff it carefully so that the parts don’t come off. We will need two fluffies - we will attach them to each other with their “backs”, placing a thread with a loop between them.

If you connect several fluffy beads, you will get beads for the Christmas tree. And if you try, you can make a snowman and a bunny like this:

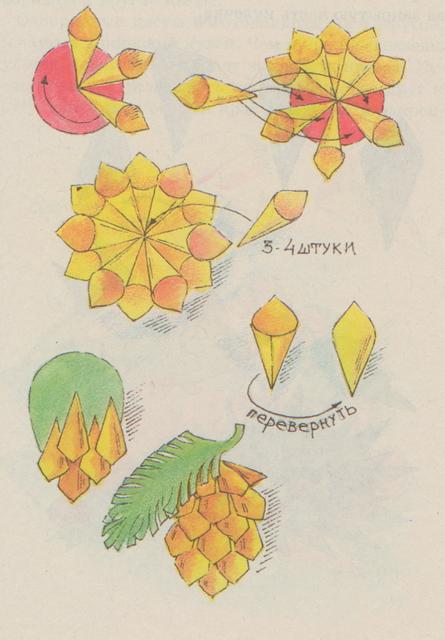
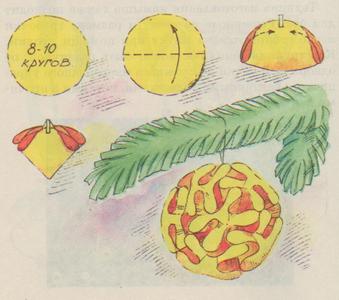
Christmas tree cone
To make the cone we use the “bucket” technology. For the cone we will need a lot of equal-sized squares (with sides ranging from 2 to 5 cm) made of paper Brown. We roll each square into a small ball and glue it together.
Next, we need a cardboard base - it can be a circle or a teardrop-shaped figure. Working with a round base: glue the first row of bags onto the circle, then the second on top of the first. When making the second row, we attach not the entire bag to the base, but only its acute corner. We will close all the remaining “gaps” with additional bags, simply smearing their sharp corners with glue and sticking them between the already glued bags. Let the glue dry, turn the structure over - the pine cone is ready. All that remains is to decorate its top-base. To do this, you can use green tinsel or paper twigs.
Working with a drop-shaped base. We first glue the bags onto one side of the base, starting from the bottom (see picture). The holes of the bags should, of course, look down. Having pasted over one side with bags, turn it over and paste over the other. Then we fill the gaps with small bags, smearing their sharp corners with glue. We decorate the top with green tinsel or paper twigs - the cone is ready.
Spiny ball
Cut out 14 circles of the same size and color. Using a compass and pencil, divide each circle into 12 equal parts. Let's make cuts along each of the eleven lines from the edge, but not reaching the center by about half a centimeter. You will get 12 sectors. Using a pencil, roll each of them into a ball and secure with glue. (see picture) Let's do the same with all fourteen circles.

Then put them in two piles of 7, face down. Moreover, you need to stack the circles so that each upper petal bag lies between the two lower ones. We fasten the circles in the stacks together with glue or thread. You will get two hemispherical blocks. Glue the blocks together by connecting them with their “backs” and laying a thick thread with a loop between them. The spiky ball for the Christmas tree is ready!
Using the same technology you can make lily flowers.
Tubular ball
The technology for making it is similar to working on a spiky ball, but making a tubular one is more difficult. Circles (14 pieces) with a diameter of 6-15 cm are cut out and divided into 12 sectors. Next, using the rod of a ballpoint pen, the sectors are twisted into a tube. Each tube is secured with glue. 7 circles are stacked (the upper tube lies between the two lower ones). The circles in the stacks are glued together or stitched in the center. You get two blocks that are connected to each other with their “backs”, and you can lay a thread with a loop. An interesting tubular ball is ready.

wavy ball
To make it you need good paper– soft, plastic. You can take mirror paper, foil, colored cellophane. Cut out 8-10 circles of the same size (the larger the size, the better). The circles are gently folded in half without bending the middle, and the edges are secured with a paper clip. The right and left sides of the circle are inserted inside our workpiece. We fasten the sharp corner of the workpiece with a paper clip so that the sides inserted inside are also secured. We do this with each circle.
Now we have 8-10 voluminous wavy triangles. We connect the triangles to each other by the sharp ends by stitching with threads or using a stapler (do not forget to immediately remove the paper clips from sharp corners, but we don’t remove from the edges yet). When all the triangles are connected to each other, you need to remove the paper clips from the edges - the ball will immediately fluff up and turn into a wavy miracle.
Christmas tree and Santa Claus from a cone
We have already talked about how to make cones. We make several cones - one larger than the other. We will make narrow small cuts at the edges of the cones and fluff them up. Let's put one cone on another: from the largest on the bottom to the smallest on the top. However, the cones can be the same size. We pass a thread with a loop through the top of the cone. We will decorate the Christmas tree with rhinestones, sequins, sparkles, etc.

You can also make funny bells for the Christmas tree from the cone. Cones for bells can be made from cardboard and covered with gold or silver foil. And the cone can also be turned into this wonderful Santa Claus. We will make a mustache, beard and hair from a paper spiral. To do this, you need to take soft thin paper, cut it into narrow strips, wrap it around a pencil, leave it for a while, and then unfold it. You can also use Christmas tree rain or fragile foil - they can make long-lasting “curls.”

Star
Very beautiful and not as difficult as it seems.
Cut out a large square from paper (the larger the square, the larger the star will be). Fold the square horizontally, vertically and diagonally. Press the folds well. We will make equal cuts along two horizontal and vertical lines (half the distance to the center point - see the picture).
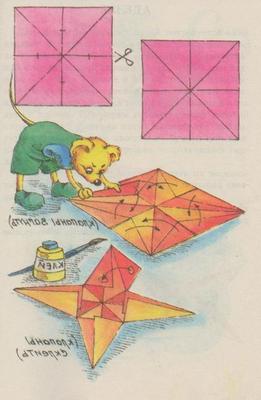
Now we have four squares in front of us, and in each there is a diagonal fold line. Bend the right and left halves of the square to a diagonal line and connect with glue (similar to how we made little bags in a prickly ball). And we will do this with each square. You will get four rays of the star. Let's turn the star upside down, thread a thread, make a loop on it, decorate the bottom of the star with tinsel - the toy for the Christmas tree is ready. To prevent the rays from “dangling”, which is quite possible if the star is made of soft paper, you can fill them, for example, with cotton wool. And if you connect several of these stars with a beautiful shiny braid, you will get a vertical garland.
Let's make two identical stars, connect them to each other with their “backs”, placing a thread with a loop between them - we get a three-dimensional star. You can connect two stars so that the ray of one of them falls between the two rays of the other. You will get an eight-pointed star (see picture).

You can make a lot of decorations in just a couple of evenings. If there are two Christmas trees in the apartment, then one of them can be decorated only with homemade toys. A hand-made Christmas tree is fashionable today. This option is especially wonderful for a children's room. I wish you creative success!
Illustrations taken from the book “One Hundred Paper Crafts” by G.I. Dolzhenko.