Adriatica (Natural Mosaic, China)
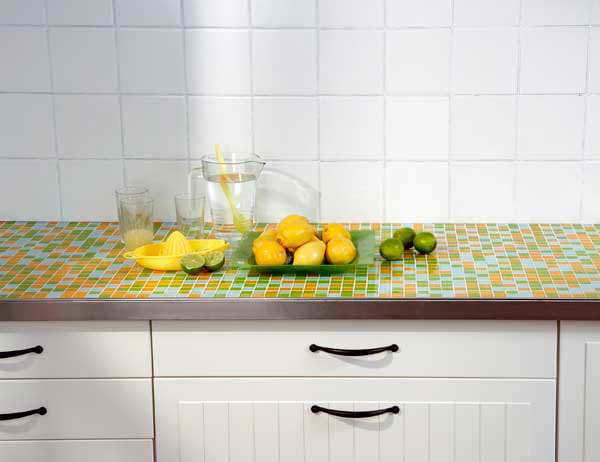
Even at the stage of choosing the material, I decided not to make the tabletop from chipboard, since it has an unusual shape and in some places it turns out to be quite wide. Artificial stone looks beautiful, but is very expensive, plus you can’t put hot things on it, it’s easy to scratch with a knife. It also looks good, but they shouldn’t be difficult to veneer curved shapes. So I decided to make a mosaic countertop with my own hands. I came across a Chinese mosaic from natural stone Adriatica Natural Mosaic. The size of each element is 25x25 mm, so it is convenient for it to form the end of a tabletop 5 cm thick.
Quick navigation through the article
Base


Essentially it is extruded polystyrene foam, reinforced with fiberglass on one or both sides and covered with a cement layer. This material is used to make benches in Turkish saunas. In terms of price, it is much more expensive than ordinary polystyrene foam, but it seems to me that for such a task it is worth the money. Instead of panels, you can use thin DSP, but they are heavy, and it is no longer possible to achieve a tabletop thickness of 5 cm.
Mosaic laying and grouting

I calculated everything in advance down to the millimeter, and began laying it: first on the countertop, then on the ends.
The mosaic was trimmed using a grinder with a disc on the tiles. In my case, I can’t do without an angle grinder. Even if you cut the sheet into separate strips and increase the size of each seam by a fraction of a millimeter, you still won’t be able to make a beautiful connection on the window sill, since the slopes are not at a right angle.


Expenses
The total length of the tabletop (and table) is 5.3 m, area 3.5 m².
- Plywood 12 mm (2 sheets) - 1000 rub.
- Dulux Golden Teak stain (0.75 l) - 700 rub.
- Wedi building panel 2500x600x30 mm (2 pcs) - 4600 rub.
- Litoacryl Plus glue 5 kg (2 buckets) - 3260 rub.
- Mosaic made of natural stone M068-25T (3.5 m²) - 11,400 rub.
- Epoxy grout Mapei Kerapoxy Design No. 734 3 kg (3 pcs) - 6900 rub.
- Colored metallized additive MapeGlitter No. 214 (6 pcs) - 3160 rub.

Total: 31020 rubles. Cheaper than 42 thousand rubles are countertops of similar sizes from artificial stone I couldn't find it. I made the base in 1 day, laid the mosaic in 2 days and finished the grout in 3 evenings. Plus 1 day for preparatory work (marking trim, holes for the hob and sink). I think it's a good alternative. Once a quarter I recommend polishing the countertop with Mellerud marble polish.
What distinguishes a table with a mosaic from other table models? Mosaic is a purely decorative element, and the functionality of the table comes second. In general, mosaic in any of its manifestations looks very beautiful. And if we are talking about a wrought-iron garden table, which in itself is very elegant, and even with a pattern laid out in glass, it has no equal.
Metal garden table with blue glass pebble pattern
Coffee table with mosaic

Certainly, the most important role plants are playing in the garden. However, if you are thinking about equipping your garden, then you should not forget about garden furniture. The market offers completely different models of garden furniture, but we suggest you buy the simplest garden table made of metal and decorate it with your own hands - what could be more pleasant and beautiful? Enjoy a nice summer day with a cup of refreshing iced tea, sitting at a table that you decorated with your own hands and put a piece of your soul into it. Any glass, remnants of tiles or ready-made mosaics, which can be purchased at any hardware store, are suitable for this.
Round garden table made of wood with a marine pattern

Geometric pattern

We have collected for you best photos garden tables that you can make with your own hands. They will charm everyone!
Rectangular garden table with mother of pearl mosaic

Metal garden table with Greek pattern

All the colors of the rainbow on one table

Classic garden furniture design

A discreet but very gentle pattern

Multi-colored sunflowers against the sky

Geometric pattern in a new frame

Mediterranean style

Patterns inspired by ancient architecture

Color scheme for cheerful people

Marine theme

The table seems to glow from within

Small mosaic or large round table?

Elegant wrought iron garden table with floral pattern

A classic pattern that fits into any setting

Mosaic is one of the oldest ways to decorate a room. Traditionally, the material is used to decorate walls and floors; less often, paintings are made from it. The range of applications of the technology has expanded significantly over time; mosaic tiles have recently been often used to cover tables. It is worth noting that making a countertop with your own hands is not difficult; it requires minimal skills and a lot of patience.

There is quite large number types of mosaics. The most common are the following:
- Glass;
- Ceramic;
- Stone;
- Metal;
- Wooden;
- Porcelain stoneware.
Most the best option According to experts, the combination of colored glass with flexible tiles is considered. Flexible tiles are products made from crumbs processed to match a certain texture of brick or stone.


Advantages of flexible tiles:
- Moisture resistance;
- Long service life;
- Mechanical strength;
- Frost resistance;
- Resistance to aggressive environments;
- Preservation of color under the influence of moisture and sunlight.
Spectacular artistic image mosaics are ensured due to their aesthetics and ease of installation; the material is ideal for covering tabletops with mosaics with your own hands.
Features of mosaic countertop finishing


Mosaic looks great in the kitchen; this decoration option perfectly refreshes the interior and makes it more original and bright. At proper care the tabletop will retain its original appearance for many years. It is not recommended to glue mosaic tiles to a set that is not very new - it is better to replace the old countertop with a new one.
You can purchase a new countertop at a building materials store. It can also be used as a board made of polyurethane foam of different thicknesses.
To make measuring and cutting easier, a centimeter grid is sometimes applied to the board.
A stainless steel profile can also be sold as a kit, which is glued to the edge of the product using the same glue as the mosaic. The glue used is a standard elastic composition; for glass mosaics, transparent or white glue is used, which is suitable for installing tiles of any color. This glue also functions as a sealant, which is ideal for kitchen furniture. Mosaic flooring involves many joints, which can lead to the formation of mold. To avoid this, special anti-fungal cleaners are used to clean the countertop.
How to decorate a countertop with mosaics

There are three main ways to make a tabletop with your own hands:
First way:
- Stage 1. The tabletop is cut out of the slab according to the dimensions, and its profile edge is also prepared. The edge with the perforated part up is placed on the edge of the board;
- Stage 2. The selected adhesive is applied to the surface and leveled using a notched trowel; the adhesive should also be applied to the upper edge of the profile;
- Stage 3. The upper perforated profile is laid on glue, which forms the edge of the tabletop;
- Stage 4. After the glue has dried, pre-cut tiles in the form of squares are laid on the surface. The same glue can be used as a sealant; a small part of it is rubbed over the surface of the countertop to grout the joints;
- Stage 5. Excess dried glue is wiped off with a damp cloth.
The finished tabletop is polished to a shine with a soft cloth; no additional coating is required, you only need to comply with the conditions for the care and use of mosaic surfaces.


Second way:
If the decor of the tabletop with your own hands does not involve complex artistic compositions, it is recommended to use the method of transferring drawings from paper to the tabletop.
- Stage 1. The mosaic sheet is carefully laid on a pre-prepared adhesive base, the paper layer should be on top;
- Stage 2. The paper is carefully blotted with a damp cloth until it begins to easily separate from the surface of the mosaic;
- Stage 3. Remains of paper are removed without unnecessary effort, which can cause a shift in the position of the elements;
- Stage 4. After removing the paper base, the design must be left for a day, after which the joints are grouted;
- Stage 5. Excess grout is removed with a damp cloth.
Third way:
This method is considered the simplest; it involves laying mosaics using a mesh.
- Stage 1. The mesh base is immersed in the adhesive solution; this must be done so that all its parts are evenly immersed to the same depth;
- Stage 2. The pattern hardens over the course of a day, after which grout is applied;
- Stage 3. To remove excess traces of grout that cannot be removed with a sponge or damp cloth, it is recommended to use light solvents (such as White Spirit). Solvents should be used a week after completion of work;
DIY mosaic installation in the kitchen (video)
All methods of making a countertop with your own hands have their advantages; with their help you can decorate any kitchen. It is not necessary to buy a mosaic; a beautiful pattern or paintings can be created from fragments of broken tiles or bottles.
Examples of mosaic countertops in the kitchen (photo)


_Stoleshnica_iz_mramornoy_mozaiki_.jpg)


Every year the cost of construction and finishing materials is increasing, which means that not everyone can afford to change the interior when they want to refresh it. The same applies to furniture. It is no secret that kitchen furniture is subject to mechanical damage several times more than in other premises. But what a pity it is to throw away your favorite kitchen table just because its top is worn out and damaged!
If your table top has deteriorated, you can decorate it with mosaics to breathe new life into it.
There is no need to despair, there is a way out. It is enough just to decorate the tabletop with mosaics, and it will shine with new colors, giving the interior a fresh and original look. In order to create a mosaic, you will need to put in a lot of effort, but it is worth it. The painstaking work will be fully paid off by creating an exclusive item with minimal expenditure of the family budget.
What to make a mosaic from?

For mosaics, you can use both finished tiles and pieces left over after renovation.
The ideal raw material for creating mosaics is pieces ceramic tiles, remaining after repair. Often owners specifically purchase a little more tiles, because during the gluing process they can break or deteriorate. Some stores sell broken ceramic tiles at the price of recycled materials or give away the remains of unclaimed collections at a reduced price. All these tiles are suitable for making mosaics.
Before starting work, the material must be crushed with your own hands. The easiest way is to cut the elements into small pieces with a simple glass cutter. In this case, the pieces may have different shape and sizes. To create pieces of equal size, a tile cutter is usually used. When cutting tiles, the pattern should be taken into account: if in one case the geometric correctness of the elements is important, then in another case the image will look more beautiful from chaotically cut pieces.
Return to contents
Preparing the base and material for applying decoration
When all the tiles are cut and the resulting elements are sorted by size and color, you can begin gluing the mosaic onto the countertop. To work you will need following materials and accessories:

For the mosaic you will need: glue, solvent, pliers, sandpaper and a brush.
- latex-based glue;
- spatula for applying adhesive;
- rags;
- paint thinner;
- gloves;
- composition for grouting joints;
- soft spatula for removing grout;
- sandpaper with different grain sizes;
- furniture wax;
- piece of linen.
Before applying the decoration to the table, you need to think carefully about the design. You can draw a sketch of the future image on a sheet of paper, the scale of which will be equal to the tabletop being processed. It is quite problematic to create a complex picture the first time, so experts recommend starting with an abstraction, which can be made from chaotically scattered pieces of tiles.

Before applying the mosaic, you need to decide on a pattern and draw it on the surface of the countertop.
Then you need to treat the countertop. First of all, it is freed from varnish or paint using a solvent. It is enough to cover the wooden surface with a solvent and leave it for a while. The composition will corrode the varnish, which can only be wiped off with a dry cloth.
After removing the varnish, the table is treated with sandpaper. First, coarse abrasive No. 2, 3 is used, and then finer abrasive No. 1, 0. Sanding with sandpaper will make the surface rougher, which will significantly improve the quality of adhesion between mosaic elements and wood or plastic. If the fastening is insufficient, the pieces can easily fall off, which will ruin the entire result of the work.
Return to contents
Mosaic creation algorithm
When preparatory activities finished, the process of creating a mosaic with your own hands begins. Here you will need to use a prepared sketch. From it, the drawing is transferred to the tabletop using a pencil.
If you are not confident in your abilities, you can use a simple circular pattern that will look great on a round tabletop.

To create it, you need to draw circles diverging from the center. Each row of circles is tiled different colors. It does not matter what geometric shape the mosaic elements will have. Only one rule needs to be taken into account: larger and even pieces should be located at the edges, and small ones should be closer to the center.
Then you can start gluing the tiles. Experts recommend starting work not from the center of the panel, as is required when processing walls, but from the edges of the tabletop. Each element must be applied as tightly as possible to the other, gluing it with latex glue. Unlike wall finishing, where the base is covered with an adhesive, when processing a countertop, the tiles are coated with glue. Each particle is covered with glue using a spatula and pressed tightly to the base. Excess glue is removed immediately with a dry soft cloth.
The result should be a flat and smooth surface with almost invisible seams. After this, the tabletop is left until completely dry. It is not recommended to use a hair dryer or other heating devices for drying. Typically it takes about 24 hours to dry.
Mosaic is one of the first methods of artistic decoration. Traditionally, it is used for floors and walls; mosaic paintings are less commonly laid out. However, the range of applications of this technique is much wider. For example, it is popular to make tables from mosaics. Next, we’ll talk about all the intricacies of this process.
It is worth highlighting the most popular and frequently encountered types of mosaics:
- Glass mosaic. It is the undisputed leader among facing varieties. A huge selection of a wide variety of textures and textures, a wide palette of all kinds of pure and combined colors have made glass mosaics so popular. It is environmentally friendly and resistant to moisture and chemicals, therefore recommended for coating in bathrooms.
- The ceramic variety of mosaic is the same tiles, since it is manufactured using a similar technology, with a difference in size. A protective layer of glaze is required.
- Stone mosaic. It is interesting primarily because of the naturalness of the material, and is often made from minerals, as well as remnants of marble production. Most often used in combination with ceramic and glass mosaics.
- Metal mosaic. It consists of blanks coated or embossed, which are assembled into matrices and form a pattern. Metal mosaic has not yet become widespread due to the tactility of metal. In fact, such a mosaic is an excellent conductor of cold or heat and therefore its use is dictated more by questions of taste than by expediency.
- Wooden mosaic. More often used for interior decoration, including even sanitary areas. Thanks to the naturalness of the wood and its resistance to abrasion, this mosaic will last quite a long time.
- Porcelain tile mosaic. It is obtained by cutting ceramic granite slabs. Since the elements have significant weight, this type of tile is more appropriate to use for cladding walls and floors.
According to experts, optimal choice will be a combination of colored tempered glass with flexible tiles, which are products made from marble chips processed to match the selected texture of stone or brick. Like glass, flexible tiles have:
- moisture resistance,
- high mechanical strength,
- durability,
- high level of frost resistance,
- retains colors during prolonged exposure to sun and moisture,
- resistance to chemically aggressive environments.
Thanks to high level the aesthetics of the material and the ease of its installation, it is this combination that will give the selected object a spectacular artistic image.
Making a garden table frame
Many will rightly note that it is easier to buy a ready-made wooden or plastic table and start decorating it. However, what is most valued is the table that was made with your own hands and certainly from natural wood. Since mosaic already involves the creation of an art object, there is no point in buying a standard base from an assembly line. The finished product will not look very impressive. Assembling a garden table with your own hands is not so difficult if you clearly decide in advance on its design and dimensions. 
If you plan to create a small table on one leg, or a large one on a single base post, it is important to consider that the table will be less stable and durable. For the base, either a thick beam or, even better, a wooden post is suitable. It is optimal if its diameter is at least 20 cm. Tabletops for these models are made round or with a small oval. The easiest option is to knock down the boards and cut them to the desired shape. Minus - it does not look aesthetically pleasing. Therefore, it is better to use gluing technology. The finished tabletop is attached to the base using furniture corners with inside and self-tapping screws on top, which must be placed so that they go through the base directly into the leg. Of course, the space for the screws is pre-bored with a drill of the same diameter as the head of the screw, to a depth of 4 mm, so that they are securely hidden flush. 
Making a table from mosaic and wood is quite simple. If you plan to assemble a structure with four legs for better stability, then 8 elements will be enough: 4 planks for the frame and 4 legs. In order to make it comfortable for people of different heights to sit at the table, it is necessary to choose a leg height of 75 cm, taking into account the thickness of the tabletop. That is, if its thickness is 2 cm, then the length of the legs will be 73 cm.
The wood for the legs is carefully sanded using sandpaper of different grades, from two to zero. Next, they are mounted into the frame using metal connecting corners. For a table frame designed for four people, an ordinary board 20 mm wide and 100 mm high is sufficient; the load is distributed according to the principle of columns, so the table can withstand quite a lot of weight. The frame of the garden table should have indentations of 20-30 cm from the edge of the tabletop on each side. The base is installed using furniture corners on the frame, after which it is securely fixed with wood screws.
However, that's not all. Of course, mosaics can add spectacular beauty to any item, and this is precisely why it is valued as an excellent way of decoration, but it hardly makes sense to completely cover the table on all sides, including the legs. Even a figuratively laid out tabletop with a base made of simple, albeit polished, timber will also not cause that ecstatic delight in people who see the finished product. To create something truly original, it makes sense to do some decorating on the wooden base as well.

You can do this with the help of a cutter and artistic skills. However, if there are none, then there is a way out. It is enough to take any pattern and make a template out of it - by printing the required design on paper. Then the main lines are carefully cut and then the drawing, when applied to a wood surface, is outlined along the lines with a simple pencil. Next, using a cutter, the design is transferred to the wood. By changing the angle of inclination and position, you can create a complex geometric pattern. Those areas of wood that will not be decorated with mosaics, it makes sense to cover them with several layers of ship varnish, which will preserve the natural color of the wood without giving it yellowness, or cover it with stain, which will recreate the appearance of more valuable types of wood. This wooden garden table will pleasantly please the eye and will decorate any summer cottage.
Preparing the base
Wood is a rather complex and capricious material, so it is important to approach the installation of mosaics on it with special care and some points should be taken into account:
- in relation to wood, you cannot use soluble mixtures prepared on a cement basis,
- excessive moisture in the adhesive composition can cause swelling of the wood and subsequent deformation of the mosaic layer,

- When laying mosaics, it is necessary to use glue with a high degree of elasticity. For example, Atlas-Plus glue has exactly these characteristics, and at the same time its retail price is $12 per bag weighing 25 kg,
- Wood tends to dry out due to hot climates and swell due to humidity, so the base for the tiles must have a layer of primer,
- Mosaic elements can also be laid using regular liquid nails, but it is better to use special mosaic glue, which is a more convenient and economical option.
Garden tables, photos of which are presented in the article, are an excellent highlight for any interior. 
DIY mosaic table
When the tabletop has been primed, it is necessary to apply markings using a pencil, along which the drawing will subsequently be laid out. It is important to remember that all details of the future composition should be large in size, and at the same time you should refrain from excessively right angles and lines. After the drawing has become complete, you need to choose one of the methods for cladding.
1. The first way to lay a table with a mosaic involves using simple PVA glue or liquid nails and grout. The mosaic elements, applied along the lines of the pattern, are placed on glue. After a day they move on to grouting the joints. Next, use a damp cloth to remove excess grout from the surface of the table. The mosaic should not be subjected to any loads during the day in order to allow the material to acquire its final strength.

2. In the event that to decorate a table there is no need to resort to complex artistic compositions and a design from mosaic elements of the same size and shape is sufficient, it makes sense to use the method of transferring ready-made designs from a paper base to the surface of the tabletop:
- Carefully place the mosaic sheet on a pre-prepared adhesive mixture with the paper base facing up. Moreover, it is important to know that the use of the mixture white will help glass mosaic get rid of the manifestation of shades on the surface;
- gently blot the paper with a damp cloth until it begins to freely separate from the surface of the mosaic elements;
- remove any remaining paper without applying any force so as not to move the position of the elements;
- after the paper base has been completely removed, it is necessary to give the laid out pattern a day to harden before applying grout;
- further, when the seams are sealed with grout, you need to remove its excess with a damp cloth.

3. The third method involves laying mosaics using a grid. This is one of the most simple ways, which involves carefully immersing the mesh base with the mosaic laid out on it into the adhesive solution so that the entire mesh is evenly immersed to the same depth. Next, the drawing is left for a day to harden and the finishing process begins - applying grout. In the event that there are traces of dried grout on the surface that cannot be removed with a damp cloth or sponge, it is worth using light solvents such as White Spirit, but it is advisable to carry out cleaning procedures with its help no earlier than a week after finishing works
Each of the methods is good in its own way and demonstrates that a table with mosaics will be a good and noticeable decoration of any dacha. Moreover, a mosaic does not necessarily need to be purchased; it is quite possible to create a beautiful pattern or picture from fragments of old broken tiles or alcohol bottles.