Growing mushrooms at home due to various factors is gaining unprecedented popularity. The leader among mushrooms grown at home is oyster mushrooms. This is no wonder, since it is the simplicity of the technology, the productivity and the pickiness of oyster mushrooms that makes them accessible to everyone. Following the recommendations and instructions, anyone can easily, using only available tools and materials, collect up to 3 kg of harvest from each kilogram of the original mycelium. The symbiosis of the right room, the quality of the mycelium and the substrate is the key to successfully growing oyster mushrooms at home.
Where to grow oyster mushrooms, choosing a room
Growing oyster mushrooms at home, of course, should begin with a solution to a banal, but very important issue– choosing the location of the mushrooms. When choosing, you should take into account that in their natural habitat, almost all mushrooms, and oyster mushrooms in particular, grow most actively in places with good air exchange. Moreover, the humidity of growing areas, as a rule, exceeds 50%.

- The room humidity level should be in the range from 70 to 90%;
- During the first three weeks, the bags with mycelium should be hidden from sunlight;
- After the first fruit buds appear, bags with oyster mushrooms should receive artificial or daylight for at least 8 hours daily;
- The air temperature in the room should not be lower than 20 degrees, but not higher than 30;
- Throughout the entire period, the technology for growing oyster mushrooms at home requires good ventilation.
Important! The chosen premises are the basis and guarantee of productivity. The approach to solving this issue must be extremely serious, since non-compliance with any of the presented requirements can not only reduce the speed of growing the mushroom crop, but also eliminate it altogether.
How to grow oyster mushrooms, preparation and processing of substrate
Before you start growing mushrooms, you should understand how to grow oyster mushrooms and what the final result depends on. One of the fundamental points is the preparation and processing of the substrate, which is essentially nutritious soil for growing oyster mushrooms. As with other steps, any error in the preparation steps can affect the yield, so it is recommended to follow simple rules and advice.
The sale of mycelium is carried out by many specialized stores and even individual companies directly involved in the cultivation of oyster mushrooms. It is the purchase from such manufacturers that is most desirable for a novice mushroom picker. In accordance with the requirements and technological features on a mass scale, mycelium, as a rule, is not used for more than a year, but during this period it is not completely developed, that is, it produces a significant harvest. Such mycelium has already been developed and bears fruit, and its cost is significantly lower than new mycelium.
 The volume of purchased mycelium should be determined depending on the desired yield - when good care at home it is possible to get up to 3 kg of oyster mushrooms from every kilogram of mycelium. Keep in mind that bags for growing oyster mushrooms can produce up to three harvests in a short period. Basing the choice of mycelium when purchasing on any indicators is quite difficult due to the lack of many obvious evaluation factors, which is why it is important not only to pay attention to the size of the mycelium, its extensiveness, but also to make a choice in favor of a trusted supplier-seller.
How to make your own substrate
 The modern market is replete with a variety of substrates for growing various plants and mushrooms. However, some mushroom pickers invariably choose a substrate made with their own hands. Such a basis, of course, better takes into account the individual characteristics of climate, care and living conditions, but it is worth understanding that the effectiveness of its use depends on the correct component composition, which, in turn, requires skills and knowledge.
Like plant soil, substrates for growing oyster mushrooms must contain a high-quality base and mineral composition. It is extremely important that the chosen base - sawdust, husks, straw, etc. - is clean and pre-treated. It is strongly recommended to avoid using chemically treated bases - it is worth remembering that oyster mushrooms are grown for consumption, so environmental friendliness and safety must come first.
Making your own substrate is a fairly simple process, consisting of only three steps:
- Disinfection of the selected base through thermal and/or chemical treatment;
- Grinding the substrate to fractions no larger than 4-5 cm in size and repeated heat treatment for two hours;
- Spin.
Did you know?In addition to being eaten, oyster mushrooms have found use in traditional and folk medicine. So, in folk recipes In Eastern countries, oyster mushroom is an almost integral part and is positioned as a panacea for many diseases.
Substrate preparation
 Preparing the substrate for growing oyster mushrooms begins with a banal, but extremely important choice raw material base. The best germination and yield results are achieved in a substrate made from wheat or barley straw, sunflower husks, crushed corn cobs and its stalks, and buckwheat husks.
Important! In practice, a substrate based on sawdust or shavings of various types of wood is often found, but growing oyster mushrooms at home on a similar basefor newbies– enough difficult process, which also requires a more painstaking approach.
Already at the first stages of preparing the substrate, it is strongly recommended to fully check the selected raw materials for cleanliness and the absence of mold. The next stage is grinding the raw material base into small fractions with a total size of no more than 5 cm.
To completely prevent contamination of the substrate by all kinds of harmful organisms, which is certainly unacceptable in the context of further consumption of grown oyster mushrooms as food, it is strongly recommended to heat treat it. Moreover, this procedure will also increase the moisture content of the raw materials to the required level.
The processing process consists of several steps:
- Placing purified and crushed raw materials in large-volume metal containers;
- Pouring the substrate big amount water (in a ratio of at least 1:2);
- Cooking the substrate for 2-2.5 hours until the raw material is completely softened;
- Drain the remaining water and cool the substrate to a temperature of 30 ° C and spin it completely.
Important! Overmoistening the initial base, despite the dependence of oyster mushrooms on moisture, will certainly make the resulting substrate unsuitable for growing mushrooms at home. So, when squeezing raw materials in your hand, only a small number of drops are permissible.
The process of forming mushroom blocks
Mushroom blocks are a kind of bed in which oyster mushrooms are grown. As a rule, a plastic bag is chosen as a “container” for the block. It should be noted that the bag must be disinfected or heat treated. Effective way treatment - washing with a bleach solution. The optimal bag volume should be at least 5 kg.
After disinfection of the substrate used and the container for it, the formation of mushroom blocks begins - layer-by-layer filling of the bag with substrate and mycelium. Based on the recommendations of experienced mushroom pickers, for every 5-6 cm layer of substrate there should be about 0.5 cm of mycelium. It should be noted that the first and last layer in the bag must certainly be a substrate.
After filling the mushroom block, the bag is tied tightly at the neck. The final stage - perforation of the blocks - consists of cutting small holes at a distance of 10 cm from each other. Moreover, it is best to do them in a checkerboard pattern.
How to properly care for oyster mushrooms
As a rule, growing oyster mushroom mycelium at home is not difficult at all - it is enough to create the proper climatic conditions and properly care for the mycelium during the ripening period, following the recommendations.
Maintaining climatic conditions, incubation period for oyster mushroom ripening
 Starting from the first days of growing mushrooms, you need to decide at what temperature the mushrooms grow in the created conditions - the temperature should be constant (within 20 – 30 °C) and not change by more than 1-2 degrees. Exceeding the upper temperature limit certainly causes heat shock in the oyster mushroom mycelium and kills future mushroom shoots. A drop in temperature also has a detrimental effect.
Along with temperature conditions, growing mushrooms at home should be accompanied by a constant level of humidity. Fortunately, even beginner mushroom pickers without experience in growing oyster mushrooms have access to automatic systems maintaining moisture through irrigation. Incubation period ripening under optimal conditions usually takes about 20-25 days.
Did you know? The color of the oyster mushroom cap depends on the growing conditions created. Thus, the selected and constantly maintained temperature is about 20°C will allow you to get a light hat, and 28-30°C – dark. However, this in no way affects the taste.
How to care for mushrooms during growth
 Caring for mushrooms, despite its apparent complexity, is quite simple and does not require special skills or tools. The main requirement is to maintain conditions of detention. During the incubation period, the room should not be ventilated, since the carbon dioxide released autonomously creates the most favorable conditions and slightly increases the moisture level.
Oyster mushrooms are one of those mushrooms that can not only be found in the forest, but also grown with your own hands in the country house, in the garden, in an old greenhouse or in a cellar. The main feature of oyster mushrooms is that for the full development of fruiting bodies they need a special substrate. In addition, for cultivation you will need a special mycelium, which contains fungal spores, from which fruiting bodies will subsequently begin to form.
In fact, growing oyster mushrooms in bags at home is not particularly difficult if you strictly follow the technology. To do this, you will find this article useful, which details the main stages of cultivating these mushrooms at home.
Growing oyster mushrooms in bags
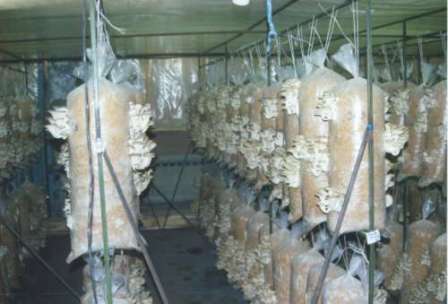
These mushrooms should be grown in bags in a separate room, since the full development of fruiting bodies requires special conditions. The room should only be used for the cultivation of mushrooms, since it will constantly contain spores that will make it impossible to use the room for other purposes (Figure 1).
Note: An old basement or cellar, a garage that is currently not in use, or even a greenhouse can be used as a cultivation chamber. However, in the latter case, you need to make sure that the room is heated if you plan to grow crops not only in summer, but also in winter.
Once a room has been chosen, you need to prepare it properly. This stage includes mandatory disinfection of the internal space. For this purpose, the walls, floor and ceiling can simply be treated with slaked lime, and if you use a greenhouse, you can disinfect it with a sulfur bomb. In any case, no matter what disinfection method you choose, the treated room must be closed for several days and then ventilated to completely eliminate the unpleasant odor.
 Figure 1. Cultivation in bags
 At this point, the preparatory stage for cultivation ends, and the future owner of a mushroom farm needs to begin preparing the substrate, mycelium and sowing the mycelium.
Preparing the substrate
Properly prepared substrate plays a key role in successful cultivation. It should be taken into account that in natural conditions these mushrooms grow on old tree trunks or on woody substrates, therefore, at home, it is necessary to create an environment that will closely resemble natural growing conditions (Figure 2).
Note: Sawdust, sunflower husks, chopped corn cobs or high-quality cereal straw can be used as a growing substrate. But the best option will use all these materials in combination, mixing them into a homogeneous mixture.
The main requirement for the substrate is that it must be completely sterile. This is necessary because untreated material may contain pathogens or pest larvae that can destroy the entire crop.
Substrate preparation is as follows:
- The mixture is poured with warm water and left for 20 minutes. At the same time the temperature environment should be about +25 degrees. Under such conditions, the substrate will be steamed and large particles of debris will be removed from it. For more uniform processing, it is recommended to stir the mixture periodically.
- Next, the dirty water is drained, the remaining material for preparing the substrate is squeezed out of the remaining moisture and re-filled with very hot water, the temperature of which should be about +70+80 degrees. A pressure is placed on top of the container with the substrate and left to soak for 5-7 hours.
- At the end of this period, the water is simply drained and the material is squeezed out of excess moisture.
 Figure 2. Substrate preparation
 The following actions are aimed at increasing the nutritional value of the substrate, since the volume of the harvest and the quality of the fruiting bodies will depend on this. To make the soil mixture more fertile, 0.5% urea, 0.5% superphosphate, 2% gypsum and the same amount of limestone should be added to it. Experts recommend pasteurizing each component separately, and only after that adding them to the finished substrate. In addition, during the mixing process, it is necessary to ensure that the humidity of all components is at the level of 75%.
Sowing oyster mushroom mycelium
When the substrate is ready, you need to take care of the containers in which it will be located. From a practical point of view, it is better to use large bags made of dense polyethylene for this purpose.
Note: Bags of any size are suitable for cultivation, so when choosing containers you should focus solely on the space of the room and the volume of the desired harvest.
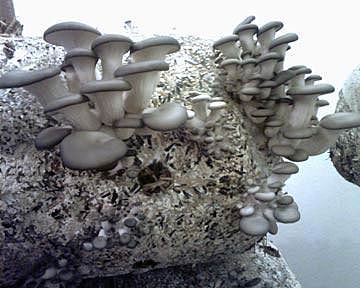
In each bag you need to make holes through which the fruiting bodies will grow. They are made in a chaotic order, but at a distance of 15-20 cm from each other, and the diameter of such holes should be about 2 cm (Figure 3).
When both the substrate and containers are prepared, you can begin directly sowing the mycelium:
- We fill the bag with 15 cm of substrate, after which we lay out a layer of mycelium, then we refill the bag with substrate and lay the mycelium again. It is necessary to fill the bag in this way until it is two-thirds full.
- It is important to ensure that both the substrate and the mycelium are distributed evenly.
- It is also necessary to control the humidity of the substrate: it should be within 75%.
 Figure 3. Mycelium sowing technology
 When the bags are filled, they are tied tightly and transferred to the cultivation room. They can be installed in rows or suspended from the ceiling on a short distance from each other.
Growing oyster mushrooms in bags at home
Preparing the substrate and sowing the mycelium are not the only tasks that should be performed to obtain a rich harvest. First of all, you need to monitor the temperature in the room. It should be maintained at +22+24 degrees, and the temperature of the substrate in the bags should be +28 degrees.
No less important role Humidity also plays a role: for the full development of fruiting bodies, it is necessary that the humidity in the room be at the level of 90-95%. In a room with such conditions, the bags should be kept until the first fruiting bodies appear. It is noteworthy that light is not required for mycelium germination.
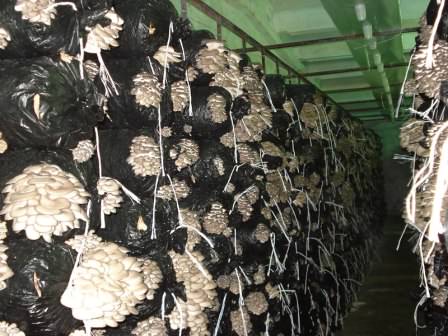
When the first small mushrooms appear on the surface of the bags, the bags need to be removed and moved to another room, where the fruiting bodies will develop. Here the bags are also placed at some distance from each other (Figure 4). It is recommended to leave such a distance that you can walk freely between the rows. This will not only make care easier, but will also ensure high-quality ventilation of the mycelium.
Technologies for growing oyster mushrooms in bags
Growing mushrooms in bags will be successful only if the rules of agricultural technology are strictly followed. First of all, this concerns temperature and humidity conditions. If the temperature in the mycelium germination chamber should be quite high, then in the room for the development of fruiting bodies it is slightly reduced. On average, the temperature should be at +12+18 degrees, and the humidity remains the same - 90-95%.
However, if you maintain the optimal temperature in the room simply using a supply and exhaust ventilation system, then maintaining the optimal humidity level is much more difficult. First of all, you can use special air humidifiers for this, but if you are not ready to spend extra money on purchasing such equipment, you can use more in a simple way. For example, to maintain humidity in a small room, it will be enough to place containers filled with water. If there are a lot of mushroom blocks, you can humidify the air from a stationary sprayer. At the same time, it is important to ensure that the liquid does not fall on the bags themselves or the young fruiting bodies of the mushrooms.
 Figure 4. Technology for growing at home
 At the final stage of cultivation, namely during the development of fruiting bodies, lighting will still be needed. In this case, there is no need to turn on too intense light: for the full development of mushrooms, lighting of 100-180 lux will be enough. In fact, this is the lighting that is typical for cloudy weather. At the same time, you only need to turn on the lighting for 12 hours a day.
In addition, for full cultivation in the room, it is necessary to provide high-quality ventilation. IN small rooms It will be enough to install several fans and turn them on for 5-7 hours a day. Ordinary open windows or doors can also successfully cope with this task. On an industrial scale, when growing oyster mushrooms, special supply and exhaust ventilation systems are used.
Other ways to grow oyster mushrooms
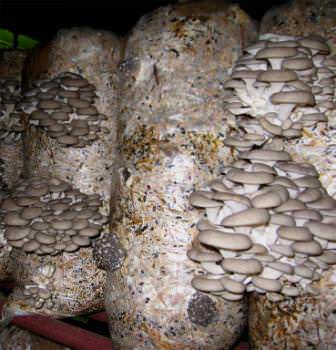
If you do not have a cellar, basement or other room suitable for growing, this does not mean that you cannot cultivate these mushrooms. You will be able to harvest in your own garden, as it is often practiced to grow oyster mushrooms on stumps or logs (Figure 5).
This method is especially loved by summer residents, because to implement the idea of cultivating oyster mushrooms on stumps, compliance with such strict rules is not required.
To grow oyster mushrooms using this method, you need to:
- Prepare a sufficient amount of wood. These can be old stumps or logs, and it is better to give preference to linden, willow or poplar.
- The wood needs to be well moistened and several holes made in it.
- We pour the mycelium into the grooves made and cover it with particles of tree bark.
- Next, we place the logs with the seeded mycelium in a shallow hole, at the bottom of which there are sawdust and dry leaves.
 Figure 5. Features of cultivation on logs
 Such a bed needs to be covered with film and watered periodically so that the soil and the logs themselves do not dry out. It will be possible to pick mushrooms from such a bed in just a few months, and fruiting will continue for 3-5 years.
The technology for cultivating oyster mushrooms in bags is shown in more detail in the video.
In the greenhouse - very interesting topic, which we have already talked about. But we came up with the idea of growing oyster mushrooms at the dacha. To what extent this is possible and what is necessary for growing oyster mushrooms in the country, we will consider now.
Oyster mushrooms are an excellent and fast-growing type of mushroom, which for many has become not only a product of their own production, but also an industrial crop that has firmly occupied a certain niche in the market. By and large, such mushrooms are inexpensive, and you won’t earn much by growing them in your dacha in small quantities, but you can always organize a small “bed” in a certain room and get paid every day. fresh mushroom for your own needs. Boiled, fried, stewed, pickled, mushrooms in a salad or fried - all this will no longer be a problem if you start growing them in the country. Of course, there is the organization of a place for production and some start-up expenses ahead, but then - no problems, and only fresh and aromatic mushrooms every day.
Growing oyster mushrooms in the country
The technology for growing oyster mushrooms involves a special algorithm that you must follow at first, but in the future do not forget about the main points. In principle, everything ingenious is simple, and in order to grow a decent harvest, you will need to fulfill only the simplest requirements.
Selection and preparation of premises for oyster mushrooms
To grow mushrooms, we need to choose a room in the country that is not currently in use. It is advisable to identify exactly the one that is not planned to be used in the near future. This could be a basement, a cellar, a special hole in an old garage, or a newly equipped room specifically for a small business.
Having chosen a room, it is necessary to prepare it for use and disinfect it. It will be enough to thoroughly treat all surfaces of the room with a 4% lime solution. After treatment, the room should be hermetically sealed for a day or two. Afterwards, ventilate well until the smell goes away completely.

It is worth taking into account the fact that two rooms must be prepared in this way - the germination room and the plant room.
Preparing the substrate for growing oyster mushrooms
Any of the presented materials can act as a substrate. These are sunflower husks, sawdust, corn cobs, and cereal straw.
We recommend using chopped straw or husks, or a mixture of these materials, for mushroom production. Initially, we will need pasteurization of straw, husks or a mixture of them and the preparation itself. You can do it as follows:
- Our mixture or individual material is poured with warm water for 20 minutes, at a temperature of no more than +25°C. All this time the mixture can be stirred, as if rinsing it;
- Afterwards, you need to drain the dirty water from the pasteurization container, squeeze out the mixture and fill it with hot water, at +70+80°C, set pressure on top for 5-7 hours, and then simply drain the water and squeeze out the straw and husks;
- Now, in order to increase the nutritional value of the substrate, and hence the fruit formation in it, we need to add additional components. We choose 0.5% superphosphate, 0.5% urea, 2% gypsum and 2% ground limestone;
- When adding additives, their humidity should be kept at 75% so that the additives are not simply washed out with water. Also, you can pasteurize the additives separately and only then add them to the substrate.

Preparing bags for the production of oyster mushrooms
To grow high-quality mushrooms, we need to plant them not only in a high-quality substrate and maintain agricultural technology, but also prepare the correct container for oyster mushrooms, that is, bags.
There is nothing complicated here, and any plastic bags can be used to grow oyster mushrooms in the country. For example, bags 40x60 cm or bags 50x100 cm. Next, we will need to make holes through which the mycelium will “serve” fruits to us. Holes in the bags for oyster mushrooms are made 15-20 cm apart, in a chaotic manner. We need holes 1.5-2 cm in diameter.
We place the substrate in bags and populate the mycelium
The finished substrate is poured into a bag. The first layer is 15 cm, then the layer, the next layer is 15-20 cm, and again the mycelium layer. This must be done until the bag is 2/3 full. The main thing is to lay the substrate and mycelium evenly, and spend about 5% of the mycelium of the total weight of the bag on each bag. Please also note that the average moisture content of straw with husks should be 75%.
After filling the bags, they are tied and transferred to a prepared room, where they are placed on top of each other in rows of 2-3 bags, or simply hung.
Growing oyster mushrooms, caring for mushrooms
The temperature of the germination room must be strictly regulated and remain at a level of about +22+24°C, the temperature of the substrate in bags should not exceed +28°C. It is also necessary to monitor the humidity in the room - 90-95%. The interesting thing is that for germination and “complete infection” of the substrate with the fungus, no lighting is required.
After the substrate is overgrown with mycelium, the bags are transferred to the second room - the plant room, where fruiting will occur.
The bags are placed over the area and on top of each other, but not tightly, so that you can walk between them and also have good ventilation. For example, you can install 3-4 bags for each square meter premises. But there is another way that will save space, or rather, make it more useful. To do this, you will need to install special stakes - bases for bags with substrate, on which you can put several bags at once. Also, the bags can simply be hung from the ceiling.
Fruiting of oyster mushroom
Fruiting of oyster mushrooms occurs only with strict adherence to agricultural technology. It is necessary to maintain the temperature at +12+18°C, humidity at 90-95%. Soon, so-called mushroom plugs should appear in the openings of the bags - oyster mushroom embryos, which will form the fruiting bodies of the mushrooms in the future.
The required humidity must be maintained at all times. This can be done using special installations, or independently, using standard sprayers, or installing several containers filled with water in the room.

If you irrigate indoor air, you must avoid getting water on the bags or forming even small puddles on the floor.
Now we will need lighting, which should work exactly half the day. Don’t worry, there won’t be any significant energy costs, since only 100-180 lux is enough, approximately the same as in cloudy weather. Standard fluorescent lamps can be used to illuminate the growing room.
Don’t forget that oyster mushrooms prefer ventilated rooms with fresh air, which means we need high-quality ventilation. To comply with the requirements, you will have to provide the growing room with special equipment (if the cultivation is large-scale and for business), or conventional fans if the room is small. It will be enough to open windows and doors and turn on fans 5-7 times a day.
Remember, the concentration of carbon dioxide in the room should not exceed 1%. In addition, be very careful about your own health, because mushroom spores during fruiting can cause coughing and even serious allergic reaction. Take care of yourself and use special protection - masks, respirators.
Oyster mushrooms - a simple and profitable business (video)
How is oyster mushroom harvested?
The oyster mushroom stretches closer to the holes that we made, but the mushrooms do not always fall exactly into them. Therefore, it is necessary to help the mushrooms get out - cut holes in the bags, making them a little larger. Once the mushrooms emerge, they take about 6-8 days to grow to the point of cutting.
Mushrooms should be cut carefully, without leaving particles of oyster mushroom fruiting bodies on the bags. You can use mushrooms immediately, but if you need to store them, you will need to use special containers or plastic packaging.
After cutting the mushrooms, the next harvest will appear in two weeks, and the next one in another two. Let's put it simply - there are three waves of harvest, which make up the total harvest in the corresponding percentage – 70%, 20%, 10%.
The value of the substrate in terms of the weight of the finished product is approximately the following - from 10 kg of substrate for the entire rotation you get about 3 kg of oyster mushrooms.

Growing oyster mushrooms in the garden
Growing mushrooms in the basement is always interesting, but today we want to present you with another way so that you can easily grow oyster mushrooms on stumps or logs. What’s good is that when using this method you will not need special equipment to grow oyster mushrooms. Also, it will not be necessary to use the technology for growing oyster mushrooms very strictly, because oyster mushrooms in the country grow very well.

As you can see, this simple method gives us the opportunity to grow oyster mushrooms in the country with our own hands.
Advantages of growing oyster mushrooms in a summer cottage
- It is possible not only to grow them in the warm season, but also to grow oyster mushrooms in winter, in basements, cellars or other specially equipped rooms.
- Low start-up costs, stable yield.
- Always fresh and environmentally friendly product.
- Stable increase in yield at will, and accordingly, a gradual transfer of hobby into business.

How to grow oyster mushrooms on stumps (video)
Oyster mushrooms, cultivation and care, technologies for forcing and harvesting - now these phrases will not scare you, but will only delight you with the memories that you were able to start such a pleasant event, as well as get an excellent harvest of mushrooms and bring it to a constant level .
In bags, it makes it possible to collect stable harvests regardless of weather conditions. To do this, it is enough to allocate a small suitable room for a mushroom project and study the intricacies of home mushroom growing. And this article will help you figure out the last point.
How to grow oyster mushrooms in bags: preparing the substrate
Mushrooms grow well on the straw of rye, barley, wheat and any other cereal plants. In addition, sunflower husks, buckwheat husks, hay or sawdust can be used as a substrate. Before processing, the substrate must be cut into pieces from 3 to 7 centimeters. The fact is that smaller pieces are easier to ferment and the mycelium grows faster.
The preparation of the substrate for growing oyster mushrooms in bags is carried out in several stages:
- Make sure you have everything you need on hand - straw (or any other suitable plant materials), a large clean container (tank, barrel with a lid) and some heavy object (for example, a brick) that will be used as a load, and also very hot water(optimal temperature is from 85 to 90 degrees).
- If you have several types of substrate, then you need to mix them thoroughly before placing them in the container.
- After this, place the materials in the tank, lightly compact its contents and place the previously prepared load on top.
- Fill the container with water at the above temperature, close it tightly with a lid and cover it with any rags (old blankets, coats, etc.) for better heat retention. By the way, if you use a metal barrel for these purposes, you can fill it with plant debris, fill it with water and simply light a fire under it.
- Depending on the initial state, the substrate is disinfected within 3 to 18 hours. In general, the fresher and purer it is, the shorter the holding time should be. In the case of husks, it is enough to steam it for just two to three hours.
The thermal shock effect destroys the vast majority of harmful bacteria living on the surface of the straw. In addition, this treatment helps soften and moisten the substrate (straw, hay, husks, etc.).
After processing is completed, the substrate should be laid out on a clean, preferably inclined surface (for example, a table or ordinary garden film) and wait until it cools completely. The tilt is needed to help remove excess moisture.
Sowing (inoculation) of oyster mushroom mycelium
 As the substrate cools to 20-25 degrees (this usually happens 15-30 minutes after removing the straw or husk from the tank), you can begin its inoculation, that is, sowing the mycelium.
Ideally, the moisture content of organic materials should be about 70%. It is very simple to control this parameter - when you squeeze the substrate into a fist, moisture should only ooze slightly through your fingers, but under no circumstances should it drip.
This work should be carried out in a perfectly clean place. To disinfect the room in use, its walls, ceiling and floor must be wiped with an aqueous solution of “Belizna” or any other similar product.
You will also need transparent polyethylene bags. The thickness of polyethylene should be from 70 to 80 microns, and the dimensions of the bags should be 40 x 100, 40 x 80 or 35 x 75.
The film must be perforated (simply - make holes or cuts in it) so that the area of open areas does not exceed 3-6%. On average, one bag should have from 10 to 20 perforations or from 20 to 30 cuts, each three to four centimeters long. Holes and cuts are staggered according to a pattern of 8 x 8 or 10 x 10 centimeters.
After this, putting on a sterile gown, you can begin filling the bags and sowing the mushrooms. Place the substrate on the bottom, crush it thoroughly, then add the mycelium in a loose layer, then another layer of substrate, and so on, until the entire bag is completely filled. As a result of such actions, it should have at least 10-12 layers of mycelium. After this, the bag must be tied tightly.
The mycelium is distributed over the surface of the straw (husk) so that 70-80% of its quantity is located near the walls of the bag and only the remaining 20% should be in its center.
Also make sure that the packing of household items is dense enough - you should try to fit at least 0.4 - 0.6 kilograms of substrate into each liter of bag. In this case, for every kilogram of substrate you will need from 50 to 60 grams of mycelium. Thus, for a 12-liter bag you will need approximately 250 grams of oyster mushroom mycelium.
Also note that the speed of its growth will depend on the number of layers of mycelium - the more there are, the better. Therefore, spare no effort in the process of compacting the substrate.
By the way, mushroom growers call a bag filled with straw and mycelium a “block”.
Growing oyster mushrooms in bags at home
 Then the blocks are transferred to a dark room with a temperature of +18 to 20 degrees and a humidity of 80 to 85%. Don’t forget to also cut off the corners of the bags to drain excess water. During this period, the place where the blocks stand does not need to be ventilated, and the substrate in bags does not need to be watered.
The air in the room with the blocks should not warm up to a temperature above +24 degrees - in such a situation, the temperature in the internal parts of the blocks can increase to +30...35 degrees, which will inevitably cause the death of the mycelium.
Already on the second or third day after sowing, a web of tiny white threads will form around the mycelium grains, which are nothing more than the hyphae of future mushrooms.
If the technology described above is followed, in two to three weeks the mycelium will grow to cover the entire volume of the blocks and it will acquire a whitish or slightly yellowish tint. From this point on, the block is allowed to stand for another 1.5 - 2 weeks, during which a sufficient nutrient supply will be created in it.
Keep in mind that if mold spores accidentally remain in the bag, they will compete for food with oyster mushrooms and yield edible mushrooms will decrease significantly.
As soon as you notice that small swellings begin to form near the perforations in the bags (these are the beginnings of fungi, which are also called the funny word “primordia”), it’s time to move the blocks to a new location.
Oyster mushrooms are grown at home in a bright but cool (temperature from +14 to +16 degrees) room away from direct sun. The northern wall of the house, a flat area in the garden under trees, a basement or a shed with windows are well suited for this (it will be quite enough if the mushrooms are illuminated for two to three hours a day). Or you can build a special small “mushroom” house on the site with a slate roof and walls made of thick film with ventilation windows made in it.
During ripening, spores appear on the fruiting bodies, which resemble plant pollen in characteristics. They are strong allergens for people, so growing oyster mushrooms indoors is not recommended. In addition, it is difficult to maintain high air humidity in an apartment or house, and this will not add comfort.
 After just a couple of days, these primordia turn into full-fledged oyster mushrooms. To stimulate this process, some mushroom growers use increased temperature. Just keep in mind that this noticeably worsens the quality of the resulting harvest - the caps become light brown, and the flesh of the fruiting bodies becomes flabby. During this period, it is especially important to maintain optimal humidity and temperature at the location of the blocks. Poor ventilation and high dry air not only causes a sharp drop in yield, but also leads to the appearance of small, light-colored mushrooms with curved legs and underdeveloped caps.
However, you should not pour water on nascent mushrooms, as this can cause their death. To ensure optimal air humidity in the room with the blocks, the walls and floor are watered, and special installations are turned on to create water mist.
Oyster mushrooms begin harvesting when the edges of their caps are straightened. Mushrooms are cut off in splices.
Fruiting occurs in waves with an interval of 5 to 7 days and lasts from two to three weeks. In this case, the maximum yield is produced by the first two or three waves. On average, you can expect to get from 350 to 400 grams of mushrooms per kilogram of substrate.
After harvesting, oyster mushrooms are carefully placed in paper bags or plastic containers with holes and stored on the bottom shelf of the refrigerator (at +4 degrees) for no more than two to three days. Before heat treatment, the fruiting bodies are thoroughly washed under the tap, slightly dried, cut into strips, and, adding onion rings or chopped garlic, fried in sunflower oil for 10-15 minutes. Oyster mushrooms stewed in sour cream or cream are also very tasty.
Growing oyster mushrooms in bags allows you to provide the whole family and relatives with fresh food for a long time. dietary product. In addition to stable yields, the advantages of this method also include the fact that harvesting can be calculated by a predetermined date.
Growing oyster mushrooms at home in bags not only provides fresh, useful product to the table. This exciting activity often becomes a hobby that generates additional income, or grows into a business. Home care for oyster mushrooms is simple, and the high nutritional qualities ensure the mushrooms' continued popularity.
How to grow oyster mushrooms in bags
Independent home production convenient because a stable harvest can be obtained regardless of the weather or time of year. Knowing the characteristics of mushroom growth in bags, it is possible to plan the harvest by the required date.
Growing oyster mushrooms at home is a labor-intensive but not complicated process. To obtain homemade mushrooms you will need a small room, a set of simple equipment and knowledge of several growing principles.
Preparing the premises
For home production of oyster mushrooms in bags, any premises where it is possible to create an appropriate microclimate are suitable. This could be a cellar, basement, veranda, pantry or extension. An important principle for successfully growing oyster mushrooms in bags at home is maintaining sterility.
For disinfection, you will need a solution of ordinary lime (4%). The composition is applied to the walls, ceiling, floor and the room is closed for 24 hours. Then ventilate the room until the smell disappears completely and all surfaces dry.
Growing oyster mushrooms at home in bags requires high humidity and constant temperature. It is necessary to ensure a flow of fresh air and light. If there is no access to the sun, artificial lighting will be sufficient.
Necessary equipment
For cold rooms when growing in bags, it is worth purchasing a heating device and additionally insulating the walls and floor. To control the constancy of the microclimate, you will need a thermometer.

Direct Sun rays harmful to oyster mushrooms. When growing mushrooms in bags at home, it is enough to equip the room with fluorescent lamps.
Conventional spray bottles are often used to maintain humidity. When producing oyster mushrooms at home for sale, modern air humidifiers are used, based on steam generation or fine spraying of water.
For ventilation when growing in bags, you can equip supply and exhaust ventilation. In a small home room, a household fan will do the job perfectly.
Selection of bags
For home cultivation of oyster mushrooms, choose translucent plastic bags with a wall thickness of about 70 microns. Should be given Special attention the strength of the packages if it is decided to hang them on supports.
The size of the bags depends on specific home conditions and may vary. The most convenient for home growing are bags from 40*60 cm to 50*100, with a minimum capacity of about 5 kg.
Buying mycelium
Seed material (mycelium) is purchased at garden centers or at enterprises that grow oyster mushrooms. Using the industrial method, the mycelium is used for no more than 12 months and then sold. It can bear fruit for a long time at home.
Important! High-quality mycelium for growing in bags from the store has a yellow or orange color, without dark inclusions or spots.

The mycelium, from purchase to use, must be stored in the refrigerator. Before planting, it is kept at room temperature for at least a day. Knead without breaking the packaging and send it to a room prepared for growing at home. This gradual warming protects the material from temperature shock.
Substrate for planting
You can find store-bought ready-made substrate for growing different types of mushrooms. Preparing the mixture at home is no less effective; oyster mushrooms in bags will be more profitable, and their production will be significantly cheaper.
Suitable raw materials:
- Wheat or barley straw is considered the best substrate for oyster mushrooms.
- Buckwheat hulls or sunflower seed husks will require minimal heat treatment.
- Corn stalks and cobs should be chopped before packaging into bags.
To grow oyster mushrooms on sawdust in bags, it is recommended to use only hardwood. Mycelium does not grow well on coniferous wood with a large amount of resin.
Comment! Sawdust that is too small cakes and does not allow the oyster mushroom mycelium to grow freely. It is recommended to mix such a substrate with larger fractions.
You can create a mixture of these components in any proportions when growing in bags. The exception is sawdust. When using chopped wood at home, impurities should not be more than 3% by weight.
Preliminary preparation of the substrate when growing in bags:
- steaming in water with an initial temperature of about 70 °C for 5 to 6 hours (for husks and husks);
- if possible, boil the mixture for about 2 hours (for straw and sawdust);
- squeezing the substrate to a state where water does not flow, but slightly oozes through clenched fingers (about 75% humidity);
- it is useful to enrich the home mixture with urea and superphosphate, taking no more than 0.5% of each fertilizer;
- limestone and crushed gypsum are mixed at the rate of 2% of the total mass.

If you purchase the mixture for bags ready-made, be sure to read the directions on the package. Homemade oyster mushrooms, honey mushrooms, and champignons require different compositions.
Forming mushroom blocks
Oyster mushrooms in bags are grown in the form of blocks that replace beds. The bags are filled according to certain rules, which speeds up the growing season and increases the home harvest.
Principles for forming blocks at home:
- The bags are filled with substrate and seed material in layers. The nutrient mixture is laid first (about 5 cm), and the mycelium is thinly distributed on it. The layers alternate and the substrate is left on top.
- For 1 kg of mixture when grown in bags, up to 60 g of mycelium is used. For a bag with a capacity of 10 liters, at least 200 g of mycelium are consumed.
- Oyster mushroom mycelium in bags is distributed so that most of it (up to 80%) is near the walls; the remaining amount is added to the center.
- Laying should not be loose: per 1 liter of volume - 0.5 kg of mixture.
- The bags, 2/3 full, are tied tightly and small holes (up to 2 cm) are cut, placing them every 10 cm.
Important! The rate of mycelium germination at home depends on the number of layers. The more mycelium, the faster it ripens.
How to care for oyster mushrooms in bags
The formed blocks are stored without access to light; the mycelium matures at a constant temperature from +18 to +23 °C. The incubation period accelerates if the room is not ventilated. There is no need to water the ripening blocks. In 10–14 days, the mycelium grows, the contents of the bags acquire White color, a characteristic mushroom smell appears.
Home incubation of oyster mushrooms is completed three weeks after planting. The room can be ventilated or the blocks can be moved to another location. Sprouted oyster mushrooms in bags will require certain humidity, temperature and lighting.
Temperature and humidity
The permissible temperature range for growing oyster mushrooms is quite wide: from 16 to 30 °C. It is important to maintain the initial conditions at the same level throughout the entire period. Allowable fluctuations are no more than 2 °C, otherwise the crop may die.
Comment! The color of oyster mushrooms depends on the growing temperature: at +20 °C the caps are light, at +30 °C they are much darker.
Humidity at home growing should not fall below 50%. Optimal indicators for rapid growth oyster mushrooms from 70 to 95%.

The emergence of seedlings is indicated by bumps on the bags that form next to the holes. Young oyster mushrooms collected in clusters are called mordia by mushroom growers. With their appearance, intensive irrigation of the bags begins.
How to water oyster mushrooms in bags
When grown in bags, mushrooms do not require watering with a substrate for active growth. In home nurseries, the goal is to create a very humid microclimate. The muzzles emerging from the bags are capable of increasing to removable sizes in a matter of days. Moist air is sufficient for this.
Watering oyster mushrooms in bags is done twice a day. Packages with substrate, floors and walls are sprayed manually, or special units are used. You can install open containers of water near heating devices. Small home production can do without special humidifiers.
Important! The room where oyster mushrooms are grown is constantly filled with many fungal spores - the strongest allergens. Wear a mask and safety glasses while working.
How to cut oyster mushrooms from a bag
Mordia are formed near the holes. To allow them to grow freely, the cuts on the bags are widened. Most often, homemade oyster mushrooms are ready for harvest in 5–7 days.
Thus, the first harvest can be obtained 40–45 days after planting. It will account for 70% of the total fertility of the block. The next wave of oyster mushrooms will be ready for harvest in 14 days (about 20%). The third harvest per bag (10%) is expected in two weeks.
In order to obtain oyster mushrooms without loss, they must be removed from the bags correctly without damaging the mycelium. Features of the collection:
- oyster mushrooms are cut with a sharp knife with a thin blade (a stationery knife will do);
- mushrooms are removed in clusters, which extends the period of home storage;
- Several young oyster mushrooms are left from each family to prolong the growing season.
The amount of home harvest directly depends on the volume of the package. From a bag weighing 10 kg you get about 3 kg of oyster mushrooms.
Storing oyster mushrooms
If the mushrooms are not used immediately, they will require storage containers. It is best to use plastic containers, packing up to 1000 g each.

Shelf life of homemade oyster mushrooms at different temperatures:
- V room conditions without cooling – up to 24 hours;
- oyster mushrooms remain in the refrigerator at +5 °C for 4 days;
- temperature -2 °C increases shelf life up to 20 days;
- freezing preserves oyster mushrooms for six months;
- deep freezing (-18 °C) – for a year.
Before storing, it is not recommended to moisten homemade oyster mushrooms, otherwise they will absorb water and quickly lose their shape and consistency.
Difficulties in growing
Following the rules does not always guarantee a bountiful harvest of oyster mushrooms. The main enemy of home plantations is damage by mold, mildew, and fruit midges. The main cause of infections is an infected block or its overwatering.
If any disease is detected, the bag is completely thrown away, the room is washed, cleaned, and disinfected. You can treat all surfaces with a sulfate solution, and then whitewash the walls and ceiling with copper sulfate added to the lime.
If there is insufficient ventilation or waterlogging of the unit, fruit flies may appear inside. Then the bags are removed, and the cleaned room is fumigated with a sulfur smoke bomb.
Warning! If an infected bunch is found with spots, pits, softening, or darkening of the stems, the entire block is thrown away. The substrate is not reused.
If the block does not bear fruit, and searching through the bag did not reveal any diseases, the reason for the lack of harvest may be poor-quality planting material.
How to grow oyster mushroom mycelium yourself
The lack of germination can be detected only after several weeks of labor and expense. Therefore, experienced mushroom growers try to grow their own, homemade mycelium. It is usually produced by specialized laboratories, but all steps can be repeated in a regular kitchen.
The easiest way to grow mycelium is on cereal crops. Pre-crushed grains are boiled for 15 minutes. All surfaces, vessels, and devices are treated with alcohol for disinfection. You need to work with gloves.

Home production is divided into three stages:
- Uterine mycelium. Produced in a test tube with crushed grains, adding pieces of oyster mushroom taken close to the cap. Fungus samples are dipped in hydrogen peroxide, added to a nutrient medium, and hermetically sealed. After 14 days, at room temperature, a white edge will appear - royal mycelium.
- Intermediate mycelium. It is grown on grains with the addition of chalk and gypsum (2 tablespoons of each additive per 1 kg of cereals). The jars are filled to 2/3 of the volume with the nutrient composition and a mother culture is added. The vessels are tightly sealed and left for 2 weeks. During this time, the jar of grains will be filled with fresh edging.
- Seed material. The substrate is disinfected as standard and placed in sterile containers. The intermediate mycelium is added to the mixture. They wait until it is completely overgrown with white edges. Now the home mycelium is ready to be placed in bags for growing oyster mushrooms.
Mycelium is capable of germinating at any stage of production. But it is compliance with the full cycle that ensures a large number of cheap, high-quality planting material.
Conclusion
Growing oyster mushrooms at home in bags is a fairly simple process, accessible even to beginners. Experienced mushroom growers advise performing the first cycle of distillation from a small amount of mycelium in several bags. After making sure that all the rules are followed, you can proceed to mass production.
Related Posts
There are no similar entries.