Drawing lessons for younger students
Master class on drawing. “In a flower meadow. Ladybug"
Purpose: A series of drawing lessons for primary schoolchildren “In a flower meadow”: “Ladybug”, “Bee” and “Butterfly”
Drawings can be used to decorate the interior or participate in a competition, or as a gift.
Target: development of children's creative abilities through artistic and visual activities.
Tasks:
teach children to draw an expressive image of a ladybug in a flower meadow
strengthen children's skills in working with wax pencils and watercolors;
develop spatial thinking and imagination;
show children the opportunity to compose a panoramic collective composition from a large number of drawings, cultivate interest in co-creation;
to cultivate the ability to see the beauty of nature, to understand its fragility, to evoke a desire to protect
The nature of our planet is our wealth, which we must appreciate. Our task is to preserve all the diversity and richness of nature. Let us admire our nature as a song! Let's become her friend and take care of her!
After all, protecting nature and preserving it means loving your native Earth.
Have a carefree summer
Golden time
Festival of sun and light
Gives joy in the morning.
Nothing is more beautiful
In the grove of birdsong,
Yellow-eyed daisies
Snow-white eyelashes.
Cornflowers bright blue
In the emerald grass
And lilac haze
Above the river at dawn.
Ripe raspberries
Sweet juice on lips
As a sign of July
In the forests near Moscow. (I. Butrimova)
How nice it is in the summer on a green water meadow! Among the lush grasses, there are bright fragrant flowers. Elegant butterflies, bees and bumblebees flutter above them.
Among the magical space
I'll get lost from the soul!
There is so much beauty here, here is the kingdom
Have a wonderful fairytale dream!
The whole meadow is replete with fragrance and breathes,
Bees and bumblebees sing here,
And the butterflies are in the highest whirling
They are looking for those flowers in delight,
That they are given the sweetest nectar! -
How delightful everything is here! -
The flight of the soul is the highest here! -
His name is happiness! (N. Klubnichkina “In a flower meadow”)
Today is the first lesson. You will learn the plot of our drawing from the riddle rhyme:
I'm a harmless bug -
neither an ant nor a cockroach!
I don't moan or butt,
although I call myself a cow!
Mustaches instead of horns
on the back, like beads,
black peas,
as if abandoned by someone.
I'm a ladybug
I'm sitting on chamomile!
There are a lot of us
we are all like twins!
Carrying me away
to the wildflower
red wings
V black dot! (N. Ileva “Ladybug”)
That's right, we will learn to draw a ladybug on a daisy. From time immemorial, chamomile has been a symbol of Russian nature. At the ancient Slavic people it was considered one of the 7 sacred plants - hazel, chamomile, oak, hops, weeping plant, willow and mistletoe.
The name chamomile comes from the Latin word meaning “Roman” when translated into Russian. In the medical literature of the Middle Ages it was called “Romanov’s flower.” IN Ancient Egypt The chamomile was dedicated to the sun god Ra. And the Greek name translates as “ White color OK".
For work we will need: album sheet, colored wax pencils, brush (squirrel or pony No. 2), water glass, watercolor.
Place the album sheet horizontally. Let's start working from the center of the sheet.
First stage.
Take a red wax pencil and draw an oval. Let's draw an arc in the middle.
Using a black pencil, draw an arc - this will be the head. On the red oval, in random order, draw small circles and dots.
Let's draw eyes and antennae. Our ladybug is ready.
Using a yellow wax pencil, draw an oval. This will be the middle of the chamomile.
We begin to draw the petals with a blue pencil. In shape they resemble elongated ovals of irregular shape.
Let's complete the composition with green leaves.
Second phase: let's decorate our drawing using watercolors. Let's start with the ladybug. I suggest taking two shades of red. In my case, this is dark red kraplak and scarlet watercolor.
We will draw “raw”. To do this, you need to moisten the desired area and inject paint there. The watercolor itself will begin to spread across the water in a random order, and adding an additional shade will create a unique pattern. The main thing is not to mix the paint, but to let it spread on its own. The wax pencil will hold water and paint in the area of the drawing we need.
Paint the ladybug's head with black paint.
For the center of the chamomile, I suggest using three watercolor colors: golden ocher, yellow and orange.
Wet the entire yellow oval and apply yellow watercolor around the edge. Then we will add golden ocher and finally orange.
A real chamomile has snow-white petals, but in our drawing they won’t turn out that way (unless you paint it over, but then the work will look unfinished). For the petals, I suggest using lemon and turquoise watercolors - in the sun the white color takes on different shades.
Since water dries quickly, I suggest moistening not all the petals, but only four to begin with. Introduce lemon color closer to the center of the flower.
Insert turquoise into the free part of the petal.
Now let’s moisten three more petals and introduce turquoise closer to the center, and a lemon tint around the edges.
Alternating watercolors in this way, paint over the remaining chamomile petals. Changing colors creates volume and gives movement to the petals.
Use yellow paint to paint over the free space between the petals in the center of the flower.
For the leaves we use two shades of green: viridon green and yellow-green watercolor.
This is what our work looks like in general.
Now let's add green grass at the bottom of the leaf. To do this, moisten the bottom half of the sheet and paint it with yellow-green watercolors. Then we introduce viridon green.
Draw a sunny sky at the top of the sheet. To do this, take scarlet, lemon and turquoise watercolors.
Working “raw” we gradually introduce all three colors.
It is the raw drawing technique that can create such smooth transitions.
Let's paint our ladybug's eyes and dots on her wings with purple watercolors.
Third stage: drawing small details with wax pencils. Using a dark green pencil, draw the veins on the leaves and you can outline the leaves.
Below we will draw blades of grass.
Our drawing is ready.
I'm sitting on a bench, looking at a daisy,
A funny little bug wanders quietly through it,
Six legs, whiskers and a red back,
There are three spots on the back - God's little beast:
I will NOT tell fortunes using chamomile today!
After all, where can a beautiful Bug crawl then?....
I will carefully take the chamomile by the stem...
I’ll take the handsome Bug to the meadow,
There are a lot of daisies there! And clover and porridge!
Her MOST FAVORITE BUG is waiting there!!! (Irina Il “To the ladybug!!!”)
If you put all the children's works in one row, you will get a whole chamomile meadow with ladybugs(panoramic team work). Or you can put the drawing in a frame and give it to someone.
Ladybug - red bug,
The daisy sat on a petal,
Fashionista of the field - daisy, so glad
Red brooch on a white outfit.
He nods his head to his girlfriends:
“Look! Look! Now it will fly away!” (L. Aleinikova “Red Brooch”)
Here are some children's works.
I wish you creative success!!! Until we meet again in the flower meadow.
Why do you need this kind of drawing?
- Unlike traditional drawing, a child has much more opportunities to show and develop his creative abilities, fantasy, and imagination.
- The child learns to work with different materials.
- By feeling materials and textures, he develops fine motor skills.
- In the process of work, the child becomes familiar with volume, texture and space.
- The child works with color, learns to mix and match colors, and develops artistic taste.
- Unconventional drawing calms and captivates, promotes the development of perseverance, and encourages the search for non-standard solutions.
- There is no word “impossible” in this type of activity. We saw cones, leaves, berries, a tea bag - all this can come in handy.
- Drawings using non-traditional techniques are obtained much faster than conventional ones. This plays a huge role for young children when they lack perseverance and patience to complete their work.
- Such activities add confidence in yourself and your abilities, and simply bring great pleasure.
Drawing with fingers and palms
Usually this is the first technique with which children begin to draw even before going to kindergarten. The drawing comes out very quickly, and this is extremely important when working with very young children. Dip your child's hand into the paint and let your child make an imprint on the surface. See what it's like. Perhaps it is some kind of animal? Ask your little one what needs to be completed to get the finished image. Maybe ears, nose or tail? the missing details can be drawn with your fingers. It is much easier to control your fingers and palms than a brush. And therefore more interesting for young children.
For this you only need Finger paint. If your child is still very small, don’t even doubt that he will be covered in paint. Therefore, it is better to immediately send him to the bath and give out the paints there. Don't worry about repairs. Good finger paints will be easily washed off both the bathtub and the tiles.
These paints are good, but expensive. One package costs about 500 rubles. He grabs her several times. After all, children do not stand on ceremony with any materials and scoop up not as much as they need, but as much as they can fit into their hand.
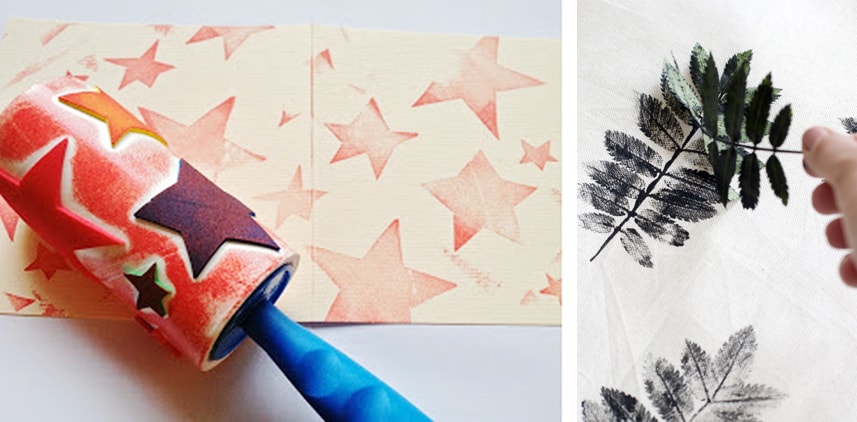
Stamps
Also quite a popular technique for early ages. You will need any object that you don’t mind and gouache or any other paint (but it’s better not to take watercolor). The technique is simple - dip the object in paint and make an imprint on paper.
Stamps can be made from apples, potatoes, wine corks, threads, pine cones, shells and many other materials. The easiest way to make this is with potatoes if you have metal cookie cutters. Simply press the mold into the potatoes and carefully trim the excess pieces around the edges with a knife.

It can be made even simpler. Take a small box, sponge or cork, glue various materials to the side surface or wrap it with threads in a chaotic manner.
Rollers with a pattern are also of interest. They are sold in construction and craft stores.
The leaf prints are especially delightful. Select leaves of various shapes, paint them and press them onto the paper. The entire texture of the sheet will be clearly imprinted on the paper.
Drawing with foam rubber
We all tend to think that we can only paint with brushes, but this is not true. For creative work, foam rubber is also quite suitable. Cut a small piece of a regular sponge and give it to your child. Foam paint prints turn out completely different from brush strokes. They have their own texture and a large coverage area. In just a couple of minutes you can create a beautiful background using just two or three colors. And using stencils you can create amazing ornaments.

Painting with a hard semi-dry brush
This technique is used for drawing spiky and fuzzy objects. You will need a hard brush and gouache. An unnecessary brush will also work. We don’t wet the brush, we immediately dip it into the paint and paint. This technique will be useful in school when drawing animals. In the meantime, you can show your child how to draw, for example, a Christmas tree.
Drawing with watercolors on wet paper
To do this, you will need a sheet of thick paper (preferably watercolor), the watercolor itself and a brush. Moisten the entire sheet evenly with water so that it is thoroughly wet, but not so that there are no puddles. Put some paint on your brush and start creating. Any stroke spreads one to two centimeters across the paper. Now is the time to show your child how colors are mixed and explain what shades are.
If the paint does not want to spread, then the sheet is dry; if it spreads in all directions, it is too wet. We need to find a middle ground. In this lesson, show your child that all movements are made easily and smoothly. There is no need to press the brush into the paper, as many children like to do. A light touch is enough.
The web in the right picture was drawn using a wax candle. Read about this below.
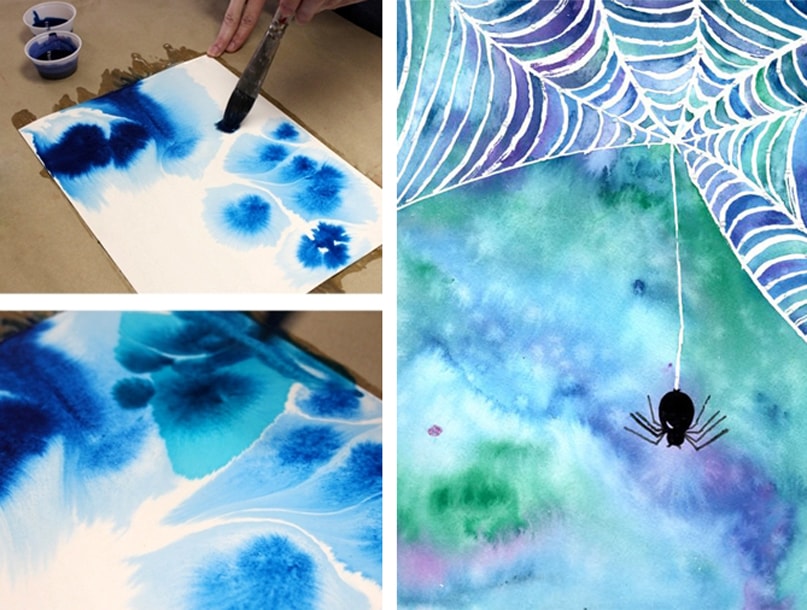
This technique works well for drawing backgrounds. Especially water. And after drying, you can continue to draw fish and algae as usual.
Wax and watercolor painting
The child draws lines, patterns, etc. with wax crayons, then covers the entire sheet with watercolors. Areas where wax is applied do not overlap with watercolor. It turns out to be quite an interesting background. For the same purpose, instead of wax crayons, use a regular colorless candle. Since the candle lines are not visible on the white paper, the final drawing will be a surprise.

"Blotography" and "spray"
Using the "blotography" technique, children draw paint onto a brush using large quantities, splash on the drawing in a chaotic manner, then try to understand what it looks like. With a sufficiently developed imagination, you can get a whole plot. Details are completed with colored pencils.
The spray technique is similar. Only spraying is done using a toothbrush and a ruler. Put paint on the brush and run it with a ruler towards you. If you do everything correctly, there will be no paint splashes on yourself. But there may well be around the leaf. Therefore, you need to think in advance about what the sheet will be attached to and how to secure the space around it.
"Monotype"
Take a regular sheet of paper. We apply a drawing to one half, fold the sheet in half and get new drawing. For example, a butterfly wing drawn on the left side will be printed on the right side. The result will be a whole butterfly. During such classes it is very easy to explain the law of symmetry to the child.
Collage
This is not really drawing, but only an intermediate stage. Surely, you have old postcards at home that you don’t need, but it’s a shame to throw them away. It's time to use them. Cut out individual elements and let your child arrange them on the paper. Newspaper and magazine clippings are also suitable for this purpose. After the child decides on the location of the objects, hand him a brush and glue and give him the opportunity to glue everything himself. Ready-made elements will be very useful for children under three years of age. After all, they still don’t know how to draw complex objects, but they will definitely be able to add details to them.
Drawing using sand, grains or sawdust
Eat different variants drawing in this technique.
- Cover the entire sheet with glue, sprinkle with sand or grain and paint with your fingers or a brush on the rough surface.
- Apply glue only to those areas where the elements will be drawn. Sprinkle everything with sand and paint after drying.
- Paint bulk materials in advance, dry them and apply the design in parts. To prevent colors from mixing too much, you need to apply glue at a time only to those parts that should be painted the same color. After each such coloring, excess sand and grains must be thoroughly blown off.
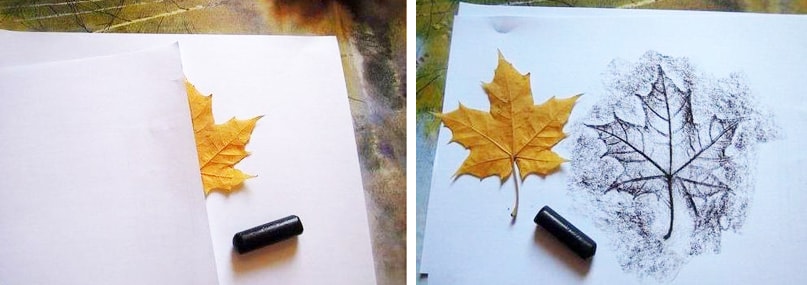
"Frontage"
This technique is familiar to everyone since childhood. Its essence is to place some relief object, for example, a coin, under a sheet of paper, and shade the sheet on top of it with a pencil or pastel. The main task is to find a suitable item. It should be flat and embossed.
Spot painting
You can use regular cotton swabs and any paint, such as gouache. Dots can be used to create many beautiful patterns. And when the child grows up, he will be able to apply the acquired skills when working with special paints for spot painting.
Painting materials
You can take any pebbles (preferably pebbles), cones, leaves or blanks for boxes, boxes, doll furniture. This technique is suitable for children from four years old; after all, painting, unlike simple strokes and stamping, already requires skill and perseverance, which younger children do not possess.
"Scratch"
This is a more complex and completely unconventional type of drawing that will require preliminary preparation. You will need a sheet of thick paper, wax crayons or a candle and mascara. First you need to evenly cover the entire sheet with wax, then with ink. You can also use gouache, but it crumbles and gets dirty during further work. Therefore, when using gouache, you need to add a little PVA glue.
When everything is dry, you can start drawing. In this technique, the drawing is created not by applying paint, but rather by scraping it out. Take a thin non-writing pen refill, an awl, a knitting needle, a stack or a stationery knife. Start by drawing the basic outlines, then move on to shading the surfaces. Depending on the type and intensity of the stroke, the object acquires its “character”. Children really enjoy the process of gradually developing a drawing.
If you want to make children's work more interesting, it is better to use colored wax (regular colored wax crayons). If you don’t have such crayons, then colored pencils or paints will do. After preparing the background, the sheet must be covered with colorless wax (rubbed with a candle). The best effect is achieved when the entire sheet is randomly covered with strokes different color or spots with smooth transitions. The technology is surprisingly addictive for children, but I would recommend getting acquainted with it no earlier than 4 years old. Still, the tools are sharp and require extreme caution.
Drawing with an eraser
The essence of the technique is similar to the scratch technique. But you can work with it from an early age. All you need to do is shade a sheet of paper with a black graphite pencil and start developing the drawing. You will need a hard eraser with pointed edges. It will have to be sharpened periodically. Do not use soft pencils; they smear on the sheet and leave more marks on your hands.
Drawing with plasticine on glass
This will require a little preparation - you need to place a drawing under the glass and use a marker to draw all the contours on it. After this we begin to “color”. To do this, softened plasticine is applied inside the contours, without going beyond the edges of the parts. To soften the plasticine, you need to warm it. This can be done by kneading it with your hands or simply placing it in the sun or radiator.
On the working side, everything doesn't look very neat. But on the reverse side there is a beautiful color drawing with clear contours. The finished picture is inserted with the reverse side into a frame with a background made of colored cardboard.
Before starting work, do not forget to seal the edges of the glass with tape to protect the child’s hands.
If the child has not yet mastered this technique, it is better not to spend money on frames. It makes sense to purchase a regular coloring book with a large design.
Glue pictures
You will need a glue gun and sticks. Hot glue is used to create outlines on paper. Inside the contours, the image is filled with paints. Thanks to the glue, the paint does not flow beyond these contours. If paint accidentally stains the glue, you can wipe it off with a napkin.
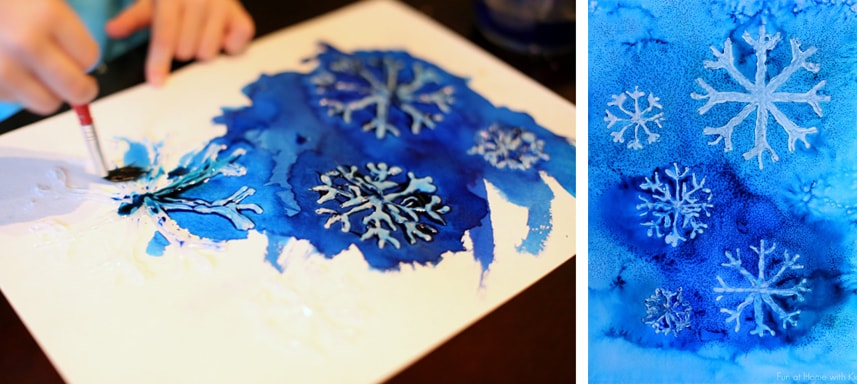
Painting with salt
We cover the entire sheet with watercolor paints and pour a little salt on different parts of the drawing. Salt absorbs excess water, sticks and creates a very interesting effect. Excess salt should be carefully shaken off after drying.
If you liked the selection of non-traditional drawing techniques for kindergarten, please share it on social networks.
Lesson notes on unconventional drawing V senior group
Theme: "Hello summer"
Purpose of the lesson:
- Introduce children to a new type of unconventional drawing technique “blotography”. Introduce children to the method of drawing using a tube and the method of finishing drawings using rice and cotton swabs.Develop the ability to choose independently color scheme colors that match the joyful summer mood. Develop color perception, improve fine motor skills of fingers and hands. Arouse a positive response to the results of your creativity. INcultivate interest, love and respect for nature.Materials:
Sheets of white paper for drawing Watercolor paints, gouache. Cocktail straw, glasses for straws, rice, glue, brushes, napkins, plates.Progress of the lesson. 1.Creating an emotional mood.
Let's hold hands together
And let's smile at each other
We are not afraid of obstacles,
If we are friendly!
2. Surprise moment.
Educator.
Someone threw it through our windowLook at the letter
Maybe it's a ray of sunshine
What tickles our face
Maybe it's a sparrow
Did you drop it while flying?
Guys, want to know who wrote the letter to us?
"Hello guys!
My name is Lesovichok. Listen to my story. There used to be a lot of forests. But now people do not take care of nature. Therefore, there are fewer and fewer forests. People cut down trees and planted nothing. The rivers and lakes dried up, the animals all died without water. And finally, people realized what they had done, but it was very late. Help me and my forest."Educator:
Guys, can we help Lesovich? Shall we draw a forest?What helps us draw with all these and other objects? (With the help of leading questions, if the children do not answer immediately, get the correct answer - hand and fingers).
Tell me, in order to be prepared for a long one, have an interesting day, feel energetic and cheerful, what do we do in the morning? What are we doing? (charging).
Right! So, in order for us to start drawing, we need to prepare our fingers for work. Let's play with them.
Finger game
Daisies"We are beautiful flowers
(Clench and unclench fingers)
The moths love us so much,
(Bend fingers alternately)
They love butterflies and insects.
The kids call us “daisies”
(Clench and unclench fingers)
Every mother has babies -
(Fingers take turns)
Everyone is beautiful and good.
Educator:
-Guys, do you want to draw? Then take your seats at the tables.What else can you draw with? (Felt pens, chalk, brushes and paints)
Conversation:
Let's all remember and list the seasons together.
What time of year is it now?
Guys, what color is summer? (Children list the bright colors inherent in a warm, sunny summer)
What insects do you know that fly only in summer and are very similar to flowers? (Butterflies)
Practical part:
Educator:
They planted a seed, blew through a magic wand, and it began to grow higher and higher. And a tall, spreading tree grew.The teacher explains.
Place a drop of paint on the bottom of the sheet, bring the end of the straw, while directing the movement upward, changing the direction - we make branches.
Educator:
What else needs to be drawn? How do you think?Children:
SunEducator:
That's right, we'll paint the sun with rice! Oh yes! They not only cook porridge from it, but also draw. First, apply glue with a brush, let it dry, then paint the sun and rays. See how beautiful it turned out. The sun seemed to be three-dimensional and warm, warm. You can also draw flowers using cotton swabs.Now it's time to get to work.
What needs to be done to make the drawing beautiful?
You need to try hard and do the drawing with love. Children draw.
Independent activity of children.
Each child draws a tree and branches by blowing a blot.We were drawing today and we were probably tired
let's do some physical education.
Physical education lesson "The tree is swinging"
1.
The tree is swayingSomewhere in the clouds, (Swinging the body left and right)
The clouds are swaying
In his arms. (We raise our hands up)
These hands are strong
Rush to the heights
Keep the sky blue
Stars and moon.
2.
The wind blows in our facesThe tree swayed. (Swinging the body left and right)
The wind is quieter, quieter, quieter, (Squats)
The tree is getting higher and higher. (Stand on your toes, stretch)
3.
The wind quietly shakes the maple tree,Tilts to the right, to the left: (Swinging the body left and right)
One tilt and two tilt, (Springy tilts)
The maple leaves rustled. (We raise our hands up and wave them)
Analysis of children's works.
Children look at the work.
They give names to their paintings.
They tell us how they painted.
What materials did you use?
What mood do children's drawings evoke?
Guys, we will definitely send our drawings to Lesovich. I hope we helped him.