Quite often, city residents are invited to take part in decorating the main Christmas tree.
A toy for a city Christmas tree can be made at home without large investments. Seeing the creation of your own hands on a forest beauty is a great pleasure and a basis for legitimate pride.
This will especially bring a lot of joy to children who made toys for the city Christmas tree along with adults. It should be noted that New Year's toys for outdoor use should be different from the decorations that decorate the Christmas tree in the apartment.
As a rule, the city tree is installed for a long period, from a week to 2-3 months. During this time, the weather can change dramatically. Calm gives way to a hurricane, bitter frosts are replaced by unexpected warming. Winter rains are not uncommon.
To withstand such conditions, crafts for the city Christmas tree must have a number of qualities:
- Big size.
Forest beauties have quite impressive dimensions. Their height can reach several tens of meters. In order to see the decoration at such a distance, it must be several times larger than its home counterparts. - Strength.
Due to strong winds, products may hit branches strongly. It is possible that snowballs, stones, branches or empty bottles will fly into the decorations. This assumes a strong or resilient surface. - Water resistance.
Even at sub-zero temperatures, the snow melts under the rays of the sun. If the product absorbs water, it will lose its shape and visual appeal, and in addition, this will lead to an increase in the weight of the toy. It can severely bend or break the branch it is hanging from. - Ease.
The strength of spruce branches is not limitless. Heavy figures can deform and damage them appearance tree. - Attractiveness and brightness.
The New Year's toy should not get lost in the clutter of tinsel and streamers that are abundantly hung around the forest beauty. - Durability.
Christmas tree decorations need to be made in such a way that they do not lose their presentability throughout the entire time the spruce tree decorates the street. It’s not bad if the jewelry can last for several years.
Therefore, the choice of materials for making outdoor toys is limited. Cardboard, glass and fabric should be excluded immediately.
Let's look at some ways in which you can make products that fully meet the listed requirements.
Large foam snowman
Polystyrene foam is an inexpensive and very lightweight material. It perfectly tolerates temperature changes, humidity and mechanical stress. various types. In addition, polystyrene foam is very easy to process. It can be cut, sawed or burned through hot steel. The material is completely safe for health. You can work with it at home.
 To work you will need:
- packaging of foam boards;
- cutting device (stationery knife, wood saw);
- synthetic waterproof glue;
- aluminum wire;
- accessories for snowman decoration.
In order to make a toy, you will need a lot of free space. When processing the material, fine flying dust is generated. Therefore, you need to stock up on gauze bandages for all participants in the needlework process.
 A snowman is made in the following sequence:
- A drawing is being drawn up.
It shows the configuration of the toy to scale. - Circles of different sizes are applied to foam boards.
You should get 3 sets of circles, 5 pieces each. - Circles are cut out of slabs.
There is no need to throw away the trimmings. They will be useful for making arms, legs and nose. Jewelry precision is not needed, since the product will be subjected to finishing. - Circles of the same diameter are glued together.
It is advisable to glue over the entire area of the workpieces. When the glue dries, their edges need to be processed. - The glued circles are placed on top of each other.
Draw a curved line at the overlap site. Carefully cut out the marked piece. Clean up its edges. The result is a puzzle-style castle. Such a connection will be very strong, capable of withstanding any load. - The grooves are generously filled with glue.
Smaller circles are inserted into them. The cracks are filled with shavings and small scraps of foam. The assembled figure is left alone until the glue dries. - Pins with sharpened edges are cut from aluminum wire.
They will serve as reinforcement for the figure. The pins are inserted into the foam when heated. Metal easily burns through malleable material. After cooling, the fittings become an integral part of the product. A wire in the form of a bracket is inserted into the snowman's head. The toy will hang on it. - The arms, legs and nose are made in the same way.
- The edges of the workpiece are rounded and polished.
To do this, use a knife, rasp and sandpaper.
Finally, eyes, nose, mouth and shoes are drawn on the toy. Waterproof oil paint is used.
Candy from plastic bottles
Every home has a couple of unnecessary ones. plastic bottles, old oilcloth. Don't rush to throw these things away. Closer to the New Year, they will be useful for making a giant candy as a decoration for the city Christmas tree.
To work you will need:
- scissors;
- furniture stapler;
- scotch;
- aluminum wire;
- braid.
This set can be found in any apartment. Children can also be involved in the work. You need to use 2 identical vessels of square or round cross-section.
 Christmas tree candy is made in the following sequence:
- The caps are unscrewed from 2 bottles.
The neck of one of them is cut off. Circumcision is carried out in the place where the narrowing begins. - The vessels are connected.
At the joints they are fastened with staples. For additional strength, the connection point is wrapped with tape. The bottles have several holes to allow air to escape during temperature changes. - An oilcloth wrapper is wrapped around the workpiece.
It is twisted at the edges and secured with aluminum wire. A ribbon is tied to one of the ends. - Several rings of adhesive tape are made around the candy.
This will prevent the oilcloth from fraying.
The result of the work is a light, elegant and durable toy.
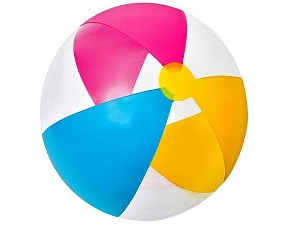
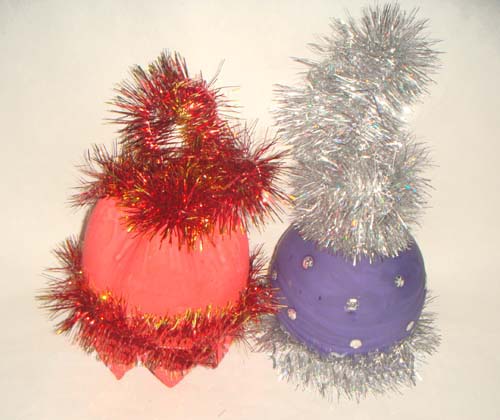
Balls are a traditional decoration for Christmas trees.
At home, you can make a huge, bright New Year's toy with minimal weight.
To work you will need:
- large inflatable ball;
- natural fiber cord;
- epoxy resin;
- silver waterproof paint.
It should be taken into account that making a New Year's ball requires an abundance of glue. Therefore, you need to stock up on cellophane film.
The decoration is made like this:
- A large rubber ball is inflated. Its entire surface is lubricated with oil, Vaseline or grease.
- Dilute 500-1000 ml of epoxy glue. Any unnecessary container is used for this.
- The cord is soaked in the container. It is wound evenly around the ball. The glue needs about a day to harden.
- The rubber ball is pierced and removed from the frame. A ball of cord is painted with silver.
All that remains is to thread a strong and bright braid through the hole in the decoration.
Such a ball will look impressive even on the main city Christmas tree.
The “DIY New Year’s Toy” competition is very popular now. For real needlewomen, the New Year does not come suddenly. They begin to prepare for it in advance, coming up with beautiful New Year’s crafts and decorating Christmas tree decorations.
And the end result is such magnificent products that you can hold a competition for the best New Year's toy.
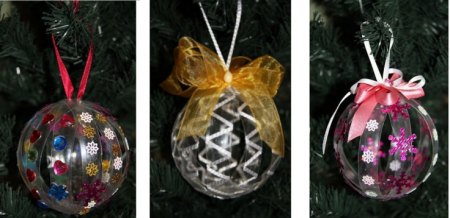
Even the most ordinary ball can be decorated, giving it an unusual look. Satin ribbons will help change Christmas tree toy beyond recognition. You can stick several bows on it.
By the way, the tree will look unusual if balls of different diameters are decorated with bows of the same color and hung so that the smallest ones are at the top, and gradually the diameter of the balls increases downwards.
You can create different patterns and weaves from thin colored ribbons by carefully placing them on Christmas balls. The fringe hanging from the balls also looks beautiful.
There are now many special sprays that create a frost effect. Once you treat a Christmas tree decoration in this way, it will immediately turn into a small snowball, shimmering even from electric light.
Snowflakes cut out of paper always look attractive, usually in new year holidays they like to attach them to windows, but if they are small, then glued onto balls they will give it a completely different look.
And Santa Claus in a New Year's sleigh, carried by fleet-footed reindeer, can be sculpted from plasticine, and the picture can be placed on a New Year's toy. Several festive winter scenes will perfectly decorate the Christmas tree.
Beads and sequins are glued onto New Year's toys, small beads are glued diagonally, in a circle, vertically and horizontally, combining colors and textures.
New Year's signs on the window for Santa Claus
A DIY Christmas tree toy can be used not only on the Christmas tree. 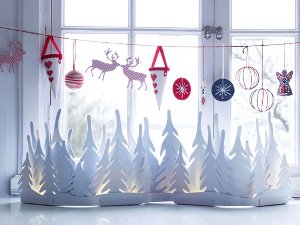 And the windows should also remind you of the best holiday of the year.
Just a basic rule: the decorations should be stylish and not disturb the interior of the home.
Once you attach golden or silver bows to the curtains, you will immediately feel the festive atmosphere, and the bows are attached to the lambrequin with long threads.
Or you can remove the curtain for a while, attaching a whole one instead New Year's story about Father Frost and the Snow Maiden, numerous snowflakes, bells, Christmas tree decorations and other holiday attributes that are molded, cut out, knitted with your own hands.
All these parts are attached to a strong rope. Seeing unusual decoration, Santa Claus will definitely look into such a home, leaving a gift under the Christmas tree.
New Year's holiday in every corner of the apartment
Different corners of the apartment should create festive mood. You can leave New Year's decorations and compositions everywhere. For example, these.
Take a ball of cotton wool and cover it with red cloth to make it look like a pomegranate. Spruce paws are placed in a small basket or on foam rubber, and a candle is placed in the middle. A pomegranate is placed between the branches.
To give it a natural look, you can also add real grains fixed with glue. To make it more impressive, dry corn cobs are added, which will be held in place with thin wire.
 Let there be a citrus wreath on the door for all guests rushing to celebrate the New Year. To do this, you need to choose fabrics to match the color of lemon and orange.
Sewing these fruits is not difficult, and you still need to prepare the yellow ribbon. Fir branches are intertwined in the form of a wreath.
The wire will help securely secure your hand-made lemons and oranges. The entire wreath is intertwined with ribbon so that you can make a lush bow at the bottom.
After the New Year comes another holiday - Christmas. Therefore, making a star for Christmas is a good decision. A star is cut out of very thick cardboard, symbolizing Christmas.
Make apples out of fabric, stuff the cover with cotton wool, and attach it to cardboard, preferably with thin wire. To make them seem real, green leaves are crocheted. And now you need to add small coniferous branches and rowan bunches to them so as not to violate the boundaries of the cut out star.
Beautiful pendants are made simply: take a metal ring of a given diameter and decorate it with glass balls on top. Satin threads are attached to the ring, to the ends of which you can attach Christmas trees cut out of thick paper and painted, figurines of funny animals, funny people.
Candles always accompany the New Year holidays. They can also be transformed so that the New Year's competition the best toy can be considered a win. Prepare several small glass jars.
Wrap them with Christmas tree branches using double-sided tape, tie the neck with a green elegant ribbon, and put several flat candles at the bottom of the jars. Such magnificent decorations are placed in different places festive table, candles are lit after midnight.
If you suddenly have the opportunity to attend a competition for the best New Year's toy, you can come up with any amazing craft from any available materials and demonstrate your ability to sew, knit, weave, make origami and beautiful products using quilling.
To create a Christmas tree toy you will need:
Thick cardboard;
Twine;
Red and green felt;
Ruler;
Scissors;
Pencil.
Take a sheet of thick cardboard and draw a five-pointed star of the size you need on it. To make the star more regular in shape, use a ruler when drawing. Inside the resulting star, draw another star, but a little smaller in size.
Here too, when drawing, it is best to use a ruler and simply draw lines parallel to the sides of the large star. Once the work is finished, cut out the large star first, then the smaller one inside it. You should end up with the shape shown in the picture below.

Take the glue and coat one side of the star with it, then carefully wrap the product with twine, trying to place the threads as tightly as possible and be sure to be parallel to each other. In this way, completely wrap the entire star. If you wish, you can cover the product with glitter or artificial snow.
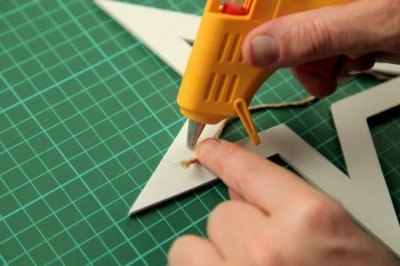
Take green felt and draw a couple of sheets on it, for example, cherries. Then draw a couple of circles on the red felt - cherries. Cut out the figures and glue them to the star. The Christmas tree toy is ready, now you can tie it up with the same twine and use it for its intended purpose.

Outdoor Christmas decorations are different from indoor ones. They should be larger in size, and also made of materials that can withstand precipitation well. To make them, you can use various available materials. In this article you will see how to make a Christmas tree toy with your own hands - great options for a street tree. We will show you several ideas for such crafts, and you choose which one you like best.
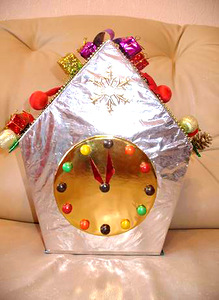
Clock in the form of a house
This toy will look great not only on a large Christmas tree in the school assembly hall or kindergarten, but also on the city Christmas tree. It is bright, large and can withstand snow and frost. In addition, this toy has a stylish and unusual design, so it will take its rightful place on the Christmas tree.
Materials and tools:
- Ceiling tiles – 2 pcs.
- Scissors.
- Ruler.
- A simple pencil.
- Colored and food foil.
- Box.
- Buttons, small colored stones or candies.
- Small Christmas tree toys.
- Glue "Moment".
- Braid.
First you need to put it on the box ceiling tiles, and draw a house. Measure the sides to prepare the sides, floors and roofs of the house. Cut out all the pieces. Large parts should be covered with food foil, and small parts with colored foil.
Then you need to glue the box to the back and front of the house. You need to make two holes in the upper part of the craft, and then thread the braid through them. The ends of the braid must be sewn together to form a loop. Connect all parts of the house. Yellow foil should be used to cover the circle for the dial.
If you don't find small multi-colored pebbles, you can use M&M'S candies to decorate the dial. However, they should first be coated with clear varnish. Glue them instead of numbers on the dial, and cut out the hands from foil in a contrasting color.
All that remains is to decorate the roof of the house with small toys. These can be balls, gifts or cones. They should be attached with glue. A DIY Christmas tree toy for a street tree is quite durable and resistant to precipitation, so it will not lose its presentable appearance throughout the winter holidays.
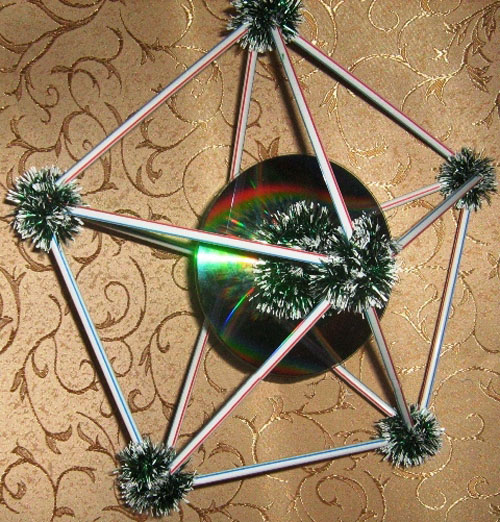
Volumetric toy for Christmas tree
You don't have to use expensive materials to decorate a Christmas tree in your yard. After all, you can make toys for a street Christmas tree with your own hands from available materials.
Materials and tools:
- CD.
- Tubes.
- Glue gun.
- Aluminum wire.
- Cardboard.
- Tinsel.
First, you need to place the wire in the tubes so that the structure is strong enough and reliable. Then you need to put the disk on the reinforced tube and secure it with a glue gun. To make the craft look neat and prevent the glue from leaking, you should cut out washers from cardboard and place the disk holes on both sides.
Close the straws into a triangle. You will get five triangles on both sides, and five common vertices, which need to be decorated with pieces of tinsel. She also needs to decorate the connection of the tubes in the center on both sides.
Ball of thread
A Christmas tree toy made of woolen threads is not practical enough for outdoor use. However, if you coat it with varnish on top, it will withstand temperature changes and exposure to atmospheric phenomena. This toy can be used to decorate a Christmas tree in the courtyard of a private home, school or kindergarten. With this master class, you will learn how to make a large Christmas tree decoration for a street Christmas tree.
Materials and tools:
- A skein of thread.
- PVA glue.
- Wide braid.
- Glue "Moment".
- Hook.
- Ball.
First you need to inflate balloon. Then wrap it with threads thoroughly soaked in PVA glue. Then you should decorate the ball. To do this, you will need a hook, with which you can create a pattern on the surface of the ball by moving the threads to the desired position. Let the ball dry.
While the ball is drying, you need to make a loop on which the ball will hang on the Christmas tree. To make it, a wide braid is used. When the threads are dry, pop the ball and remove it. All that remains is to fix the top layer with varnish in an aerosol can, and you can hang it on the Christmas tree.

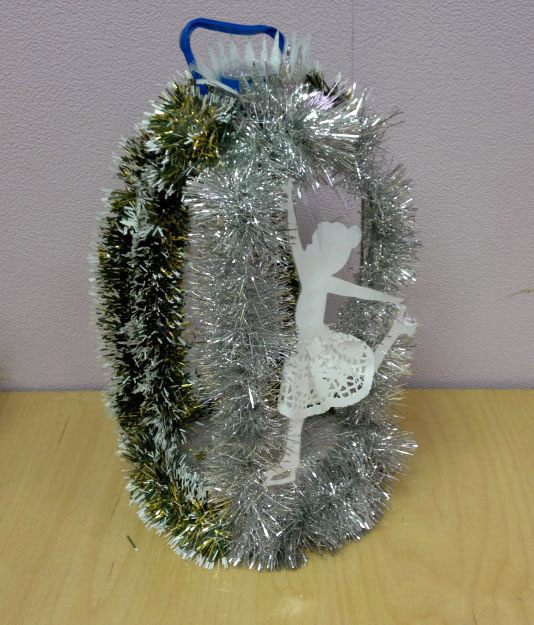
Christmas tree toy made from a plastic bottle
DIY decorations for a large outdoor Christmas tree should be large enough to be clearly visible. Therefore, a toy based on a large plastic bottle would be an excellent option.
Materials and tools:
- White paper.
- Film for lamination.
- Empty five liter plastic bottle.
- Tinsel.
- Thread.
- Scissors.
- Scotch.
- Polyflex.
- Marker.
- Glitter.
- Stapler.
- Laminator.
First, you should draw a figure skater on a white sheet of paper. You can also find the silhouette on the Internet and print it out. After which the ballerina must be cut out and laminated. You can first laminate the entire sheet, and then cut out only the silhouette of the figure skater.
You can cut out a skirt from a white napkin and then stick it on the figure skater’s silhouette. Secure it with tape.
Lines should be drawn on the bottle along which the cuts will be made. There should be three windows. You will need a piece of polyflex on which you need to outline the lid and bottom of the bottle, and also draw a design for the lid in the form of a crown. Cut out the details.
We glue the parts to the bottom of the bottle on both sides, and also decorate the lid. Glue glitter onto the remaining sides of the bottle.
All that remains is to decorate the bottle with tinsel. To do this, we attach tinsel to it using a stapler, and also screw on the pre-decorated lid. The figure skater silhouette can be attached using thread and tape.
Thanks to the presence of a handle on the bottle, hanging this toy is very easy.
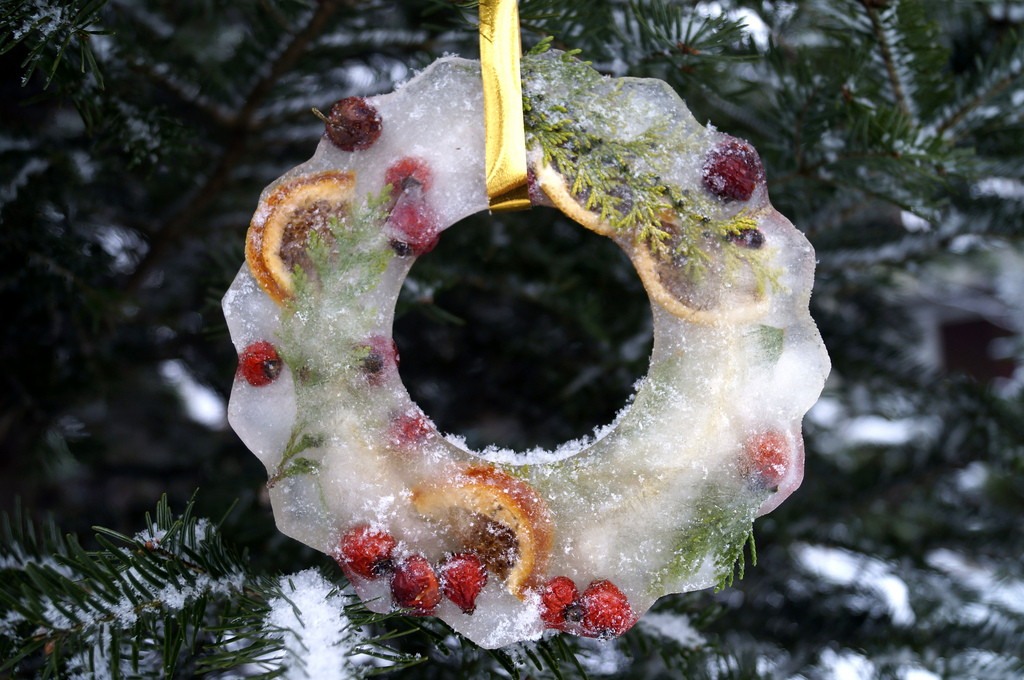
Ice toys for decorating a street Christmas tree
To decorate a Christmas tree outside, you can use bright colored ice, from which you can form unusual toys.
Materials and tools:
- Unnecessary disposable tableware.
- Water.
- Food coloring in various colors.
- Various natural materials.
- Any decorative elements.
First, you should arrange decorative and natural materials on various plates and other containers. Then add dye to the water different color. Fill plates and other containers with water and dye, then put them in the freezer or put them outside.
You can attach ribbons or wires to these containers to secure them to the tree. It is effective to use decorative materials of the same shade as the water dye. Ice will look clearer and more beautiful if you use purified water.
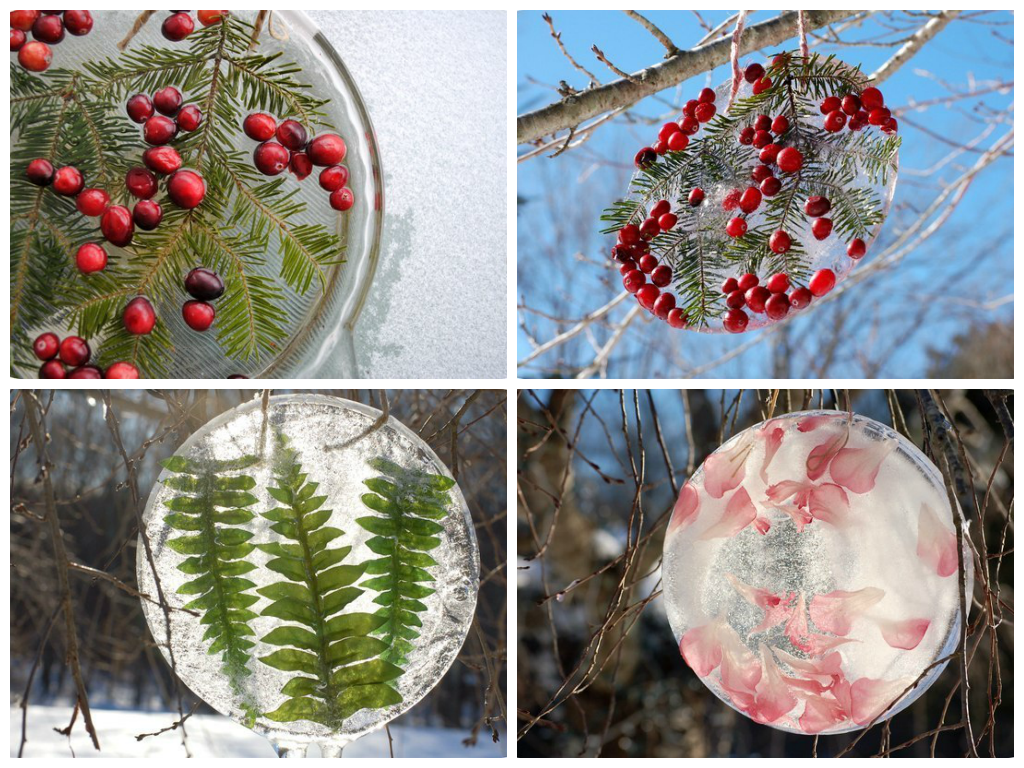
The resulting toys can be used not only to decorate the Christmas tree, but also to decorate the balcony, garden or yard.
Plastic bottle toys
A plastic bottle is universal material for the manufacture of various New Year's crafts. The unique properties of the material allow it not to deform due to snow and frost, which makes it possible to use toys to decorate the Christmas tree outside. Great option a bright tulip will emerge from the bottom of the bottle.
Materials and tools:
- Plastic bottle.
- Scissors.
- Scotch.
- Gouache.
- Brush.
- Glitter.
- Ribbon.
- Glue gun.
It is necessary to cut off the bottom part of the bottle. Cut teeth along the edge of the workpiece. Using a brush and red paint, decorate the workpiece. All that remains is to decorate the craft with tinsel, which can be attached with tape.
You need to take the high bottom part of the bottle. Using a glue gun, you need to attach a ribbon with which the toy will be attached to the Christmas tree. Additionally, you can decorate the craft with sparkles, beads and other decorative elements.
You can make a ball in a similar way. To do this, you will need a bottle with a round part near the neck. We cut it off, paint it any color, and then decorate it with sparkles, tinsel and bright sequins.
Large DIY toys for a street Christmas tree require a minimum of manufacturing time. At the same time, they will last without losing their external qualities thanks to the use of materials that are resistant to external influences. To decorate a Christmas tree in the courtyard of a kindergarten or school, you can make toys together with the children, or organize a competition for making such crafts among students. Many beautiful toys will make your Christmas tree even more festive and elegant.
You may also be interested in:
Culinary recipes:
Coming 2017 and on its eve in schools and kindergartens, parents receive the task - do it yourself with your child Christmas decoration for outdoor Christmas tree. Well, the task is given, it is not difficult to complete. It’s enough to scrape the bottom of the barrel, place it in the barns, and the materials will immediately be found.
But what are we talking about? Oh yes, New Year 2017 is just around the corner, and we offer you some interesting options for making New Year's toys on a street Christmas tree with your own hands.
Bright, simple and unusual Christmas tree decorations are made from the most common materials - shampoo packaging, plastic bottles, boxes, etc. So, cover the box with bright paper of the appropriate color, add some scrap materials and you will get a cute pig, fish or other animal toy that will certainly attract attention.
Simple but always effective candy. Video MK:
New Year's balls made from plastic bottles decorate with affordable decor, and a magnificent craft is ready:
Look what beauty can be made from plastic cups. They are attached to each other using the most ordinary stapler. Based on this idea, you can simply make a snowball and hang it on the Christmas tree.
DIY Christmas toys for a street tree photo. Use old discs - cover a foam ball (you can find it in any craft store) with pieces of discs using a glue gun or Moment Gel glue.
DIY Christmas toys for a street tree photo. And finally, a few more ideas.
Permanent address of the material: