I like to buy paper lanterns instead of pretentious chandeliers. Why? Firstly, they are inexpensive. Secondly, when they become dusty or torn, they can be replaced. Thirdly, they are easy to transform, if only you had paints, napkins and free time. I've been wanting to do this for a long time balloon, and then a suitable basket was found and the idea immediately matured.
For your next birthday or upcoming garden party, you can also make a real baby balloon that rises with hot air. To do this, you don't need a real fire, but a hairdryer and a large trash bag. Cut a 5cm edge from the plastic cup. Don't tape it too tightly when opening the trash bag with duct tape. The plastic edge will serve as a hole for filling. Now you can heat the hot air into the trash can. Tie the balloon to the dragon line and let the big balloon rise.
For the balloon-shade we will need the simplest things:
paper lantern,
4 napkins with sunflowers,
broken basket without handle,
flower stickers,
scissors,
tassels,
paints,
PVA glue,
5–6 meters of cord,
balloon passengers and fantasy.
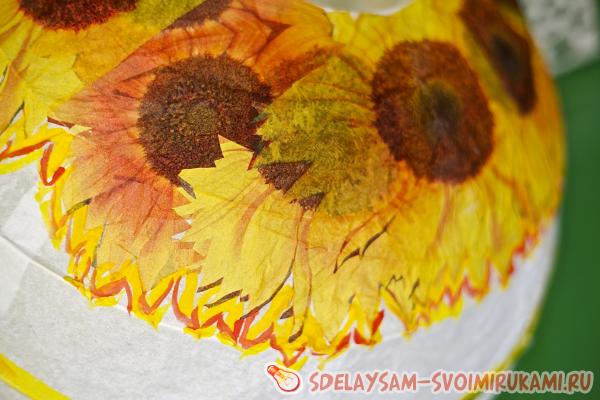
When I came across napkins with sunflowers in the store, I thought that they were very reminiscent of flames that burst out of a burner and inflate a balloon. The flashlight has been lying around for a long time, all that remains is to bring all the elements together. Cut out flower pieces of the desired size.
Flying balloon made of different materials - use silk paper
Once the hot air cools, the balloon will float on its own. The hot air balloon can also be made of silk paper, which is also transported by hot air for flight. Draw a diamond shape on the cardboard box and cut it out. You can use this as a template for the individual sheets that will create your balloon. Place the template on 5-6 sheets of silk paper and cut out individual sheets. Glue the silk paper pieces together on the bottom edge so that the balloon is in shape.
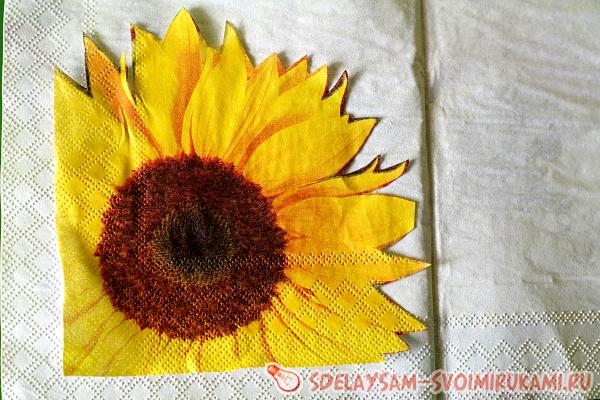
Now you need to remove three white paper layers from the napkin so that only the colored one remains.

We carefully place it on the bottom of the lamp and coat it with PVA glue. I dilute the glue with water in a 1:1 ratio to make it easier to apply. You can use undiluted, but then there is a high risk of tearing the napkin when spreading it over the surface. For this process you need to take a brush with soft bristles.
You can use a stronger paper ring for filling. If you're thinking about your next carnival or Halloween costume, you can create an impressive balloon without large quantity time and effort with which you will undoubtedly stand out. For this project, first cut the bottom of the basket and tape the sharp edges in place. Attach four paper bag “sandbags” to the basket. You can wear two strip shoulder straps that are cut to fit your body. Take a large helium balloon and place it in a matching net that you can tie with string or gift ribbon.
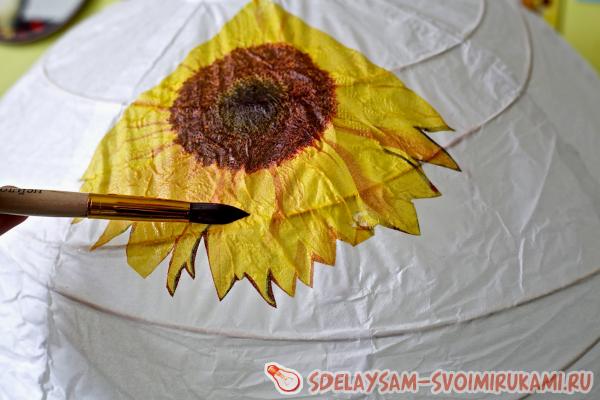
From pieces of napkin we gradually form our flame below.
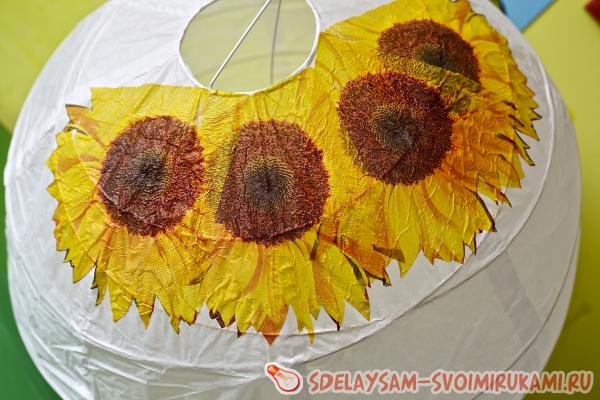
We do this until we fill the circle completely. We try to distribute the napkins so that there are no unsightly gaps.
Balloon made from papier-mâché - instructions. If you want to decorate a small balloon at home, you can make it from cardboard. Pop the balloon to your desired size and flatten it with a wallpaper cutter. Travel in shredded newsprint or silk paper and wrap the balloon on it. Apply another layer of wallpaper and apply a total of 3-4 layers of paper clip. Allow to dry completely. Use the needle to gently bite into the balloon and remove it.
You can create a basket for the balloon. Cut a square from a piece of paper and fold a wide strip on each side, creating a square in the center. Tape the sides together and thread four holes through the basket and into the bottom of the balloon. Finally, attach four ropes to the basket and attach them to the cardboard.
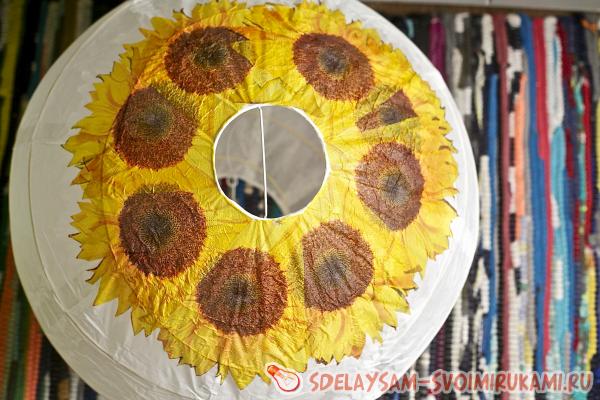
On top I decided to duplicate the same pattern for symmetry. Let it be the sun.

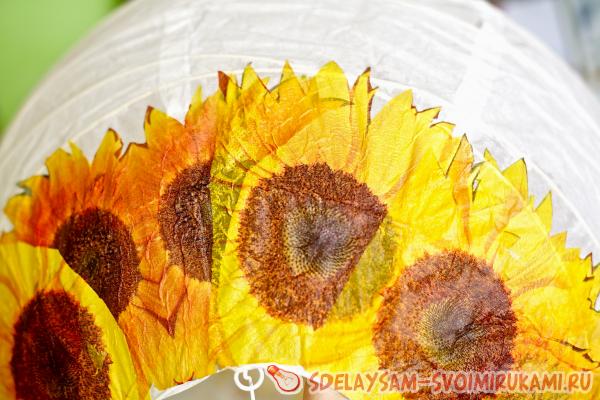
To make the sunflower fire look brighter and more complete, I painted the flames with red and yellow gouache.
Create magical decor for indoors and outdoors with hot air balloons. Decorate a mini balloon after heart failure. The body of your model with balloon can keep your baby with water. or acrylic paints at your request. You can experiment and find small decoration items that will turn your homemade balloon into a unique piece. Pins of different sizes and old postcards or envelopes make a nice balloon figure.
With this decoration you can create a vintage touch in the room. Using the same technique, you can also create mini lace balloons and make them a stunning decoration not only for the interior but also for the outdoor area. To hang a balloon from a window or tree, you must first attach a thick wooden bead to one end of the string. Then place a small hole in the center of the balloon and wipe the cord from the inside. The bead remains invisible and serves as a reinforcement.
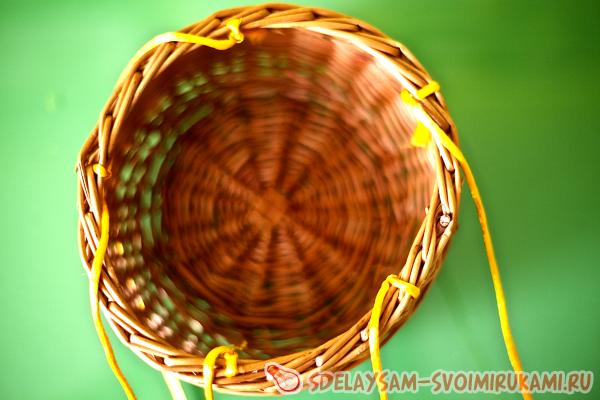
Now we tie a cord to the basket, distributing its segments at equal distances inside the circle. Try to keep all the knots inside the basket. Each suspension takes about a meter of cord. You can additionally duplicate it with a cord around the lamp. It is very important to center the basket; this is one of the most difficult aspects of the job. Check it, it should hang evenly under the balloon. To make this process easier, you can look through the hole below. Through it you can clearly see where the center of the basket is. A real basket made of twigs is quite expensive; you can weave it from newspapers. Master classes on newspaper weaving can easily be found online.
From a balloon The balloon is fiddled with as a gift of money. If you want to make money, your creativity is required when packing. If the envelope is too plain and impersonal, you can create a balloon from a simple lampshade and make an attractive and personalized cash gift. For the balloon basket, you can take a small basket or roll up a paper basket yourself. Attach 4 wooden spikes to the basket and place the lamp screen on it.
If you want, you can pull the skewers through the colored straws and then attach them to the tab on the basket. You can fill the completed basket with colorful paper clips and place greeting card with your cash gift in the basket. To decorate the ball, you can design a garland. Cut a long chain and make several paper flags that adhere to the string. Instead of flags, you can also use various masking tapes. Secure the garland with tape to the screen.
In the finale, I decided to decorate the center of the paper lampshade with stripes of yellow-green gouache and flower-shaped stickers. Try to find stickers on thin paper so that they do not peel off from the tissue paper that covers the lampshade. Luminous phosphor-coated stickers also look very nice on such lamps. It turned out to be a real waltz of flowers.
Birthday balloon. What did you find this cute balloon? When a little creature is born, we are always looking for a unique and loving gift idea. A creative gift packaging could be a balloon with a basket in which you put diapers, colorful spittoons, washcloths, bodysuits, socks or samples of various baby care products. For a durable basket that can support the weight of a gift, you can use a box that you put in the lid for more stability.
Decorate a balloon and basket after heart failure. For decoration, you can choose a colorful pennant chain, heart, butterflies, circles or any other motif. Let your imagination run free and design a sign with the words "Welcome to the World" or with the child's name, weight and body size.
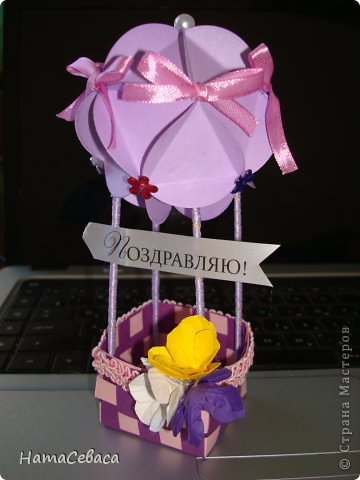
The children and I recently made such a balloon and, hot on our heels, made MK for those who will like it.
The time to make it (with cut out parts) is about an hour and a half, it all depends on skills and age. I have done this for 7-8 year old children, they need the help of an adult.
You will need glue (PVA, stationary glue, Moment “Crystal” glues well, and in some cases a glue gun with hot glue helps a lot), 20 circles of paper, several strips of paper for a basket length = 4 x the length of the side of the basket (mine is 5 cm) + 1 cm for gluing and 1 cm wide, base for the basket (I have a 13x13 square of paper), ribbons, braid, at the end of production any decor - flowers, beads, rhinestones. Schemes for drawing circles and baskets are given at the end of the MK.
Instead of baby's diaper, you can make a basket out of a homemade diaper balloon and hold them together with a wide piece of fabric or organza. You can place the individual diapers either vertically close to each other or rolled up as well. Give this unique basket the finishing touch with a blue or pink bow. You can put a cute cuddly toy in the middle of the diaper basket. This creative gift is sure to make a great gift.
A balloon decorating a beautiful, decorated table decoration. Original idea table decorations - turn this balloon into the heart of the table. For childbirth, babies or weddings floral decoration Fresh flowers are almost indispensable for various celebrations. The material of the balloon basket is up to you. You can also choose a plastic container, glass vase or jar and glue it with jute cord. Place a piece of sponge in the basket and insert a small bouquet of flowers different colors. Depending on the occasion, you can decorate the lantern with lace, flowers or self-loading bows.

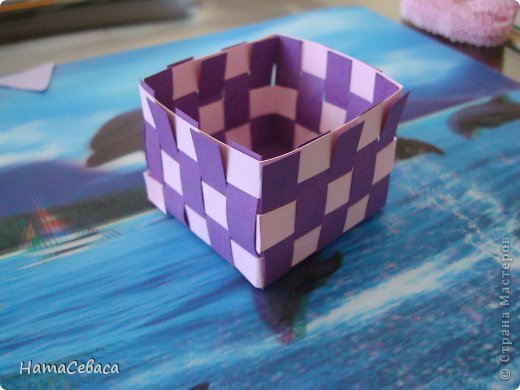
Let's start making a basket. We braid the edges of the basket with a paper strip in a checkerboard pattern. To prevent it from flying off, I secured it with a paper clip at the beginning, after weaving all the sides, we glue the tip of the strip (1 cm) to the wall of the basket and then in several places on each wall we glue the walls to this strip. Then repeat with the second strip.
The balloon theme can also be used for invitation cards, room decorations or gifts for guests, as well as special event appropriate and lasting memories. In turns you can create beautiful decoration for a children's room. For this next project, you can let your kids join in because a balloon made from paper is really quite simple. First create a template for the balloon. To do this, fold a piece of paper in the center.
Place the desired size plate and draw a circle centered on the break. Draw the balloon basket and cut out the template. Take colored paper and fold it into the center. Place the template on it and cut out balloons of different colors. You can now specify which order will have the colors. Balloons made from paper are a charming and colorful wall decoration, making white walls exciting and enchanting your child. If you want, you can equip the balloon with a basket and hang it in the room.
We finish with the third strip, gluing all the protruding ends of the walls to the paper strip.
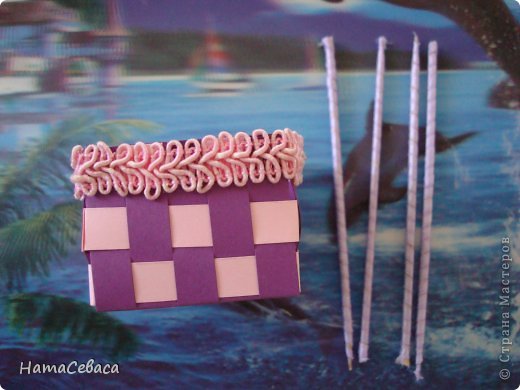
You can glue any braid, lace or ribbon to the edge. We take 4 wooden kebab sticks, wrap them with ribbon, fixing them with glue on the edges.
For a basket without a floor, you need a wide strip of paper, which you glue together like a ring and attach to the balloon. An attractive basket can also be made from paper bun shapes. By using balloons The Easter nest takes its beautiful shape. Color does not matter.
An Easter ball and a cardboard mask - this sounds admittedly strange. But you will soon realize how smart they are. Because the balloon is there to give the Easter party the right shape. For implementation you only need following materials: balloon, old newsprint, glue, glue, napkins bright yellow color with patterns and, of course, these instructions.
Let's start gluing the ball. Apply glue to the bent edge, fold two circles, matching the bent edges and fix it. Thus, we glue five circles so that the sharp vertices converge at one point. It turns out to be a hemisphere. Let's make another hemisphere. Then we glue a strip of 10 circles, directing the sharp vertices of the triangles alternately up and down.
If you want to make the Easter test yourself, hit the balloon first. The balloon cannot be too big. To get the egg shape, it is glued with adhesive tape in the correct shape. Is it all like Easter Egg? Lubricate the balloon with a mixture of tapestry and glue. Afterwards, for example, place the tame gazelles on the sticky ball so that it is completely covered. But this is not enough: the process is repeated until the future Easter balloon test is surrounded by ten layers of cardboard mesh.
Napkins decorated with beautiful spring or Easter motifs decorate the Easter basket of balloons. Once this is done, the slippery ball should dry within one day. The next day we will continue development. Draw an oval circle on the long side of the ice and cut it out using a knife. Doesn't it look like a cracked egg? But only almost: in order to make the illusion perfect, the squares are cut along the hole with scissors.

We close the strip into a ring, gluing the outer circles, and then glue the hemisphere on top and bottom, folding the 5 remaining free edges of the hemisphere with the 5 edges of the strip.
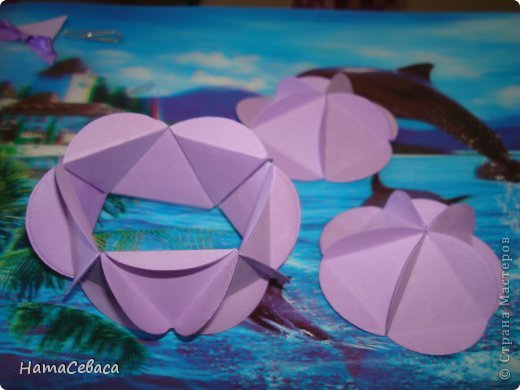
This is what the ball looks like after gluing one hemisphere (photo above), then put on the top hemisphere and glue it. We get a ball.
Now assembly. Glue the skewers to the basket, fixing them with Moment or hot glue in the corners of the basket. The fastest way to glue the ball to the skewers is with a hot gun; we determine the gluing points by eye, leaving one of the tips at the top.
Creating an Easter Basket: How to Continue
To prevent the old newsprint from flickering anymore, the egg is now covered with light yellow tissue paper. Now the finished Easter ball, made from a balloon and cardboard, just needs to be decorated. Children especially enjoy the balloon craft and collaborators. And the result can be seen.
Get napkins with Easter motifs like colorful eggs, chicks and bunnies. But fresh spring motifs are also suitable as decoration for a basket. They are also glued on and the beautifully decorated Easter pate is dried again for half a day. Now you can admire the results of your efforts. Not only does the Easter look like a cracked egg, but it is also decorated creatively. At Easter, it can now be filled with Easter grass, as well as heal and give away.
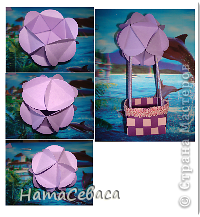
Then we start decorating - covering the places where the skewers are glued to the ball and the remaining holes in the places where the tops of the triangles are glued with bows or flowers or rhinestones; I glued a bead at the top. Add an inscription and flowers to the basket. The ball is ready. You can use it as a gift basket - put a small gift, candy or chocolate inside.
How to prepare circles for a ball. Here it is very important to make the correct markings for a neat appearance of the ball. Let's remember geometry and fit an equilateral triangle into a circle. How to do this: Draw a circle with a compass with a center at point O, take an arbitrary point D on the circle, measure the segment DO (radius of the circle), plot the length of the radius from point D on both sides using a ruler so that the end of the segment lies on the circle (this will be points A and C) or draw a circle from point D with the same compass (that is, with the same radius), place points of intersection with the circle in both directions (we get points A and C). This will be one side of the triangle. Now from point C we draw a circle with a compass with a radius equal to the side of the triangle AC until it intersects with the circle (or we draw a line segment from point C with a ruler, equal to side AC, so that the end of the segment lies on the circle). This will be vertex B. Connect points A and B. My side of the triangle is 2.8 cm. We bend it up along the sides of the triangle. TO speed up the marking process, draw a triangle on one circle of thick paper, cut it out, then apply it to the circles (you can take one at a time or several at once, if the paper is not thick) and bend the edges of the circles, holding the triangle in the middle. Or we apply a triangle to each circle, trace it with a pencil and then fold it over. Or we take several circles, fold them into an even stack, put a circle with an inscribed triangle on top and at the vertices of the triangle with scissors we make small cuts all over the stack at once, and then fold the edges, guided by these cuts. This stage is the longest and most boring.