Hello, dear readers of the Sea of Ideas blog!
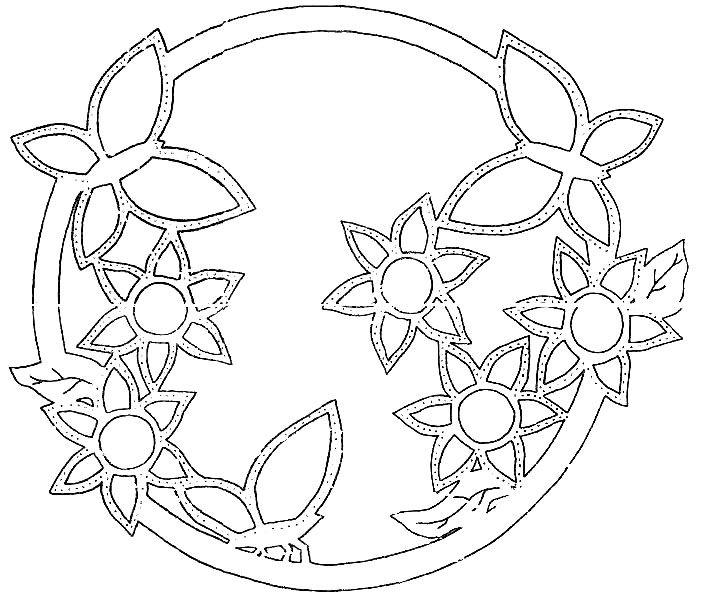
Thank you for your interest in the topic of vytynankas, as well as for your questions. Thanks to you, I realized that not everyone is familiar with this type of creativity, so I want to tell you more about it. And after a short story, patterns of vytnanka on the theme of flowers will be posted, continuing the publication - with 15 flower patterns.
What is vytynanka?
This is a type of creativity that is based on cutting out patterns from paper. The ancestor of this handicraft was China, since paper first appeared there. It’s just called “Jianzhi” there. And then this art spread throughout the world, acquiring its own characteristics in each locality.
Every reader of this site has made the simplest vytynanka (from the word “vytynat” - cut out) - remember the snowflakes you cut out in winter... Postcards and paintings made using vytynanka are now popular. Previously, in Ukraine and Belarus they made openwork curtains from paper and decorated beams and stoves. They gave it to each other for Christmas and Easter... I can say that for these countries the concept of “vytynanka” was synonymous with symmetrical cutting. But in Poland, practically the same term - wycinanka (vytsinanka) - simply meant cutting, not necessarily symmetrical... In Russia, as they say, there was a name "tenderloin", but I have not come across it...
By the way, it is quite possible that “silhouette cutting” will become a more familiar term for you. It is with this name that this creativity has firmly established itself in Western countries - Germany, England, France and others.
I hope that I was able to clarify for you a little the origin and meaning of this word. So now I suggest you look for yourself
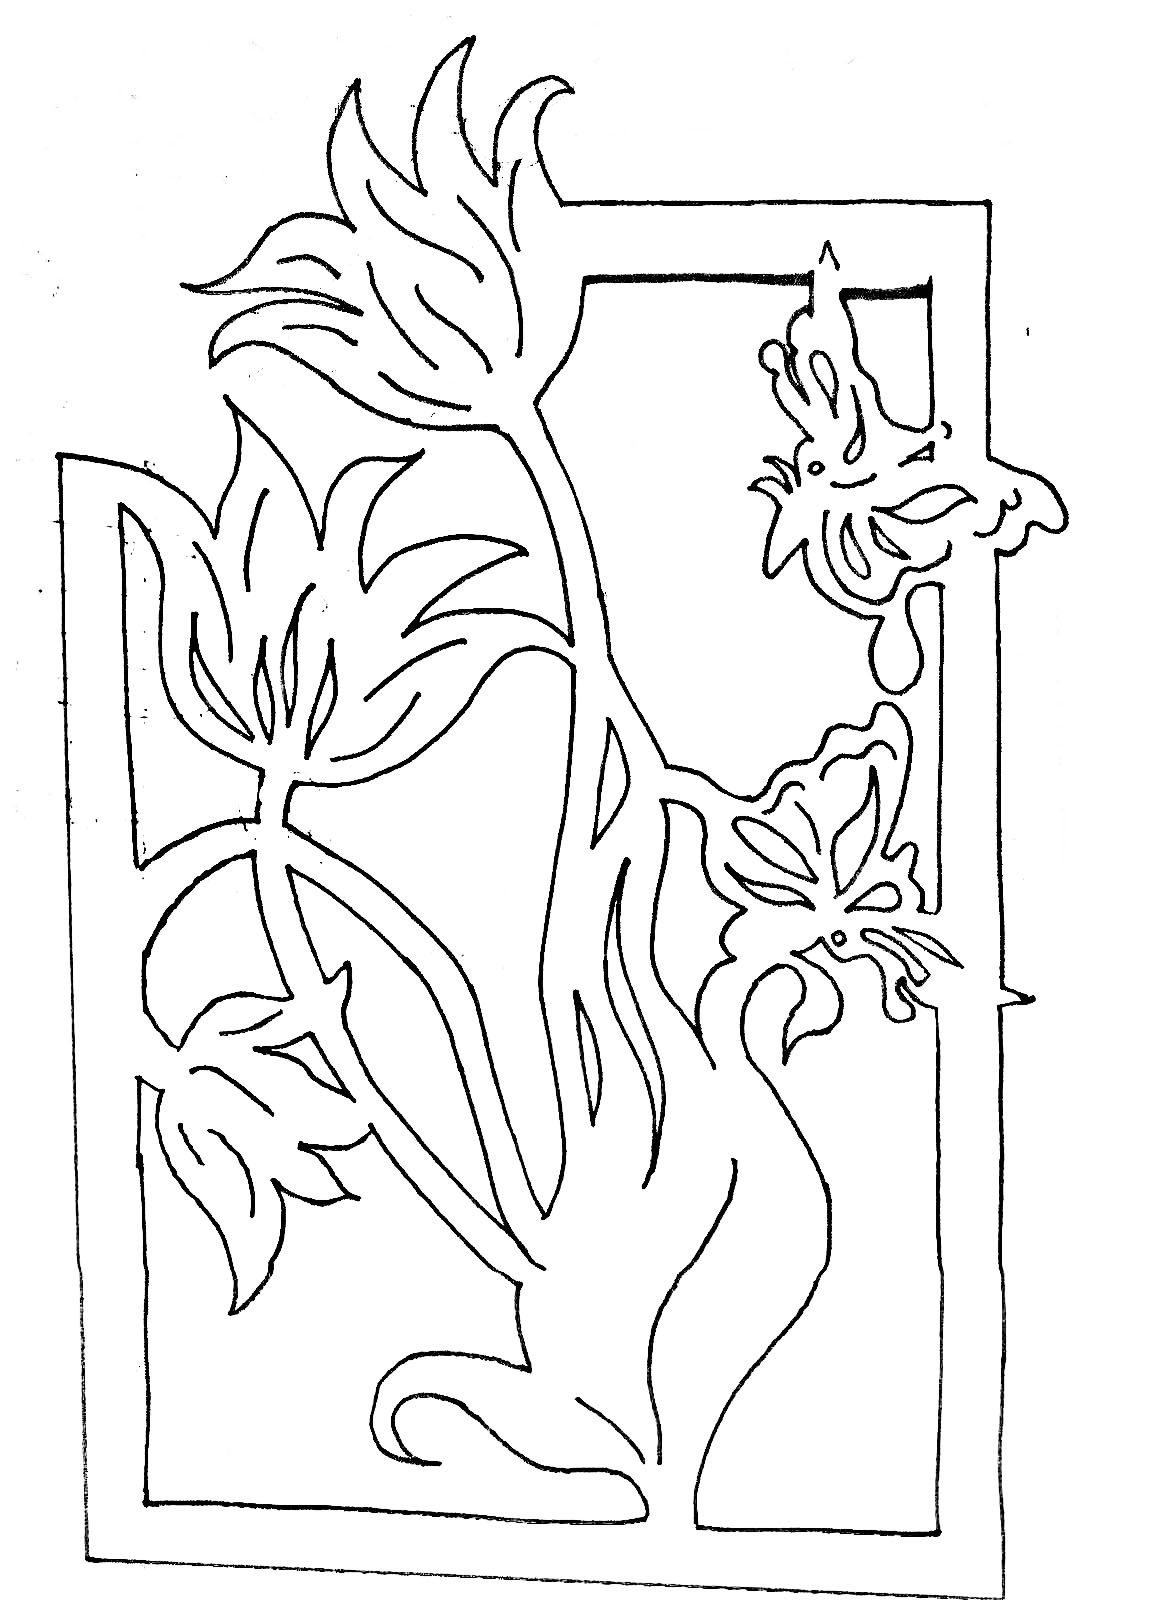
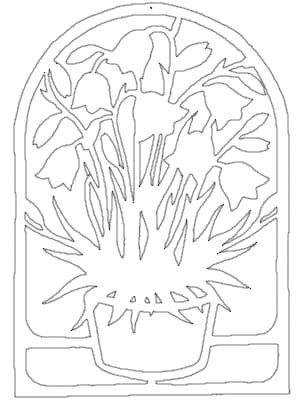
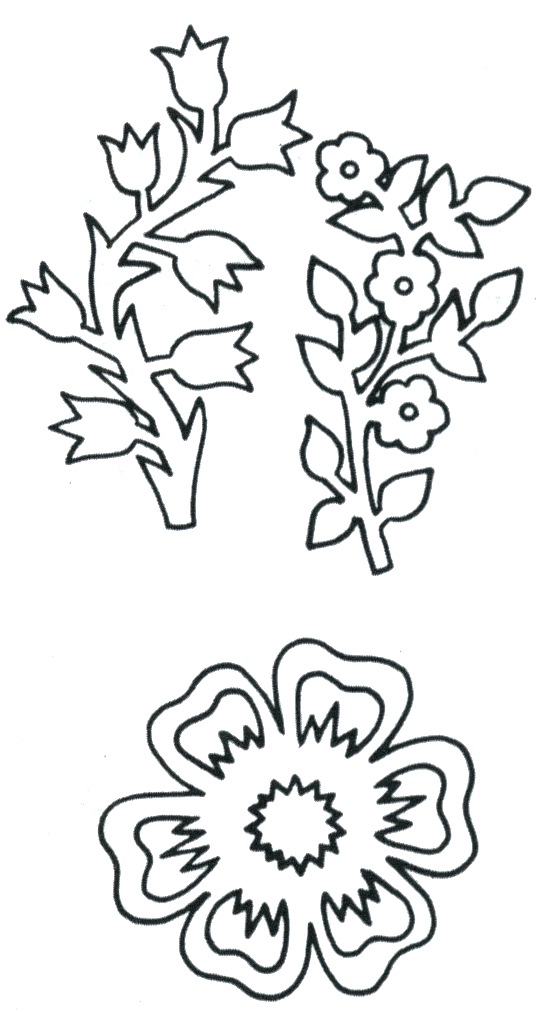
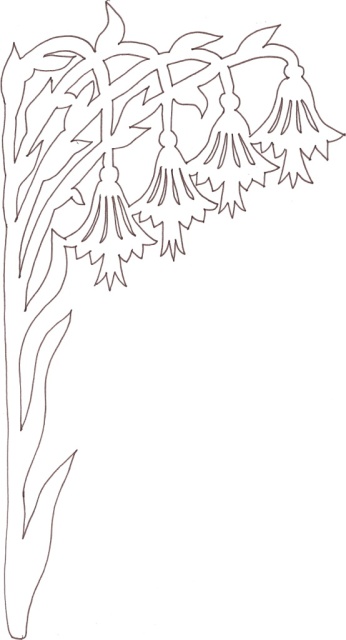
vytynanka flower schemes
Theme is flowers. And before that, I posted templates, the theme of which was...


Vytynanka came from Ukrainian decorative and applied arts. “Vytynaty” means “to cut out.” Thin paper figures are becoming increasingly popular as decorations for the New Year. They are traditionally made from sheets white, but variations are possible.
During its existence, the technique of making this decor has been improved, so several types of vytynanka have appeared:
- flat figure for mounting on a flat surface;
- figure with folded edges, which give light volume;
- a combined three-dimensional figure made from several paper parts;
- composition – a picture or drawing of several figures.
Compared to conventional vytynanka, it has a number of aesthetic advantages:
- You can create characters from your favorite fairy tales and cartoons, entire paintings, cities, fairy tales– any image.
- It is possible to make three-dimensional figures.
- The vytynanka can be attached to a window, furniture, wall, placed on, or suspended by a thread.
- Cutting out shapes with an adult can be a fun activity for children.

At the same time, the vytynanka is not so quick and easy to make. The composition may consist of thin lines, the cutting of which requires perseverance, thoroughness and accuracy.
Advice. The beauty of the vytynanka does not depend on your artistic abilities. The figure for cutting does not have to be drawn by hand - the finished template can be downloaded and printed. Therefore, the scope for imagination is not limited.
How to cut a vytynanka
Ideally, it is faster and more convenient to cut the protuberance using special accessories, although you can get by with improvised means. This list contains the tools and materials necessary for the process, including their budget counterpart:
- breadboard knife or its stationery version;
- a special cutting mat or a simple plywood board;
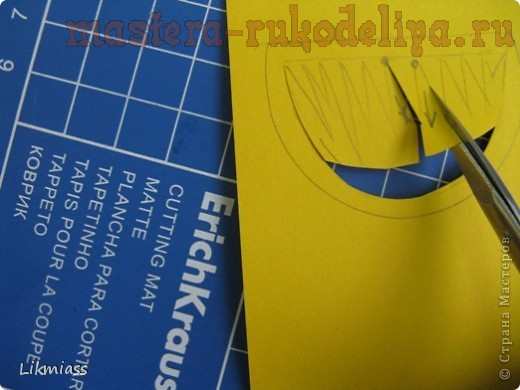
- nail scissors;
- paper;
- threads, tape, soap solution - to secure the finished figure to the surface.
Attention! As a rule, glue is not used when making protrusions. Even complex three-dimensional figures are fastened together only through slits and grooves or with the help of threads.
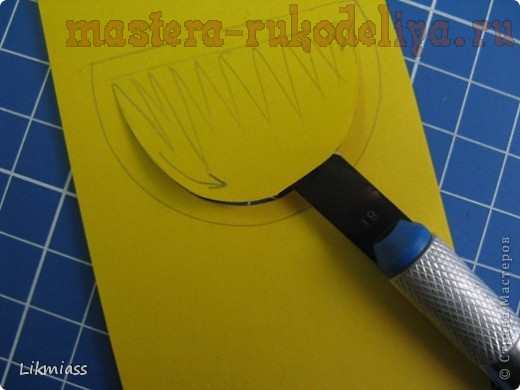
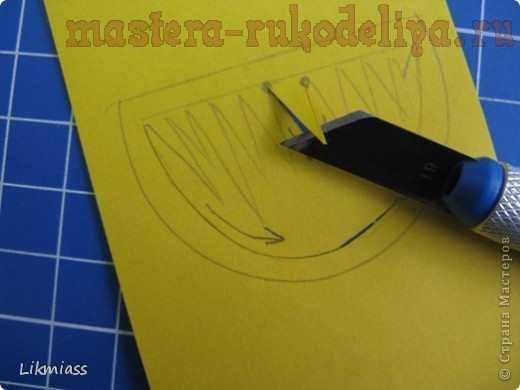
The production of vytynanka occurs in 5 stages:
- Preparation. If you are using a knife for cutting, place the printed or drawn template on work surface. Place a clean sheet of paper underneath and secure the resulting “sandwich” to the surface - for example, with tape.
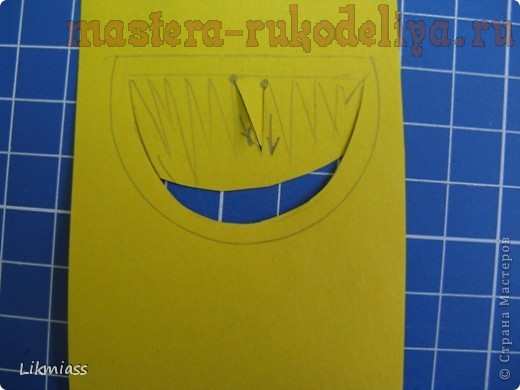
- Cutting out small parts. Remove excess pieces of paper from the surface immediately to control the quality of the process.
- Cutting out large elements in the inside of the sheet.
- Cutting along the contour of the figure. Vytynanka is ready!
- Drawing up a composition and securing the vytynanka in the room.
Advice. If you need several identical designs, place more blank sheets under the template.
How to decorate a house with vytynanka
Flat paper figures can be attached to window glass, walls, furniture, postcards - any more or less flat surface in your home. Today it is fashionable to place on glass entire landscapes of paper towns with fancy roofs and chimneys, images of snow-covered villages or forest snowdrifts, with Santa Claus, sleighs, deer, fir branches, Christmas stars, angels and other holiday attributes. At night this composition looks magical. Using thread, voluminous and flat protrusions are attached to the Christmas tree, hung under lamps, on shelves, in window openings.
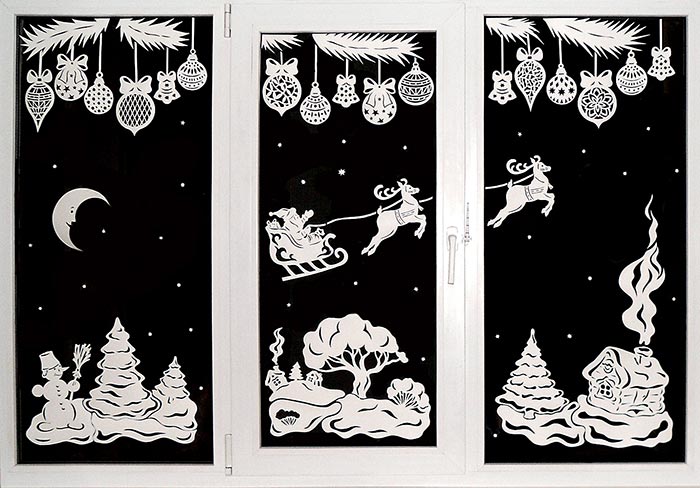
You can even make a hanging mobile from protrusions. For example, from angels with different musical instruments in hand. A ball-shaped vytynanka with a pattern glued onto colored cardboard will decorate your Christmas tree.
A postcard is made using a similar technique. You can also make a voluminous candle holder for a small candle. The light from the fire will shine through the slits in a whimsical and beautiful way. However, in this case, make sure that the fire is as far away from the paper as possible.
Among other figures, do not forget about the symbol of 2017 according to the Eastern calendar, . If your experiment with this animal involves the use of colored cardboard or paper, choose red or Orange color to appease the symbol of next year.
Paper decorations for windows: video
Vytynanki is the art of paper cutting. These are amazing paintings, this art originated a very long time ago... These can even include the well-known snowflakes with which we decorate our windows on New Year’s Eve. These are also handmade cards. Vytynanki is a very exciting activity, beautiful, unusual and amazing! You need to fold the paper in half, apply a design and cut out the details, and when you open the folded sheet, you will get a symmetrical design.
Simpler images can be cut out with children, but in general, this is a real art, in which you can create amazing pictures!
This type of fine art appeared a long time ago. Presumably in the 7th century in China. Although they say that something similar existed in Trypillian culture. If we talk about the roots of the art of cutting out patterns from paper, then it must be said that it originated in the 9th century in China, simultaneously with the invention and spread of paper.
In Ukraine, vytynankas were used to decorate homes. Masters of vytynanka are called vitinankar in Ukrainian, there are not so many of them.
Here is an inexhaustible source of inspiration for carving masters. Ukraine is a young state. During the short years of independence, unique Ukrainian brands appeared. These are vyshyvankas (folk-ethnic clothing with hand embroidery), pysanky - eggs decoratively painted according to centuries-old tradition... and, brought to your attention, VYTYNANKA.
Flowers, trees, birds, animals, Cossacks and girls cut out with lace from white or colored paper - and in general all sorts of images of various plots and contents - have long decorated Ukrainian huts - stoves, windows, shrines, walls, etc. They performed both decorative and protective functions.
Detailed diagrams, step-by-step instructions and detailed color photographs will help you make an old castle and a house with a dome, interesting subject compositions - flowers in a vase, giraffes in love, a girl and a cat, a nightingale on a branch, as well as original postcards for various holidays.
All models are supplied with sheets of full-size template diagrams.
Inside are templates for making products.
Paper cutting
In Russia, the most popular paper cutting is, of course, New Year's - we cut out snowflakes! They can be very different!
Today there is even a book on sale for cutting out snowflakes.
Over 100 cutting projects presented!
Who among us does not remember bright moments from childhood, when, preparing for the New Year, we, like wizards, cut out man-made snowflakes from an ordinary sheet of paper?
Now you can bring back those wonderful moments. Snowflakes look very cute on windows, you can decorate a Christmas tree with them, or collect them in a garland. In the book you will find more than 100 models of snowflakes of a wide variety of shapes and sizes: patterned ones in which folk ornaments are intertwined, silhouette snowflakes that look so much like funny little animals that they are suitable not only for New Year’s decorations, but also for any children's party, snowflakes using various geometric shapes. Thanks to the step-by-step illustrations, making any of the presented models will not be difficult. All you need is paper, scissors and inspiration!
Give yourself, your children and loved ones an amazing holiday feeling!
There is also a book on cutting out snowflakes.
New Year holidays are the most joyful winter time. It is during this period that we decorate the house, prepare treats, and give each other gifts. The most beloved and, perhaps, the most democratic new Year decoration- snowflakes cut out of paper that you can make with the whole family and then hang on windows and walls. collecting whole snow garlands. All you need to do is pick up a piece of paper, scissors and a book.
Magic paper
Tutorial on cutting techniques for schoolchildren.
The art of paper cutting has ancient history. It originated in China after the invention of paper there. Now the paper cutting technique is becoming a popular type of needlework all over the world. Using this technique you can make interesting, beautiful things: openwork crafts for holiday decorations, Greeting Cards, New Year's decorations, hanging modules, valentines and much more.
You can even work with schoolchildren using this technique. junior classes. Schemes for many of the crafts presented in the book were specially designed for cutting in lessons with children aged 8-11 years. Materials for work are very accessible. First, take some drawing paper, a small utility knife, thick cardboard (to place under the paper) and try to cut out the simple pattern presented at the beginning of the book. It's not difficult at all!
Paper lace.
Traditional carving techniques
They write on it, print books, glue and cut it, fold and crumple it, wrap various objects in it, and sometimes it itself becomes the basis of any product... And all this is about paper, one of the greatest inventions of mankind.
In a new book called “Paper Lace,” Anna Zaitseva, a designer, talks about traditional techniques for working with paper using the example of interesting models, which will not be difficult to repeat thanks to step by step instructions and excellent illustrations and diagrams.
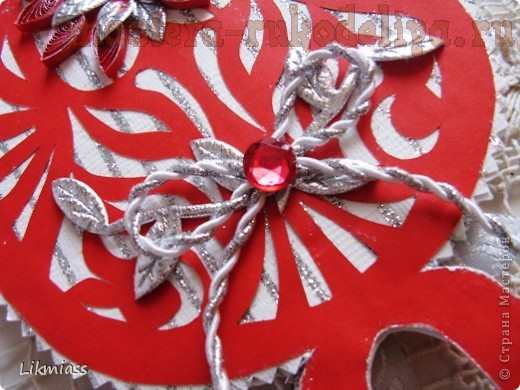
This card consists of 2 parts, decorated slightly differently. I associate Easter with rich and solemn decoration, gold and silver, colors white, red, azure. I present to you red on white with silver.
Actually, no one decorates vytynanka, but I... I decorate, I need splendor today, so silver and rubies...
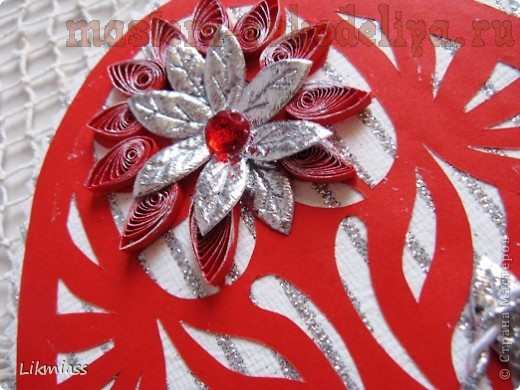
The flower is silver-plated quilling, but this was not enough and I covered it with a flower made from ribbon with silver leaves.
The silver and white cord seemed to gather the egg into a pile, otherwise it somehow spread out.

The reverse side is a little more modest, depending on who you like. As always, I didn’t have a general concept for the work, except for the openwork red egg on the legs. In the process, when the treasured chest with bells and whistles appeared in front of me, the work became more fun and exciting.
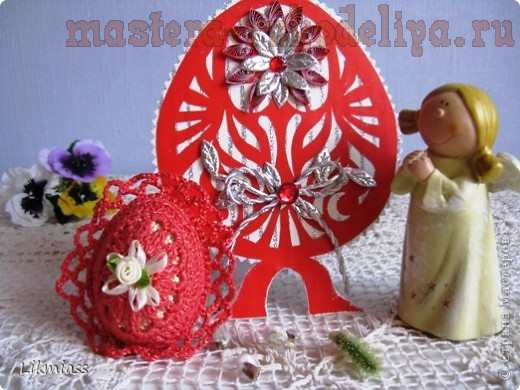
On the back side, the flower turned out to be more magnificent and more solemn than on the front side, so the front side was torn out by the roots and justice triumphed, see photo 2). Those. the face asked for the color of the rear, what was there before is no longer there, although it was also normal, but since it’s gone, so now. By the way, the face was redrawn three times, first independently, and then at the request of the face itself....
A modest bow, but, I think, no worse than the prim one on the front side. And in general, who said that this is the rear, now this is the face, and let it not be modest.
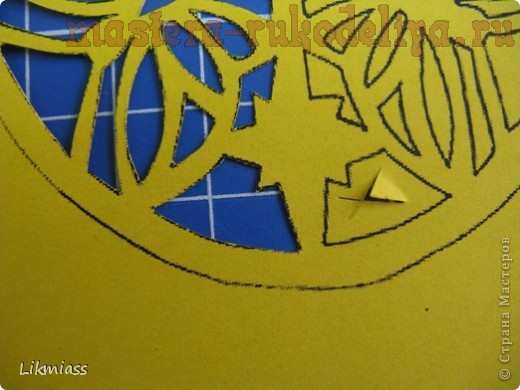
That's all. And let's move on to the lesson where I tried to show some cutting elements.
I haven’t seen MK on this issue, and I myself can’t quite imagine how it could be done, but I’ll try, maybe there will be at least some benefit. T.K. Then, when I started carving, I asked many craftswomen to show me how it was done, but it was not a rewarding task, so I had to somehow get out of it myself.
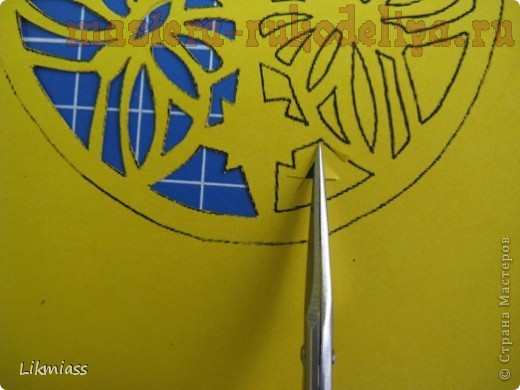
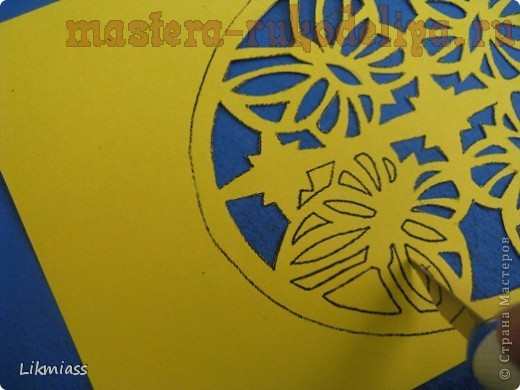
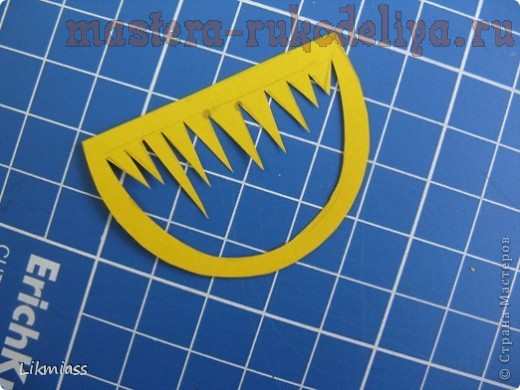
Before us is a partially cut out picture. We will cut out the bottom right element.

I cut with a knife, but I'll show you how to do it with scissors. We make a cut in the middle of the element. In general, you need to cut out small parts first, then large ones, and move from the middle to the edges. But because It’s more convenient for us to look at a relatively large element, so we chose it. This is an egg again, as a result it came out 10 by 8 cm.
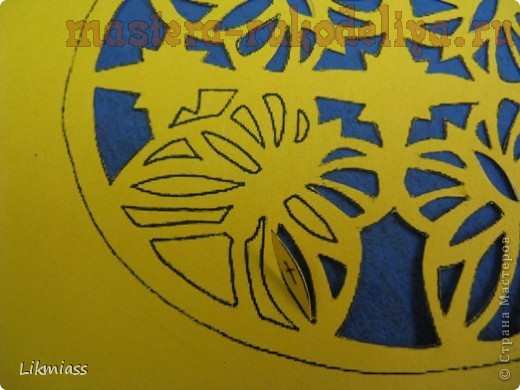
Now, using very good nail scissors, we make cuts from the center to the corners. The tips of the scissors should cut all the way through.
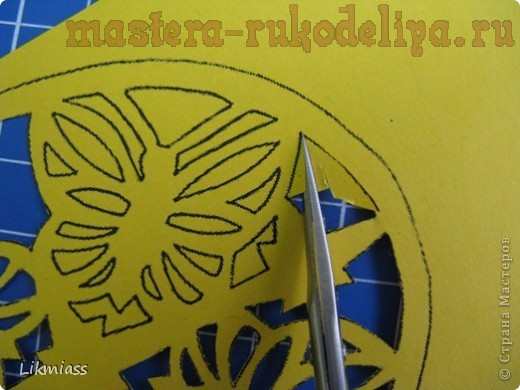
Having made a cut into the corner of our element, we turn the work and cut along the line to the nearest corner. There is one hole.
![]()
Now again we move from the middle to the corner to which we approached earlier, and to the next corner. The result is a sharp corner that looks inside the figure.

We turn the work and repeat the chicking operation into the middle of the next corner.
After the corner is cut, cut off the excess along the line from the right corner to the left.

I took a wrong picture, but you can still see our element in the upper left corner and we cut off the triangle remaining from the previous operation. Something like this.

Now we cut out the petal. It’s definitely more convenient to use a knife, but scissors are also good. If using scissors, then again make cuts from the middle into the corners and further along the line.
Using a knife, we draw from the corner along the left side of the line, i.e. the line is to your right, so you can see it better.
And on the second side. It's better when what you cut off is in your possession. right side, and not as I showed.
Naturally, you always hold the paper with your left hand, but I took photographs with my left (I was sophisticated) and, naturally, I only held the knife and did not cut.

We cut from the tip of our leaf to the tip, we try to make the cut accurately, otherwise everything will be visible on the reverse side (our front side).
It is more correct to cut like this, as I have drawn, so that the corners do not get wrinkled and when you cut from acute angle, the paper may be pulled. And so there are two cuts from the middle to the corners.
And this is a diagram of cutting out a figure with a knife, which we cut out earlier with scissors. . 5 cuts and the figure is ready.

Woo-ala! Our egg with butterflies is ready!

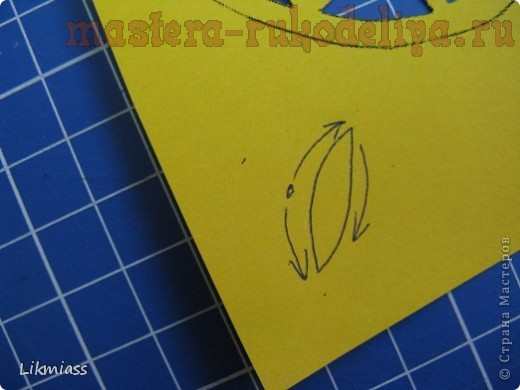
Let's try to cut out something like this, this is just a sketch for display, but in general such details are quite common, fir trees, grass, and all sorts of other things.

Make a cut along the line in the direction of the arrow
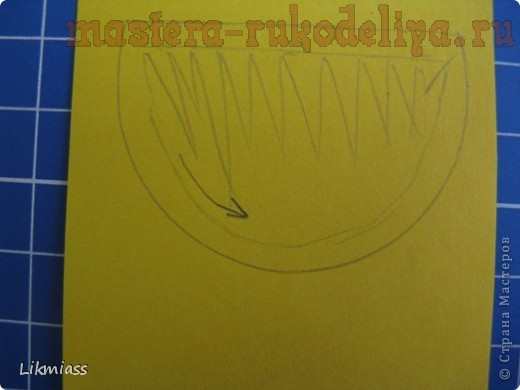
This is what it looks like.
Now we cut according to the arrows like this if you are working with a knife, but it is convenient to cut such Christmas tree herbs with scissors.

This is what happened with a knife.
We will cut with scissors and for convenience we will cut it like this, i.e. Let's widen our incision.
We take scissors and from our extended cut to the left, to the right along the lines we cut to the top of each corner

Woo "ala! Christmas tree, icicles, grass (who sees what) are ready
Something like that. My knife is not the same as I showed you, I have a knife for my finger, but something has become dull. This knife looks like a prototype, but a set of such knives for ridiculous money is nothing like a prototype.
These are wood carving knives. You can cut on a stele, but I like it better on a mat.
The knife and scissors must be sharp and the scissors must cut to the very ends. From experience, darker paper is better than light, and even more so white is better cut.
I haven’t tried cutting paper thicker than 80, but origami paper cuts flawlessly.
Vytynanka is the art of paper cutting, which originated in China back in the 9th century, from the time of the invention and spread of paper. Combines the traditions of silhouette and shadow paper cutting. A type of folk arts and crafts, this includes cutting out complex paper figures, small paintings and openwork patterns from plain paper. They were used to decorate the hut and the little room for Easter and Christmas; they were mainly hung on the windows. If a child was born or someone got married, then they always hung them on the windows. holiday decorations and by these protrusions it was possible to determine who had a child or who got married. For skillful work on cutting out original beautiful openwork patterns, it is better to use cutters or there is a special set on sale, which includes: a thick mat (wooden), several sharp scalpels, scissors, a metal ruler, a stationery knife, and spare blades. It is better to buy paper of different densities, although you can cut it on copier paper, colored paper, corrugated sheets, cardboard, even wallpaper or fabric.
Vytynanka is the amazing magic of cutting out white and colored paper. In China, in the seventh century, the first masterpieces were born, and since the beginning of the twentieth century, decorative and applied art has gained popularity in Russia and nearby countries. In room decor, vytanki are used to prepare festive events. Openwork appliqués on the theme of the holiday decorate the walls and windows of houses. When choosing a lace motif, use a template, paper, an awl, a sharp breadboard knife, and nail scissors. Painstakingly, with patience, cut out the decorative work according to the openwork pattern.
A question about beauty - I wanted to answer). ** Vytynanki or vitinankas are when we take paper, sharp scissors or a blade and cut out the openwork. Whatever fantasy comes to our minds, we cut it out. You see, this is an amazing activity - and it calms your nerves, because it greatly distracts you from sad thoughts. And it’s useful for children - it perfectly develops a sense of beauty, creativity and fine motor skills. It also helps to decorate your home, your room and your favorite kitchen. ** Having originated, almost as always, in great China twelve centuries ago, the art of making vytynanka is now experiencing a rebirth. You can cut any silhouettes, any figures with openwork. ** This comes in the form of beautiful napkins, paintings that can be used to decorate walls, surfaces, and so on. By the way, both everyday life and holidays can be decorated with such products. ** I myself really like to invent something out of paper. But when we were children, we also cut out snowflakes - these are piercings.
The art of decorating your home dates back to ancient times - even primitive people decorated the walls of their caves with drawings. The Chinese invented paper, which is why, since the 7th century, such a trend as creating paper paintings using the cutting method appeared. And in our time, this art has been revived in Ukraine under the name VYTYNANKA (from the word - “vytynat”, i.e. “cut”). The simplest design is ordinary snowflakes, which almost everyone cut out at school. A little more difficult is to fold the paper in half and also cut out a symmetrical figure, for example this Christmas tree: From many such small pictures you can assemble a whole panorama on the window - after all, protrusions are often made instead of drawing with tooth powder or paste before the New Year (due to humidity, such drawings can flow, but the paper will retain its shape). In addition, after the holiday you can peel it off the window (after all, it is glued to the soap) and put it away until next year. Sometimes vytynankas are made for other holidays, more often family or Orthodox ones: weddings, birth of a child, intercession, Easter, but they still look better on a dark winter window. How to do it? Print or draw any picture you like on paper, secure it with tape on the board, and use a market knife to cut out all the internal unnecessary parts, removing them immediately. And then the outlines themselves - this is how the picture will be disconnected from the main sheet. If you want to make several copies at once, place several sheets at once. A bunch of New Year templates can be found here.
Paper cuttings are called vytynankas and are currently quite popular. The roots of vytynanka come from antiquity - they began in China, along with the advent of paper. Also, the name “vytynanka” comes from a Ukrainian word, and if you translate it into Russian it will be cut out. That is, it was in Ukraine, starting from the 19th century, that they decorated homes, they were also used as amulets - they carved out a lot - various subjects. Currently, this art is quite widespread. And making them is quite simple - now there is a huge selection of templates, which you just need to print/draw and cut along the contour. Examples of protrusions.