An important attribute of any event dedicated to Cosmonautics Day is various crafts on the theme “Space”. These can be either stars and planets cut out of paper, or more complex man-made products: rockets and flying saucers.
Space rocket from a plastic bottle
This easy-to-make craft can soar up like a real space rocket! The model can be made for Cosmonautics Day and with its help explain to children the operation of some laws of aerodynamics.
We need:
- empty plastic bottle with cork;
- thick cardboard;
- scotch;
- a pump with a needle (a pump for inflating balls or swimming mattresses is suitable);
- some water.

Since the main purpose of the rocket is from plastic bottle- to let it go on a spectacular flight, at the end of which it, alas, will fall apart, it is not necessary to tinker with the model for hours, designing every detail. It is enough to make 4 parts from cardboard - a cone-shaped “roof” and 3 blades and tape them tightly to the bottle with tape.
Insert the pump needle into the bottle cap. Make sure that the hole matches the diameter of the needle, otherwise water will leak out. Alternatively, water can be poured immediately before launching the rocket. Now it's time to put the pump into action! You can see what a rocket flight from a plastic bottle looks like in video 1. From parts of a collapsed craft, you can assemble a new one and launch it dozens of times a day!
Toilet paper rocket
Believe it or not, you can even make a themed mini-masterpiece for Cosmonautics Day from a roll of used toilet paper or paper towel. In addition to it, we will need:
- Multi-colored paper for decoration (you can take leftover wallpaper, decorative flower bouquets, or stock up on a set of colored paper for creativity).
- Glue gun. You can do without it, carefully using a glue brush, but still with the help of this accessory the work will go much faster.
- Scissors.
- Beer glass.
- Becheva.
- Scraps of fabric or any other flexible material to create a flame tail at the bottom of the rocket.
If you were wondering why you need a beer glass for paper crafts, the answer is simple. According to the diameter of its neck, we cut out a round blank for the head compartment of our rocket from colored paper. We turn the glass over, place it on a sheet, trace it in a circle, and cut it out. In the resulting workpiece you need to make a cut along the radius.

We cut out a fragment from colored paper, which, when rolled into a tube, should be approximately 1/4 wider than the diameter of the sleeve and several cm longer than it. We wrap it around the sleeve and carefully glue it. Special attention We pay attention to the design of the edges.

We bend the edges of one of the sides (the one to which the head compartment will be attached) as shown in the figure.


Now we need to make a cone from our blank. Fold the paper as shown in fig. 5. and glue it well. Using an awl, punch a hole in the top of the cone and thread a double-folded twine through it (you will need it to hang the rocket). Tie the ends of the twine and pull them inside the cone to form a loop.


Cut the tape or corrugated paper onto the strips and glue them inside the paper tube from the bottom. Our space rocket has flames flying out of its tail!


Apply glue to the top of the tube and attach the rocket head compartment blank. When the glue is completely dry, the craft can be hung by the string.

Paper plate UFO
Simple decor for a room or school office for Cosmonautics Day can be done using a quick fix. The basis of the craft is ordinary paper picnic plates (plastic ones will not work, as they are not very convenient to paint).
Necessary materials:
- paper plates (it is better if they are of different diameters);
- markers;
- reflective tape;
- glue.

One UFO consists of 2 plate halves. We paint the bottom of two plates in the same style. We cut the reflective tape into narrow strips 10-15 cm long. We coat the rim of one of the plates with glue and glue the strips of tape, keeping equal intervals. While the glue is not dry, cover this half with a second plate to make a “sandwich”.
Beautiful craft is ready! Such toys can be thrown like frisbees (not a bad idea for a competition for Cosmonautics Day).
3D flying saucer
If you believe modern media, not only rockets and shuttles roam the expanses of space, but also UFOs. For Cosmonautics Day, you can make a three-dimensional model of an alien spaceship at school or a themed group. The craft can be used not only to decorate a stand for Cosmonautics Day, it can also be exhibited at other themed events, for example, at Halloween celebrations.
You will have to tinker a little with cutting out the base from wood. As an alternative wooden base For a plate, any round element of sufficient diameter will do, or you can take a ready-made one (for example, you can cut a circle out of polystyrene foam). In addition, we will need a tarpaulin (preferably with a reflective effect), several wooden blocks, a clear plastic breakfast cereal plate and a toy in the form of an alien.
In Figure 1-5 you can see what a three-dimensional flying saucer looks like at different stages of creation. If you surround her electric garlands and alien figures, you will get a luxurious installation for Cosmonautics Day.
In our material you will find the most interesting ideas for crafts on the theme “Space” that a child can make with his own hands for projects at school or for self-study Universe.
The mysterious cosmos and everything connected with it have always fascinated both adults and children. Is there life on Mars, why do stars glow, how to get to the Moon - . If your child enjoys this topic, encourage him to explore space in more detail. They will be a wonderful start. And so that studying your favorite topic does not turn into boredom, invite your child to make it with his own hands interesting crafts about space for school.
Such DIY children's crafts about space not only have an educational effect, but are also perfect for concentrating a student's attention. With their help, you will be able to act out stories from them well, your child will learn more about the solar system and will be able to prepare well for thematic lessons at school. Just imagine the joy of a child when his craft about space at school receives a lot of praise!
How the Solar System works: a cheat sheet for children's crafts for school on the theme of Space
Tell your child how the solar system works: what planets are included in it, how far the Earth is from the Sun. Let the child gradually remember the names of all the planets. Don't rush it - it will take time.
Crafts for children on the theme "Space" with your own hands


.jpg)
.jpg)
.jpg)
If nothing works with foam plastic, you can draw planets on cardboard and place them in the same way as foam plastic, as shown in the pictures above.
.jpg)
Planets are an absolute element of any craft about space. Making similar planets from threads is not difficult. Step by step instructions and what you need for the craft you will find in our master class on how to make it, because the principle is the same.

.jpg)
Saturn made from a foam ball and an old CD - a great idea for a small craft about space with your own hands. Main- find at least one old disk at home.

An interesting mobile made of felt planets, stars and a spaceship will become an entertaining craft about space with your own hands for a child, because it will require time and patience. And such a mobile will be a wonderful decoration for the room. If it’s hard for your child to handle, let him build a similar mobile out of paper.

What about a soft solar system? These pom-pom planets are very pleasant to hold in your hands and can be easily carried to school for lessons. - do not wrinkle and fit easily into a backpack. , read the link.
.jpg)
Simulating the surface of the Earth - a very beautiful and simple craft. A child can make it as a craft on a space theme, because the Earth- this is one of the planets of the solar system, or as a craft to school on Earth Day. Watch the master class on how to do it at the link.


Every space lover dreams of flying there one day. But while your child is still learning the basics of space exploration, invite him to make a rocket like this. Both a great toy and an incentive for a future profession!
.jpg)
.jpg)
When studying space, you simply cannot do without stars and constellations. Having made a similar craft with your child from toilet paper rolls, rubber bands and cut out paper diagrams of constellations, it will be more interesting to study astronomy. Poke a needle through the black dots on the diagrams, stick over the black paper onto the sleeve and secure with an elastic band. The child can look into the sleeve as if through a telescope, or use a flashlight to illuminate the holes from the inside. You can download constellation diagrams from the link.

It’s very simple to make a craft on the theme of space and planets with your own hands, which you can also wear on yourself. Girls will especially like this. You will need beads of different sizes and colors. If there are no beads of the required colors, do not let the child be upset, because they can always be recolored.
Now, when your child needs to make a space-themed craft for school with his own hands, you won’t have to spend the whole evening racking your brains about what to build and how. And here we are for some reason confident that these DIY crafts will captivate not only children, but also adults. Make interesting crafts with your child, watch educational cartoons, read and discover the secrets of our Universe together!
Before Cosmonautics Day, various exhibitions of crafts are organized in preschool and school institutions. Today a space rocket, UFO or solar systems easy to make even from scrap materials. Have fun with your kids and turn disposable tableware, cardboard boxes or toilet paper rolls into creative crafts on the theme "Space". You can make many unique products yourself.
Flying saucer made from paper dishes
Interest in UFOs arose quite a long time ago, so any child will be interested in making a flying saucer, which he often saw in films and cartoons. The easiest way to make this craft is from plastic or paper of different sizes.

A UFO made from two plates, one of which serves as a control cabin, will look original. In order to glue them together, you need to make cuts in the lower part of a small plate, and then bend them in a circle and glue them onto a large plate. If you are working with paper materials, then this can be easily done using regular PVA; it is better to glue plastic with hot glue. Don’t forget to paint your craft with acrylic paints and decorate it by gluing regular buttons along the outline.

A flying saucer made from half a large egg from Kinder Surprise will look original. You can even use part of a plastic egg; it will be much more convenient to glue than the larger half. Don't forget to decorate your craft.

DIY space station
From toilet paper rolls and towels you can make either a ship or an entire space station. For this you will need plastic bottles, double-sided tape, spray paint, plastic plates or bowls, acrylic paints. First, consider the design and dimensions of the future station. After that, prepare everything necessary materials and tools. The parts can be glued together using tape or hot glue. Make the base of the station from a 1.5 or 2 liter bottle. A beautiful stand is made from disposable plates or containers, which will need to be turned over and placed on top of each other.

Attach one long towel roll and 6 small ones at the bottom to the bottle. Small parts from old toys may be useful for making a space station with your own hands. After you have completely assembled the craft, you can start painting. First use spray paint, and then apply a pattern or some kind of design with acrylic paint. This craft will definitely win at the space exhibition.
If your craft consists of a small number of small elements, then instead of paint you can use regular foil, which covers the entire craft.
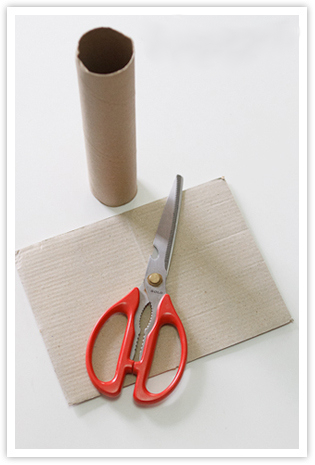
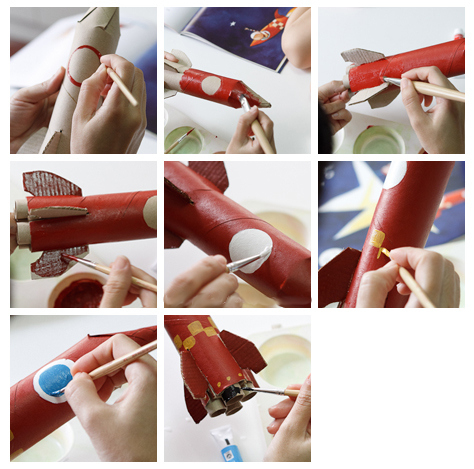
Master class: How to make a rocket
It’s easy to make a real space rocket from an ordinary cardboard roll, which most often ends up in the trash after use. To do this, take a roll and a piece of corrugated cardboard. After this, make 4 cuts on the roll up to 5 cm deep and twist them to form a cone. This will be the top part of the rocket. Glue it tightly with PVA.


Rocket made from cardboard boxes for children

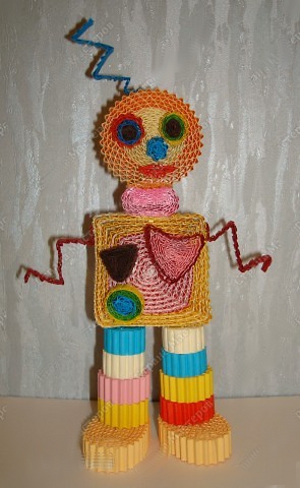
Space robots from scrap materials
If your child is delighted with robots, there is no need to buy a ready-made toy in the store. Try to make a beautiful robot with your own hands. This does not require any specific knowledge or skills. You can use regular cardboard boxes of different sizes and toilet paper rolls. Give the fake a metallic effect using foil.
Hello, dear readers and guests of the site!😍
Such a distant and endlessly attractive, charming space! Not every adult understands the fullness of this concept, let alone children. Every boy dreams of going to space, and girls won’t refuse either. Therefore, there are now a lot of planetariums and exhibitions on this topic. Schools and kindergartens are not lagging behind and for Cosmonautics Day they are organizing an exhibition of the works of their students.
In order not to search for ideas for a long time, we will make an amazing selection for you by April 12. We bring to your attention an extensive overview of delightful ideas for different ages. We make crafts and tell the children about Gagarin’s first pallet. Nothing brings children and parents closer together than sharing and interesting time seeing off.
In today's review you will find ideas for postcards on the theme of space, appliques, paper and cardboard work. All ideas were found on the Internet and we invite you to familiarize yourself with them.
Let's go!👨🚀👩🚀✨
Interesting crafts for Cosmonautics Day for kindergarten and school
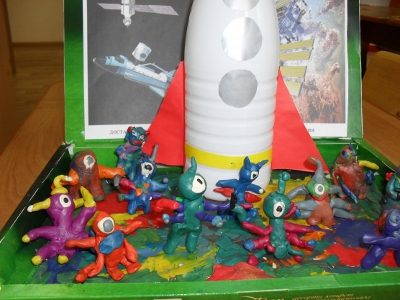
Let's start with a selection of amazing works made from plasticine. Creativity allows you to develop hand motor skills, thinking and imagination, and children simply need this. For creativity we will need:
- plasticine;
- cardboard;
Look how beautiful it is!

Children have amazing imagination, help your child develop through creativity. In the picture below, the sun is made of shiny packaging, the planets are made of plasticine, and the people are made of paper. This is how one application can combine several materials.

All works are individual and beautiful.

Plasticine applications are the easiest for kids to make.

Even a child can handle this application. We draw a rocket, planets, stars on cardboard. We show the child how to make small balls from plasticine and first decorate the picture together. Developing our fingers.

Let's move on to volumetric work that is suitable for a cone in kindergarten and to school. For creativity we need:
- Box (suitable for shoes);
- Plasticine;
- colored paper or watercolor paints;
- Colored cardboard (dark blue or black);
Let's take a box and cover it with colored paper, or you can do it a little faster and just paint the box. Then we make a sun on colored cardboard in the corner. We make flagella from white plasticine and attach them to cardboard. Next we make planets and fix them on flagella. We make stars, rockets, people and aliens from plasticine. Glue the finished applique to the bottom of the box. We attach the figures to the wall of the box.

Another option for working in 3D. We also take a box as a basis, draw the sky and stars. We attach plasticine planets to strings.

The work process is the same, but the applications turn out completely different.

Continuing the theme of plasticine crafts, we invite you to draw or print a picture. And draw it with plasticine. See an example below.

The creative process is not only interesting, but also develops attentiveness and perseverance.

Space applications for preschool age.

DIY crafts for Cosmonautics Day
And so, we begin the simplest tasks that the child himself can handle. And the first option would be to make a craft from cardboard sleeves.
For work we need:
- cardboard (toilet) sleeve;
- glue;
- paints or colored paper.
The picture below shows the process of creating a rocket. As you can see, it’s not at all difficult to make.

Is there some more step by step photo how to create a spacecraft.
For creativity we will need:
- sleeve;
- colored paper;
- glue and scissors.

How do you like such bright rockets, here they are already decorated with colored paper. And we send the minion into space.

They make amazing space rockets in kindergarten. The guys flew to the moon.😉

Let's move on to the flying space saucer. It also relates to space and is interesting for children. We will make it from scrap materials.
For creativity we need:
- paper plate;
- plastic bottle;
- glue;
- markers or paints
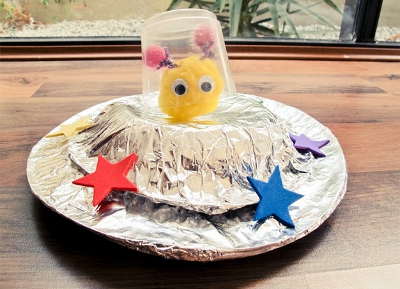
Take two paper plates and glue them to each other. Then we will paint it on both sides with felt-tip pens or paints. If you don't draw very well, then it's better to outline or print the alien. Let's color it brightly. From a plastic bottle with a volume of 0.5, cut out a ring 5-6 centimeters high. We attach it to the plate using plasticine or glue, and insert the alien inside. This is the kind of original work we produce.

There is another version of the flying saucer. Making it is also not difficult. We take a paper plate, decorate it with paints, maybe even plasticine. Let's create an alien from plasticine. If there is a transparent candy jar, then it's great that we need it. No, it doesn’t matter, we’ll make it from a plastic bottle. We put the alien inside and attach the jar to the plate.

Oh, there are still such aliens in space.

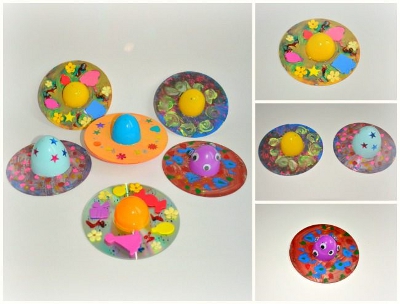
Space dishes can be made in different ways and from different materials. How do you like space crafts made from old disks and a plastic Kinder egg? Glue long skewers.

Friends, look what kind of flying saucers preschool children are making.

Let's move on slowly to complex versions of creativity. We found such a wonderful job on the Internet. Perfect for an exhibition.

We make a huge rocket with our own hands from a plastic bottle.
For work we will need:
- plastic bottles;
- colored paper;
- clear tape
We cut the bottles and fasten them together with tape. Then let's take colored paper and decorate the space rocket. So that our craft does not accidentally get wet, and the paper does not tear. Carefully wrap the top with tape.

The result is such a beautiful, bright rocket.

I would like to note another creative option such as felt work. Here, of course, you definitely can’t do without your mother. Soft and interesting rockets. Children's rooms are often decorated with such toys.

Craftsmen make appliqués and even tutorials from felt.

Felt is not a fancy material, it is a pleasure to work with it. If you cook, work in the kindergarten for junior groups, then felt will help you with this perfectly. Most often, applications are made using Velcro. So that children can touch, attach and detach parts.
 source: Yandex pictures
 But we won’t limit ourselves to felt. And let's crochet space!

How do you look at this option?

And they couldn’t show you such wonderful space toys. Do you think it will be good for the competition?😉😍

Cosmic ideas from the land of Masters
The following ideas that we will show you were found on the website of the country of Masters; the authors post photos of their crafts. Maybe you will find some interesting ideas for yourself. There are very few days left until April 12th.
Charming DIY paper lunar rover. What kind of endurance is needed to create such a masterpiece?
 Source Country of Masters:
  Source: Country of Masters: Author: desert
 Making the following craft is very easy. It is created entirely from plasticine. Benevolent Martians greet the Russian cosmonaut. Great!
 Source: Country of Masters: Author: Timofeevna
 Rockets for April 12th, a great craft for an exhibition or competition. Made using modeling and design techniques.
A Russian guy took off in a rocket,😎
I saw the whole earth from above.
Gagarin was the first in space... 👨🚀
What score will you be?😍
 Source: Country of Masters: Author: YULIA Ryadskaya
 There are an incredible amount of ideas. All works are amazing creative activity The guys are seething and it’s wonderful!
 Source Country of Masters:
 - old disks;
- plasticine;
- half a plastic egg from a kinder surprise.
 Source: Country of Masters: Author: Pelargonium
 I really liked the idea with the planets. It turns out to be a whole benefit for children. To work you will need:
- colored cardboard;
- decorative glue;
- Double-sided tape;
The craft is made using the paper tunnel technique. We prepare the basis for work. To do this, take blue cardboard and fold it like an accordion so that the lines are one centimeter wide. We will need two parts.

Then we prepare cards with planets. Take colored cardboard, cut out a circle of the same diameter for everyone, decorate it with sparkles, and attach stars. You can make the planets yourself from colored paper or cardboard. Oh, there is an easier option, just print it on a color printer.
 Source: Country of Masters: Author: Elena Oleynikova
 All that was left was to combine everything prepared into one whole. Let's take the base, namely, roll the part into an accordion, carefully glue the double-sided tape. Glue the sheets of planets onto tape.
 Source: Country of Masters: Author: Elena Oleynikova
 We'll do the same on the other side. Thus, the craft will be stable and the “tunnel” technique will be clearly visible.
 Source: Country of Masters: Author: Elena Oleynikova
  Source: Yandex pictures
 DIY ideas for crafts on the theme of space from waste materials
It is becoming more and more popular to make crafts from waste material(handy), in other words, what you have at home will definitely be useful for creativity. Oh, you also think so, that there is no need to throw things away?😉 We give a second life to the material at hand.
How do you like this comic rocket made from a plastic bottle and cardboard? We can say that the work was done using modeling techniques!
 Interesting idea from disposable tableware, plates and glasses.
 On the vastness of the world wide Internet, ours has such a cool job. People are good at making up inventions. And it’s so pleasing how creative our people are. Make a race car for aliens using plastic shampoo bottles and caps.

Soap box lunar rover. This is what hands from that place mean.😉😍

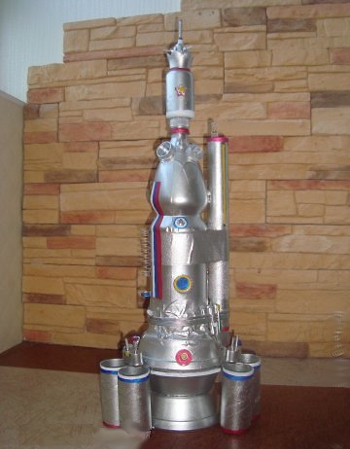
Wow, you found a tinfoil space station.

The alien says hello to you! For creativity you will need:
- two disposable spoons;
- two deep disposable plates;
- one flat plate.
- plasticine;
- straw straws;
- foil
We wrap all the plates in foil and glue the parts to each other. We make aliens out of spoons and straws. Next we decorate with plasticine.

I also offer you such material as puff pastry. Do you have any favorite space heroes?

For children, such creativity will be interesting. Once the dough has hardened, allow your child to color the work themselves.

We create a voluminous space work with our own hands. Cut off the bottom of the bottle and cut out a window. We put the sock on the bottles and cut off the unnecessary part of the fabric. Carefully make a cutout and cover it with paper around it. Then we’ll finish the rocket, attach cardboard parts, and make clouds from cotton wool.

Paper crafts for Cosmonautics Day for children
How come our selection won’t include works like this? simple material, which is easy to handle and you can create whatever you want with it. Let's start with simple applications - children love them very much. There are ready-made ones in stores, but we are not looking for easy ways and will create them ourselves.
Astronaut template.

Ah, this is what happens in the end. I really like it, how about you?

The astronauts themselves, beauty! There are so many ideas that your eyes just run wild, you want to do everything at once. It's a shame that this is not possible.

April 12th is a holiday, but what do we always cook with you from paper? I think you already guessed that we are talking about postcards. So let's see some ideas, maybe you'll like something for yourself.

In order to make a postcard we will need the following materials:
- colored cardboard;
- colored paper;
- templates;
We trace the templates of the month, stars, astronaut and rocket on colored cardboard and cut them out. Then we glue all the details onto the front side of the work.

There is such a simple idea to implement.

Summary:
Cosmonautics Day. DIY crafts for Cosmonautics Day. Children's crafts on the theme of spaceIn many schools and kindergartens last years They began to organize exhibitions of children's crafts on the theme of space on the eve of Cosmonautics Day. In this article we will tell you about what interesting crafts you can make with your children for this holiday. The most popular material used for crafts for Cosmonautics Day is the so-called. waste material: plastic bottles, cardboard boxes, cardboard toilet paper rolls, parts from broken toys, etc. When making crafts, it’s also good to have a glue gun on hand.
1. Crafts for Cosmonautics Day. Flying saucers
It's very easy to make a flying saucer from disposable plastic or paper plates. For this Cosmonautics Day craft, select plates of different diameters and depths.
The finished flying saucer can be wrapped in foil
or paint it with silver spray paint. Don't forget to make signal lights for the flying saucer, for example, from buttons or rhinestones.
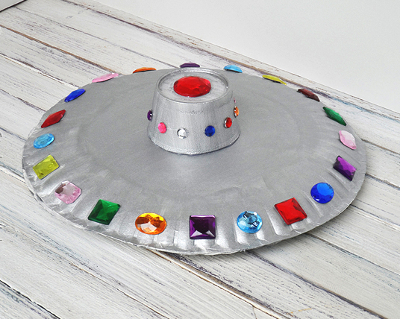
You can also make a flying saucer from an unnecessary CD and half a Kinder egg.
2. Cosmonautics Day DIY crafts. Starships, space stations
In this section we will tell you about one interesting way to make crafts with your own hands for Cosmonautics Day. A beautiful starship or space station can be made from waste material that you can easily find at home. Using a glue gun or double-sided tape, fasten all the parts of the craft together. Finally, paint your Cosmonautics Day craft with silver spray paint. Additional details can be painted with acrylic paints.

Here is another example of a similar craft for Cosmonautics Day. The body of the space station is made from an old aquarium filter, a wheel from a typewriter, a plastic bottle, remnants of pens and all sorts of broken toys, the wings are a cut floppy disk. Everything is covered with spray paint. Link .

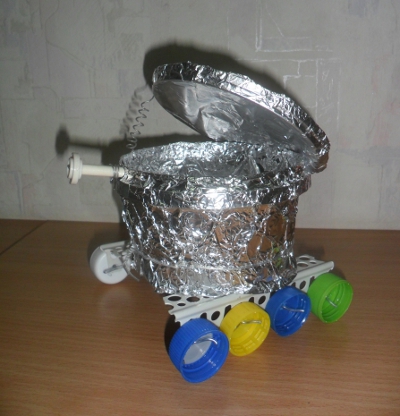
If your space-themed craft made from scrap material doesn't have many small parts, you can simply wrap it in foil at the end. Look at this lunar rover made from a plastic jar and bottle caps.
3. Space crafts. How to make a rocket with your own hands
The easiest way to make a rocket for Cosmonautics Day is from a cardboard roll. In the photos below you will find a detailed master class on how to make this space craft with your own hands.
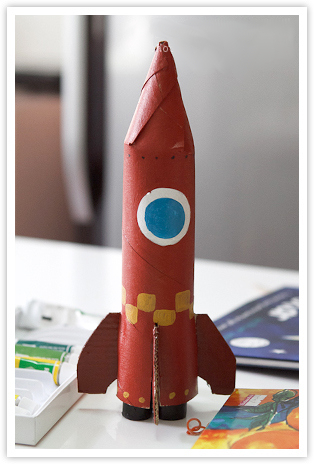
Make cuts on one side of the roll. Twist the strips into a cone and glue them together.

Use an extra piece of cardboard to make a rocket stand and engines.

Paint the rocket with paint. The space craft is ready!
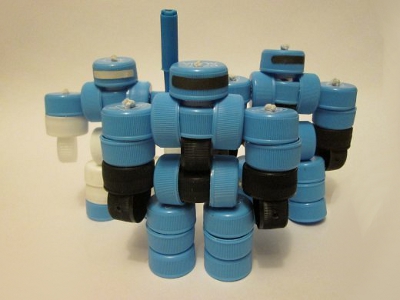
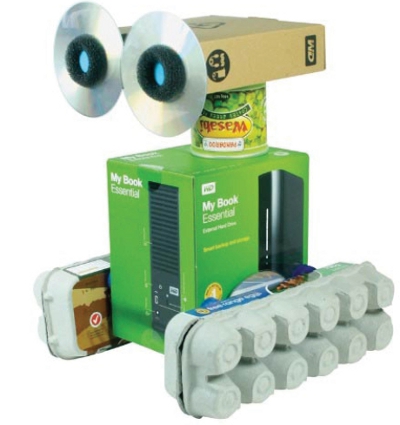
Robot made of corrugated cardboard. Link
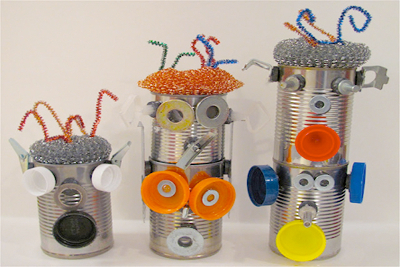
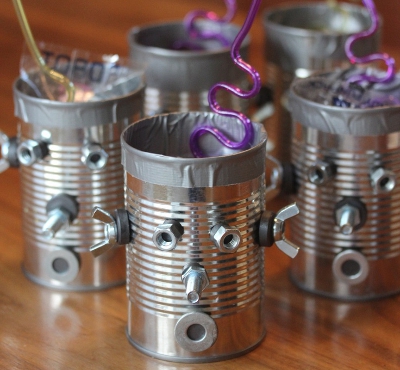
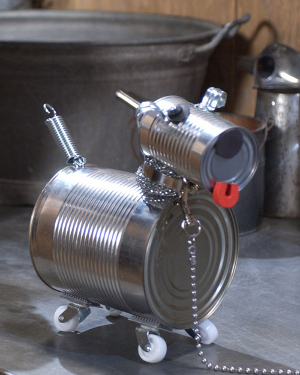
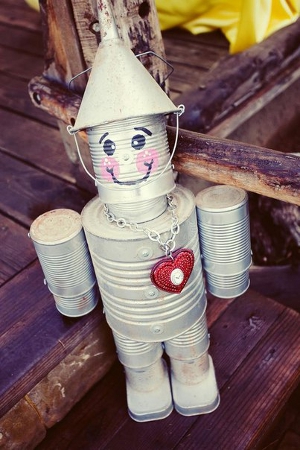
Robots from tin cans
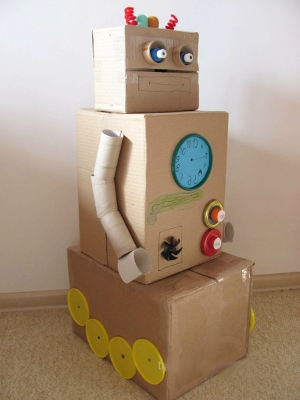
Robots made from cardboard boxes
5. Children's crafts on the theme of space. Aliens
You can make a humanoid from newspapers and napkins, wrapping them on the outside with foil.

You can make an alien out of plasticine
or made from waste material.
6. Crafts for Cosmonautics Day. Paper applique on the theme of space
A simple craft for children for Cosmonautics Day is a paper applique.
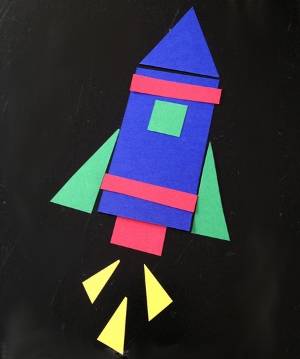
Geometric rocket applique
Paper rocket using origami technique