Recently, there is an increase in the popularity of shower cabins. They are installed both in apartments and in private houses. A shower cabin takes a minimum of space, and the possibilities provide considerable. This is especially true of the premium Cabin.
Installation of a shower cabin presents certain difficulties, because modern cabin It is a multifunctional unit, which combines the functions of the shower, fan, hydromassage, radio and other additional elements. There are boils with steam generators, as well as with thermostatic mixers, allowing to maintain a given water temperature with any changes in the pressure and temperature of water in a common system.
Step 15 On the crushing pump there is another side entrance, which we will not use, so we annul it with a plastic lid, which includes the kit. Step 16. The next thing we will do is. We present it glued to the crusher, mark the attachment points and make holes.
Step 17 Insert the screws into the toilet, place the gauze into the outlet and secure it with a clamp that we must tighten to prevent leakage. Step 18 With a fully performed connection, we complete the installation of the toilet, well tightening nuts with. Step 19 Now we need only to put the pipe that will take wastewater from the tank in the overall drain.
This article will describe an instruction on the installation of a shower-free class with a description of the full list of work. An independent installation of the shower cabin is made according to the attached instructions and in a specific sequence. Only so can ensure that the design will be reliable and durable.
How to install a shower cabin with inclined floor?
Step 20 On the other end of the ascending Canal, we will place the elbow, add another plastic tube and give the last to the total leakage, by following the minimum tilt specified by the manufacturer. Finally, we connect the crusher pump and check the correct operation of the system.
Why not italian souls?
It is true that many solutions exist today and perfectly adapted to spatial restrictions, as well as to the taste criterion. Finally, get the real space of well-being! Depending on your ambitions and your budget, you will quickly choose between two large families who have several similarities. However, installation and installation procedures differ greatly and can quickly complicate your life, especially if you have not taken care to explore the place and type of plumbing available in your bathroom.
First of all, you need to decide on the place of installation of the cabin in the bathroom. Typically, the installation is produced in the corner of the room. Of course, the cabin should be angular.
If it is planned to be installed near one of the walls, the cabin should be purchased.
For example, the login system known as the "Italian shower" is highly appreciated for its inalienable advantages: most of the time it is an open, easily accessible your bathroom is a chic and trendy look. However, it is a complex and subtle implementation to make yourself, and for which you will have to double your attention, especially with regard to evacuation of water and waterproofing assembly. From now on, two design methods are available to you.
Advantages of the built-in shower
Make a screed yourself: in this case, in particular, you will need to make a casing to seal the ground under the tie. Use the shower tray ready for the tile: In this case, the seal is performed using sealing strips on the progress. You can also decide to install a full cabin in its space supplied in the form of a ready-made kit. This type of installation is less expensive than the stone bungalow system, however allows you to get a lot of functions, depending on the budget you want to allocate.
Previously to the place of installation it is necessary to bring electricity, water and drain pipe. If necessary, the cab is installed on some elevation, providing a normal drainage of water into the sewer.
The following elements are usually included in the shower kit:
- pallet;
- doors;
- top cover;
- rear panel;
- side walls;
- additional accessories.
Independent implies an assembly in place, that is, the finished product is going from individual components. Such an assembly allows you to install the cabin of relatively large sizes in the presence of narrow doors in the bathroom.
What functions has a modern shower?
As a rule, the device includes a receiver, walls and all fittings. However, you will not be able to free yourself from a certain number of settings to a minimum. Also, do not forget to install the system in the expected location next to the inputs of hot and cold water.
To avoid all forms of unforeseen circumstances, we advise you to rely on a professional wizard to install your soul to make you most inform you about choosing your future installation. This will give you an expert advice and expertise. You should also know that if you go through a specialist, you can get a tax credit depending on the nature of the work.
Installation of the shower - instruction
Work begins with the installation of the pallet. Any pallet has a design that provides a flow of water, so do not need an additional slope of the pallet. The installation of the shower pallet is produced in a horizontal plane, according to the testimony of the construction level.
![]()
Siphon for the floor :: This type of evacuation requires the availability of space under the receiver and must have a proper size to be effective. Krivoship: This evacuation gives the advantage of easier access to evacuation and, moreover, more design. Evacuation type exists in the center or not. . To ensure a fast flow of water and the perfect seal of the shower area, career is required when the siphon is installed and the drainage tube is installed to ensure the perfect sealing of the entire area.
Waterproof screed: It consists of creating the lower part of the shower with a leaf of a synthetic material that makes it hermetic before coating with a screed. The stand must take into account the tilt of the drainage from 1 to 3% to ensure the flow of water into the siphon. Whale for tiles: the solution is easier to implement, as it is enough to build a receiver in readiness for tile and soul plum. Evacuation slope is already provided in the receiver. Decorating Recommendations: Avoid selection of a large tile to cover a set receiver, which should be laid with tiles, you risk losing the desired slope to the siphon.
The horizontal installation is provided by adjustable legs located below the pallet. Drop of the pallet connects with the sewer pipe.
It is advisable to use a siphon that protects you from an unpleasant smell that comes from the drain pipe.
Connection locations are additionally closed with silicone sealant. The hermetic gasket that prevents the flow of water from the pallet must be located below the pallet.
Preparation of composite elements of the device to assemble
Prefer a small format plate, even pebbles with very pleasant rendering, which also possess anti-slip properties. To avoid young children, the risk of slip, you can also plan a tick grid on which they will be safe.
What is the Italian shower to choose?
Italian shower is easily installed in all bathrooms, large or small. This option is often done in relation to the allocated space, if necessary or envies the space completely open in the bathroom or, on the contrary, a space in which there is little freedom, in this case the wall is perfectly suitable for a matte glass shower or glass brick. Choosing a coating: There is almost complete freedom!
The next step will be the installation of the back wall of the cab. It is screwed to the pallet to the pallet in strictly defined places. Connection locations are recommended to be asked for.
After that, the side walls and the upper dome are installed. The top panel is mounted bolted to the rear wall. Until the attachment, you need to connect the necessary items to the top panel, since as a collected form, access to the ceiling of the cabin will be difficult. The top panel usually includes shower, radio, lighting devices, fan and some additional comfort devices.
Why replace the bath shower?
What is the price of replacement of an old bath shower? What is the cost of replacing the bath shower? To improve the comfort of the whole family, it may be necessary to repair partially or completely its bathroom. You can also install a shower, replacing it with an old bath, without converting the whole bathroom. The price for replacing the bath shower is lower than the complete reconstruction of the bathroom.
Indeed, the bath has some drawbacks in everyday life. Especially in terms of surface loss, because the bath is a more impressive element than a simple shower. Because of this, it is quite logical to want to remove your old bath to install a new shower and, thus, to increase the surface of your bathroom. This replacement project can be earned up to 2 m². Whether it is a simple shower, a shower cabin or a shower for balneotherapy, you can repair the bathroom, performing some work.
Nuances when installing a shower cabin with their own hands
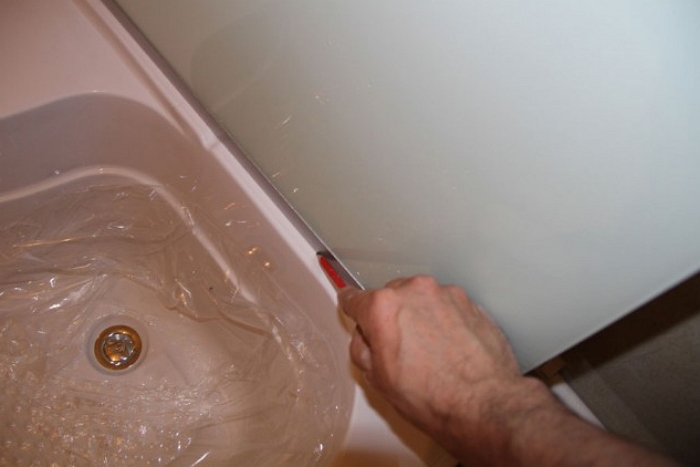
Next, the guides are established by which opening flaps will move. The lower poloz is installed, and the fixed glass sidewalls are inserted into it, which are tightly fasten with self-draws. Places of all connections are treated with silicone.
Many are interested in the question of how to establish a shower cabin, if the instructions are attached in an unfamiliar language. Difficulties may occur with the installation of doors and side walls.
Main stages of mounting shower
One or two days you can completely convert your bathroom, successfully completing the work on the replacement of the bath shower. However, the availability of the bath provides a real charm, there is a bathroom. Is it for a relaxing or romantic bathroom, a bathroom with a bathroom has a warm and convenient image.
Updating your bathroom without major jobs
One of the main advantages of replacing the bath with the soul is that with minimal work you can completely change the use of the bathroom. Repair your bathroom does not necessarily entail serious work. No need to split the whole bathroom to repair it. Localized work, such as a shower bath replacement, can be enough to redo its bathroom.
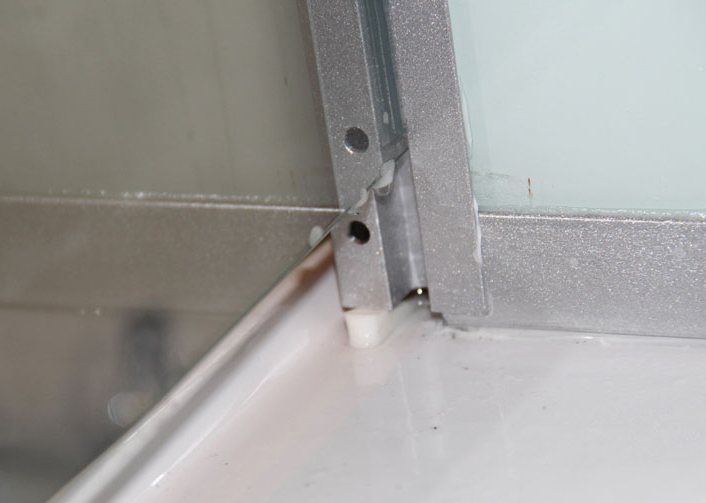
Upper poloz is always wider than the lower. The top of the door and the top of the side wall can have more holes than the lower parts of them.
The door of the shower cabin is not initially ready for installation. They need to establish accessories. On each moving door there are special holes in which two pairs of rollers are inserted. After fixing the rollers, the doors are inserted into place, and the rollers are reached in guides.
What is the price for replacing the shower on the bath? Convert your bathroom in the bathroom with shower. Performing repair with minimal work in the bathroom, you will also save at the cost of the site. Indeed, the cost of replacing the bath shower is about € 000.
Bathing shower bath
Discover the work on replacing the bath shower easily and without the need to attract a professional building. It should be noted that this site is not within reach of all amateur email workers and that a certain period of time may be required depending on the current situation in the room: what floors and walls are covered? Do you need to put tiles in the shower?
After the door canopy, the lower guides are set to install, which are designed for the safety of opening and closing doors.
The fact is that in the process of movement, the door can shift, which will lead to the output of the rollers from the guide. As a result, the door can simply fall out of his place. The limiters hold the doors in a vertical position.Preparation for assembly
Before you can build a shower in your bathroom, you must remove the bath to free the place. The easiest way is to build a shower in exact place of the bath. Thus, you will benefit from the arrival and evacuation of water, which clearly limits the work that needs to be performed. If the new shower does not take the same place as your bath, work will be more consistent.
Install shower instead of bath
- Let the coming and evacuation of water from the bath.
- Cleaning or distraction for the arrival and evacuation of water for the shower.
- Reconstruction of the place of the bath.
- Preparation of the place and construction of the soul.
On the final stage Cabin installations are connected to all communications. The drain pipe is already connected, so it remains to connect water and electricity. As a rule, all communications are fully made in modern shower cabins.
The supply voltage is connected to a special reduced adapter. Water is supplied to the cabin connectors with flexible hoses. Before the first use of the cabin, it is necessary to check the tightness of all connections, being outside the shower.
Replacing the price of a bath for shower
Indeed, the installation of the soul requires some knowledge in the plumbing, but also for independent installation seams, laying tiles, etc. Therefore, this is an important step, since the construction of a shower guarantees the durability of your installation. Bath replacement Shower does not require serious repair work. Indeed, the work is limited to the removal of the old bath and construction or installation of the shower. Depending on the bath removed or the shower model, which will be installed, the work will not be the same. The cost of replacing the bath in the shower depends on several factors.
 How to install a shower cabin and use the hydromassage normally, if there is a small water pressure in the overall system? Simply put, difficulties arise when using cabins for those people who live on the upper floors multi-storey houses. Of course, water pressure in such apartments is weak.
Price to replace bath shower
Fully bathroom repair requires great work blocking access to this number for several days or weeks. Not to mention the cost of repair, which can easily exceed € 000 depending on the size of the plot. You can replace the bath or shower only in one day. These costs cost from € 000 to € 000 and include.
- Removal of bath with waste evacuation.
- Construction of a new shower or installation of a shower room with a connection.
In this case, the apartment can be installed in the apartment. It is crashed into the tap pipe and works in manual or automatic mode. As a rule, such a pump is enough to raise water pressure in two or more times.
As you can see, the installation and connection of the shower cabin-process is complex, but interesting. Sequentially performing all the points of instructions, you can achieve an excellent result on your own, which will allow you to be proud of the results of your work for many years.
Replacement leads a bath with a shower
If your work is limited to installing the shower cabin or the construction of the shower, the installation price of the shower is from 000 to 100,000 euros. The price is more expensive depending on the workforce of the plumber, selected materials, bathroom, etc. Bath replacement shower is not within reach for the first wizard. So you will be sure that.
- Repair of this water will be performed perfectly.
- This shower bath replacement project will continue no more than a few days.
Shower cabins, thanks to their convenience and a wide functionality, gradually displacing traditional baths in small-sized apartment. However, the installation of the shower cabin is much more difficult to install the bath. However, this plumber can be assembled independently, if you use the right tools, high-quality materials and follow the instructions, how to install a shower cabin with your own hands. In this article, you will find detailed information, how to properly assemble a shower cabin.
Order of preparatory work
During the preparation, it is recommended to learn all the schemes and instructions that the manufacturer attached to the cabin. Instructions for assembling the shower cabin attached to it when buying. It is often difficult to understand in all guides and schemes from the first time, but better stock patience and carefully understand everything. The better you are in the essence, the clearer will be imagined to represent the future assembly of the shower cabin and make less mistakes during installation.
Also, you need to so much about getting the appropriate allowing documents. If the installation of shower cabins will be carried out on the place of the bathroom, then nothing to worry about it, but if the cabin will be put together with the bathroom, then you have to notify the relevant services, since the additional point of water intake in the bathroom needs to be design.
- explore the installation instructions before the start of work;
- check that the floor is perfectly smooth at the installation site;
- places of joints of the plots thoroughly insulate;
- places where the pallet is connected and the frame should be sealed.
Installing the shower cabin with your own hands will be difficult if you follow these recommendations.
IMPORTANT!
What tools will need?
Whatever model you do not acquire installation and assembly of the shower room with your own hands consist of the same stages. Great popularity enjoys corner options. All of them consist of identical elements that include:
- back wall;
- racks;
- side panels;
- roof;
- pallet;
- screen.
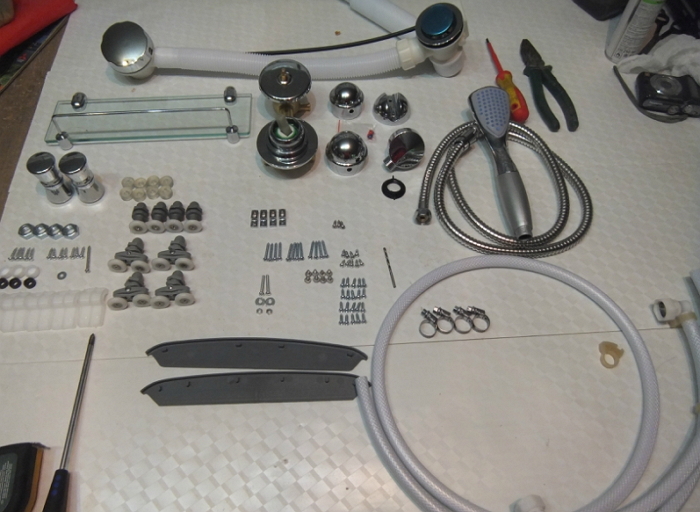
Before collecting a shower cabin with your own hands and for the assembly of these items will need such tools:
- wrench at 19 and stopped by 45;
- long cross screwdriver with a bit of pp2;
- transparent Sanitary Silicone;
- construction gun for sealant;
- silicone blade;
- spray;
- means for dishes;
- drill with a drill of 3 mm;
- roulette;
- bubble level 1 m;
- electrolovik;
- erasing marker;
- thread retainer or cold welding;
- hose for water supply to ½ "Nut-nut - 2 pcs. Length is selected at the place;
- sewer transition 40 × 50;
- toilet paper.
It is better that before the eyes there is always an assembly scheme of the shower.
Main stages of mounting shower
We study the cab assembly consistently.
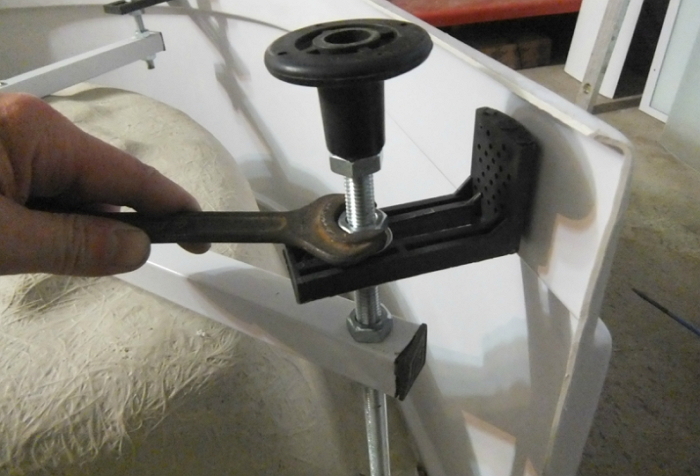
Assembling pallet The shower consists of the following steps
- On the studs you need to put the lock nuts and screw into the pallet. Short screwed in the center. We do it by hand until you stop, after fixing the nut. When breaking, the threads should be used by the retainer of the thread or cold welding.
- It is necessary to shut up on each stiletto on the other knotting notches up.
- The frame is placed on the ramp, attracts and fixed on two sides of nuts.
- Plastic brackets are screwed to 4 front studs. Part with perforation should be located below.
- After screwing the legs with locknuts, the pallet is installed in place.
- The height of the screen is adjustable to the bottom edge of the pallet side. Twisting legs, exhibit everything in terms of level.
- Without tightening until the stop, exhibit with a gap of 20 mm from the floor of the lower edge of the brackets
Installing the shower cabin with your own hands is unthinkable without connecting to sewer pipes in the bathroom.
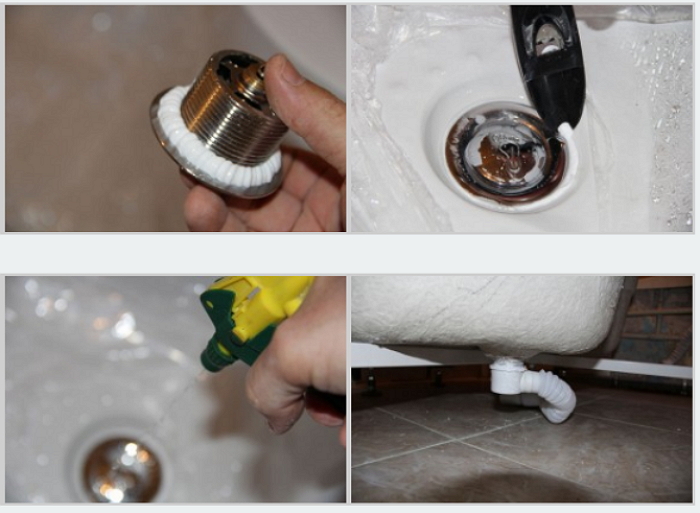
Connection to sewage:
- Install the siphon and drain. Around the drain hole you need to remove the protective film. The upper rubber gasket is recommended to replace silicone. Silicone is screwed. Bottom connections and threads for reliability are also treated with silicone.
- With the adapter, the siphon is connected to sewage. This connection also needs to be enjoyed.
- If everything has fallen into place, disconnect from the sewage and continue the installation.
Assembling the shower cabin, with your own hands, it necessarily includes installation of lateral walls:
- The top of the pallet is released from a protective film, but the bottom does not touch the bottom.
- The pallet moves away from one wall and an opaque wall is installed in this place.
- Holes in the pallet connect with a corner using 35mm screws (effortless).
- We celebrate the holes by spending a marker along the corner.
- The partition is removed and 5 mm layer of silicone is applied.
- We put the partition in place and immediately after pressing we remove the surplus silicone.
- The pallet with a partition is inputting to the wall and to understand whether the additional lining will need, try on the central panel.
- Siliconym of the junction of the central panel and the side wall.
- We connect them with 10 mm screws.
Breep the second side wall According to the instructions for installing a shower similar to the first wall:
- Starting a fixed transparent partition. It must be remembered that the slash of the metal profile should be located below.
- If everything is suitable, the profile is solved and the partition is installed.
- The top edge is exhibited with the wall.
- Drill in the profile from the outer side of the hole in 3 mm and with the help of self-samples, connect the partition with the wall.
- Mount the upper and bottom profile. Round parts we rail to each other. The lower profile is already upper, the silicone is applied under it.
Before correctly installing a shower cabin, you need to collect her ceiling.
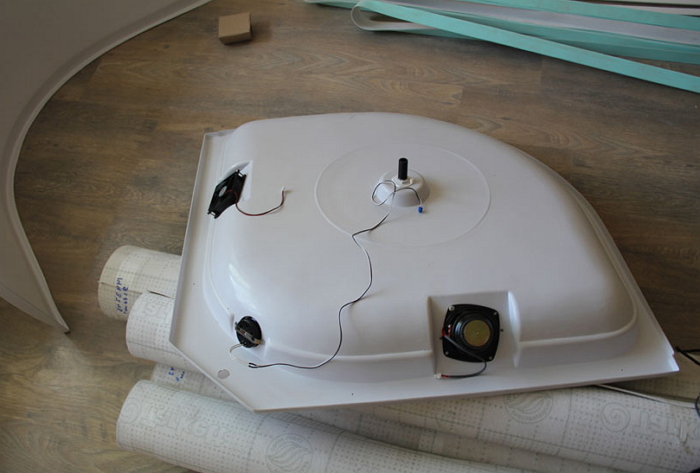
Roof assembly:
- We collect the ceiling of the shower cabin. To free it from the film, you need to unscrew the speaker and ventilation grilles.
- In order for the fan to work as a hood, it must be consolidated by labeling.
- To avoid twisting the ceiling watering can be recommended to be asked for.
- Ceiling mounted without silicone in place. It should be reduced from the bottom to 4 mm 16 mm brassing.
- Using the clamping clips to the wandes we connect hoses.
- Wires are connected to the labeling and color through the tips. A transformer is located on the ceiling.
- All connect and check electricity and water. Try not to wet the pallet to the top edge.
- The cab is placed in place and its level and stability is checked.
- The bottom perimeter and the central rack are silicone from the inside.
Installation of doors:
- Rubber door limiters are screwed from the inside of 12 mm screws.
- Turn the handles to the doors. The cap on the handles from the outside should be below. If the self-tapping screw is not fixed, it is recommended to compact the hole with a plastic insert, for this it may be suitable, for example, a trimming of a tile cross.
- Magnetic moldings are put on the door of the handles. On the rest of the parties - the shelf outward Mr. Moldings.
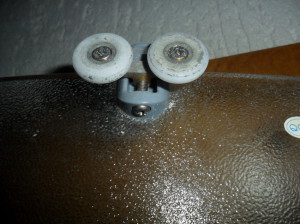
- The wheels outside the doors are put on. At the bottom of the doors are attached rollers with a button that should look up. And on the top rollers, the adjusting screws look down.
- Doors suspended on top rollers. In order to start the bottom, you need to press the buttons.
- Test the density of the adjunct and smoothness of the door. There should be no independent opening of doors from any position. Adjustment is adjusted using screws on top rollers. See the instructions how to install a shower cabin.

Screen installation:
- Packing with wedges, mount the screen in place. If the pipes interfere with, with the help of a jigsaw or shallow orcher make cutout.
- We try on the screen and make a pencil on the floor label.
- We remove the screen and apply marks in front of the brackets.
- With the help of the cooler from the markup minus 2 mm on the floor adjust the brackets. With a 0 cm clearance, we exhibit the lower edge of the bracket.
- Nuts tighten completely.
- On the bottom of the subcord, install the screen.
- Opposite the floor-indent labels, align and drill holes.
- With the help of decorative screws, we attach the screen to the brackets.
- Check the density of the ceiling adjoining to the upper arc. If there is a need for siliconym connection and press the strut or cargo.
- After drying the silicone, check how the watering can and switch work. Sliced \u200b\u200bcockpit butt.