Acesta este unul dintre cele mai multe circuite simple lebădă din triunghiuri de hârtie. Pentru a crea o astfel de lebădă, vom avea nevoie de 458 de module albe și unul roșu (sau portocaliu) pentru cioc. Cum se face un modul triunghiular >>
Deci, să începem. Să începem să facem primele două rânduri. Luăm trei module și le aranjam astfel

Introducem colțurile a două module în buzunarele celui de-al treilea

Luăm încă două module și le conectăm la structura rezultată

Apoi, exact în același mod, mai conectăm două module... și înțelegem că structura este fragilă și începe să se destrame în mâini cu fiecare mișcare neglijentă. Nu vă supărați, pentru ca totul să se țină mai bine, vom asambla imediat trei rânduri

Pentru a face acest lucru, luați modulul și plasați-l astfel

Și repetăm trucul de a introduce colțuri în buzunare

În acest fel colectăm trei rânduri. Fiecare rând este format din 30 de module. Și le închidem în cerc.


Acum luăm fusta rezultată cu ambele mâini în stânga și în dreapta, cu degetele noastre apăsăm ușor mijlocul, răsturnând produsul pe dos

În loc de fustă, primim o farfurie

Îndoim cu grijă marginile în sus, dând produsului această formă:
Vedere laterală

Vedere de jos


Din al șaptelea rând începem să facem aripi. La fel ca și în rândurile anterioare am montat 12 module. Apoi sărim peste două colțuri (de la două module adiacente) și punem alte 12 module. În locul lipsă cu două colțuri va fi un gât, iar într-o zonă mai largă va fi o coadă.

În rândul următor reducem fiecare aripă cu un modul. În consecință, fiecare aripă a celui de-al optulea rând va avea 11 module
Vedere laterală

Așa că reducem fiecare rând de aripi cu un modul până când rămâne doar unul (pe măsură ce întindem aripile, le îndoim ușor, dând forma dorită)

întoarcem lebada înapoi spre noi și facem o coadă (tot după principiul scăderii cu câte un modul în fiecare rând)

Mai rămâne doar să facem gâtul și capul lebedei. Pentru aceasta avem nevoie de 19 module albe și unul roșu. În roșu, este mai bine să lipiți colțurile în avans, astfel încât ciocul lebedei să nu fie bifurcat. Gâtul este asamblat puțin diferit. Luăm două module și le aranjam astfel

Introducem colțurile unuia în buzunarele celui de-al doilea

și le vom asambla pe toate celelalte în același mod, îndoindu-le în mod corect în timpul asamblarii

Acum așezați cu grijă gâtul pe celelalte două colțuri. Lebada este gata.


Origami este frumos și jucărie originală, care poate servi, fără îndoială, ca un cadou bun. Și puteți face un astfel de cadou cu propriile mâini. Orice sculptură origami constă din modele de hârtie, părți separate care sunt conectate între ele într-un mod simplu. Dar va fi mai eficient dacă toate modulele sunt acoperite cu adeziv pentru fiabilitate.
Hârtia simplă de birou, coli A4, sunt grozave pentru a face origami. Pentru a compune orice figură origami, veți avea nevoie de un număr mare de module de hârtie, care trebuie realizate în prealabil. Cum să faci o lebădă din hârtie? Să ne dăm seama.
Lebada este o pasăre frumoasă, fabuloasă și loială. Această pasăre este un simbol al iubirii și fidelității. O lebăda origami va fi un cadou grozav pentru absolut oricine. Acest articol vă va ajuta să creați o astfel de capodoperă cu propriile mâini.
Dacă aceasta este prima ta experiență, atunci ar trebui să începi cu o lebădă simplă, ceea ce poate face oricine.

Frumoasa noastră lebădă este gata! O astfel de lebădă nu îți va lua prea mult timp și va fi un cadou grozav pentru copilul tău!
Lebădă de hârtie modulară: goală
Acest origami va arăta grozav. Nu este necesar adeziv pentru a-l asambla; modulele în sine vor fi atașate unul de celălalt. Acest tip de meșteșug vă va lua mult timp, este o muncă destul de minuțioasă. Dar crede-mă, merită. Rezultatul va depasi toate asteptarile dumneavoastra!
Să începem cu pregătirea modulelor de hârtie:
Lebăda origami modulară: asamblare
Deci, tu și cu mine vom împături o lebădă tridimensională colorată din modele de hârtie. Pentru a face acest lucru, va trebui să colectăm următorul număr de module de hârtie:

Când toate modulele de hârtie colorată sunt gata, vom începe asamblarea lebedei origami.
- Mai întâi, luați 3 module de hârtie roz.
- Introducem colțurile a două module de hârtie în buzunarele rezultate ale celui de-al treilea modul de hârtie.
- Luați încă 2 module de hârtie roz și atașați-le la primele trei module de hârtie.
- Vom obține primul inel, care va fi format din două rânduri: intern și extern.
- Cel din interior va fi un rând scurt, iar cel exterior va fi unul lung.
- Fiecare rând va fi format din 30 de module de hârtie roz.
- Începem să colectăm primele inele, sprijinindu-le cu grijă cu mâinile noastre.
- Cu ultimul modul de hârtie fixăm capetele modulelor cele mai exterioare ale inelului.
- Acum asamblam un inel din 30 de module de hârtie portocalie folosind metoda descrisă mai sus.
- Introducem al treilea inel portocaliu în cele roz într-un model de șah.
- Colectăm al 4-lea și al 5-lea rând de inele portocalii și le introducem, de asemenea, într-un model de șah în inelul rezultat.
- Întoarcem 5 rânduri de inele din modulele de hârtie cu mâinile.
- Vom lua forma unui stadion.
- Vom face al 6-lea rând din 30 module de hârtie galbenă.
- Introducem inelul nostru galben deasupra.
- Pe al 7-lea rând vom începe să facem aripi. Trebuie să alegem un loc pentru capul de lebădă. Unde va fi capul, lăsăm 2 colțuri de module de hârtie li se va atașa gâtul de lebădă.
- La dreapta și la stânga acestui loc atașăm 12 module de hârtie galbenă.
- Acum numărăm modulele, ar trebui să obțineți 24 de module de hârtie galbenă și două spații.
- Vom continua să facem aripi de lebădă origami.
- Al 8-lea rând va fi format din 22 de module de hârtie verde, 11 pe ambele părți.
- Al 9-lea rând va fi format din 20 de module de hârtie verde.
- Al 10-lea rând - 18 module de hârtie verde.
- Al 11-lea inel - 16 module de hârtie albastră.
- Al 12-lea inel - 14 module de hârtie albastră.
- Al 13-lea inel - 12 module de hârtie albastră.
- Al 14-lea inel - 10 module de hârtie albastră.
- Al 15-lea inel - 8 module de hârtie albastră.
- Al 16-lea inel - 6 module de hârtie violet.
- Al 17-lea inel - 4 module de hârtie violet.
- Al 18-lea inel - 2 module de hârtie violet.
- Să modelăm aripile lebedei noastre.
- Să trecem la realizarea coadei lebedei.
- Coada va fi formată din 5 rânduri: 3 rânduri de 12 module de hârtie verde, 2 rânduri de 3 module de hârtie albastră.
- Modulele de hârtie trebuie reduse cu 1 modul.
- Acum să începem asamblarea gâtului de lebădă origami. Va exista o tehnologie diferită pentru asamblarea modulelor de hârtie. Introducem 2 colțuri ale unui modul de hârtie în 2 buzunare ale celui de-al doilea.
- Gâtul trebuie să fie format din 1 module de hârtie roșie și 7 violet.
- Îndoiți gâtul.
- Lipiți colțurile modulului de hârtie roșie cu lipici.
- Apoi atașăm următoarele module de hârtie: 6 module de hârtie albastre, 6 albastru deschis, 6 verzi, 6 module de hârtie galbenă.
- Fixăm gâtul între aripi pe 2 colțuri libere.
- Ne împodobim lebada cu un arc și ochi.
- Așa cum am făcut gâtul de lebădă, facem 2 inele.
- 1 inel - 40 module de hârtie roz.
- 2 inele - 36 module de hârtie roz.
- Lipim aceste două inele cu lipici. Standul nostru de lebede este gata.
- Lipiți lebada pe suportul rezultat.
Lebada noastră origami este gata!
Folosind tehnica origami, puteți crea artă din hârtie. Doar câteva falduri și ai o pasăre adevărată în fața ta.
Dacă puteți petrece mai mult timp și efort, puteți crea o figură din module. Citește cum să faci o lebădă din hârtie.
Nu este nevoie să inventați modele și sarcini complexe pentru copii. Singurele materiale de care veți avea nevoie sunt hârtie, carton, foarfece și lipici.
În funcție de vârsta copilului, puteți ajuta copilul și desena un șablon.
Urmați instrucțiunile pas cu pas pentru a crea o pasăre de hârtie:
- Pe o foaie de carton cu un simplu creion desenează silueta unei lebede.
Este necesar să decupați un șablon pentru aplicație: faceți-o singur sau încredințați foarfecele unui copil de peste 3 ani.
- Acum lăsați baza deoparte, trebuie să începeți să faceți piese. Din foi obișnuite A4, tăiați benzi de 2 cm lățime și până la 10 cm lungime.
Marimea poate fi ajustata in functie de model: imitatiile de pene pot fi mai subtiri sau mai lungi.
- Acum conectați capetele benzii cu lipici. Pentru copii, este mai convenabil să cumpere un creion pentru a nu-și păta hainele cu o picătură care cădea accidental.
Aceleași manipulări trebuie făcute cu toate benzile.
- Când semifabricatele sunt tăiate, trebuie să decorați baza lebedei. Desenați un cioc și un ochi cu creioane colorate.
Începând de la marginea de sus, lipiți pene de hârtie cu arcuri în sus.
- Formați mai multe rânduri în acest fel.
Important! Înainte de munca creativă și în timp ce creați o pasăre, explicați-i copilului dumneavoastră unde locuiește lebada, cât de frumoasă și nobilă este.
Puteți veni cu propriile versiuni de meșteșuguri. Decorați nu numai partea în care sunt aripile, ci și gâtul și capul. Ciocul poate fi creat dintr-o altă bucată de carton portocaliu, iar ochii pot fi negri.
Pentru a-ți surprinde copilul, ajută-l să realizeze o versiune cu două fețe. Jucăria de hârtie este gata.
Instrucțiuni pas cu pas pentru o lebădă volumetrică mare și mică
Puteți crea o pasăre de orice dimensiune folosind trucuri simple de pliere a hârtiei. Cu cât foaia de hârtie este mai mare, cu atât ambarcațiunea va fi mai mare.
Nu aveți nevoie de foarfece sau lipici pentru a crea o macara mică.

Doar ia-o cearceaf albși urmați instrucțiunile:
- Din foaia A4, tăiați partea de sus, lăsând doar baza pătrată (laturile ar trebui să fie egale). Dimensiunea bazei poate varia: de la o bucată mică la dimensiunea hârtiei Whatman.
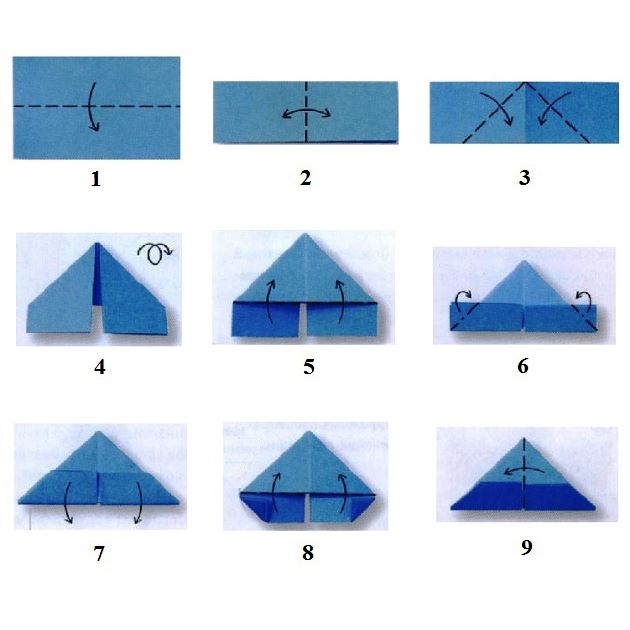
- Îndoiți foaia într-un triunghi, fixând ferm latura comună rezultată a diagonalei.
- Ca și cum ar fi pliat un avion, părțile inferioare opuse trebuie să fie pliate pe o linie comună de intersectare.
- Următorul pas este să aduceți colțurile inferioare la îndoirea diagonală.
- Conectați colțurile de sus și de jos. Astfel, piesa de prelucrat, pliată în jumătate, a ajuns în mâinile mele.
- Trageți înapoi colțul ascuțit rezultat. Formați capul și ciocul lebedei.
- Acum îndoiți din nou figura rezultată în jumătate și întindeți aripile păsării.
Sfat! Folosind acest model, puteți crea nu numai o lebădă albă clasică, ci și macarale colorate.
Schemă pentru asamblarea modulară a unei lebede din șabloane de hârtie pentru tăiere
Folosind tehnologia modulara, prin pliere, poti crea adevarate elemente decorative: cosuri, vaze sau cutii.
Astfel de articole nu vor rezista mult și nu vor rezista la greutatea dulciurilor, dar pot deveni un decor interior. Pentru a crea o lebădă modulară, urmați instrucțiunile descrise în tabel.

Conexiunea modulară este principiul creării de obiecte tridimensionale folosind o tehnică specială origami:
| Etapa de creare a păsărilor | Descriere |
| Pregătirea pieselor | Luați o foaie mică de hârtie, de aproximativ 5 pe 5 cm îndoiți pătratul într-un triunghi, apoi pliați-l din nou în jumătate în înălțime și îndoiți colțurile suplimentare spre interior. Pentru a crea o lebădă mică veți avea nevoie de cel puțin 500 de elemente. Apelați gospodăria și copiii dvs. pentru ajutor |
| Module de conectare | Veți avea nevoie de lipici pentru a atașa. Așezați cele două elemente unul lângă altul și lipiți piesele împreună. |
| Crearea trunchiului | Formați un semicerc din părți și adăugați mai multe elemente în fiecare rând. Corpul va fi finisat după 5-15 rânduri (în funcție de rezultatul dorit). Trebuie doar să întoarceți matrița pentru a plasa următoarele părți de lebădă în interior |
| Formarea părților cozii și gâtului | Din părți opuse (puteți schimba culoarea hârtiei în roz sau galben) formați o parte triunghiulară a gâtului și a cozii |
| Făcând aripi | Pentru un rezultat uniform, este mai bine să formați ambele aripi în același timp. Pentru fiecare aripă veți avea nevoie de aproximativ 5 rânduri. Faceți extinderea treptată folosind module. La o anumită înălțime este necesară ascuțirea capetelor: îndepărtați 1-2 module din fiecare rând |
| Stand | Este necesar pentru stabilitate și un aspect îngrijit. Folosind bucăți de hârtie cu colțurile întoarse spre exterior, formați baza. |
| Aripi interioare | Sunt făcute ca primele aripi, dar mai înguste și mai mici ca dimensiuni. Faceți baza cu 5-6 părți mai mică decât corpul. După 2-3 rânduri, formați aripi, împărțind părțile laterale în două părți. Tăiați marginile modulelor până când aripile sunt finalizate |
| Al treilea detaliu important | Coada trebuie făcută chiar mai îngustă decât partea interioară cu aripile. Marginile pot fi evidențiate într-o culoare diferită |
| Piese de conectare | Aripile interioare trebuie introduse în corp și fixate cu lipici. Următorul pas este instalarea cozii |
| Gât | Folosind rânduri identice de module de hârtie, formați curba gâtului. Ciocul poate fi făcut din hârtie portocalie |
Lebada trebuie să se usuce pentru un timp. Pentru a preveni deformarea hârtiei în timpul lucrului, este mai bine să utilizați un creion lipici incolor.
Cum să asamblați o lebădă din module de hârtie pas cu pas cu fotografii
Pentru a face o lebădă Vom folosi două culori de hârtie: alb și albastru. Dimensiunea unui modul în cazul nostru este de 7,5 cm pe 5 cm (modulele pot fi realizate într-o dimensiune și culoare diferită)
Veți avea nevoie, de asemenea, de lipici PVA și ochi de plastic.
Asamblați modulele alb și albastru conform diagramei. Veți găsi diagrame pentru asamblarea modulelor.
Acesta este genul de lebădă pe care o vom colecta cu tine
Proces pas cu pas pentru asamblarea unei lebede
Așadar, am colectat module albe și albastre pentru tine.
.jpg)
Luați 30 de module albe pentru primele trei rânduri. După ce am adunat trei rânduri, le conectăm într-un inel.
.jpg)
.jpg)
al 4-lea rând: 30 module albe.
.jpg)
Întoarceți piesa rezultată pe dos
.jpg)
al 5-lea rând: Punem din nou 30 de module albe, dar le întoarcem cu partea lungă spre interior.
.jpg)
al 6-lea rand: deplasându-ne în cerc, alternăm 1 modul alb și 1 albastru (continuăm să punem modulele cu partea lungă spre interior).
.jpg)
al 7-lea rând: 30 module albe.
.jpg)
Acum vom face gâtul și capul.
primul rând: 3 module albe, îmbrăcate cu partea lungă în afară (atașate oriunde pe modulele din al 7-lea rând).
.jpg)
al 2-lea rând: 2 module albe (pe fiecare margine rămâne un colț liber).
.jpg)
Al 3-lea, al 5-lea, al 7-lea, al 9-lea, al 11-lea, al 13-lea, al 15-lea, al 17-lea și al 19-lea rând: 1 modul alb, 1 albastru, 1 alb (modulele exterioare sunt așezate pe un colț al modulului din rândul anterior și un colț al modulului de primul rând).
4, 6, 8, 10, 12, 14, 16, 18 și 20 rând: 2 module albe (fiecare este pus pe un colț al modulului albastru și un colț alb).
.jpg)
.jpg)
.jpg)
.jpg)
.jpg)
.jpg)
.jpg)
.jpg)
.jpg)
.jpg)
.jpg)
.jpg)
.jpg)
.jpg)
.jpg)
.jpg)
.jpg)
.jpg)
Al 21-lea rând: 2 module albe (fiecare modul se așează cu un buzunar pe două colțuri ale modulului din rândul anterior, cu un alt buzunar pe colțul modulului din rândul 20).
.jpg)
al 22-lea rând: 1 modul alb (două colțuri în fiecare buzunar.
.jpg)
Al 23-lea rând: 1 modul albastru.
Modelați gâtul îndoindu-l ușor.
.jpg)
În dreapta și în stânga gâtului, puneți 3 module albastre cu partea lungă spre interior.
.jpg)
Plecând de la ele 18 colțuri albe, puneți 1 modul albastru, apoi săriți peste două colțuri albe și puneți și puneți 1 modul albastru (desfacem toate modulele cu partea lungă spre interior).
.jpg)
Să începem asamblarea cozii.
Așezați 2 module albe pe modulul alb din mijloc cu partea lungă spre interior, apucând un colț al modulului al șaptelea rând pe fiecare parte.
.jpg)
Deasupra, in acelasi mod, asezati 1 modul alb pe colturile din mijloc. Așezați 2 module albastre de-a lungul marginilor, întorcându-le cu partea lungă spre exterior (fiecare modul într-un colț).
.jpg)
În rândul următor, puneți din nou 2 module albastre, cu partea lungă spre exterior (fiecare este pus pe un colț al modulului alb și pe două colțuri ale modulului albastru din rândul anterior).
.jpg)
.jpg)
Coada este gata.
Să începem să facem aripa.
Dați înapoi de la cele trei module albastre puse după gât, un colț alb și asamblați primul rând al aripii, întorcând modulele cu partea lungă spre interior: puneți 1 modul albastru (un buzunar pe un colț), 6 module albe. (două buzunare pe două colțuri) și 1 albastru (un buzunar pe colț).
.jpg)
al 2-lea rând: 1 modul albastru (pentru un colț al modulului albastru și un colț al modulului alb din rândul anterior), 10 alb (un buzunar pentru un colț), 1 albastru (pentru un colț al albului și un colț al modulului albastru al rândul anterior). Vă rugăm să rețineți că în acest rând și în următoarele rânduri punem modulele cu partea lungă în afară.
.jpg)
al 3-lea rând: 1 modul albastru, 9 alb, 1 albastru. Există un colț liber rămas de-a lungul marginilor.
.jpg)
al 4-lea rând: 1 modul albastru, 8 alb, 1 albastru. Există un colț liber rămas de-a lungul marginilor.
.jpg)
al 5-lea rând: 1 modul albastru, 7 alb, 1 albastru. Există un colț liber rămas de-a lungul marginilor.
.jpg)
al 6-lea rand: 1 modul albastru, 6 alb, 1 albastru. Există un colț liber rămas de-a lungul marginilor.
.jpg)
al 7-lea rând: 1 modul albastru, 5 alb, 1 albastru. Există un colț liber rămas de-a lungul marginilor.
.jpg)
al 8-lea rând: 1 modul albastru, 4 alb, 1 albastru. Există un colț liber rămas de-a lungul marginilor.
.jpg)
al 9-lea rând: 1 modul albastru, 3 alb, 1 albastru. Există un colț liber rămas de-a lungul marginilor.
.jpg)
al 10-lea rând: 1 modul albastru, 2 alb, 1 albastru. Există un colț liber rămas de-a lungul marginilor.
.jpg)
al 11-lea rând: 1 modul albastru, 1 alb, 1 albastru. Există un colț liber rămas de-a lungul marginilor.
.jpg)
al 12-lea rând: 2 module albastre. Există un colț liber rămas de-a lungul marginilor.
.jpg)
al 13-lea rând: 1 modul albastru. Există un colț liber rămas de-a lungul marginilor.
.jpg)
Modelați aripa îndoind-o ușor.
.jpg)
Asamblați a doua aripă în același mod.
.jpg)
.jpg)
Acum vom face un suport albastru pentru lebădă.
Luați 30 de module albastre și, desfăcându-le cu partea lungă spre exterior, introduceți-le în modulele albe din primul rând al lebedei.
.jpg)
.jpg)
Apoi asamblați un alt rând de 30 de module albastre, introducându-le în modulele din rândul anterior.
.jpg)
Lipiți ochii păsării.
.jpg)
Lebada este gata.
.jpg)
Vedere din spate
.jpg)
Lebada este o pasăre frumoasă și nobilă, cu care sunt asociate multe legende și povești. Un simbol al frumuseții imaculate, al purității și al inspirației. Casa a fost adesea decorată cu imaginea acestei păsări, în speranța de a atrage dragostea, bogăția și fericirea familiei. Folosind tehnica origami, puteți crea o figură de lebădă cu propriile mâini acasă. Datorită aspectului său unic, o lebădă de hârtie origami se va potrivi armonios în interiorul apartamentului tău sau va servi ca un cadou de neuitat.
Există multe moduri de a face o lebădă de hârtie origami. Toate diferă în complexitate, cantitatea de material folosită sau aspect produs finit. Mesele la nunți și zile de naștere sunt servite cu figurine simple de păsări făcute din șervețele. Multe opțiuni simple pot fi făcute cu copiii la cursuri la grădiniţă sau în timpul orelor de muncă din sala de clasă. Copiilor le place să facă produse sub formă de macarale și păuni. Meșteșugurile realizate folosind module vor fi laborioase, dar frumoase.
În această versiune de origami de hârtie, o lebădă, a cărei asamblare pas cu pas necesită o muncă minuțioasă, va arăta impresionantă și unică.
Puteți citi despre cum să faceți o lebădă din hârtie origami în acest articol. În ea vă veți familiariza instrucțiuni detaliateși planuri de lucru.

Opțiune pentru cei mici
Părinții pot realiza o astfel de figurină pentru ca copilul lor să vizualizeze animalele. Este potrivit și ca decor pentru brad sau element decorativ pentru scrapbooking.
Acest meșteșug este potrivit pentru copiii mai mici sau cei care abia încep să practice acest hobby.
Materiale:
- O coală de hârtie în formă de pătrat (puteți folosi autocolante albe).
- Foarfece.
- Creioane negre și roșii.
- Lipici sau capsator.
Instrucţiuni:
- Îndoiți foaia în jumătate în diagonală.
- Cu ajutorul foarfecelor, faceți tăieturi mici de-a lungul celor două laturi ale triunghiului rezultat. Acest lucru va crea „pene”.
- Desenați o linie pentru gât și cap de-a lungul bazei lungi și tăiați de-a lungul ei simetric.
- Desfacem piesa de prelucrat, conectăm colțurile superioare și inferioare, le fixăm cu lipici sau cu un capsator, lăsând capul liber.
- Desenăm ochii și un cioc pe cap - pasărea este gata.

Există mai multe tipuri de lebădă origami de hârtie, inclusiv modele pentru începători. Multe instrucțiuni pas cu pas descriu procesul de realizare a figurilor de păsări de hârtie pas cu pas.
Puteți găsi opțiunea care vi se potrivește cu imagini care ilustrează întregul proces de fabricație. O prezentare detaliată și un comentariu asupra acțiunilor din materialele video vă vor ajuta să înțelegeți succesiunea și nuanțele execuției modelului.
Lebăda origami dintr-un șervețel
Puteți crea o lebădă origami nu numai din hârtie folosind instrucțiuni pas cu pas. O figurină îngrijită de lebădă realizată dintr-un șervețel te va ajuta să decorezi masa înainte de o mare sărbătoare și să-ți impresioneze oaspeții. Acest detaliu de servire nu va trece neobservat și va sublinia triumful momentului.
Pentru a face acest lucru veți avea nevoie de un șervețel pătrat de dimensiune medie.

Instrucţiuni:
- Șervețelul ar trebui să se afle în fața ta cu un unghi în jos. Marcați o linie centrală verticală folosind un pliu.
- Îndoiți colțurile spre linia centrală.
- Întoarceți piesa de prelucrat cu partea din spate în sus, îndoiți colțurile spre centru.
- Îndoiți partea de sus în jos, astfel încât colțul de sus să atingă partea de jos.
- Îndoiți din nou jumătate din unghiul rezultat în sus. Acesta va fi capul păsării.
- Dați volum figurii îndoind-o în jumătate pe verticală. Aliniați ușor gâtul și capul folosind aceleași pliuri.
- Reglați unghiul gâtului. Puteți ridica ușor interiorul aripii, oferindu-i contururi suplimentare.
Figurina este gata - așezați-o pe masă sau farfurie.
Nota. Servetul este un material foarte moale. Nu își poate păstra întotdeauna forma. Lucrul cu acesta necesită o subtilitate și o acuratețe deosebită. Prin urmare, se recomandă exersarea pe hârtie simplă.

Swan creat din module
Origami modular este una dintre cele mai minuțioase și meticuloase activități. Origami din diagramele lebedelor din hârtie include multe nuanțe în procesul unei astfel de creativități. Crearea fiecărui detaliu individual poate necesita mult timp și efort, dar rezultatul merită toate așteptările. Acest model are curbe netede și părți mobile flexibile, cum ar fi gâtul. Un model de pasăre în acest design poate fi demonstrat în siguranță ca o adevărată operă de artă.
Crearea folosind această tehnică este posibilă numai pentru meșterii care își cunosc meșteșugul, cu toate acestea, le puteți crește numărul datorită instrucțiunilor suplimentare despre cum să faceți o lebădă de hârtie origami folosind module.
Nota. Modulele sunt înșirate una peste alta, ceea ce le face să își țină strâns forma, totuși, pentru o mai mare stabilitate în lucru, cartonul de diferite culori va servi.
Fabricarea pieselor principale
Vom avea nevoie de o bucată mică de 7,4 pe 5,3 cm (pentru o ambarcațiune mare). O foaie de birou obișnuită trebuie împărțită în 4 dreptunghiuri egale (16).
Dacă dimensiunea este mai mică, foaia ar trebui să conțină de două ori mai multe dreptunghiuri. Apoi, spațiile vor avea dimensiunea de 5,3 pe 3,7 cm.
Crearea unui element structural:
- Așezați dreptunghiul ca pe o foaie de peisaj. Îndoiți în jumătate pe orizontală.
Nota. Dacă hârtia sau cartonul sunt colorate pe o parte, așezați-o cu partea din spate în sus.
- Marcați linia centrală îndoind bucata de hârtie pe verticală și îndreptând-o din nou.
- Îndoiți părțile laterale din colțurile de sus spre centru. Întoarce-o.
- Îndoiți colțurile extreme ale capetelor proeminente în sus. Apoi, îndoiți capetele rămase spre vârf.
- Îndoiți triunghiul rezultat în jumătate pe lungime.
Aveți un semifabricat modular triunghiular. Este foarte important ca fiecare dintre ele să aibă aceeași cantitate de legătură între ele pentru a crea o compoziție uniformă. De asemenea, este necesar să vă asigurați că piesele se potrivesc în mod egal una peste alta, altfel figura va fi neuniformă și piesele vor ieși în afară.

Mică lebădă construibilă
Înainte de a crea un model mare, puteți exersa făcând o versiune mai mică. Bun pentru începători. În această opțiune, veți pune mâna pe producția de piese și fixarea acestora. Urmați instrucțiunile „origami de lebădă de hârtie”, care arată asamblarea pas cu pas a unei copii mici.
Instrucţiuni:
- Pentru bază vom avea nevoie de 3 triunghiuri: apăsăm 2 dintre ele unul împotriva celuilalt și le introducem colțurile în buzunarele celui de-al 3-lea, care este situat cu partea lungă în jos.
- Mai ia două. Fixați-le de piesa de prelucrat rezultată în același mod, apăsând părțile laterale împreună, plasând colțurile în buzunare. În acest fel, trebuie să atașați încă 40 de piese (20 de colțuri adiacente și 20 de fixare). Ca rezultat, ar trebui să ajungeți cu un cerc format din 2 rânduri.
- Folosind 20 de bucăți, creați al 3-lea rând, punând și module pe colțuri. Repetați procedura, creând al 4-lea, al 5-lea rând folosind aceeași cantitate.
- Îndoiți cercul rezultat spre interior. Acest lucru vă va oferi o bază stabilă.
- Efectuați al 6-lea din 20 de elemente, îndreptându-le ușor în sus.
- Creăm aripi. Pentru a face acest lucru, determinați câteva colțuri unde va fi amplasat gâtul păsării. Atașați modulul la ele pentru referință. Depărtați 8 elemente de el în ambele direcții - acestea sunt bazele aripilor.
- Faceți restul formațiunilor, reducând numărul de piese pe fiecare nouă cu UNA. Ca rezultat, ar trebui să aveți aripi în formă triunghiulară.
- Făcând o coadă de cal. Pentru a face acest lucru, atașăm 3 elemente la bază, apoi, ca și în aripi, reducem fiecare rând următor cu 1 element.
- Modelarea capului. Pentru a face acest lucru, folosim 16 elemente, pe care le înșirăm unul peste altul în locul marcat anterior pe bază. Cu fiecare element nou ne „îndoim” treptat gâtul. Ultimul detaliu ar trebui să fie roșu - acesta este ciocul păsării noastre.
- Reglați forma aripilor îndoindu-le ușor spre exterior. Puteți lipi ochi mici de mărgele pe capul păsării.

Pasărea noastră este gata. Înălțimea unei astfel de lucrări este de aproximativ 20 cm, folosind piese mari.
Lebăda volumetrică din 3 părți
Spre deosebire de versiunea anterioară, acest exemplar are părți mai luxuriante, expresive, cum ar fi, de exemplu, aripi duble. Din cauza cantitate mare elemente și succesiunea conexiunii lor, lebăda de hârtie origami necesită aderență pas cu pas la fixarea elementelor.
Pentru a face o copie mare, veți avea nevoie de 1502 părți, dintre care 1322 sunt albe și 180 sunt de orice altă culoare. Procesul de creare implică 3 modele separate.
Acest lucru este tratat în detaliu în următorul ghid.
Instrucţiuni:
- Faceți un blank din 3 module, ca în primul caz.
- Acum creați 2 rânduri de 30 de bucăți.
- Adăugați încă 5 în aceeași ordine. Numărul de elemente din fiecare dintre ele este stocat.
- După crearea celui de-al 10-lea, îndoim discul spre interior, întinzând ușor volumul viitorului corp.
- Continuăm să adăugăm pe o nouă linie, până la a 15-a. Creăm treptat un corp tridimensional.
- Baza este gata. Acum formăm gâtul. Pentru a face acest lucru, creăm un sistem de 6 module: atașăm primul de ultimul într-o culoare diferită, făcând același lucru în rândurile următoare ale gâtului. Ne ridicăm, reducând numărul cu 1 în fiecare următor.
- Vizavi de gat colectam coada folosind aceeasi tehnica. Abia acum avem în sistemul inițial nu 6, ci 4 părți.
- Măsurăm aripile. Fiecare aripă are 10 elemente inițiale.
- Din ordinul al 2-lea, facem primul și următorul element o culoare diferită. În această ordine, creăm înălțimea aripilor la 10 linii.

Nota. Asigurați-vă că înălțimea fiecărei linii este aceeași. În caz contrar, puteți ajunge cu aripi asimetrice.
- După a 10-a construcție, începem să reducem cantitatea din fiecare una ulterioară cu 1 parte. Nu uitați să încadrați cu culoare primele și ultimele detalii.
- Îndoiți cu grijă aripile. Până la urmă am primit partea principală.
- Pentru a ne asigura că produsul stă ferm, creăm un stand. Pentru a face acest lucru, utilizați adeziv pentru a fixa modulele de la baza corpului. După ce prima cantitate s-a uscat, aplicați a doua.
2 design:
- Începem să creăm partea internă în același mod ca și cea principală, dar acum avem 20 de elemente în set.
- Pas cu pas construim 7 rânduri. Încercăm să întindem puțin corpul.
- După a 7-a facem aripioare: câte 10 părți. Marginile fiecărei linii sunt indicate printr-o culoare diferită.
- După 3 rânduri, reduceți fiecare detaliu ulterior unul cu 1.
- Ca rezultat, ar trebui să avem aripi interioare alungite.

Al treilea design:
- Tehnica de creare a bazei este aceeași. Acum există 12 părți fiecare.
- Creați o înălțime de 6 module. Întoarceți partea de bază în jos.
- Din al 7-lea rând atașăm 6 elemente de altă culoare, folosim 1 element mai puțin, împărțind corpul în 2 părți.
- Partea centrală este gata.
- Rămâne doar să punem toate detaliile laolaltă. Fixați cu grijă aripile interioare în partea principală, lărgindu-l ușor. Fă-ți timp pentru a evita deteriorarea carcasei.
- De asemenea, introduceți o mică inserție în partea din mijloc. Dacă este posibil, asigurați-l cu lipici.
- Înainte de a crea gâtul, se recomandă să acoperiți rândurile inițiale cu lipici, deoarece această parte este foarte lungă. Pentru a crea, puteți folosi 3-4 părți la bază și continuați înălțimea acestora în aceeași cantitate, până la cap. Fixați penultimul colț cu negru, iar ultimul cu roșu. Acest lucru va crea o margine în jurul ciocului.
- Atașați ochi artificiali pe cap (mărgele sau autocolante). Modelați aripile și gâtul. Acum piesa noastră este gata!
Concluzie
Dacă se dorește opțiune gata făcută O poți decora cu o panglică la gât și la bază și să atașezi alte elemente decorative pentru a completa aspectul. O astfel de pasăre va fi apreciată de prietenii tăi. O lebădă de hârtie făcută de tine, precum arta origami, va servi ca un cadou grozav și va decora perfect interiorul casei tale.
Alexandra este un expert obișnuit pe portalul PupsFull. Ea scrie articole despre jocuri, sarcină, educație și educație, îngrijirea copilului și sănătatea mamei și a copilului.