Picturile modulare sunt o tendință general recunoscută în designul interior, care constă din mai multe pânze unite printr-o idee sau imagine comună. Astăzi vom vorbi despre a face acest lucru acasă.
Tablouri modulare în interior
Originalitatea unor produse precum picturile modulare constă în următoarele:
- dau camerei un aspect unic si complet;
- subliniază gustul proprietarului casei;
- atrage atentia vizitatorilor;
- au o redare a culorilor de înaltă calitate;
- sunt o sursă puternică de energie;
- creați iluzia de mișcare în cameră;
- ascunde micile defecte de suprafață etc.
Tipuri și scheme de picturi modulare

Astăzi există o mare varietate de picturi modulare, care diferă ca mărime și formă. Deci pot avea deplasare orizontală, verticală, asimetrică și, de asemenea, pot fi segmentate și împărțite în mai multe imagini separate (diptic, triptic, penaptic etc.).

Un loc aparte il ocupa picturile modulare pe sticla, realizate cu vopsele si imprimante speciale.
Cum să faci un tablou modular cu propriile mâini

Nu trebuie să fii un artist sau un designer talentat pentru a obține un produs unic. Este suficient să alegeți orice poză care vă place și să o tipăriți folosind echipamente speciale pe material textil, hârtie sau alt material de foaie. După aceasta, tot ce rămâne este să tăiați imaginea în elementele corespunzătoare și să le remediați.

Procesul de creare a unui tablou din module
Metoda nr. 1

Pentru a realiza o imagine modulară pentru bucătărie, trebuie să pregătiți mai multe structuri de cadru din lemn de diferite dimensiuni și să atașați la ele imaginea imprimată finită folosind un capsator de mobilă. În același timp, rețineți că cadrul în sine ar trebui să rămână pe partea greșită.
în absența posibilității de a vă imprima și picta singur, puteți utiliza țesătură strălucitoare cu model ca pânză;
Dacă se dorește, cadrul poate fi înlocuit cu o bucată de PAL sau placaj dreptunghiular.
Metoda nr. 2 (Pictura modulară „Flori”)

1. Pregătiți vopsele în ulei sau alte vopsele care nu se estompează și sunt folosite pentru pictarea batikului și a picturilor pe pânză.
2. Luați mai multe pânze și structuri de cadru de o anumită dimensiune. Totuși, rețineți că acesta din urmă ar trebui să fie puțin mai mic decât materialul, altfel nu veți putea surprinde imaginea rezultată.
3. Fixați pânza pe fiecare cadru folosind un capsator de mobilă.
Dacă se folosesc vopsele acrilice, atunci este mai bine să lucrați cu ele pe țesături de bumbac sau mătase (tehnica batik). Avantajul acestei metode este că mai întâi desenați desenul pe o bucată de hârtie și apoi îl plasați sub material.
Pe verso, asigurați-vă că marcați ordinea în care sunt amplasate modulele individuale.
5. Odată ce desenul schematic este gata, puteți începe decorarea cu culoare.
6. Când pânza este uscată, instalați-o pe perete.
Dacă pictura dvs. modulară „Orhideea” va fi amplasată într-un loc întunecat, atunci instalați iluminare suplimentară pe lateral sau lumină care vine din „din interior”.
Fotografii cu tablouri modulare:


Video de pictură modulară DIY:
Picturile modulare de astăzi au devenit elemente integrante ale oricăror casă modernă sau apartamente. Cu siguranță aparțin stilului „modern”, dar multora le place pur și simplu o imagine frumoasă și nu este atât de important dacă se potrivește în interior general. Cu toate acestea, pentru noi sunt interesante nu numai din punct de vedere design design premise, dar și, într-o măsură mai mare, ca un articol care poate fi realizat cu propriile mâini, pentru orice, chiar și pentru cel mai sofisticat gust.
Picturi modulare - ce este?
În a doua jumătate a secolului al XX-lea, în special odată cu apariția așa-numitului „minimalism”, lumea a aflat despre picturile modulare de la designeri de interior. Astăzi, când în spații rezidențiale este de așteptat număr mare spațiu liber, pereți neacoperiți cu covoare și nu umpluți cu „pereți” camerei, ei „cere” să le decoreze punând pe ei un „pată” strălucitoare.

Un astfel de „loc” izbitor sunt picturile modulare. Dar de ce „modular”? Pentru că reprezintă, în esență, o imagine întreagă, împărțită în segmente, sau module, care pot fi fixate fie paralel între ele, fie în orice alt mod.

Poate fi fie pictat în ulei de către artist sau vopsele acrilice, un tablou adevărat (poliptic, triptic, diptic etc.), sau doar o imprimare foto obișnuită.

Puteți alege orice imagine pentru un tablou modular, chiar și una care pare complet fără legătură cu tema și stilul decorațiunii casei. Cu toate acestea, după gustul proprietarului său.

Puteți alege orice imagine de pe Internet sau puteți comanda o imagine sub formă de mare fotografie de familie, sau există o altă opțiune interesantă pentru picturile modulare pentru interior - aceasta este o pictură cu ceas modulară.

De asemenea, puteți face singur o imagine modulară din imagini de fundal foto, cumpărându-le de la orice magazin relevant. Vom vorbi despre cum să faceți picturi modulare cu propriile mâini în acest articol puțin mai târziu, dar acum să ne uităm la exemple despre cum să decorați cel mai bine o bucătărie, o creșă și dormitorul părinților folosind picturi modulare.

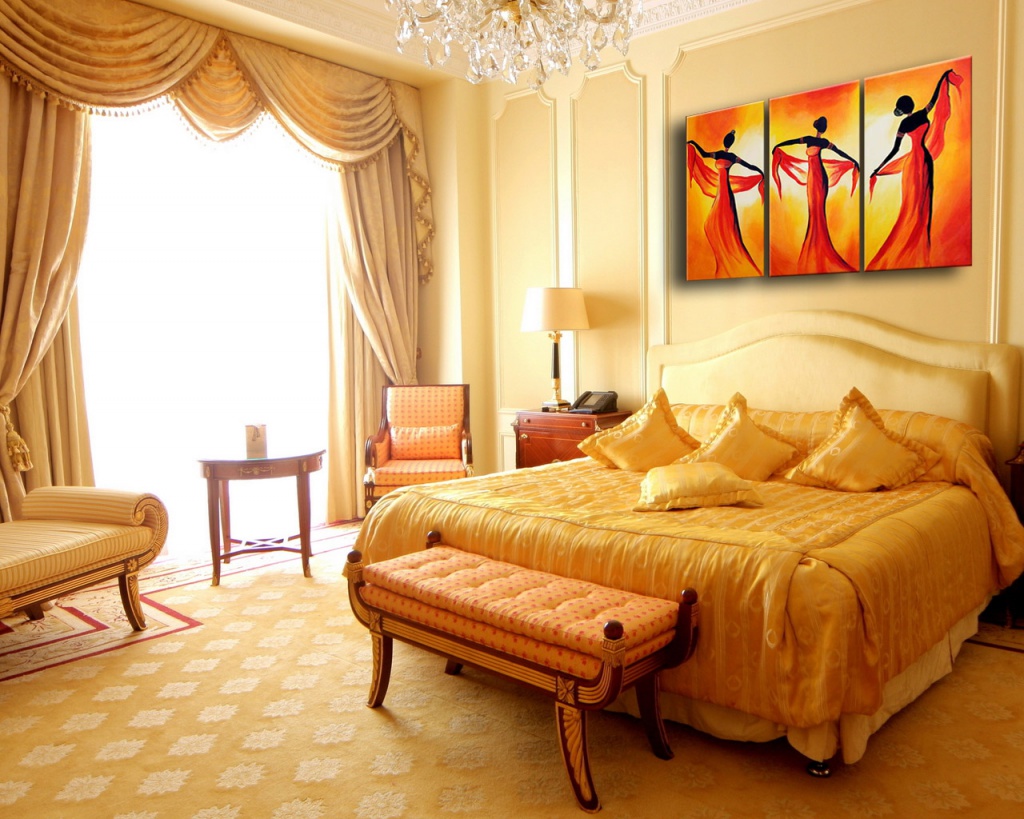
Tablouri modulare pentru interiorul casei

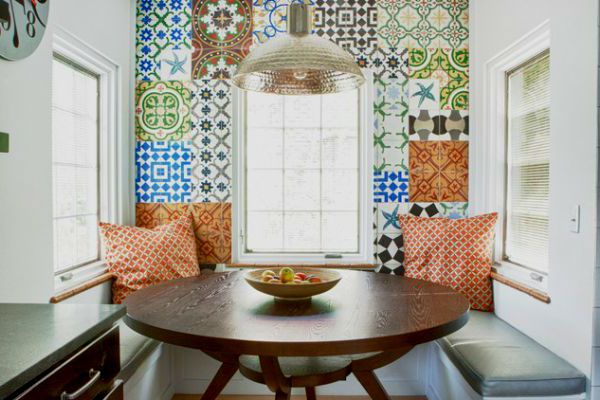
Pentru bucătărie, cel mai bine este să alegeți o imagine cu tema potrivită a camerei - aceasta ar putea fi flori, fructe sau legume, precum și marea, fântânile sau o altă temă cu apă.

Orașele, mașinile sau tineretul, precum și temele erotice ar fi nepotrivite aici.

Oamenii vin la bucătărie să mănânce și totul nu ar trebui să provoace iritații sau dezgust, ci emoțiile pozitive, le ridică starea de spirit și apetitul.

Se stie ca portocale, ca și roșu, provoacă dorința de a mânca, iar verdele calmează și îmbunătățește digestia.

Prin urmare, persoanele slabe pot adăuga luminozitate spațiului lor de bucătărie cu ajutorul unui tablou modular colorat, în timp ce cei care vor să slăbească, dimpotrivă, ar trebui să evite culorile portocalii și roșii în bucătărie, este mai bine să aleagă ceva plăcut. , tonuri de verde moale.

Același principiu se aplică și în dormitorul copiilor - evitați culorile luminoase, toxice și folosiți tablouri în culori moi, plăcute. Pentru picturile modulare într-o cameră pentru copii, puteți alege imagini cu personaje de desene animate sau pui de animale.

În camera de zi, puteți folosi culori diferite, atâta timp cât acestea sunt în armonie cu interiorul general.

Imaginile naturii, un oraș modern pe timp de noapte, monumente culturale sau mașini ar fi potrivite aici.

Pentru dormitor puteți folosi imagini cu oameni, animale și păsări, flori.
Dar cum să faci un tablou modular cu propriile mâini? Nu este deloc greu. Vă vom explica acum totul în detaliu.
Cum să faci picturi modulare cu propriile mâini

Realizarea unui tablou modular cu propriile mâini este absolut ușor. Odată ce stăpânești această afacere interesantă, poți chiar să câștigi bani buni din ea. La urma urmei, oamenii își schimbă periodic interiorul casei și îi schimbă designul decorativ. În acest articol nu vom descrie procesul de realizare a unui tablou modular de la zero, vom spune doar că pe Internet puteți găsi multe fotografii diferite (sau chiar să le folosiți pe ale dvs.), după procesarea lor program special, puteți comanda imprimarea lor la un studio foto.
Odată cu dezvoltarea mijloacelor folosite de oameni pentru schimbul de informații, poate principala valoare modernă, viteza de răspândire a acesteia a crescut de mii de ori. Multe idei de design, fără să aibă timp să apară în Occident sau în Asia, devin aproape instantaneu proprietatea tuturor. Una dintre cele mai recente tendințe general recunoscute în designul spațiilor publice și rezidențiale a devenit picturile modulare, care sunt mai multe pânze separate unite printr-un sens comun sau o imagine comună.
![]()
Acest design original Pereții conferă camerei unicitate, subliniază cu succes gustul artistic al proprietarilor și devin obiectul atenției tuturor vizitatorilor. Cum să-ți faci propriile picturi modulare va fi discutat mai târziu.
Chiar înainte de a descrie tehnologia pentru obținerea unui astfel de decor interior original, să ne oprim mai în detaliu asupra tipurilor lor. În prezent, nu este deloc necesar să stăpânești priceperea unui artist pentru a primi o pânză artistică. Este suficient sa selectezi online o poza care iti place si sa o tipari folosind echipamente specializate pe hartie, material textil sau alte materiale de foi. După aceasta, tot ce rămâne este să tăiați imaginea rezultată în părțile corespunzătoare și să le asigurați.
Desigur, dacă tu însuți ai abilități artistice, obținerea de tablouri modulare gata făcute, care au un conținut semantic comun, nu va fi dificilă. Poate că aceasta ar putea deveni chiar o activitate destul de profitabilă.
Trebuie remarcat faptul că ambele module realizate din părți de aceeași dimensiune și picturile cu pânze arată original în interior diverse formeși dimensiune.

Combinația dintre vertical și orizontal este, de asemenea, avantajoasă. tablouri modulare, combinate într-un singur modul.

Autoproducție de tablouri modulare
Dacă nu aveți idee despre elementele de bază ale picturilor, să ne uităm mai detaliat la procesul de pregătire a bazei. Pentru a întinde o pânză scrisă de mână sau imprimată, veți avea nevoie de mai multe structuri de cadru realizate din blocuri de lemn. Artiștii le numesc brancardieri. Dimensiunea lor determină dimensiunea elementelor pe care le utilizați. Este de remarcat faptul că picturile modulare, atât cele auto-realizate, cât și cele industriale, nu au rame.
La vânzare în magazinele specializate găsiți multe diferite tipuri subcadre De regulă, acestea sunt implementate cu pânze deja atașate acestora.

Dacă scrii singur un trei sau poliptic, poți folosi baza propusă pentru viitoarele tale picturi. Când utilizați imagini imprimate, materialul trebuie îndepărtat cu grijă de pe targă.
De regulă, fixarea pânzei se face folosind capse de la un capsator de mobilă.

Pentru a îndepărta materialul, trageți-l cu forța cu mâinile.

Dacă nu este posibil să achiziționați subcadre sau nu doriți să cheltuiți timp și bani pe asta, numerar, puteți face singur rame pentru fotografii. Pentru a face acest lucru, veți avea nevoie de șipci cu o secțiune transversală de 50×20, 40×20,50×25 milimetri. După ce rindeleți părțile laterale ale pieselor de prelucrat până când sunt netede, tăiați părțile de lungime egală în perechi, pileți capetele la un unghi de 45 de grade și conectați cu lipici sau capse de 14 milimetri lungime. Pentru a întări îmbinările colțurilor din interior, fixați garniturile din placaj în fiecare colț - triunghiuri dreptunghiulare cu laturile de 10 centimetri.
Următoarea etapă a producției de bricolaj este tăierea și fixarea picturilor pe targi. În cazul tipăririi unei imagini, este recomandabil să se producă nu o pânză comună, ci mai multe separate, cu modele suprapuse. Apoi, când picturile sunt asigurate și poziționate reciproc, integritatea imaginii va fi păstrată.
Dacă nu este posibil să imprimați nicio imagine sau să pictați o imagine, există un alt mod simplu, dar nu mai puțin expresiv - folosind bucăți de țesătură cu model strălucitor în loc de pânză. Pentru a tăia, trebuie să plasați o targă pe țesătură și să tăiați piesa astfel încât marginile acesteia să se extindă pe baza cadrului cu o margine.

După ce țesătura este tăiată, aceasta trebuie asigurată. Pentru aceasta, cel mai bine este să folosiți un capsator de mobilă sau de construcție. Așezați o margine a pânzei de-a lungul părții lungi a targii și fixați-o cu capse. Apoi, ținând materialul ușor întins pentru a preveni pliurile și ridurile, atașați-o pe partea opusă a bazei. Următoarea etapă este fixarea pe părțile scurte folosind tehnologia descrisă anterior.
Acordați o atenție deosebită așezării țesăturii în colțurile picturilor în curs de realizare. Încercați să evitați aglomerarea excesivă, distribuiți uniform țesătura, împingând-o parțial spre părțile lungi și scurte ale targii.

Dacă nu există targi pentru picturile modulare, rolul acestora poate fi jucat de o bucată dreptunghiulară de placaj sau PAL. După tăierea și finisarea marginilor, așezați piesa pe material și decupați-o.

După aceasta, tot ce rămâne este să fixați marginile pânzei pe o bază plată folosind un capsator. În urma tuturor lucrărilor, vei primi un triptic original realizat chiar de tine, care va decora interiorul camerei tale.

Atingerea finală va fi montarea tablourilor pe perete în locația aleasă. Și aici, folosiți-vă imaginația, deoarece poziția relativă a picturilor în modul poate fi diferită. Pentru fixare, umerasele mici de mobilier obișnuite sunt destul de potrivite. Puteți agăța brancardie cu pânze atașate direct pe capetele șuruburilor care ies din perete, înșurubate în dibluri de plastic, care sunt instalate în găuri cu diametru adecvat.
Un exemplu de creare a picturilor modulare pe o bază grafică imprimată:
Dragi cititori, comentați articolul, puneți întrebări, abonați-vă la publicații noi - ne interesează opinia dvs. :)
Alegerea picturilor modulare vă va permite să creați un stil interior special. O serie de mai multe elemente se îmbină într-o singură compoziție - pare vie și dinamică. Alegând să realizați picturi modulare cu propriile mâini, vă puteți exprima individualitatea. Clasa de master vă va ajuta să stăpâniți rapid elementele de bază și veți deveni proprietarul unui element decorativ original.
Ce sunt picturile modulare
O pictură modulară este mai multe pânze care sunt combinate într-o singură compoziție.
Există multe opțiuni pentru aranjarea elementelor:
- aranjare simetrică în plan orizontal;
- deplasare și asimetrie pe orizontală și pe verticală;
- mixt vertical-orizontal;
Cele mai populare sunt variațiile cu decalaje simetrice și asimetrice - schimbă literalmente spațiul camerei. Este uimitor cum folosind această tehnică de design puteți obține o creștere vizuală a spațiului. Acest lucru este foarte important pentru amenajarea interiorului unei camere mici.
În funcție de câte părți constă imaginea de ansamblu, acestea se disting:
- diptic – 2 pânze;
- triptic – 3 pânze;
- poliptic - mai mult de trei pânze.
Nu există reguli stricte pentru designul interior folosind picturi modulare. În plus, cu capacitățile actuale de imprimare, nu trebuie să fii un artist pentru a realiza o astfel de compoziție cu propriile mâini. Nu este aceasta o provocare pentru o persoană cu adevărat creativă?
Cum să o faci singur
Materialul care poate fi luat ca imagine poate fi selectat în funcție de disponibilitatea finanțelor și de dorințe.
Opțiuni pentru pânza cu imagini:
- țesătură cu imprimeu luminos și clar, cum ar fi florile;
- fotografie sau imagine tipărită pe o imprimantă;
- versiunea preferată a tapetului cu fotografie.
Alegerea cadrului depinde de baza aleasă. O clasă de master despre realizarea unor astfel de picturi vă va ajuta să creați o capodopera interioară.
Clasa de master din material textil
Materiale:
- țesătură cu un complot sau ornament, o imagine imprimată sau tapet cu un design foto;
- bază: lamele de lemn 50x20 și placaj, plăci de fibre sau spumă de polistiren;
- adeziv PVA;
- foarfece;
- creion, cretă sau săpun;
- centimetru;
- capsator pentru mobila.
Pasul 1. Pregătirea bazei
În funcție de bugetul dvs., puteți cumpăra o bază de pânză gata făcută sau puteți realiza una singur. Prima opțiune este potrivită pentru cei care sunt inspirați să picteze o imagine. Pentru primul experiment, este mai bine să facem un triptic - trei elemente, pentru care pregătim trei baze. Din șipci și bucăți de placaj puteți construi rapid o bază pentru o imagine modulară. Pentru a face acest lucru, conectăm șipcile de lemn într-un cadru, tăind capetele la un unghi de 45 de grade. Pot fi capsate sau lipite.
Pasul 2. Atașați pânza la bază
Înainte de a tăia segmentele, planificați bine și marcați locațiile tăiate folosind principiul „măsurați de două ori și tăiați o dată”. Dimensiunea țesăturii ar trebui să țină cont de pliurile de pe verso. Fixăm țesătura pe targă cu un capsator de mobilă, atașând capsele din partea greșită a lucrării. Este important să întindeți țesătura uniform, fără a forma pliuri. Prindem mai întâi partea lungă, apoi pe cea scurtă.
Versiunile tipărite pot fi lipite chiar și pe spumă subțire de plastic placi de tavan adeziv PVA.
Mulți oameni, în loc de tapet cu o fotografie, comandă o imprimare a imaginii care le place de la numeroase servicii de imprimare. Nu trebuie să fii un maestru pentru a face acest lucru, totuși, atunci când tipăriți, trebuie să vă gândiți la realizarea mai multor elemente separate cu modele suprapuse. În acest fel mențineți integritatea imaginii de ansamblu.
Pasul 3. Așezați tablourile
În această etapă, trebuie să descoperiți un loc în care vă veți agăța compoziția, precum și o modalitate de a poziționa pânzele una față de cealaltă. Pentru montare, puteți alege umerase de mobilă obișnuite de format mic. Dacă tablourile sunt montate pe targi, atunci acestea pot fi fixate cu șuruburi care sunt înșurubate în dibluri și ies ușor din perete.
Extrem de interesante sunt opțiunile de aranjare, unde o pânză este compensată într-un mod interesant. Un element care este mutat în mod deliberat în „zbor” ca și cum ar fi printr-o lovitură de vânt arată unic.
Clasa de master vă va oferi o înțelegere a principalelor puncte ale creării unui tablou modular. Puteți experimenta în siguranță cu materialele pânzei în sine și ale bazei, alegând ceea ce aveți la dispoziție. Pentru primele teste, chiar și bucăți de gips-carton sau plastic spumă, pe care sunt lipite imagini de la o imprimantă sau dreptunghiuri de pe tapet, vor fi potrivite. Când exersezi materiale simple, puteți realiza compoziții mai complexe pentru decorarea interioară.
Picturile, realizate folosind diverse tehnici, sunt concepute pentru a face designul standard al apartamentului sofisticat, adăugând note luminoase și originale. O confirmare clară a acestui lucru sunt tablourile de tapet din interior. Ce opțiuni pentru execuția unor astfel de elemente decorative pot fi folosite atunci când amenajați interiorul și cum să faceți picturi din tapet cu propriile mâini, vom lua în considerare în articol.
Cele mai potrivite pentru crearea imaginilor din tapet sunt imaginile de fundal foto. La urma urmei, acestea sunt inițial un element decorativ gata făcut. Pentru a oferi acestui segment de decor o notă de individualitate, maeștrii artei designului folosesc ca fundal pânze gata făcute, decorându-le cu alte modele și modele.
Important! Principala cerință atunci când utilizați imagini de tapet pentru a decora pereții este să luați în considerare dimensiunea camerei, iluminarea acesteia și stilul general.
Este mai bine să plasați astfel de elemente decorative pe un perete liber, făcându-le singurul element de accent
Folosind imagini de fundal puteți rezolva cu succes mai multe probleme simultan:
- Ascunde defectele de design.
- Împărțiți spațiul în zonele functionale, care este deosebit de important atunci când planificați o garsonieră.
- Evidențiați pereții principali din cameră și spargeți monotonia interiorului.
- Acționează ca atingere finală a unui concept de cameră cu o singură cameră, subliniind în același timp în mod favorabil individualitatea fiecărei camere.

Elementele decorative realizate independent nu sunt produse în serie și, prin urmare, pot adăuga personalitate și farmec camerei.
Un element decorativ bine ales va ajuta la schimbarea raportului proporțional dintre înălțimea și lățimea peretelui sau va netezi efectul tavanelor prea înalte. Principalul lucru de reținut este că crearea de panouri false originale și panouri expresive necesită nu numai bun gust, ci și grijă deosebită. Utilizarea ineptă a materialelor creează impresia că proprietarul casei pur și simplu nu avea destui bani pentru tapet.

Imprimeurile geometrice se potrivesc perfect într-un interior modern laconic
Opțiuni pentru realizarea tablourilor de tapet
Elegant și în același timp interior original nu neapărat asociat cu semnificative costuri financiare. Poti crea o atmosfera expresiva si in acelasi timp confortabila cu ajutorul accesoriilor realizate din materiale disponibile, folosind doar puțină imaginație.

Picturile selectate corect din punct de vedere stilistic din resturile de tapet pot acționa ca un decor interior demn
Alegerea culorii și texturii tapetului ales pentru a crea un tablou cu propriile mâini depinde numai de preferințele de gust ale maestrului. Singura condiție este ca acestea să fie combinate cu designul general al camerei. Dar picturile cu modele geometrice mari, imprimeuri florale complicate sau orice alt model expresiv arată încă cel mai avantajos.
De ce să te limitezi la tablouri când poți face un colaj care să acopere tot peretele!
Panouri decorative si panouri false
panou de fundal – tendință modernă, permițându-vă să utilizați vechiul pentru a crea noul.
În funcție de materialele implicate în compoziție, panoul poate regla vizual camera: combinațiile contrastante vor adăuga note luminoase, iar inserțiile de oglindă vor extinde spațiul.

Principalul lucru la creare panou decorativ– menține simțul proporției și stilului
Pentru a crea o imagine din tapetul foto, trebuie doar să tăiați un fragment din pânza selectată, să faceți o chenar pentru aceasta dintr-un alt material și să alegeți un cadru interesant pentru compoziția finită.
Pentru a crea o imitație a tehnicii 3D Wallpapper, panourile sunt realizate din același tapet care a fost folosit pentru a decora întregul perete.

Panouri realizate din tapet 3D - câștig-câștig creând un interior elegant și modern
Pentru a crea un decor, tapetul este pur și simplu lipit pe o bază de placaj sau carton, fără a uita să lăsați alocații pentru a întoarce marginile tapetului pe verso.
Compoziții modulare de tapet
Picturile modulare, care au apărut la începutul anilor 60 în perioada de vârf de popularitate a tendinței minimalismului, sunt încă capabile să servească astăzi drept un decor demn pentru un interior modern.

Picturile modulare sunt pânze împărțite în mai multe segmente, care sunt unite printr-o singură poveste
Compozițiile segmentate pot fi împărțite în două, trei sau mai multe elemente. Absența cadrelor are scopul de a sublinia tranziția lină a designului de la un modul la altul.

Modulele folosite pentru a crea compoziții pot avea dimensiuni identice sau diferite. Sunt așezate la aceeași distanță unul de celălalt, așezați aleatoriu pe un plan sau la același nivel. Distanța dintre module ar trebui să fie de așa natură încât atunci când contemplați, să nu îngreuneze perceperea întregii imagini.

Cel mai simplu mod de a crea compoziții modulare din imagini de fundal foto
Lucrarea de creare a unei compoziții modulare se desfășoară în mai multe etape:
- Faceți o schiță a compoziției viitoare, împărțind imaginea în segmente.
- Faceți baza modulelor. Se foloseste foi de polistiren spuma de 1,5 cm grosime, bucati de stofa sau hartie intinse pe targi.
- Lipiți părțile individuale pe bază.
- Așezați elementele pe perete, păstrând uniformitatea imaginii și păstrând aceeași distanță.
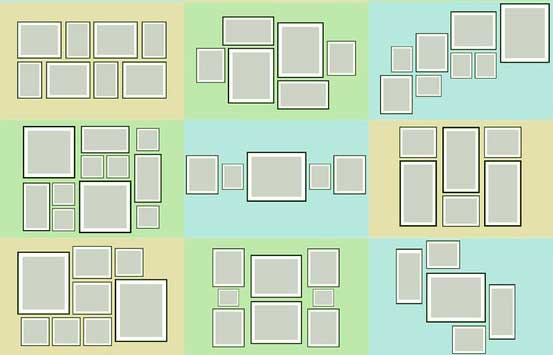
Opțiuni de aspect pentru compoziții modulare
Principalul truc atunci când compuneți compoziții modulare este să vă asigurați că fiecare element are o anumită marjă care s-ar suprapune modelului. Prin urmare, nu este suficient să aveți o pânză imprimată obișnuită. Este mai bine să aveți două sau trei astfel de piese la îndemână, din care este convenabil să tăiați elemente individuale, lăsând în același timp o rezervă.

O astfel de compoziție modulară indică în mod clar gândirea non-standard a autorului.

Compoziție modulară mare alcătuită din picturi pe targi
Tablouri spectaculoase realizate din tapet lichid
Astăzi, picturile pe pereți din tapet lichid au devenit destul de populare. Principalul lor avantaj este că designul poate fi creat chiar și pe un perete neuniform. Material plastic ascunde cu ușurință toate fisurile și defectele.
Lucrați cu material care se combină cele mai bune calități tapet de hârtie și tencuiala decorativa, o placere. În plus, un material prietenos cu mediul constând din celuloză, fibre de mătase și plastifianți asigură o izolare fonică excelentă.

Tablourile spectaculoase realizate cu tapet lichid atrag întotdeauna atenția atât a membrilor gospodăriei, cât și a oaspeților
Când este aplicat pe perete, tapetul lichid nu formează îmbinări convexe. Iar atunci când sunt reaplicate pe o altă suprafață, nu își pierd calitățile. Pentru a le reutiliza, trebuie doar să îndepărtați amestecul înghețat de pe perete cu o spatulă și să îl puneți într-un recipient cu apă pentru o perioadă.

Acest model vă va încânta și vă va încălzi în serile reci de iarnă.
Cel mai bun lucru despre lucrul cu tapet lichid este că toată lumea poate stăpâni procesul aparent laborios.
Creăm o imagine „pentru a se potrivi unui cadru”
Nu este nimic dificil să faci o imagine din tapet rămas cu propriile mâini. Trebuie doar să alegeți materialul potrivit și să abordați creativ soluția problemei.

Compozițiile făcute de tine vor arăta cel mai avantajos într-o cameră cu pereți simpli
Tehnica de creare a picturilor înrămate este simplă: tapetul este lipit pe o bază de carton dur, după care semifabricatul este încadrat cu o bandă decorativă sau șină.
Alegerea materialelor necesare
Pentru a crea picturi din tapet, cel mai bine este să folosiți pânze cu o abundență de imagini și modele. Toate aceste elemente pot fi decupate și utilizate ca unitate de lucru atunci când creați creația dvs.

Nu mai puțin importantă este selecția bazei imaginii, care va servi drept fundal.
Pentru a crea o compoziție armonioasă, este mai bine să selectați fundalul într-una singură schema de culori cu poze decupate. Dar din moment ce prețul este frumos și tapet de înaltă calitate este întotdeauna destul de mare, designerii recomandă luarea în considerare a opțiunii de cumpărare a rulourilor din resturi. Vânzătorii din magazine sunt adesea dispuși să vândă pânze care au un ușor defect de culoare la un preț rezonabil.

Motivele de plante discrete se potrivesc perfect în interiorul sălii de mese în culori deschise
Nu aruncați resturi de țesătură, reviste vechi și desene pentru copii - toate acestea pot deveni parte din imagine. Pentru munca ta, poți folosi în siguranță: fotografii vechi, panglici, scoici și flori uscate.

O eliberare puternică de energie creativă
Materiale de care veți avea nevoie:
- foarfece;
- cuțit de papetărie;
- adeziv PVA;
- perii largi și înguste;
- cârpă pentru a îndepărta reziduurile de lipici.
Puteți comanda ulterior un cadru pentru munca dvs. de la un atelier de încadrare sau îl puteți realiza singur din șipci de lemn sau spumă poliuretanică. Un cadru din funie groasă răsucite va arăta interesant.
Sfat: pentru a proteja designul de decolorare și praf, făcând în același timp mai prezentabil elementul decorativ creat de dvs., cadrul poate fi completat cu sticlă.

Ramele albe ca zăpada completează perfect aranjamentele florale delicate.
Formarea compoziției generale
Înainte de a începe lucrul, este indicat să se realizeze o schiță, conturând pe ea contururile așezării elementelor. Folosind-o, este mai ușor să puneți cap la cap compoziția finită, evitând în același timp multe greșeli.
După ce ați decis dimensiunea picturii, tăiați baza din carton gros. O bucată de pânză este lipită pe ea, acționând ca fundal.

Pe baza pregătită sunt fixate fragmente frumoase de tapet și elemente decorative selectate.
Elementele decupate sunt fixate pe bază cu adeziv PVA. Compoziția lipește perfect hârtia groasă fără să o deformeze sau să lase dungi.
După ce lipiciul s-a uscat, compoziția finită este înrămată și introdusă în sticlă. Când intenționați să utilizați elemente de baghetă ca cadru, trebuie doar să tăiați semifabricate care corespund lungimii și lățimii compoziției. Tăiați îmbinările pieselor de baghetă cu un cuțit de papetărie la un unghi de 45°. După ce lipiți bagheta de bază, tot ce rămâne este să acoperiți cusăturile cu chit și să o vopsiți în nuanța dorită.

Soluții simple uneori arată mai impresionant decât decorul exclusivist scump
În funcție de greutatea compoziției formate, se pot folosi cârlige lipite de perete, cuie lichide sau bandă cu două fețe ca prindere.
Decorarea pereților cu tapet lichid
Nu este dificil să faci o imagine voluminoasă și texturată din tapet cu propriile mâini. Pentru muncă, puteți folosi tapet lichid de orice structură și nuanță.
Pentru a crea un decor trebuie să pregătiți:
- grund universal pentru tencuieli decorative;
- spatulă din metal și cauciuc;
- bandă de mascare;
- role de blană;
- recipient pentru amestecarea materialului.
Tapetul lichid este înmuiat în apă caldă pentru perioada specificată de producător.

Pentru a da tapetului nuanța dorită, în compoziție se adaugă culori.
Între timp, cu ajutorul un simplu creion Pe perete se realizează o schiță a viitoarei picturi, gândindu-se la dimensiunea compoziției și la amplasarea elementelor. Puteți lua ca bază orice design doriți sau puteți folosi un șablon în acest scop, care poate fi achiziționat de la un magazin de hardware.
Un strat de grund este aplicat pe bază cu o rolă, care este conceput pentru a crește aderența elementelor la perete. Cel mai bine este să folosiți un grund în acest scop care conține nisip de cuarț. Oferă un efect decorativ în sine.
Sfat: pentru a nu depăși limitele compoziției atunci când aplicați amestecul, marginile imaginii sunt acoperite cu bucăți de bandă de mascare.
Tapetul înmuiat, care are consistența unei mase vâscoase, se aplică pe suprafață cu o spatulă, așezând un strat de 2 mm grosime. Pentru a preveni lama spatulei să tragă materialul împreună cu el, este mai bine să o poziționați într-un unghi ușor. Dacă modelul are contururi clare, amestecul este așezat în etape, astfel încât culori diferite nu s-au atins unul de altul.
Această compoziție se va usca în 1,5-2 zile, în funcție de temperatura și aerisirea încăperii.
Procesul de decorare cu tapet lichid este prezentat clar în videoclip:
Instrucțiuni video pentru aplicarea unui model cu tapet lichid
Cum să folosiți tapetul rămas în interior: o selecție de idei
Tablourile de tapet sunt o modalitate eficientă și în același timp ieftină de a decora interiorul într-un mod original, care poate fi folosit de oricine îi place creativitatea interioară.