Every child needs movement during the period of active exploration of the world. He needs to play, run, have fun. Children usually spend their time outside on playgrounds. This place should be as safe and functional as possible. Such requirements apply to all sites, no matter where they are built.
If a vacation spot is being set up on a suburban area, you should become familiar with the technology of work and prepare the necessary materials and tools. It is better if someone who has basic carpentry and plumbing skills builds a playground in the yard with their own hands.
Primary requirements
Each playground is created to develop the child's skills and increase his level of physical fitness. The main feature of such complexes is that the child can play and move independently. Adults here act only as observers. For this reason, all playgrounds are decorated very brightly. In addition, each building in the complex can be used differently. As can be seen from the numerous photos of playgrounds, various structures can be positioned differently depending on the design idea.
The requirements according to which playgrounds must be built can be found in the relevant SNIP. The most relevant established standards are the following:
- The site should be fenced off from passages. At the same time, a distance of at least 10 m should be made from it to the parking lots.
- The playground area should be made impassable. It should be separate from footpaths.
- The site is landscaped around the perimeter. In addition, it is necessary that the territory have both darkened and sunny areas.
- The site should be located 20 m from other large open areas and waste receptacles.
- Every three months, all equipment installed on the playground must be inspected. It must be functional and undamaged.
- The sand in the sandbox should be changed every year. At the same time, the safety of sand on the playground is confirmed by certain sanitary and hygienic standards.
For children of different ages, it is necessary to divide the playground into certain zones. They are performed for children under three years of age, preschool children, and primary schoolchildren. However, often a playground for children includes attractions for several age groups at once.
The sandbox must be equipped with a lid. Therefore, it is better to make it simple. Such an element of the playground should not only be beautiful, but also functional. With a complex sandbox configuration, it will be difficult to make a lid. It is better to make it in the form of a hexagon or square. Photos of sandboxes will help you choose the appropriate option.

Advice! If there are two roof flaps for the sandbox, children will be able to open it independently. Adults will only need to supervise the process.
Ideas for creating playgrounds
The design of playgrounds for children involves the use of various equipment. If you don’t have the necessary equipment, you can use the advice of experienced professionals. You can also experiment with structures installed on the territory of the playground. For example, you can install a basketball backboard at the entrance to the slide house. If you have large tires, it is easy to set up an obstacle course on the playground (as in the photo).

The sandbox in the playground is made not only from boards. It is often surrounded by stumps. If you are using tires from a passenger car, you will need to prepare five pieces. The sandbox is fenced off with tires, laying them two on top of each other. The main thing is to securely fix the tires in place. This is usually done using metal pins. Then the tires are covered with sand. Then such a fence is painted.
In addition to the slide-house, you can equip a small house on the site in the standard version. If you know how to work with wood, you can install various models of airplanes and ships on the territory. Children will happily climb on them. You should not chase exact forms - children often complete various devices and designs in their imagination.

Children's playground with ready-made kits
A children's playground can also be made from purchased exercise equipment. In various stores you can find many designs that are made for installation on playgrounds. Here you can find houses and slides, swings and rope ladders. Installing a children's playground in the courtyard of a private house is not difficult if you have ready-made kits.
The main thing is to read the instructions that are issued along with the design. Exercise equipment for playgrounds must be installed on a rigid base. This requirement is specified in SNIP. Most often, purchased designs have a more attractive appearance than homemade ones. This is confirmed by numerous photographs of such products.

Making a platform with your own hands
No children's playground is complete without a slide. This simulator should be comfortable and functional. The design can be made of different materials:
- steel corners - they must be at least 3 m thick;
- Sheet steel;
- pipes - will be needed to create a frame;
- plywood;
- boards.
When choosing such materials, you can equip a durable and functional slide.
Creating a slide house
The slide-house is mounted on racks, which are usually made of timber. There should be 4 supports. This frame allows you to creatively approach the creation of the main children's simulator. In this case, you can make several ascents - ordinary steps, a ladder and a rope ladder. In this case, one stingray is enough.
The angle that is made when creating the slope should not exceed 30 degrees. This avoids overclocking and injuring children. With such a design, children's leisure time can be very well diversified.

Advice! If there are plastic panels, it is better to make a ramp from them. In addition, plastic slides for playgrounds are often sold in stores. You can purchase curved slides. Children get more joy from going down such a structure than from going down a straight wooden slide. The playground must be comfortable for the child, so all elements must be created in accordance with certain requirements.
Materials
To build a slide house on the site, you should select certain materials. To create such a design you will need to prepare:
- 5 bars.
- boards from 50 to 100 mm;
- boards with a thickness of 25 and a width of 100 mm;
- plywood sheets 15 mm;
- mounting angles;
- nuts and bolts;
- self-tapping screws;
- a pipe equal in diameter to the cross-section of the beam.
After preparing the materials, you can begin to create the base of the slide-house for the site.
Preparing the base
It is necessary to find a place to install the slide, and also prepare a hole that will be needed for the foundation. It is worth making a square frame. There should be a distance of 1 m between the posts. Each side of the pit should be 1.5 m long. In addition, the pits should have a minimum depth of 20 cm.
The bottom of the pits must be compacted, and then crushed stone must be poured. This layer should be 10 cm thick. It also needs to be compacted. You can dig a small hole under each block. The depth of each of them should be at least half a meter. The lower edges of the beams are impregnated with bitumen.
A crushed stone cushion must be placed at the bottom of the pit. Crushed stone must be selected in fractions of 15-25 mm. After filling the gravel at the bottom of the holes, pillars are inserted into them. They are leveled and correctly oriented. Then the concrete solution is poured.
Advice! Concrete is strong if it contains the optimal amount of water. The mixture should be thick when kneading. In order for concrete to move, it is necessary to add plasticizers to it. They are easy to purchase at a hardware store.

Ramp and bottom harness
The strapping of the bars must also be done using 50 mm boards. They are mounted at the floor level of the structure. In addition, to increase the reliability of the house, it is worth making a jumper. The boards should be screwed to the beams using self-tapping screws. Fastening elements must have a minimum length of 100 mm. In addition, it is necessary to make a tray for the stingray.
For this purpose, you should follow simple steps. First, cut 2 boards that are slightly longer than the slope. Then the angles of contact of the slope with the ground and the harness are marked. The board is cut to the required size using a jigsaw. Then the jumpers are cut. Long boards must be laid on the ground, and then the jumpers must be secured to them with self-tapping screws.

There should be a distance of about 30 cm between the jumpers. However, the first and last of them are mounted 5 cm from the edge. A cutout is made on top of the board. This is necessary to create full support for the ramp on the harness.
Then the slope is attached to the harness with corners. They are fixed with screws and nuts. The corners must be installed in such a way that children do not get scratched while playing. In addition, it is necessary to ensure that no fasteners or sharp parts protrude from the side of the slope. The slope is sewn up with plywood, which is installed on self-tapping screws. The fasteners are recessed into the material by 1 mm. Then the attachment points are puttied and sanded.

Ladder
It is necessary to cut 2 pieces of board 50 mm thick. Their length should be slightly longer than the length of the stairs. The corners of the connection with the ground and the harness are cut off. Then you need to cut grooves for the steps in the boards. Afterwards the steps are cut to the required width. All that remains is to assemble the ladder. The steps are fixed to the side boards with self-tapping screws.
The ladder must be securely fixed. It is attached to the strapping beam. Railings and supports are installed on each side of the stairs. They are processed with a plane to remove irregularities and sharp edges. Then the structural parts must be carefully sanded. The upper edge of the railing is attached to the posts.
Entrances and roof
Each slide on the playground features an extreme climb. To do this, you should make a tray of the same size as for the ramp. The part of the harness, which is located on the side of the extreme entrance, must be reinforced with steel corners.

Then cut pieces of plywood are laid on the floor of the house on the site. The ceiling is also lined with the same material. The house must be sheathed on the outside with plywood sheets. Its entrances are designed in the form of circles or ovals. Their size should be such as to provide maximum comfort for children playing on the playground. To create a roof, you need to cut 4 rafters. They are made from 25 mm boards. The angles of the rafters can be determined based on the height of the roof. They are attached to the corners of the frame, and then connected to each other on top with metal corners. The roof is covered with plywood of the required size.
Final work
When the work is completed, it is necessary to sand all the places where children can get a splinter. A rope is attached to the top harness on the side of the extreme climb. It should have nodes located every 20 cm. The house is painted in such a way that it looks attractive. You can apply various images to it, as in the photo.

conclusions
It is not always possible to buy a ready-made play structure for a playground. In this regard, a children's playground in the yard is often done with one's own hands. The main condition is that the materials used must be durable and of high quality. Wood is often chosen to construct various structures for playgrounds in the yard.
It is important to control the quality of processing of elements. Some areas should not be allowed to remain uncleaned or structural parts to have sharp edges. This can cause injury to children playing on the playground.

A small house is installed on each playground. It is usually made from scrap materials. You can build a house with your own hands with the participation of the children themselves. This will not only please the kids, but also make the designs more convenient.
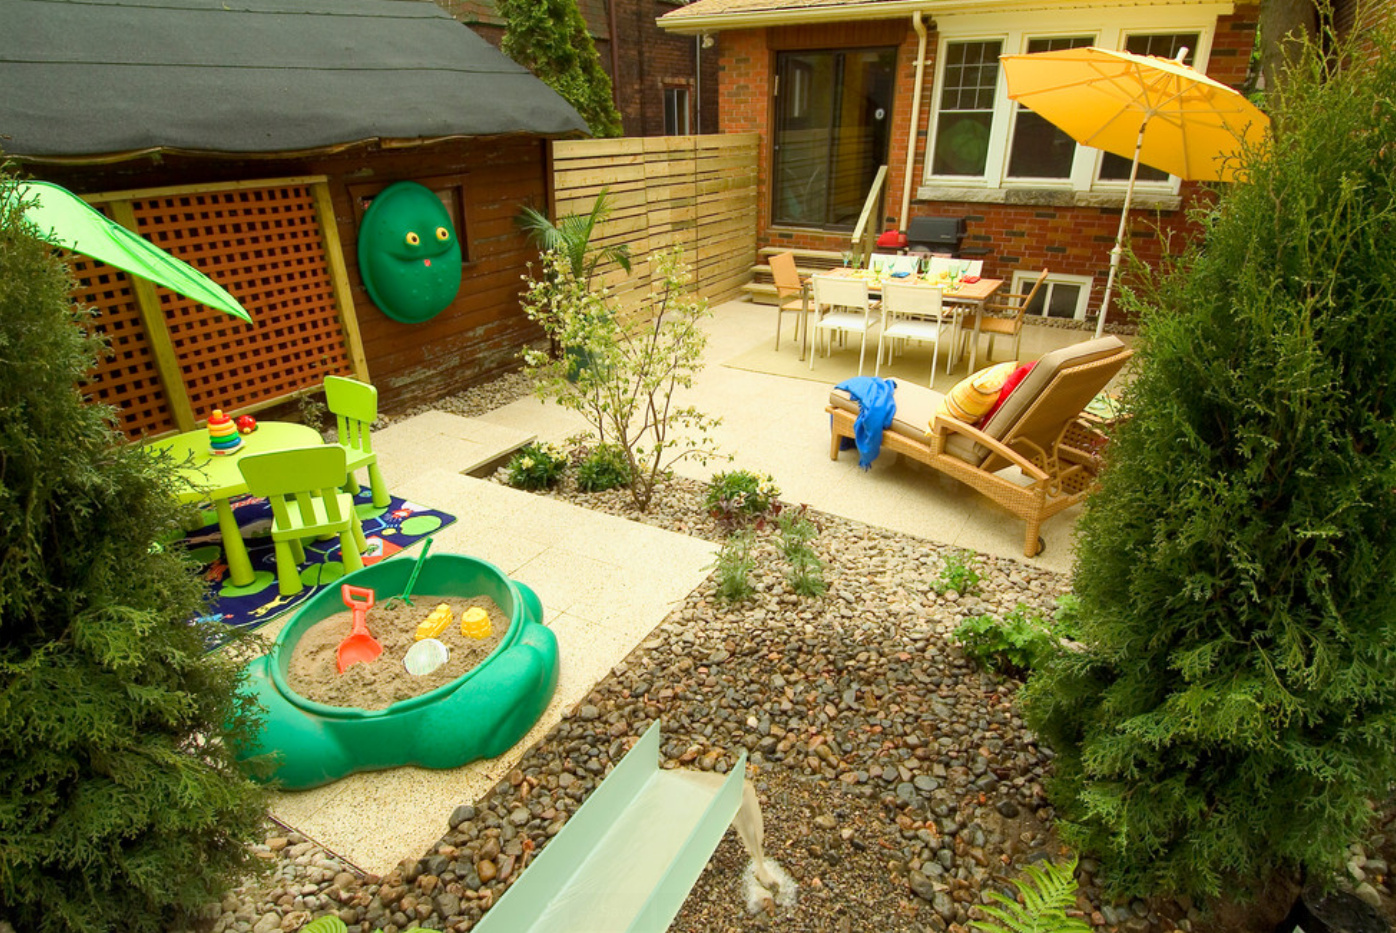
Summer is coming, vacation. How to organize leisure time for children in nature, in the countryside, in the countryside? We make a playground for children ourselves!
In the summer, most parents try to take their children out of dusty, polluted cities into nature. If you spend the summer months at the dacha with your children, then you need to make sure that their summer vacation is not only beneficial, but also enjoyable. To prevent your child from getting bored at the dacha, make a playground for him with your own hands. This will require very small financial investments plus your time and imagination. Be sure to involve the children themselves in creating the playground. Firstly, joint work helps to unite the family and strengthen the relationship between parents and children, and, secondly, designing a playground is a creative activity that will be useful for the overall development of the child.
Any child will prefer natural materials (for example, wood) to artificial plastic when playing. Therefore, we will focus on creating crafts for the playground from natural materials.
The required components of any children's playground are as follows:
- sandbox
- water
- green spaces
- children's playhouse (tent, awning)
- swing
- natural materials for play (gravel, stones, tree cuts, cones, twigs, plants, etc.)  1. DIY playground. DIY sandbox
All children get a lot of joy and pleasure when playing with sand. Playing with sand provides unlimited opportunities for a child's development. You can make Easter cakes from sand, build castles and tunnels, cook “soup” for dolls, and it can be transported in cars. Another fun thing to do is bury various objects in the sand and then dig them up. You can sprinkle dry sand on the beetle, and then watch how it gets out of it. It is interesting to draw pictures and write letters on damp sand.
Making a children's sandbox with your own hands is not at all difficult. First of all, you need to choose a suitable place for it. The sandbox should not be in the sun, but at the same time, a too dark, damp place is not suitable for it. If the child is still small, the sandbox should be near the house so that the baby is always in your sight.
You can fence off the sandbox using logs, stumps, and boards. If the sandbox is large enough, you can divide it into several play areas (see photo below). 
To protect from the sun, you can make a canopy.

2. Children's playgrounds for the dacha. Swimming pools
Just like with sand, children only like to play with water. The best option is to combine games with water and sand. Make sure that your child always has a source of water near the sandbox. Even a small bowl of water will be enough.

Of course, any child will be delighted to have a pool at their dacha. 
Another good fun is to spray each other with water from a hose on a hot summer day. Or you can ask your dad or grandfather to make an outdoor shower from PVC pipes. 


3. Children's playgrounds. Children's playgrounds photo
When creating a playground with your own hands, you cannot do without all kinds of logs, stumps, tree cuts, and boards. You can make tables and chairs from stumps and surround the sandbox with them. Stumps and logs can be used as sports equipment: it is useful for children to learn to walk on them while maintaining balance. The tree cuts will make a nice path.
A child's imagination can turn a simple log into a bridge spanning an abyss, into an airplane, a car, a horse, etc. Such games with object replacement are very useful for developing children's creative thinking. 


4. Decoration of the playground. DIY playground photo
A prerequisite for a good playground is the presence of greenery: trees, shrubs, grass, flowers.
Large trees provide protection from the sun on a hot summer day. They are fun to climb. 
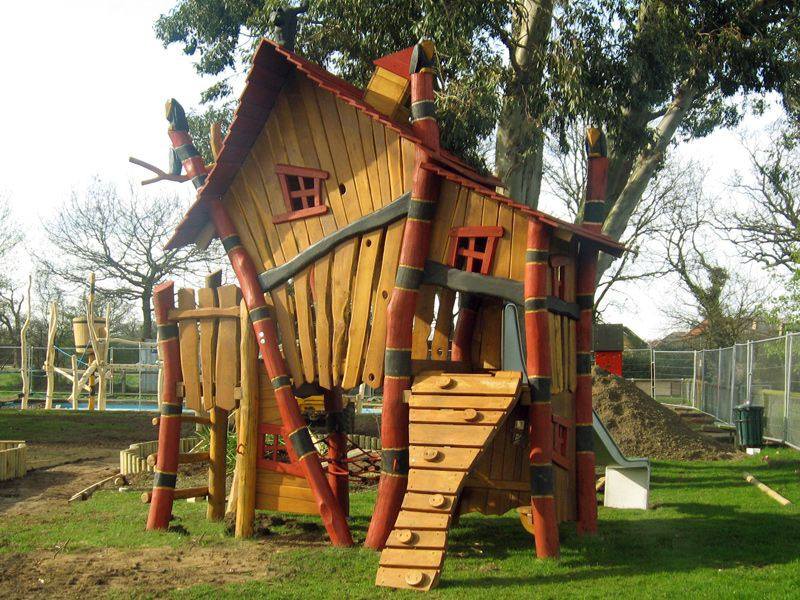
Sometimes trees have to be removed for various reasons. However, you should not cut down the tree at the very root - turn it into an interesting decorative element - a fairy-tale “house”. 
The base of large trees is the best place to create fairy houses. Making such a fairy-tale house from any available material will be interesting for every little girl. 


Be sure to help your child make his own flowerbed, which he will take care of on his own. 

Even if you yourself prefer not to plant anything in your dacha, make sure that your child has his own small garden. Just a couple of beds where he can grow unpretentious and tasty plants, for example, green peas. 
5. Crafts for the playground. Decorating a playground with your own hands
Decorating children's playgrounds is an interesting and creative activity. Handmade crafts made from wood, tires and plastic bottles are suitable for decorating a children's playground. Here are some ideas for decorating a playground with your own hands. Be sure to involve children in the process of creating crafts for the playground. 


6. How to make a playground. Playground ideas
When creating a playground with your own hands, be sure to give your child a secluded corner where he can be alone or in the company of his friends, dream, play, read, and finally take a break from you, the adults. This could be a purchased children's playhouse or tent. Or you can make a children's house (tent, pavilion) with your own hands. Here are some interesting ideas.
DIY children's house made of wood 
Children's houses for dachas. Children's houses tents.
The easiest way to make a children's house with your own hands is to stretch a rope between two trees, pillars, between a tree and a fence (see photo below) and throw a thin blanket over it. The ends of the blanket must be tied with ropes to pegs driven into the ground, or pressed with stones. 

DIY children's house.
The most interesting way to make a children's house for a summer cottage is to “grow” it on your own plot. Any climbing plants with lush foliage, such as beans, are suitable for this. 
Using the same principle, you can “grow” a children’s house from sunflowers. Sunflowers are a good plant to grow with children. They have large seeds, grow quickly and are very unpretentious. Plant sunflowers around the perimeter of the circle at a distance of 10 cm from each other. When they grow to 1.5 meters, collect their tops and tie them together - your sunflower house is ready! Yes, don’t forget to leave room for entry when planting! 
7. DIY playground. Children's playground made of wood
As we already mentioned at the beginning of the article, be sure to make sure that the child has natural materials available for play: sand, water, large stones, small stones, twigs, pine cones, plants. Games with natural materials are of great importance for the development of sensory perception, motor skills, creative thinking of the child, and have a beneficial effect on the physical and mental health of children. 

8. DIY playground ideas.
Concluding our review article “Do-It-Yourself Playground,” we will share with you a few more useful ideas for decorating playgrounds.
Plexiglas easel.
Many mothers know how useful games with paints are for young children. But most do not very often allow children to draw at home, because... After such activities, you have to wash both the child and the apartment.
Games at the dacha in warm weather have one great advantage - a child dressed in only panties, no matter how dirty he gets, can be very easily washed right on the street, by watering, for example, with warm water from a hose. And at the same time, you don’t have to worry about the cleanliness of the carpet, furniture, or floor. Let the children at the dacha have plenty of fun with dirty materials, with the same paints, for example. A homemade plexiglass easel, which can be washed using the same hose, will provide you with invaluable help. 

It's a good idea to hang a chalk board on the fence. Don't forget to give your child crayons, a bucket of water, and a rag. 
Taking care of the physical development of children, you can make a rope bridge and a bungee for them. And from an old chair you can make a comfortable swing. 

Good luck in fulfilling your plans!
Marina Suzdaleva
This article will give you ideas DIY playgrounds from loving moms and dads. Many of them are simple to implement and original. And many playgrounds thought out to the smallest detail and can be recognized as a “street development complex” for conducting comprehensive activities with children.
Just look at the statement “We wanted to make sure that children simply lived on the street.” It sounds stunning, but after seeing the playground and the happy faces of the kids, you want the same for your child.
Each work has its own interesting ideas and unusual solutions. We really hope that these works can inspire other mothers, fathers, grandparents to create a playground in their yard or country house!
All works are presented at the Club of Passionate Mothers as part of the summer competition -! We want to thank everyone who took part and shared their ideas for creating outdoor play areas!
DIY playground No. 1 from Maria, Pyt-Yakh
My name is Maria. I am 27 years old, I am from the city of Pyt-yakh, Khanty-Mansiysk Okrug. I have two children: a 7-year-old son and a 4-year-old daughter. I understand perfectly well that my children’s creation at the dacha does not look much like a playground, it is just one of the components. I’m just proud that I made this sandbox with my own hands, without anyone’s help, without any carpentry experience, from what was lying around, and at the same time I’m a young girl. Just one day I wanted to make a place for the children to dig in the sand, otherwise I was tired of burying holes all over the dacha)))

DIY playground No. 2 from Svetlana, Donetsk region
My name is Svetlana, my daughter is 4 years old. When she was one year old, I decided to make a playground in the front yard. We live in the Donetsk region, in a village. Now all the kids from the street gather near our yard.

DIY playground No. 3 from Svetlana Yakovenko
Playground for my beloved daughter
In the bright summer light
In the park, in the flower garden,
Small children
Fiddling around in the sand...V.Ya.Bryusov
Hello! My name is Svetlana, I am the mother of 2.7-year-old Veronica. I would like to show you our small children’s playground (size 6 by 3 meters); in the future I plan to expand it by another 3 meters, as much as the front garden space allows.

First there was an idea. I wanted to create a safe place where I could spend time comfortably with my little mischief-maker, and where my great-grandmothers could calmly babysit my daughter. Last summer I got excited about the idea of a playground, the most important thing for my child is “playing around in the sand,” so the first thing I did was look for a sandbox, found a box 0.5 by 0.5 m, painted it, and placed it in the front garden, but it turned out to be such a size for an older child too small Then the idea arose to sow lawn grass in part of the front garden and decorate the area.
How it was? Autumn 2013. I dug up the ground several times, removed weeds, and prepared the ground. At the beginning of March I sowed the grass, it did not sprout for a long time, and then sprang up in pieces, although I sprinkled the seeds very generously and tamped them down. Then I begged my grandfather for boards for the sandbox, painted it white and... decided that I was a jack of all trades, began knocking down the sandbox with nails - it turned out that I was not a master after all: the sandbox was skewed, it fell apart, so I followed the advice of the wise and used self-tapping screws
My grandfather made us a swing back in the winter, so I was happy to paint it. I dug the pins from the sandbox into the ground, laid black non-woven material inside so that the sand did not mix with the ground, removed part of the lawn and repaired the bald spots on the main part of the site. They put up a swing. I planted flowers along the perimeter of the lawn: bindweed, daisies, lilies, and put geraniums and petunia in pots in the corners. I sewed a cover for the sandbox from waterproof fabric, and a small “blooming” canopy was made from bindweed.

Why white? It's simple - white is a universal color, goes with everyone, easily transforms space! And one more thing - white paint was available at home at the time of creation.
As a result, the playground consists of the following elements:
- sandbox standard
- Jung's sandbox (for sand therapy, I also did it myself)
- swing
- bench
- tent
- swimming pool (inflatable)
- white large bucket with a blue lid for small toys.

What we do on the playground:


- invite friends;
- we organize theatrical performances;

- blowing soap bubbles;
- draw with chalk on the concrete path;
- We'll swim in the pool as soon as the weather gets better;
- We enjoy communicating with each other and life in general.
I ended up with a transformable playground, since we spend most of the summer outside.
What else do I want? I really want ladders and trapeze.
Lifesaver,
Evening game!
The sky has cast shadows,
Let's make some fun
It's time for us to run! (V.Ya. Bryusov)
Thank you for your attention, have a good day and inspiration, and it’s time for Nikulya and I to run!
DIY playground No. 4 from Irina Efimova, Moscow
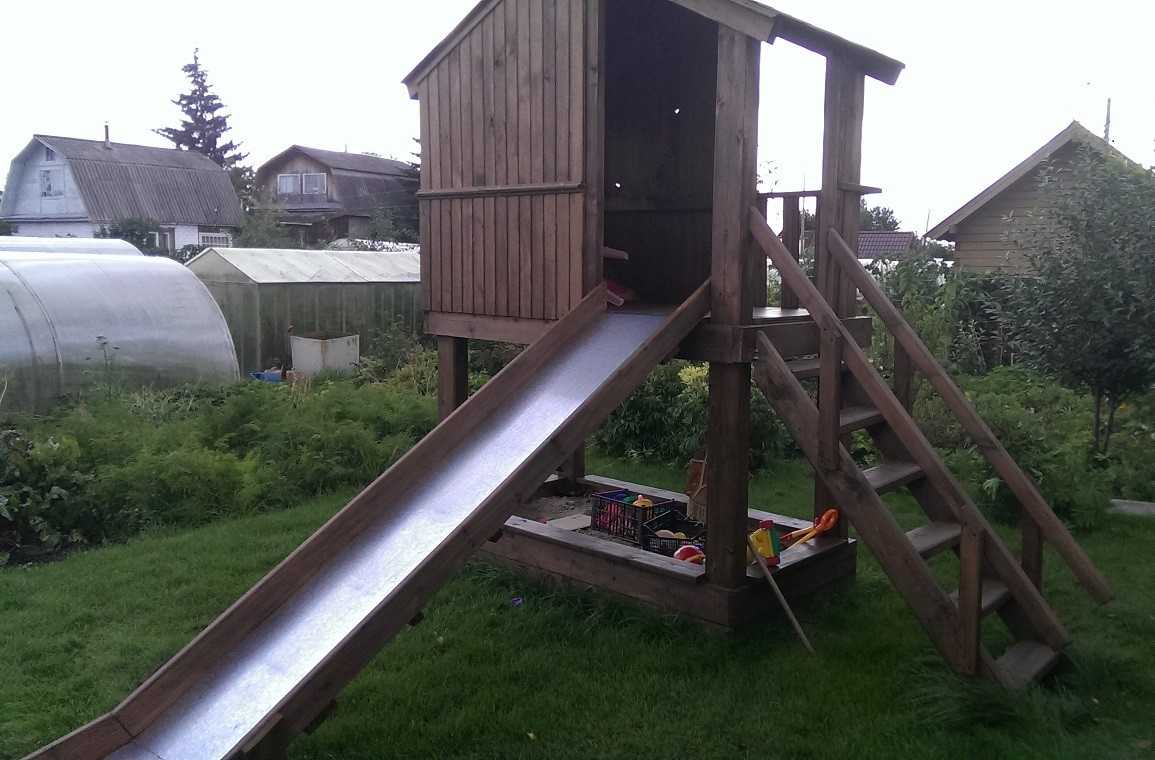
Probably every parent who spends the summer with their child at the dacha is thinking about creating their own playground. This is how it happened for us. This idea was born when we arrived at the dacha for the first time - at the age of 3 months. We collected ideas and thought through them down to the smallest detail. And a year later, that is, when the baby was 1 year 3 months old, we began to implement our project!
They made everything from materials left over from the construction of a house, bathhouse and other outbuildings. The main builder was my husband (by the way, a newbie in this area), and everyone else (me, my mom and dad) got involved whenever possible. And naturally the most important assistant was my son!

So far on our site there is only a slide and a fence (multi-level stumps), but there are plans..! This year there will definitely be a sandbox and swings on the playground, and the lower part of the slide will turn into a cozy house.

And the next thing... I want a car (or a train/plane), and even my husband, during the creative process, had a dream to build a second such tower with ropes/ladders and other activities... In general, we won’t stop at small things! Everything so that the baby actively develops in the summer :)
DIY playground No. 5 from Natalia Kiseleva, Perm
Vovushka woke up very early today. The bright sun was shining, birdsong could be heard through the wide-open window, and, despite the early hour, the neighboring boys were already riding their bicycles.
Waking up, Vovushka stretched sweetly. A new day begins, full of adventures and discoveries. The boy hastily washed his face, ate his porridge (daddy’s porridge is the best breakfast in the world!) and got ready for a walk. He paid special attention to the latter, because an exciting walk was ahead on his favorite playground.

Vovushka lives in her own house. Home is a fortress. Large, with many windows and a spacious veranda. In front of the house there is a vegetable garden: carrots, cabbage, potatoes, beets, berries. Arma the dog lives nearby. Arma guards the house and barks at crows and cats all day long.
In addition to a vegetable garden with various fruits and vegetables, there is a playground in front of the house. Vovushka really loves to play here. Especially with dad. Especially when driving a big, big tractor.

This tractor has never been before! He rolled around the swing made by Vovin’s grandfather, around the sandbox, around the pirate ship, who knows how it sailed here. The tractor even floated in the pool (in the hottest weather, the pool is filled with warm water, and if it’s cool outside, you can “swim” in the balls). And the tractor is working at a construction site:
In the middle of the yard there is a mountain
There is a game going on on the mountain.
Come running for an hour,
Get on the sand:
Clean, yellow and raw
If you want, swarm, and if you want, build,
If you want, bake for the dolls
Golden pies.
Come join us guys
Don't forget to take shovels
Excavators, shovels,
Buckets and trucks.
There are screams and laughter here.
And everyone has a job. (A. Barto)
A real mountain: sand, stones of different sizes. You can transport sand or build a road for tractors and cars, you can arrange an avalanche and carry out rescue operations, you can dig canals and launch ships, you can...

It’s great when the site is made by grandfather’s and father’s hands. It’s great that there is a lot of space and room for imagination and creativity. This is the playground of your dreams!
DIY playground No. 6 from Maria Tragaryuk, Kurgan
Good day to all!
To make it interesting for a child to be outdoors in the summer, he should create an interesting learning environment. I will show you what we did for our girls (Yaroslava, 2 years old, and Radmila, 4.5 years old).
At our dacha we have done a lot of interesting things for our daughters, naturally all with our own hands.

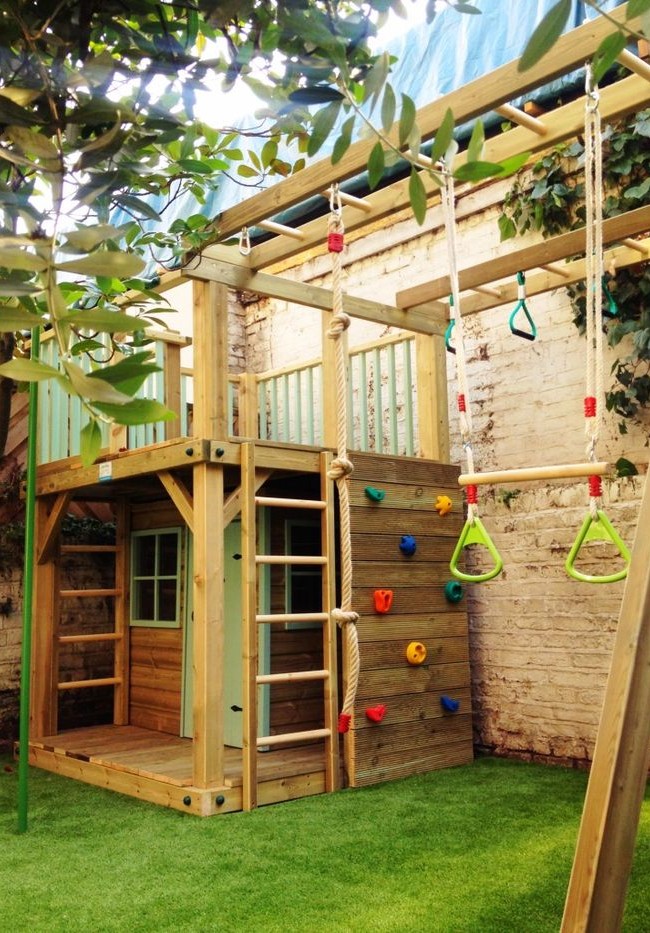
Play gazebo
Initially we wanted to build a tree house, then just some kind of climbing frame. We went through a bunch of options and eventually came up with the idea of making a structure like this.
We made a two-story gazebo with an observation deck at the top. On one side there is a climbing wall and a slide, successfully tested by one-year-old Yaroslava that year. On the other hand, for now there are just intersecting bars for climbing; later we plan to hang a climbing net here.
On the front side there are stairs to the second floor. This year the top of the stairs is covered with fabric. As a result, two-year-old Yasya does not climb up without supervision, but almost five-year-old Rada climbs up and down calmly. Even in front we constantly hang a swing or a trapeze (at the request of our daughters). On the back side there are just bars that the girls climb on.
Inside the gazebo, on the ground floor, there is a comfortable bench, which, at the request of the girls, turns into a table for playing with sand. This year we placed a low wooden table inside. I also made a kitchenette for the girls from an old bedside table: I attached disks on top - burners, on the front there were lids from cans - gas switches, on the side there were hooks for towels and ladle spoons, on the outer door there was an oven door and a fire, inside there was a shelf on which young housewives put their ovens. pies made in the sandbox.
Inside the gazebo we hang a large hammock, in which our daughters love to swing.
This year we plan to finalize the gazebo and complete the second floor (install doors for security purposes).

Sandbox
The sandbox is the most common one, with a roof. A wicker wall was installed on the side of the sandbox to prevent air from blowing in from the direction of the gate. We often place a homemade table inside the sandbox.

Other elements of the playground
At the dacha there is also a control panel, a portable slide, and in hot weather we set up a pool near the gazebo. There are wheels dug in around the playground, from which it is simply wonderful to jump into the sand poured around the playground. There is another swing hanging on the adult veranda. There is also a table for games and a rug to make it comfortable to sit and play. There is also a large plastic box with a lid in which toys are stored. At the dacha, the girls have their own brooms, shovels, rakes and watering cans. Everything little helpers need.
We are planning to make this year: a board for drawing with chalk, a bench-type car with a steering wheel, and a ring for throwing balls.
A lot was done with our own hands on the playground in Rada’s kindergarten. My other parents and I made this playground completely from scratch. I’ll show you some elements: a car and bees, piglets and ring throwers, and also butterflies and a matryoshka made from wheels.

Do-it-yourself playground No. 7 from Natalia Kushnareva, Riga (Latvia)
Natalia, mother of five wonderful children (8 and 6 years old, 4, 2 years old and the youngest 3 months).
We live in a private house near Riga. The children do not go to kindergarten, only the eldest has entered 2nd grade. We spend a lot of time in the yard and, of course, we try to make sure that the children have something to play with. We have a purchased swing, a house, and a sandbox. There is a table where we draw, sculpt, etc.
But it couldn’t be done without homemade products.
Ship
We made a raft for the children from a construction pallet. We attached a blue bath mat with screws, I sewed a sail, but we found the steering wheel and anchor in the attic. It turned out great, and the guys regularly go on “big voyages.”
Tired of the mess in your nursery? Tired of endlessly collecting toys for your child?

Football goal
The World Cup also captured our family. Therefore, my husband and son built real football goals from boards and oilcloth. Work for one evening, but joy...

Developing accuracy
I decided to make another sports “equipment” from a plywood board, a former part of some furniture. My husband cut out several circles, I painted them, and sewed sandbags in three colors (for the older ones, each has its own color). And now the children are developing their eye and throwing bags into the holes. They really like it)))

Mind games
And besides sports, I also want to))) For this, I chose a circle made of chipboard, which my husband brought for firewood. I painted it green on one side and divided it into 9 parts, and black on the other. The edge was covered with rope. And now on such a table we play “Pine Cones”, or “What is missing in an empty cell”, we solve problems with 9 screens (system, subsystem, supersystem, etc.), and on the black side you can write words, problems with chalk or just drawing. Or you can lay out something from leaves, pebbles or shells, and draw with sand.

There are also tires buried in the ground - these are both a “motorcycle” and a “horse”, but you can simply jump from them.
We draw and play a lot on the asphalt, and create obstacle courses from scrap materials. As you can see, everything is simple, but done with imagination and love for children)))
DIY playground No. 8 from Maria Fedorova, Miass
Garden for Daisy
In October 2011 we moved to a new old apartment building. New - for our family. The old one is for me personally. This is my childhood home. In this yard I painted hopscotch, made acacia pickles, skinned my knees, jumped in rubber bands with my friends, hid secrets under pieces of glass... And I also watched how the flowers grew in the flower beds under the windows of my grandparents’ apartment.
All their lives in this house they grew flowers outside. Grandfather showed me: these are cosmos, and these are cornflowers. Taught me how to collect seeds. I glued “containers” for seeds from matchboxes... Returning to this house, to this yard, I simply could not do otherwise: as soon as the snow melted, I picked up a rake and went out into the front garden. And it was already impossible to stop me.
Just planting flowers was not enough for me. Near a picturesque, but very old lamppost, under coniferous trees, planted again by the hands of our ancestors, I created a flowerbed with a children's corner.
From waste material I made a small composition:

In general, our clothes dryer is hidden behind this larch and fir tree. Yes, yes, in the 21st century, some people still prefer to dry their laundry in a fresh breeze. For Rita, I also pulled a string at a height accessible to her, where she hangs her socks and handkerchiefs and attaches them with clothespins, just like mom! (In the photo you can barely see the rope right behind the girl)
I planted daisies next to this composition. With what tenderness my Margarita looks after them!
The main advantage of our mini-town is that it is located right under the windows (our apartment is on the 1st floor). I can let my child go outside with my grandmother (who is already in her ninth decade), and from the kitchen window I can watch how my great-grandmother and great-granddaughter get along. On the other hand, in my spare 10 minutes I can go out and paint some boards and weed a flower bed. Slowly but surely, things are moving forward. This project has spanned more than one year, it grows and changes along with my little girl.

One year we did a mini health track. I collected old bricks from the area, laid them out in a row, and Rita whitewashed them herself. Next, I laid 3 trimmings from tires (the tires themselves became flower beds) and poured in various fillers: sand, pebbles and just grass.
(The first photo below shows tests of a freshly painted object)
All this was located on the border between the clearing under the common drying area and the central flowerbed. I am trimming the clearing, trying to imitate a lawn))). Of course, my flower girl helps me care for the flowers in the “central” flowerbed, and for all the flowers in general. Previously, they carried watering cans, but now they have connected a hose that extends directly from the window.
Our children's area is also distinguished by its mobility. There are small benches here, put together by my grandfather’s hands for his various crafts. The baby can easily take this bench himself and put it where he likes.

There are simple stools for adults. Some grandmother from a neighboring yard passing through our yard will sometimes sit down on a stool for a couple of minutes and move on. (In the photo below are great-granddaughter and great-grandmother)
Unlike garden plots, we have asphalt here where you can draw with crayons. If you’re tired of painting on the asphalt, you can take out the easel and paint portraits of sunbeams.
We take the trampoline out onto the lawn, which, by the way, is used not only for its intended purpose, but also as a chair, as a table, and as a lounger)))

In hot weather, a mandatory attribute of our corner is a basin of water.

On our site you can find opportunities for interesting activities all year round. In the fall, see how the larch has turned yellow, or discover the first ice in a forgotten bucket. In winter, clean the path, build a snowman in place of the lawn, decorate the Christmas tree for the New Year, hang bird feeders. In the spring, watch the snow melt and organize a cleanup day. 
In the summer - paint at the table, without being afraid to spill everything around, or even celebrate your birthday!
Of course, there is also a weak point in our corner - we live in the city center, and even if the yard is not the most accessible, there are still a lot of crooks here. This year the corner with the house is no longer alive; we still have to reincarnate it. The vandal defeats make us very sad, but they don’t stop us.
We plan to make a birdbath, add some outdoor equipment, and whatnot. This is a great place to receive guests in the summer. This is what we are going to do next Saturday - for the second time, we will have a children's birthday party here, in the fresh air in the lap of nature and at the same time 2 steps from the house.
DIY playground No. 9 from Marina Sigaeva
My name is Marina. My son's name is Igorek, on August 2 he will be 2 years old. In addition, I was entrusted with my niece and goddaughter Tanya (4.5 years old) for the summer. These are our happy players)
And the children's playground, photos of which I willingly share, appeared only 2 months ago. All photos are “live”, nothing was specially embellished, nothing was cleaned up, everything is as is.
We call it nothing other than “A Million Children’s Delights”!!!
Judge for yourself. We were limited in funds and space, but we wanted everything for the children at once. In addition, the age of children coming to the dacha ranges from one to 7 years. And everyone should be passionate! And the task was ambitious - “Make sure that children simply live on the street!”
Every detail was selected with pain, we even went to the plant in Dmitrov. And that's what we got! Swings, trampoline, slide, hammock, giant construction set, climbing frame, basketball, sandbox, water area with a pool and Montessori water games, sandbox, benches in the shade for adults, playhouses and even a “green” puppet theater!
On site we conduct:
- /sports tales (with ropes, hoops, balls, nets, punching bags, etc.)
- (sand, buckets of water, pebbles and other dacha joys)
- We develop thinking and imagination (we build from a construction set a house, a car, a table and chairs - whatever your heart desires)
- We dramatize fairy tales + finger theater on stage (see photo), and just play!

Let me tell you right away that we spent about 45 thousand rubles. This is a lot. But when you compare what manufacturers of ready-made solutions offer for this money and what we did for our children, the difference will be obvious. We made it entirely with our own hands (it took about a week) - a sandbox, hemp chairs, a bench. We leveled the area, concreted it and laid out a puzzle covering, delivered and assembled the slide, trampoline, climbing frame, and varnished all the wooden elements.

 I would like to tell you a lot of details, but I won’t drag it out. The main find is - don’t buy a ready-made house! They will never get tired of the house that children build themselves from construction sets!!! Don't consider it an advertisement. I'm just a fan and I recommend it to everyone.
Many ideas will be implemented later. There are many options with old tires and logs. Functionally, the site turned out to be much more advanced than visually. But it won’t rust behind us, we’ll decorate it!
And we have already achieved our main goal. The children even eat on the table they built and sleep in a hammock =) So from morning to evening we are outside getting healthier and enjoying life!
Here's a “Million Pleasures”!
DIY playground No. 10 from Albina, Yaroslavl
My name is Albina, my daughter is Katerinka, she is 1 year 7 months old. We are from Yaroslavl, a small children’s playground was “created” at our dacha this summer, so we decided to take part in the competition. They decided to place the site behind the bathhouse, because the bathhouse is protected from the wind and in the afternoon, just when the sun is at its hottest, shade forms there.
So the first participant in the creation of the site emerged - our grandfather, who built the bathhouse :). The beds begin behind the bathhouse, it’s very convenient: I’m in the beds, Katerina is playing on the playground - we both see each other, both are calm :). The next participant in the creation of the site is our grandmother. She made the biggest sacrifice - she had to move two whole of her flower beds from this place :) In addition to her grandparents, our dad and I, of course, had a hand and head in creating the site:)
Now let's get serious ;)
What we have on the playground: there is a sandbox, there is a swing and rings, there are stump walkers. There is also a climbing frame and a slide, but this is no longer our doing :)

Sandbox
This is a huge wheel from some kind of truck (I’m even afraid to imagine its size, looking only at the wheel). Grandfather got it somewhere. Our dad diligently carried sand into the sandbox, and mom (that is, me :)) painted it.
Swings and rings
The swing and rings hang on a piece of iron, which once was a stand for some spare parts in my grandfather’s store. Grandfather prudently did not throw her away and now she has found a second life. Dad dug it in securely, hung swings and rings, and I painted it with small flowers to make it look more fun.

Hemp
The stumps: “walkers - climbing frames - jumping ropes - climbing frames” were picked up, treated with some kind of disinfectants and dug in by dad, painted, as usual, by me. They were lying in our old woodpile, we got them from the previous owners. The stumps are dug in at different heights, but the difference between neighboring stumps is not very large, they gave Katya a discount for her age :) An improvised table and two chairs were also made from stumps.

Total our costly team:
- grandfather - supplier;
- grandmother is a landscape designer who was forced to make room;
- dad is a builder, designer, the main driving force;
- Mom, that is, I am a painter - decorator, ideological inspirer and so, give orders;)
- Katerina is a happy owner.
What Katya does on the set:
- : we bake Easter cakes, stand castles, cook shortbread porridge.
- The swings and rings also serve their purpose, I really like them.
- Stumps are walkers: we walk on them, jump on them, climb over them, sit on them. Toys sit on them and end up here.
- Easter cakes from the sandbox, we have fun sweeping up the stumps, pouring water on them, and rolling balls and cars on them.
- Katya doesn’t perceive the table and chairs as furniture; she jumps all over them like she does on other stumps.
In addition to Katya, moles have taken a fancy to the playground and create mini-sandboxes for us. Katya loves to dig in their earthen mounds; the soil there is so crumbly, steeper than sand. Well done moles, they are trying :)
This is the kind of playground we have. I still have a lot of ideas, I hope to implement something else this summer, as long as supplies and labor don’t let me down :)
DIY playground No. 11 from Natalia Mylnikova
The real decoration of our dacha is my mother. She brings beauty there.

Dad made two swings for the children himself. I assembled one simply from sticks and boards and Soviet abacus, and the others - I sawed out horses and made swings and scales. The horses in the photo turned out whitish. They are actually more brightly colored.

The only thing we don’t have at our dacha is a sandbox. It is not needed there, because our soil is sandy and you can play with sand anywhere.

 The workbench actually stands a little to the side, under a canopy, but for the sake of beauty I photographed it here.
The boy loves to call his work phone, buzz with a drill, twist, hammer...
There are also crayons, paints and (attention, I’m sharing a secret!) an album with wallpaper samples.
We were given these outdated catalogs from last year in December at a local hardware store.
Their sheets are made of durable non-woven fabric, and the theme is children's.
We’ve been making crafts for six months now, drawing on them, and there’s no end in sight to the album!
DIY playground No. 13 from Olga Kazunetkina, St. Petersburg
Our “platform” is divided into 2 parts:
- Street: , rocking horse and slide.
- Attic: swing, gymnastics rings, hanging shuttlecock (to hit it with a racket) and a toy rocket house with balls.
This, in my opinion, is the optimal solution - to divide the site into a “street-house”, because the weather in St. Petersburg is not particularly pleasing to us. We spend a lot of time in the attic.
 On the one hand, I would, of course, like to do something on a larger scale with my own hands (I’ve seen good examples), but, on the other hand, we already have enough, and then we have a reason to run through the neighboring dachas, look at their sites and get to know each other with children, and our dacha is located in a village where there are several municipal sites. So Dimka has an incentive to walk there.
The playground has everything you need for children's games, but the veranda has not been updated for a very long time. I love to draw and, in my opinion, I’m a little good at it, so I suggested not just painting the veranda, but drawing something. Remembering what the children studied during the school year, I decided to draw. It turned out to be two in one: bright pictures and a guide to consolidate the material covered.

And finally Fairy tale "About the sad veranda."
In one kindergarten, there lived a small playground and it had a nondescript, sad veranda. She was so sad that the children playing nearby also began to feel sad. And there was a sad veranda, because a long time ago a sorceress bewitched it green.
She decided that all the verandas in her garden would be only green. And then one day, when the summer holidays arrived, not indifferent parents came to the playground. They waved the magic brush once, winter appeared, waved it a second time - spring, the third time - summer, the fourth time autumn appeared. Thus, on the playground, a veranda with the seasons appeared, bright, light and cheerful.
Now our veranda decorates the playground, and gives children smiles and a good mood. And anyone who passes by must stop and look at our veranda. And the sorceress ordered the other verandas to be bewitched too.

DIY playground No. 15 from Svetlana Bardina, Saransk
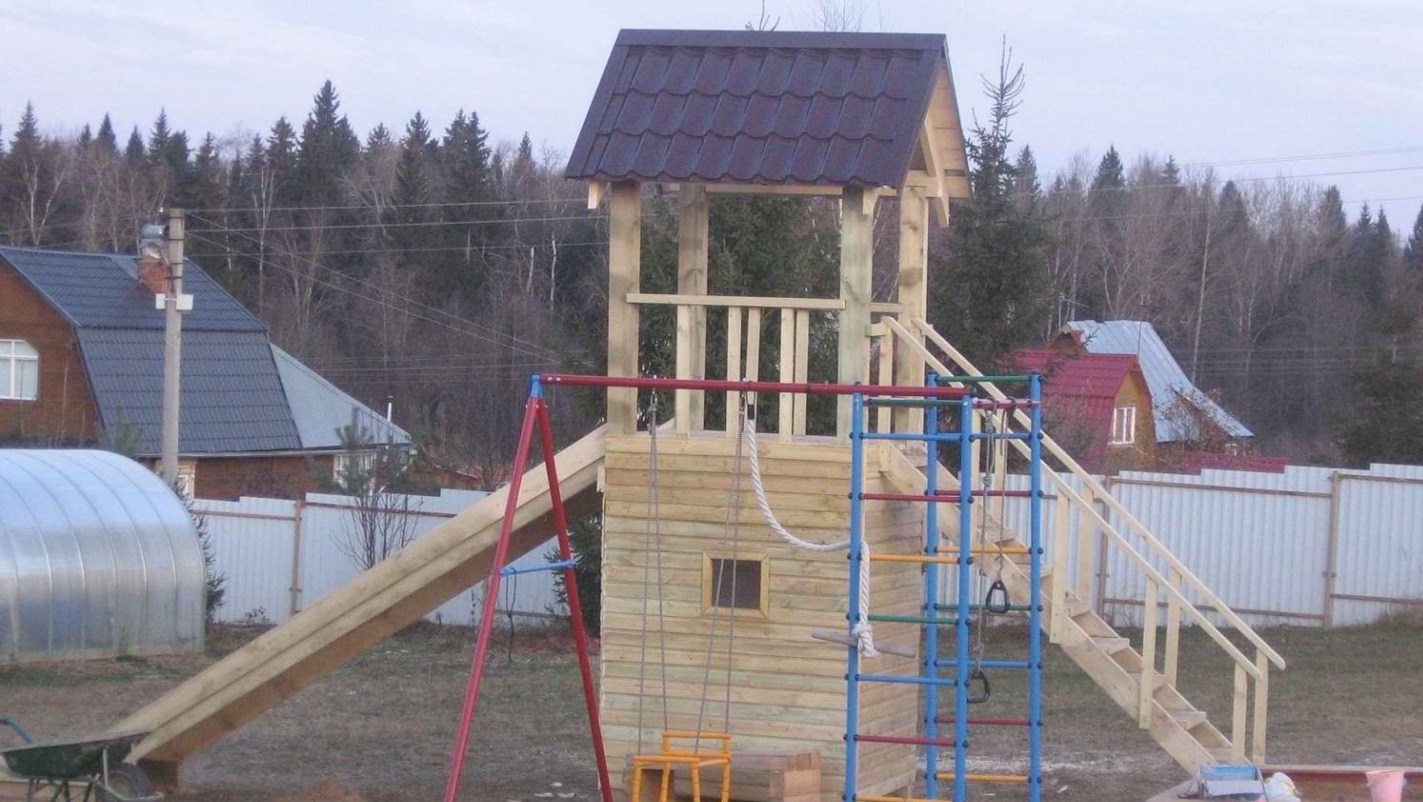
Hello! My name is Svetlana. My husband Oleg and I decided to take part in a competition for homemade playgrounds. After all, when the competition was announced, the construction of our site was in full swing.
We have three wonderful children: Roman, 14 years old, Lev, 5 years old, and Maria, she recently turned one year old. We live in Saransk. Our site is located in a small country village.
My idea of organizing a playground for my daughter’s birthday was happily supported by my husband and sons. Initially, we wanted to purchase a ready-made mini-site, but then our dad decided to do everything with his own hands. “What is done with love and warmth is always better,” he said. “Especially since I have such wonderful assistants,” he added, meaning Roma and Leva.
And the work did not take long to arrive. My husband designed the structure, purchased boards and timber, and our men began construction. We worked every evening: sawing, sanding, assembling, painting. And besides, it was necessary to prepare the site in advance: level it, dig it up, sow grass, and then weed it out.
We finished it in a month, just in time for July 5th, Mashenka’s birthday. There were a lot of children, the older kids loved the big slide and the basketball hoop, the kids played in the sandbox, rode on the swings, splashed in the pool, and then fell asleep in the hammock.

There is a lot of greenery around the children's area, apple trees, birch trees, and linden trees. All this creates useful shade, and you don’t have to be afraid that the children will “burn” in the sun.
Now every day children from all over the village come to play with us. We are very happy about this.
Of course, there is still a lot to be done on our playground: paint the house inside, decorate the outside, make a small slide for kids, make a table with a bench for children and much more, as much as your imagination allows. But the main thing is that a start has already been made, and there is a great desire to continue this magnificent undertaking.
The most wonderful thing is that this big cause unites our family, makes it stronger, more friendly and stronger.
The voting results have been summed up
, and we managed to choose the most handicraft and creative parents who spare no time and effort to create a miracle with their own hands for their kids. At first I was going to independently determine the first place, but when I saw the voting results, I was pleasantly surprised - this time my opinion coincided with the opinion of the majority. Therefore, I am pleased to present to you the winners of the DIY playground competition:1 place. Competition work No. 3. Svetlana Yakovenko and Veronica
2nd place. Competition work No. 6. Maria Tragaryuk and two daughters - Yaroslava and Radmila
3rd place. Competition entry No. 8. Fedorova Maria and daughter Margarita
Congratulations to the winners! Information about prizes will be sent to you within 48 hours.
I thank all the other participants once again and admire your ideas and their creative implementation! You guys are great! Thank you for the clear example and inspiration!
We will send the material to you by e-mail
D For the normal development of children, they need to actively spend their free time - running, playing, having fun. When creating playgrounds, the main attention is paid to their safety and functionality. To build playgrounds with your own hands on a country plot or dacha, photos of which you will find in this article, you will need some tools, carpentry, construction and plumbing skills.
Homemade playground
Decorating children's playgrounds with your own hands, photos of which are posted on the Internet, requires the presence of certain equipment. If you don’t have something, don’t be upset, here are some ideas that will help you equip your playground.


Making a slide house
A do-it-yourself children's playground at the dacha, a photo of which you can find on the Internet, always includes a slide or a house slide. The base of the slide is a frame of 4 vertical posts. You can use only 2 stands, but then the possibility of creativity is reduced and the slide will be limited to one slope and one rise. On a frame of 4 posts you can make a slide with one slope and several rises. Make one climb in the form of a ladder, another with normal steps, and the third with a rope.

This design will seriously diversify children's leisure time. For a slide with a straight slope, it is undesirable to make the angle of the slope more than 30 degrees relative to the ground in order to avoid excessive acceleration and injuries.

Helpful advice! If possible, use a plastic ramp, which is sold in stores. With its help, children will get more pleasure than from a straight wooden ramp.

What to make a slide house from
For this you will need:
Preparing the base
Find a place for the slide and prepare a hole for the foundation of the frame. We recommend making a square frame with a distance between posts of 1 meter. The side size of the pit should be 1.5 meters, the depth should be at least 20 cm. Compact the bottom of the pit and pour a 10 cm thick layer of crushed stone (fraction 15–25 mm) there. Compact it. You can also make do with small holes under each block. In this case, the depth of the pit should be at least 50 cm. Soak the lower edge of the beam with diesel fuel and molten bitumen, the treated part should rise above the ground by 1.5–2 cm. Place a crushed stone cushion on the bottom of the pit - fraction 15–25 mm, thickness 5 –10 mm. Insert the pillars into the hole, level them and ensure their correct orientation - their edges should be parallel to each other (this is not required with logs or round bars). Then pour concrete.

Helpful advice! The less water in concrete, the stronger it will be. To make thick concrete more flexible, add plasticizers to it, which can be bought at a hardware store.
Bottom harness and ramp
Tie the bars with a 50 mm thick board at the floor level of the house, and also install one longitudinal jumper. Attach the boards to the bars using self-tapping screws no less than 100 mm long. Make a tray for the ramp from a 25 mm thick board. To do this, cut 2 boards, the length of which is slightly longer than the length of the slope. Mark the angles of contact with the framing frame and the ground, then cut the board using a circular saw or jigsaw. Place the boards against the trim to make sure you have done everything correctly. Then cut the lintels from the same board. The length of the jumpers is equal to the width of the slope. Lay the long boards on the ground and use self-tapping screws to attach the lintel to them from the bottom.


The distance between the jumpers is no more than 30 cm, and install the first and last jumpers 5 cm from the edge. Make a cutout in the upper edge of the board so that the slope rests on the frame as if on a shelf, and the jumpers are flush with the frame. Attach the ramp to the harness using the corners of the bolts with nuts and self-tapping screws. Install the corners so that children do not get scratched. Attach the corners to the slope using bolts and nuts so that there is nothing protruding or sharp on the side of the slope. Sew up the slope with plywood using self-tapping screws. They must be recessed by 0.5–1 mm, then puttyed and sanded. Secure the bottom edge of the ramp using pegs or anchor bolts driven into the ground.

Ladder
Cut two pieces of 50 mm thick board, the length of which will be slightly longer than the length. Mark and trim the angles of contact with the harness and the ground. Cut 24.5mm wide grooves into these boards to accommodate the steps, then cut the steps to the required width and assemble the stairs. Attach the steps to the side boards using self-tapping screws. Attach the ladder to the harness and the ground on the side opposite the slope. Attach supports and railings to both sides of the stairs. They can be made from 25 mm thick boards. Posts and railings should be smoothed using a hand or electric plane to remove any sharp edges, then sanded thoroughly. The top edge of the railing must be attached to the posts.

Additional entrances, roof trim and roof
On one of the sides, make a ladder from the same block that was used for the racks. Process the cut bars using an electric planer to slightly round the edges. Attach these bars to the posts at a distance of 20–30 cm from each other. Screw the first block at a distance of 20-30 cm from the ground. Prepare for an extreme climb to the lodge. To do this, make the same tray as for the ramp, but installed at an angle of no more than 20 degrees relative to the posts. Tie the posts at the ceiling level of the house using a 50 mm thick board. On the side of the extreme entrance, strengthen the strapping using steel corners. Cut and lay plywood on the floor, then line the ceiling with plywood. Cover the outside of the house with plywood, making round or oval entrances. Determine the size of the entrances/exits yourself so that the child is comfortable. To make the roof, cut 4 rafters from 25mm thick boards. Determine the angles of the rafters based on the height of the roof. Attach the rafters to the corners of the frame and connect them together from above using metal corners. Cut the plywood into pieces of the required size and sew up the roof.

Cutting plywood with a jigsaw
Final works
After finishing the work, be sure to sand all the places where a child could get a splinter. Then treat the slope, steps and extreme rise with parquet varnish. Attach a 10–15 mm thick rope to the top harness on the extreme climb side and tie knots on it every 20 cm. Paint the house so that it looks beautiful.

A sports or children's playground for a summer residence is a great opportunity to provide a full-fledged active and interesting holiday for children. Such towns are easy to make independently. To do this, it is enough to use competent drawings and purchase high-quality material.
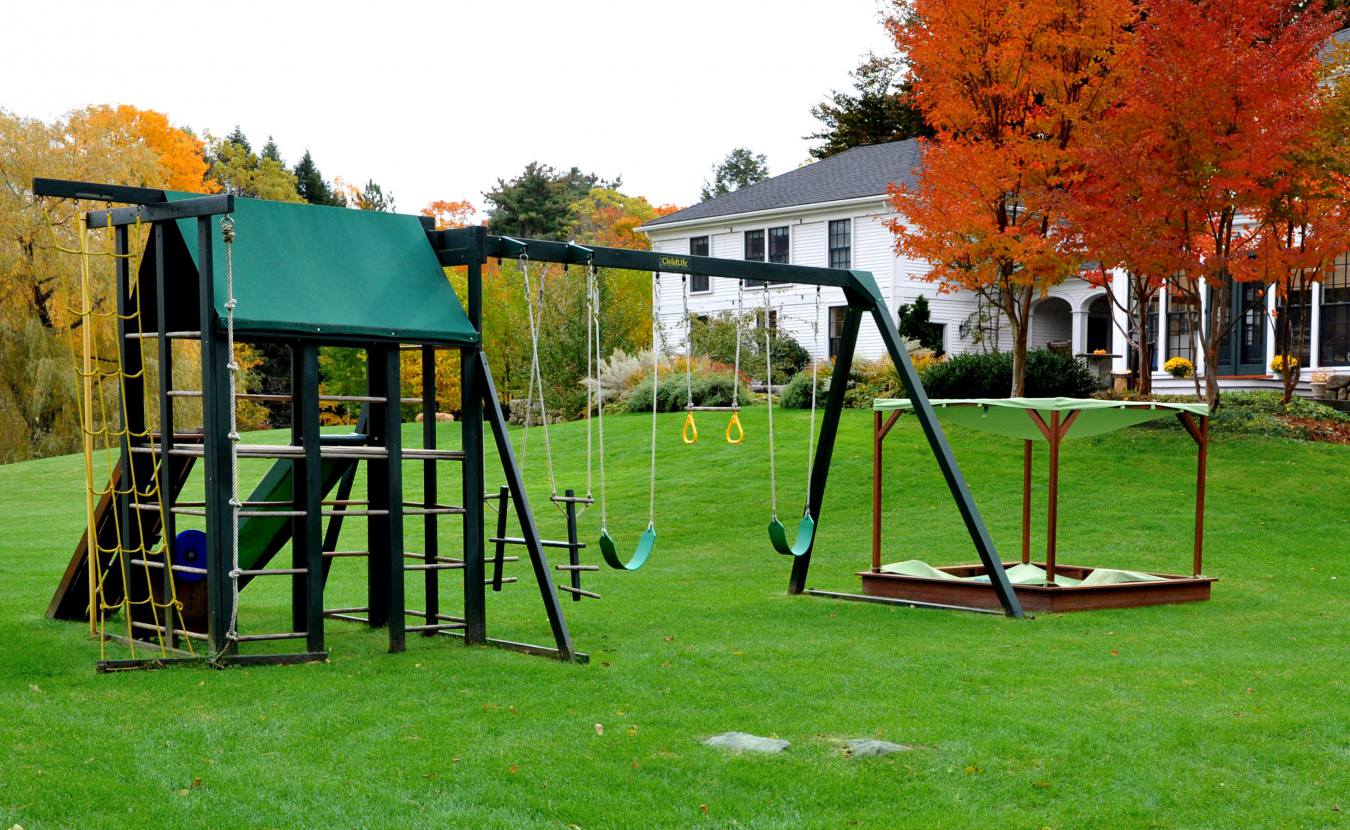
Children's playground for a summer residence: criteria for selecting ready-made complexes
When choosing a playground, you must take age into account, and also be child-centered. For preschool children, models that are equipped with a rope ladder and swing are best suited.
The most modern playground towns for teenagers are often equipped with rope climbing walls, spiral slides and monkey bars. Before purchasing, you must decide on the number of children and their total weight, and also carefully study the technical characteristics, paying particular attention to the maximum permissible load on each projectile.

- stairs, including rope options;
- horizontal bar;
- swing;
- slide;
- trapezium;
- rope with rings.
Optional, additional elements most often include parallel bars, a hammock, a climbing wall, a climbing net, hanging carousel tires, tic-tac-toe panels, suspension bridges, tables and benches. In some cases, the design provides for the possibility of adding new modules as children grow and develop.
Many manufacturers also produce additional protection in the form of mats, soft overlays for handrails, additional handrails for stairs and other types of protective covering, which helps minimize the risk of injury as a result of an accidental fall. Protective bumpers, along with other soft elements, may be included in the package or purchased separately.
How to make a sandbox with your own hands (video)
How to make a children's playground out of wood with your own hands
The easiest way to make your own playground is out of wood. It is the wooden complex that meets all safety and environmental requirements.
Site layout and drawings
As with any type of construction, before carrying out work on the independent construction of a play area, it is necessary to create a competent and most interesting project. Initially, you need to draw up a full-fledged plan of your home or garden area, which marks the area allocated for organizing a children's play area. At the next stage, the main elements introduced into the project are determined. When planning a site and drawing up drawings, it is necessary to take into account the perspective.
The wood used to create the structure is easy to process and absolutely harmless, and also successfully combines an attractive appearance and an affordable price for a wide range of consumers. Besides everything else, wood goes well with metal crossbars and a labyrinth, made from rubber car tires. At the last preparatory stage, the construction site is inspected and the area is thoroughly cleaned and leveled. It is also necessary to provide for the creation of artificial or natural coverage.

Making a sandbox
Children of almost any age love to play in the sand, but most often this option is used when arranging a play space for preschoolers. Standard dimensions are 170x170 cm. Self-construction technology:
- thorough clearing of the area, removing all debris and vegetation;
- using marking pegs and lacing, an area of the required size is fenced off;
- inside the fenced area, the top layer of soil is removed to a depth of one shovel bayonet;
- the base of the sandbox being built is covered with a layer of sand 50-60 mm high, after which it is covered with plastic film or an ordinary plywood sheet;
- all wooden elements used in construction must be treated with drying oil in several layers;
- the corners of the sandbox are created using bars measuring 450x50x50 mm, which are dug in with a depth of 150-200 mm;
- After they are buried, side wooden boards measuring 1500×300×25 mm and the same horizontal sides are nailed to the support bars.
At the final stage, the assembled sandbox must be painted in bright and durable colors. After the paint has completely dried, sand is poured. The best option is to add a special lid to the sandbox that will be closed at night.

How to make a sports corner
The sports part of a self-built playground can be represented by various sports equipment. For the youngest users, it is recommended to build a path from stumps with different heights or a standard labyrinth from ordinary car tires. In adolescence, horizontal bars, bars, rings and ropes are of interest.
We make a swing and a slide
Building a slide on your own on a playground is not a very complicated process. Of course, it is advisable to purchase a ready-made canvas for rolling, but the frame base and climbing ladder can be made with your own hands. For the youngest children, it is advisable to use high-quality and comfortable skates made from modern and reliable plastics. Today, manufacturers produce not only straight, but also helical and tubular plastic slopes, differing in size and coloring, which allows you to create an individual and most attractive design. The main advantage of such slopes is the low risk of injury to the child.

It is recommended to make the frame base for the slide from standard wooden blocks with a cross-section of 100×100 mm. The surface of the wooden elements used should be as smooth as possible and, if necessary, the block can be brought to perfect condition using a regular plane. It is advisable to use boards measuring 25×100 mm as connecting elements. When making a ladder, you need to attach a pair of bars to the frame base at an angle of 45°. Such bars serve as the basis for fixing supporting elements for making steps, the distance between which varies depending on the age characteristics of the child.
It is mandatory to securely secure the slide using guide bars., onto which elements with a cross section of 40×40 mm are fixed in a parallel direction, and then the slope itself. Regardless of the type, the ramp must be secured only in strict accordance with all the rules in the instructions supplied by the manufacturer. To prevent children from being injured when sliding down a structure that is too high, handrails are installed if necessary. The final stage of self-construction of a children's playground slide is the treatment of all parts of the structure with special protective agents and subsequent painting with waterproof paints or varnishes.

Swings are one of the most popular elements of a children's playground. regardless of the child's age. You can purchase a ready-made model; fortunately, domestic and many foreign manufacturers today produce swings in a very large assortment. Making a swing with your own hands is also not too difficult. This part must be installed on site at the very last moment. You can make your own swing seat out of wood a, as well as metal or plastic, but the first and last options are more preferable.
As a rule, the size of the seat varies depending on the age of the child, so it should be possible to replace it with a larger model if necessary. The seat is suspended on a chain or a strong and reliable rope rope. When making a wooden slatted seat, wooden slats are used, having a cross-section of 20x40 mm and a length of 50-60 cm. The back of the swing can in this case be made of boards or similar slats. Particular attention should be paid to the beam on which the structure will be attached. This element can be either metal or wood, but it must be durable and reliable.
Ideas for children's playgrounds in the country (video)
Wooden house for a children's playground
The frame base of the children's playhouse is made using wooden blocks with a cross-section of 50x50 mm. You need to think about the number and location of windows in advance. In standard models, a pair of windows are installed, the lower part of which should be located at a height of half a meter from the floor level.
The doorway must necessarily exceed the height of the child by a quarter of a meter. Boards treated with antiseptic compounds 20 mm thick are nailed onto the frame base. After the walls are erected, a roof is installed on a frame made of bars. After the roof is covered with boards, roofing material is laid or the entire structure is simply painted.

Rope elements
The most popular and convenient option to manufacture and use is. Such an element consists of ropes or ropes with a diameter of 10 mm. Wooden, metal or plastic reliable steps with a length of 45 cm and a diameter of 35 mm are attached to such ropes. The standard distance between the steps to be fixed should be approximately 18-20 cm, with a width of the working part of the suspended staircase of 38-40 cm. The standard length of the element must be determined by the general indicators of the height of the frame and is equal to 180-200 cm.
In each step, at a distance of 2.4 cm from both ends, holes with a diameter of 10 mm are drilled. Ropes are passed through the holes and secured with knots on both sides. To prevent wooden steps from cracking during operation, special metal rings are attached to their ends. All wooden elements are necessarily treated with antiseptic solutions, which extends their service life.

About safety rules: fences, site coverage and other important points
For safety reasons, it is best to fence the area for the smallest children with a low and bright fence. Very important Before starting operation, check all structural elements for the absence of sharp or traumatic parts, and also make sure that all fastenings and hanging structures are strong.
Particular attention is required when covering the floor of a play or sports area. A budget option can be represented by a sand or gravel layer, but it is best to use a soft and hygienic modular coating option for this purpose. High-quality elements of such coating from trusted manufacturers are not subject to changes in rain and snow, and are also durable and retain their attractive appearance throughout the entire period of operation.
How to make a playground at your dacha with your own hands (video)
Children's playgrounds and sports complexes for summer cottages occupy a very important place in the life of every child. The child spends most of his free time on a properly equipped playground, and gradually learns to live a healthy lifestyle.