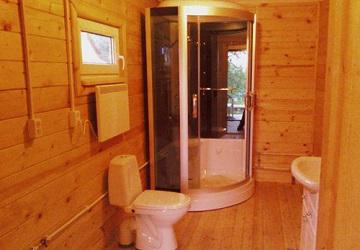
Nothing saves space in the bathroom like a small shower stall, and over the last few years it has been very fashionable to install one in country houses and dachas instead of a bath.
Installing a bulky, heavy bathtub or even a Jacuzzi will be quite expensive, and cannot be done without outside help. But you can install a compact shower yourself; it’s not at all difficult if you show the proper perseverance.
Remind her that it is night time and everyone is sleeping. Write down the hours when you wake up normally, so your doctor can give you the most suitable medicine to avoid insomnia. If you use free sentences or words from context, try to anchor your thinking based on the current situation. If you don't answer, ask the same question again. Ask about things with kindness and calm, so that you are in a favorable position to answer. Familiarize yourself with what you are doing. Predictably, he imitates you.
- Plan long walk during the day to exercise and get tired.
- Always at the same time and after noon.
- Avoid or reduce headaches throughout the day.
- It's nice to drink warm milk or herbs before bed to help you relax.
- If you find him wandering at midnight, tell him who you are.
- If you don't pick up the thread again, change the topic.
- Avoid complex language and long phrases.
- Use short words and simple sentences.
- Tell it like it is, without giving explanations.
- When you ask a question, keep it simple, avoid making choices.
- You have to give him time to answer and check if he said it correctly.
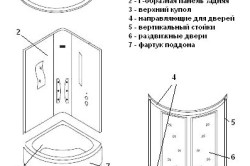
Many companies make shower enclosures, so assembly may vary slightly. And since you can’t keep track of everyone, we’ll consider assembling a standard shower cabin: with a holder, a stand for the shower hose, a tray, walls, a drain, and watering cans.
Preparation, list of tools:
Adjust your clothing so you can easily remove them when you go to the bathroom. Take him to the bathroom as soon as he sees him shaking or throwing his clothes, he has forgotten where the toilet is. If you do not have the necessary coordination to sit on the toilet, help him and may need to install a special toilet that is high. Have a potty if you can't get there in time. Try to learn how your relative expresses the desire to urinate or defecate.
- Discard other origins other than illness.
- Accompany him to the bathroom every two to three hours to urinate.
- Drill, drill bits.
- Keys: pipe and open-end.
- Screwdrivers: slotted, Phillips.
- Sharp knife.
- Construction level (Virgin level).
- Screwdriver.
- Construction and assembly pistol.
- Crimper is an electrical installation tool.
- Hardware, screws, nuts.
- Pipes and hoses made of metal-plastic, matching the style.
- Adhesive sealant.
- Sewer siphon.
- Fittings for water pipes.
- Gloves, duct tape.
Before installing the cabin yourself, be sure to read the operating instructions.
Naturally, we do not need our home to have all the necessary equipment for a hotel, sports complex, public institution, or we will have to strictly comply with all the rules for outdoor installations regarding the strict separation between cleaning and bathroom, the connection between areas intended for changing rooms, showers, sauna, functional division between different rooms for different stages, etc. we can force our accessibility to a bare minimum according to our own habits: next to the sauna you can wash yourself hot water, wash yourself in the cold and swim in the open air.
Prepare a place for the shower in advance. If necessary, cover the wooden or plank floor with something to waterproof it. If you are not sure that the parquet will support the weight of the cabin and the person inside, fill the floor with a cement screed.
After reading the instructions, no matter how meager it may be, you will know. But during the first assembly, do not use glue (just temporarily fasten the parts), this way you will make sure that the individual parts are in full working order and that there are small parts.
Which shower stall to choose
For those who are planning to build new house, this is not a major problem: the architect can easily find the right place, the right size, with a shower and access to the outdoors. It is more difficult to find the right solution in an existing house: a basement or attic, even if it can be converted into an ideal space. Even in a condominium you can find space, it is important to find a company that is able to implement custom projects.
In a private sauna, you can combine a room for pre-cleaning the sauna and for intermediate cold showers. Also be sure to install a cold shower on a regular overhead shower plant. This is essentially the last time the cooling phase is flooded by the cabin that has just left. Therefore, it is preferable to use a type of spray shower of varying heights, which encloses the body from all parts, leaving the head last. You should also avoid overusing cold showers and never be tempted to use them immediately after a hot shower: it's good to stop cold showers before the body gets too cool.
Stages of work
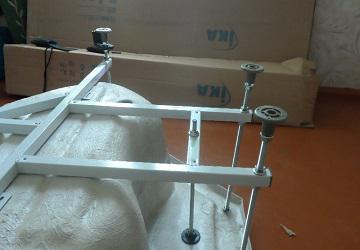
Pallet assembly:
- We turn the pallet over and fasten the 4 hairpin legs into the seats.
- We attach the pallet only after putting nuts and washers on the legs.
- We find a pre-soldered nut on the short support and attach the central leg to it.
- To secure the leg, tighten the nut more firmly, put a washer on top, a lock nut on top and tighten it to the limit.
- To avoid distortion, do not tighten the bolts to the limit.
- Level the legs using a locknut.
- Now, install the brackets for the pallet screen.
- We secure the pallet level.
- The pallet is ready.
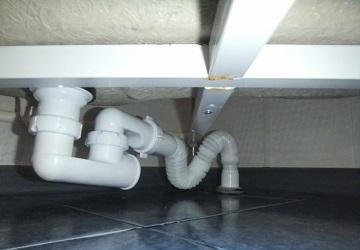
Securing the siphon

Even the spray does not get too hot: for this tap will be opened as much as required to get a bucket measuring about 10 cm from the opening of the tube. The spray that comes out of it should be directed towards the body with a very acute angle holding the tube with his right hand, wrapped in a pencil. Given enough space in your shower room, it is best to install a cold-water soaking tub with sufficient capacity. And it’s very nice to immerse yourself in cold water, as soon as you leave the overheated cabin.
In terms of measurements, the bathtub should allow a person to be submerged, even if they are sitting, in water up to their neck. Just a simple pool filled with hot water and a chair. It's not a real sauna without an open-air bath! It is necessary to sufficiently remove moisture from the lungs, as well as the internal respiratory organs. For a private sauna this is often a protected balcony. terrace or corner of the garden, but also the simple weight that once led to a funeral laundry room, now turned into a sauna.
The next important part is attaching the siphon. Its design and material may vary significantly, so read the instructions carefully at this stage! By the way, if you do not pay due attention to this point, it will be incorrect to install air valve, then you will enjoy the ambrosia of sewer pipes.
We mount the siphon to the bottom of the cabin. It is better to tighten the release with a water and gas wrench.
In multi-family buildings, hotels, resorts, industrial companies, schools, youth hostels, sports facilities, we increasingly see collective saunas in Central Europe, and their design is naturally also subject to economic criteria. and women can access you individually. In these cases, installing two cabins offers the following advantages: If the number of regulars is low enough to manage one cabin or divide the attendants according to gender, use two cabins simultaneously.
To ensure a tight seal, apply a little sealant adhesive or waterproofing paste.
How to secure panels
Fastening is carried out in steps:
- We check the fit of the panels in advance by placing them side by side. Where there are more holes for self-tapping screws, that's where the top is. The edges are rounded at the bottom. We fit the glass into the guides;
- Having lifted the panel, coat the bottom of the frame with sealant and wipe off excess glue;
- After installing the glass, tighten the screws on the clamping tabs;
- We use self-tapping screws and attach the arch at the top and bottom;
- We place the silicone seal on the glass panels with the petal facing inward;
- We coat the lower parts of the guides and the rim of the tray with silicone. We fasten it. We don’t touch the screws!
- We coat the joints of the side panels with silicone sealant for complete insulation;
- Apply a little silicone along the rim of the tray. Be careful not to touch the water drainage area! Then, we attach the side panels to small self-tapping screws with washers;
- We attach one of the side panels to the pallet; the latter has special holes for screws;
- We fix the second panel in the same way;
- Coat the place where the rear trim meets the side panels with glue;
- We check the coincidence of the holes for securing the back panel with self-tapping screws, then insert the back panel and screw in the self-tapping screws;
Naturally, a collective sauna requires stricter compliance with hygiene rules than a private one. In hotels or on the peninsulas of a company or association, the layout of the premises should take into account the various successes of the sauna operation, that is: after a sufficiently large entrance, they follow the changing rooms, then into a room with a hot shower for pre-cleaning, then separate from it a room with a cold water with a sauna and toilet; From this room you should be able to go straight to the open one. The resting place is separated from all others.
Showers for the elderly: why choose them
The house where our loved ones lived for many years is also the place of our memories. One of the most common problems for seniors is in the bathroom and especially in seniors or showers. As people age, they live in a home that for many years provided a safe and comfortable place for their personal life. However, over time, even your home can become dangerous. With the rise of advanced health and fitness issues, seniors may need more affordable equipment to enable them to perform their daily activities independently.
If you are not sure of the correct location of the screws and bolts, then do not tighten them to the limit. You can always go back and correct it. The main thing is don't forget.
Many cabin models require separate complete assembly of panels. There is no need to glue arches, etc. with sealant one by one.
Daily hygiene can be difficult for many older people. This happens especially when you are faced with a classic bath or small shower installed many years ago. Reduced maneuverability can lead to serious risks of very dangerous falls and near misses. It often becomes impossible to reach certain areas of the body to ensure hygiene. Daily problems that highlight when old man loses residual autonomy and needs assistance from a family member or professional.
How to install a pallet on a wooden floor?
The need for a healthy older person is to wash in autonomy and safety. Having a shower for seniors can be an urgent need for people in need of assistance. Here, a practical, economical and safe solution is to replace the bathtub with an elderly shower. Showers for the elderly are very stable and reliable shower enclosures with wide openings for easy entry, support handles and anti-slip surfaces. Exist different models in different sizes and with the ability to customize them according to their needs.
It is highly recommended to coat the space between the finished panels and the pallet with sealant. Especially if a gasket is not provided for this.
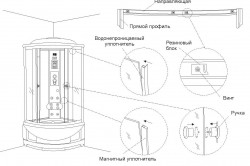
How to install doors
Now most often used sliding doors on casters, so we will consider the option of securing them:
- screw the rollers into the upper and lower parts. The first ones to failure. The second - we pull back during installation;
- Pull the seal with the “petal” outward onto the door;
- we check whether the door leaves are sealed tightly, tighten the bolts as necessary;
- We attach plastic plugs to the screws for the door rollers.
How to mount the top:
Can everyone ask for a shower for the elderly?
Showers for seniors can be customized to fit the size of their bathroom. Entrance doors, shower enclosures, handles and locks of various types can be inserted. Replacing your tub/shower allows you to have a new, affordable, and functional shower. A senior shower allows anyone to safely access and take full care of their personal hygiene. Older people are often very concerned when their loved ones have to bathe in uncomfortable bathtubs or inexpensive showers. Elderly people may also experience serious consequences.
- We connect the roof with a watering can, a fan, lighting and a speaker. The assembly of the upper part is unique in almost every model, so read the instructions carefully. For convenience, we will secure the speaker with sealed glue;
- We fix the hose from the shower head outside;
- We install additional parts: mirrors, glass shelves, etc.
When the exterior finishing is completed, we check the correct operation of the cabin and cover the tray with a screen.
Now, by replacing a bath with a shower, you will gain greater comfort in personal hygiene and provide greater peace of mind to family members. Showers for the elderly avoid bad falls, especially for people with walking problems. But showers for seniors can be installed by anyone. It often happens that installing showers for elderly people are still young people without any health problems. In many cases, older family members install an elderly shower that requires a tub replacement.
Showers for the elderly
For the elderly and disabled can be installed Various types shower cabins. Depending on the available space, you can install corner cupboard or niche. Shower enclosures are fully customizable, from the choice of shower enclosures to tempered glass: clear, satin or printed.
Do-it-yourself connection to an autonomous water supply network
Required tools:
- independent control unit;
- pump and water supply network;
- water battery.
Process:
- We attach the electric pump to a cable that will hold it suspended above the water.
- To provide warm water, we install an external electrical cable.
- For the water supply itself you will need a hydraulic accumulator ( modern version) or pneumatic tank. Let's look at both devices:
- The first option is storage water equipment. Capable of maintaining constant network pressure levels. Here you will have to start the pump much less often;
- the second option is installed as high as possible (in the attic or under the roof) - this is a capacity of up to 300 liters in volume.
This type of tank provides constant pressure, and the automatic mode turns on the pump when necessary.
Principles for operating a shower cabin in a private home:
Standard solutions include the installation of low-density acrylic shower trays. If desired, a flat floor can be installed with complete elimination of architectural barriers. Problems with walking or limited dexterity can seriously compromise the health of our seniors. Elderly hygiene practices can lead to very serious consequences. So let's see what are the design ideas and what are the best showers.
Design: Showers for the elderly and disabled for the disabled
Replacing a bathtub with an elderly shower. The Italian company specializes in the supply and installation of tanks with doors for the disabled and elderly. Let's ask a few questions to Nazareno Gioffrey, who is in charge of the company.
Who does the soul transformation service benefit from?
Our goal is to provide people with walking difficulties - The best decision for personal hygiene.- To extend the life of injectors or small accessories, constantly polish and clean them from dirt and rust;
- After the next use of the cabin, wash the mixer clean water, dry with a towel;
- Do not disassemble the faucet parts without turning off the water supply! To avoid flooding at home;
- Regularly wipe the electrical wires with light bulbs in the cabin, they are affected by high humidity;
- Choose the siphon for the tray carefully and do not forget to secure it well with sealant.
If you are not confident in the strength of the floor, then it is better not to buy a cabin with a large pallet. Most of the mass falls on it. Also, if your shower stall has a low tray, then under no circumstances close the drain hole with a stopper to avoid a flood.
Add site to bookmarks
- Kinds
- Choice
- Installation
- Finishing
- Repair
- Installation
- Device
- Cleaning
How to install a shower cabin in your home yourself
- Which shower stall to choose
- List necessary tools and materials
- Do-it-yourself installation of a shower tray and sewer system
- Do-it-yourself installation of side panels, doors and roof in a shower stall
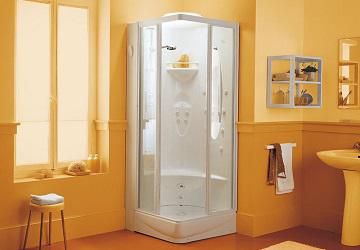
Currently, it has become fashionable to install not a bathtub, but a shower cabin in the bathrooms of apartments and houses. It saves space, looks beautiful, is easy to use, economical, and functional. You can use the shower cabin daily. However, lately everything more people began to build their own houses. But how to install a shower stall in a private house? Call specialists and pay about 30% of the cost of the cabin for installation, or try to do it yourself and truly enjoy the work done with your own hands? In fact, installing a shower stall on your own is not at all difficult.
A shower stall, compared to a bathtub, saves space, looks beautiful, is easy to use, and is also economical and functional.
The main thing is to be patient, purchase a shower cabin in a store, prepare the necessary tools, familiarize yourself with the rules for its installation and awaken in yourself the desire to definitely cope with the installation on your own. But there is one problem. Most people now do not buy expensive Italian cabins, but prefer cheaper analogues from China. The instructions supplied with them are scant; the equipment does not always coincide with that declared by the manufacturer. Often you have to buy more required material. In addition, many owners of private houses often want to save money on installing a cabin. Why pay for something you can do yourself?
You should describe in detail what tools and materials you will need, as if you were doing it yourself, so that its use brings only joy and makes living in a private home more comfortable.
The rules may vary depending on the type of cabin and the materials used to make it. Below is a description of the installation of a shower cabin with standard equipment (shower stand, shower holder, tray, drain, shower heads, walls).
Which shower stall to choose
When choosing a cabin you need to consider:
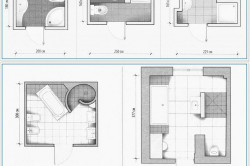
- Size. The cabin must be free to avoid discomfort during operation. In it you will have to raise and lower your arms, bend over. Optimal size- no less than 80x80 cm. The main thing is that the selected cabin fits into the space allocated for it. You also need to leave 40 centimeters around the perimeter for future installation and maintenance of the cabin.
- Shape (there are round and semicircular, rectangular, square).
- Quality of glass elements. They must have a thickness of at least 6 mm. Then the cabin will be more shock-resistant.
- Shower stall decor (you need to rely only on your taste preferences).
- Functionality ( different types massage, Turkish bath, contrast shower, tropical rain, etc.). Here it is better to stick to simpler options. You just need to pay attention to the number of shower heads. It is advisable to have two of them: manual and cascade.
- Cabin height. To the height of the cabin in the store you need to add 30 centimeters for installation and the height of the podium.
- Pressure. It is advisable that the water pressure and the cabin pressure match (for your own home, up to 3 bar is optimal).
Return to contents
List of required tools and materials
To install a shower stall, you will need a set of tools and materials. It should be noted that the list may vary slightly depending on the cabin model, available connection options, and the structural features of the house. You will need:
- drill with a set of drills;
- a set of open-end and pipe wrenches;
- screwdrivers (phillips and slotted);
- screwdriver;
- construction gun;
- level;
- roulette;
- electrical installation tool;
- hardware, screws, nuts;
- metal-plastic pipes and flexible hoses;
- siphon for sewerage;
- fittings for connecting water supply networks;
- adhesive sealant;
- insulating tape;
- gloves.
Return to contents
Do-it-yourself installation of a shower tray and sewer system
To install a shower stall in a private home with your own hands and subsequently operate it safely, you need to remember three things:
- Before installing the cabin, it is necessary to supply water, sewerage and electricity, as well as ensure good ventilation.
- Carefully read the instructions supplied with the cabin. This is where you can find everything detailed instructions for installing this cabin model.
- Prepare a place for installing the cabin.
Advice: before starting to install the cabin, it is better to assemble the purchased cabin without using sealant to check the presence of all parts and fasteners.
So, all materials and tools have been prepared, the instructions have been carefully studied, and space for the shower stall has been cleared. Now you can get to work.
The peculiarity of a private house with your own hands is that there are still no special conditions for work there plumbing equipment. They will have to be organized on their own. So, if the house is wooden, and the floor in the house is plank or parquet, it needs to be waterproofed. When planning the installation of a bathroom, it is necessary to take into account the weight of the cabin with a person inside, so you will have to install reinforcing beams or pour a cement screed. To insulate the bathroom floor you will need waterproofing mastic, roofing felt, and extruded polystyrene foam. For finishing it is better to use ceramic tiles.
Then you need to ensure good ventilation and work on the walls in the room where the cabin will be installed. It would be nice to provide them with additional vapor and waterproofing and cover them with an antiseptic. The same goes for the ceiling. This is done very easily. Reflective thermal insulation is fixed. The thermal insulation has slats attached to it on top. KVL sheets (xylitol fiber sheets) are attached to the slats using special self-tapping screws. They are attached in two layers to make the structure stronger.
The sealant will help increase the seal at the junction of the pan and sewer pipe.
In the ceiling it is necessary to provide space for hoods, lighting and electrical wiring. The size of the holes will depend on the size of the equipment that was purchased in advance from the store for installation. In order not to miscalculate the dimensions when carrying out communications, it is better to purchase a shower cabin, washbasin, fan, built-in lamps, faucets, and sockets in advance.
So, preparatory activities finished. It's time to move on to the main part. First you need to remove the apron from the pallet. It will only be useful at the end of the work. If you fix the screen right away, it will not be possible to get to the back of the cabin and install communications. The screen must be installed when all the hoses are connected.
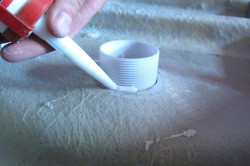
Then – attach drain hose to the sewer drain and secure with sealant. It is necessary to install in the drain hole of the pan sealing gasket. Treat it with silicone sealant. Secure the drainage unit with screws.
Where possible, it is necessary to fix the brackets. They are included. Treat the junction of the pan and the sewer pipe with sealant. Let it dry and fill the tray with water. If it doesn’t leak, it means everything was done correctly. Then you just need to adjust the legs of the pallet and use a level (1.5 meters) to make sure that the pallet is horizontal.